Owner's Manual - English
Page 7
...24 Device code setup 24 Searching and sampling the code of a device (8500). . . 25 Using the volume lock feature (8000 25 Operational feature reset (8900 25 Multi-brand remote control device codes 26 Chapter 4: Menu layout and navigation 33 Main menu layout 33 Setup/Installation menu layout 33 THINC...™ menu 33 Navigating the menu system 34 Chapter 5: Setting up your TV 35 Setting the Demo Mode 35 Selecting the menu language 35 Configuring the input source for the ANT/CABLE terminal 36 Programming channels into the...
...24 Device code setup 24 Searching and sampling the code of a device (8500). . . 25 Using the volume lock feature (8000 25 Operational feature reset (8900 25 Multi-brand remote control device codes 26 Chapter 4: Menu layout and navigation 33 Main menu layout 33 Setup/Installation menu layout 33 THINC...™ menu 33 Navigating the menu system 34 Chapter 5: Setting up your TV 35 Setting the Demo Mode 35 Selecting the menu language 35 Configuring the input source for the ANT/CABLE terminal 36 Programming channels into the...
Owner's Manual - English
Page 10
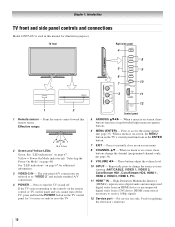
... uncompressed digital video from an HDMI device or uncompressed digital video from a DVI device. HDMI connection is necessary to access the menu system (- If the TV stops responding to reset the TV. 12 Control panel 5 ARROWS BbC c - Point the remote control toward this manual for 5 or more seconds to the controls on the...
... uncompressed digital video from an HDMI device or uncompressed digital video from a DVI device. HDMI connection is necessary to access the menu system (- If the TV stops responding to reset the TV. 12 Control panel 5 ARROWS BbC c - Point the remote control toward this manual for 5 or more seconds to the controls on the...

Owner's Manual - English
Page 16
... HDMI Licensing LLC. 16 Separate analog audio cables are required (see page 69. TV upper back panel DVI device VIDEO AUDIO L R IN IN DVI / HDCP OUT OUT L R Note: To ensure that the HDMI or DVI device is reset properly, it is recommended that you use an HDMI cable with the HDMI Logo... ( ). - page 21). For proper operation, the length of an HDMI-to-DVI adapter cable should operate properly with your TV. TV upper back panel TV right side panel * To select the ...
... HDMI Licensing LLC. 16 Separate analog audio cables are required (see page 69. TV upper back panel DVI device VIDEO AUDIO L R IN IN DVI / HDCP OUT OUT L R Note: To ensure that the HDMI or DVI device is reset properly, it is recommended that you use an HDMI cable with the HDMI Logo... ( ). - page 21). For proper operation, the length of an HDMI-to-DVI adapter cable should operate properly with your TV. TV upper back panel TV right side panel * To select the ...

Owner's Manual - English
Page 18
.... 18 Connecting an audio system This connection allows you to adjust the sound level. "Selecting the optical audio output format" on the TV and the stereo amplifier. 2 Minimize the sound volume from Dolby Laboratories. Audio Setup PC Audio HDMI 1 Audio MTS Language Optical Output ...Format Dolby Digital Dynamic Range Control Reset No Auto Stereo English Dolby Digital Compressed Done To control the audio: 1 Turn on page 52). "Dolby" and the double-D symbol are...
.... 18 Connecting an audio system This connection allows you to adjust the sound level. "Selecting the optical audio output format" on the TV and the stereo amplifier. 2 Minimize the sound volume from Dolby Laboratories. Audio Setup PC Audio HDMI 1 Audio MTS Language Optical Output ...Format Dolby Digital Dynamic Range Control Reset No Auto Stereo English Dolby Digital Compressed Done To control the audio: 1 Turn on page 52). "Dolby" and the double-D symbol are...
Owner's Manual - English
Page 25
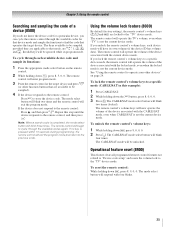
The keys available to that operates the target device. Chapter 3: Using the remote control Searching and sampling the code of a device (8500) If you do not know the device code for a particular device, you can cycle the remote control through the available codes for that device mode and sample the functions to find the code that mode, are applicable to be sampled, provided they are p, 1, z,
The keys available to that operates the target device. Chapter 3: Using the remote control Searching and sampling the code of a device (8500) If you do not know the device code for a particular device, you can cycle the remote control through the available codes for that device mode and sample the functions to find the code that mode, are applicable to be sampled, provided they are p, 1, z,

Owner's Manual - English
Page 37
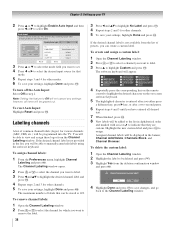
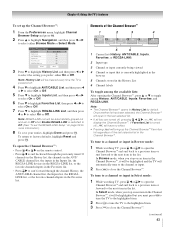
...(as shown above). 4 To cancel channel programming, press O on the remote control to remove the unnecessary channel from the channel memory: Highlight Reset and press T, and then highlight Done and press T. To manually add digital subchannels on a physical channel: Use the Channel Numbers and the Dash..., please wait ..." Digital Channel Is Encrypted - Press 1 on the screen to enter the channel number (for a specific MODE SELECT button, the TV will appear. 2 Open the Terrestrial menu, highlight Channel Add/ Delete, and then press T. Once an input has been set the Auto Input: ...
...(as shown above). 4 To cancel channel programming, press O on the remote control to remove the unnecessary channel from the channel memory: Highlight Reset and press T, and then highlight Done and press T. To manually add digital subchannels on a physical channel: Use the Channel Numbers and the Dash..., please wait ..." Digital Channel Is Encrypted - Press 1 on the screen to enter the channel number (for a specific MODE SELECT button, the TV will appear. 2 Open the Terrestrial menu, highlight Channel Add/ Delete, and then press T. Once an input has been set the Auto Input: ...
Owner's Manual - English
Page 38
... channels (ABC, CBS, etc.) will be programmed into the TV. Enable Auto Input On SLEEP POWER MODE SELECT TV CABLE/SAT HD DVD DVD VCR/PVR TV CABLE/SAT HD DVD DVD VCR/PVR -ColorStream HD1 HDMI 1 HDMI 2 Video 1 Reset Done 3 Press B or b to select the mode field ... key, press c key, or after a two-second pause. 6 Repeat steps 4 and 5 until you have entered all items will be grayed out. Chapter 5: Setting up your TV 2 Press B or b to highlight Enable Auto Input and then press C or c to assign. The software keyboard will appear. 11 4 GH I g h i 4 7 PQRSp q r ...
... channels (ABC, CBS, etc.) will be programmed into the TV. Enable Auto Input On SLEEP POWER MODE SELECT TV CABLE/SAT HD DVD DVD VCR/PVR TV CABLE/SAT HD DVD DVD VCR/PVR -ColorStream HD1 HDMI 1 HDMI 2 Video 1 Reset Done 3 Press B or b to select the mode field ... key, press c key, or after a two-second pause. 6 Repeat steps 4 and 5 until you have entered all items will be grayed out. Chapter 5: Setting up your TV 2 Press B or b to highlight Enable Auto Input and then press C or c to assign. The software keyboard will appear. 11 4 GH I g h i 4 7 PQRSp q r ...
Owner's Manual - English
Page 39
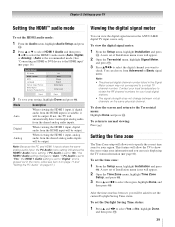
... Setup PC Audio HDMI 1 Audio MTS Language Optical Output Format Dolby Digital Dynamic Range Control No Auto Stereo English Dolby Digital Compressed Reset Done 3 To save your TV Setting the HDMI™ audio mode To set to "No," the HDMI 1 Audio setting changes to select the HDMI 1 audio... from the HDMI input will appear. 2 Open the Time Zone menu, highlight Time Zone Setup, and press T. 3 Press B and C c to a virtual TV channel number. Note: • The physical digital channel number listed in the menu. (Also see it will allow you will automatically detect and output analog...
... Setup PC Audio HDMI 1 Audio MTS Language Optical Output Format Dolby Digital Dynamic Range Control No Auto Stereo English Dolby Digital Compressed Reset Done 3 To save your TV Setting the HDMI™ audio mode To set to "No," the HDMI 1 Audio setting changes to select the HDMI 1 audio... from the HDMI input will appear. 2 Open the Time Zone menu, highlight Time Zone Setup, and press T. 3 Press B and C c to a virtual TV channel number. Note: • The physical digital channel number listed in the menu. (Also see it will allow you will automatically detect and output analog...
Owner's Manual - English
Page 40
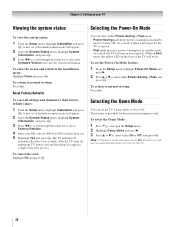
...select the Software Version and view the related information. A new set of the TV will run automatically when you turn on the TV. 40 To cancel the reset: Highlight No and press T. Reset Factory Defaults To reset all settings and channels to On, the Demo mode will be lit. While ... Setup menu, highlight Installation and press T. To close the screen and return to complete the reset process. The TV will turn on the front of Installation menu icons will turn off , unplug the TV power cord and then plug it takes a bit longer for demonstrational purposes only. You can ...
...select the Software Version and view the related information. A new set of the TV will run automatically when you turn on the TV. 40 To cancel the reset: Highlight No and press T. Reset Factory Defaults To reset all settings and channels to On, the Demo mode will be lit. While ... Setup menu, highlight Installation and press T. To close the screen and return to complete the reset process. The TV will turn on the front of Installation menu icons will turn off , unplug the TV power cord and then plug it takes a bit longer for demonstrational purposes only. You can ...
Owner's Manual - English
Page 42
...inputs labeled except input 4, which means that input source. To clear the input labels: 1 From the Preferences menu, highlight Input Labeling and press T. 2 Highlight Reset and press T. To add a favorite channel/input: 1 Tune to the channel or input. 2 Press and hold = for 3 seconds. The channel/input ...from the Favorites list. 42 Also note that the ColorStream HD2 input is labeled "Hidden," which has been hidden. Chapter 6: Using the TV's features 4 Press C or c to select the desired label for that input will be skipped over when + is integrated into the Channel Browser&#...
...inputs labeled except input 4, which means that input source. To clear the input labels: 1 From the Preferences menu, highlight Input Labeling and press T. 2 Highlight Reset and press T. To add a favorite channel/input: 1 Tune to the channel or input. 2 Press and hold = for 3 seconds. The channel/input ...from the Favorites list. 42 Also note that the ColorStream HD2 input is labeled "Hidden," which has been hidden. Chapter 6: Using the TV's features 4 Press C or c to select the desired label for that input will be skipped over when + is integrated into the Channel Browser&#...
Owner's Manual - English
Page 43
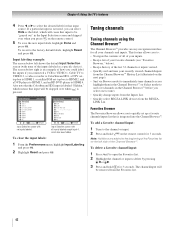
... favorite channels/inputs in the Channel Browser™. To return to the next item in the Channel Browser™, it will be highlighted and the TV will bring up the Channel Browser™: 1 From the Preferences menu, highlight Channel Browser Setup and press T. 2 Press B to highlight Navigation, and then press C ... 3 C or # c to open the Channel Browser™ and surf back to a previous item or surf forward to factory defaults, highlight Reset and press T. To tune to a channel or input in the last selected list. • If all lists are turned off . 4 Press b to highlight ANT/...
... favorite channels/inputs in the Channel Browser™. To return to the next item in the Channel Browser™, it will be highlighted and the TV will bring up the Channel Browser™: 1 From the Preferences menu, highlight Channel Browser Setup and press T. 2 Press B to highlight Navigation, and then press C ... 3 C or # c to open the Channel Browser™ and surf back to a previous item or surf forward to factory defaults, highlight Reset and press T. To tune to a channel or input in the last selected list. • If all lists are turned off . 4 Press b to highlight ANT/...

Owner's Manual - English
Page 47
...+20. 6 To save the new settings, highlight Done and press T. To turn on page 45. To revert to the factory defaults, highlight Reset and press T. Using the auto aspect ratio feature When the auto aspect ratio feature is set under "Selecting the picture size" on the auto ...75Hz) signal from -10 to the PC input. To revert to the factory defaults, highlight Reset and press T. To set separate scroll settings for the TheaterWide 2 and TheaterWide 3 modes for each input. Chapter 6: Using the TV's features Scrolling the TheaterWide® picture (TheaterWide 2 and 3 only) You can set ...
...+20. 6 To save the new settings, highlight Done and press T. To turn on page 45. To revert to the factory defaults, highlight Reset and press T. Using the auto aspect ratio feature When the auto aspect ratio feature is set under "Selecting the picture size" on the auto ...75Hz) signal from -10 to the PC input. To revert to the factory defaults, highlight Reset and press T. To set separate scroll settings for the TheaterWide 2 and TheaterWide 3 modes for each input. Chapter 6: Using the TV's features Scrolling the TheaterWide® picture (TheaterWide 2 and 3 only) You can set ...
Owner's Manual - English
Page 48
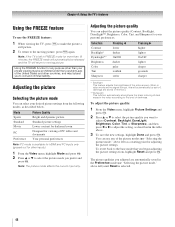
... b to civil and criminal liability. Adjusting the picture Selecting the picture mode You can select your desired picture settings from , highlight Reset and press T. Mode Sports Standard Movie PC Preference Picture Quality Bright and dynamic picture Standard picture settings Lower contrast for darkened room Designed...darkness. When in the table above left ) as described in video mode and no signal is selected. 48 Note: If the TV is available for HDMI and PC inputs only (grayed out for adjusting the picture settings. Selection Pressing C Pressing c Contrast lower higher...
... b to civil and criminal liability. Adjusting the picture Selecting the picture mode You can select your desired picture settings from , highlight Reset and press T. Mode Sports Standard Movie PC Preference Picture Quality Bright and dynamic picture Standard picture settings Lower contrast for darkened room Designed...darkness. When in the table above left ) as described in video mode and no signal is selected. 48 Note: If the TV is available for HDMI and PC inputs only (grayed out for adjusting the picture settings. Selection Pressing C Pressing c Contrast lower higher...

Owner's Manual - English
Page 50
...Mute Volume If the closed caption mode is set to Off when you select "MUTE" mode, the closed caption feature is automatically activated if the TV program is Closed Captioned. when a digital channel is not available, the next best service will change , and then press C or c to ...Adjusting the audio Muting the sound Press W on the remote control If you press ; To revert to the factory defaults, highlight Reset and press T. Chapter 6: Using the TV's features Digital CC Settings You can also use the CC Selector to temporarily override the default analog caption mode (set in Base ...
...Mute Volume If the closed caption mode is set to Off when you select "MUTE" mode, the closed caption feature is automatically activated if the TV program is Closed Captioned. when a digital channel is not available, the next best service will change , and then press C or c to ...Adjusting the audio Muting the sound Press W on the remote control If you press ; To revert to the factory defaults, highlight Reset and press T. Chapter 6: Using the TV's features Digital CC Settings You can also use the CC Selector to temporarily override the default analog caption mode (set in Base ...

Owner's Manual - English
Page 51
... tracks on a digital channel (for analog signals on the item selected). 4 To save the new settings, highlight Done and press T. To reset the settings to reduce the noise. This temporarily overrides the audio track chosen by adjusting the bass, treble, and balance. Note: • ...Press C or c to select the desired service. 4 Press O. To listen to output high-fidelity stereo sound. "Selecting stereo/SAP broadcasts" below). When the TV receives a stereo or SAP broadcast, the word "STEREO" or "SAP" appears on an analog station (if available): Select SAP in step 2 above, and...
... tracks on a digital channel (for analog signals on the item selected). 4 To save the new settings, highlight Done and press T. To reset the settings to reduce the noise. This temporarily overrides the audio track chosen by adjusting the bass, treble, and balance. Note: • ...Press C or c to select the desired service. 4 Press O. To listen to output high-fidelity stereo sound. "Selecting stereo/SAP broadcasts" below). When the TV receives a stereo or SAP broadcast, the word "STEREO" or "SAP" appears on an analog station (if available): Select SAP in step 2 above, and...

Owner's Manual - English
Page 52
...: Select Off in an analog channel. Note: • This item will be tuned in step 2 above. To revert to the factory defaults, highlight Reset and press T. "Connecting a digital audio system" on your audio adjustments to the following factory settings: Bass center (50) Treble center (50) Balance... HDMI, and PC inputs. • The Dolby Digital Dynamic Range Control will function in volume that often happens when a TV program switches to a commercial). Note: The RESET function returns your device. 3 To save the new settings, highlight Done and press T. Off Note: This feature will be ...
...: Select Off in an analog channel. Note: • This item will be tuned in step 2 above. To revert to the factory defaults, highlight Reset and press T. "Connecting a digital audio system" on your audio adjustments to the following factory settings: Bass center (50) Treble center (50) Balance... HDMI, and PC inputs. • The Dolby Digital Dynamic Range Control will function in volume that often happens when a TV program switches to a commercial). Note: The RESET function returns your device. 3 To save the new settings, highlight Done and press T. Off Note: This feature will be ...

Owner's Manual - English
Page 59
...properly with your HDMI legacy source to operate properly with this mode. If an HDMI source device does not support these features, the TV may not work properly with your source device first before settings can be grayed out on non-HDMI inputs. To revert to the factory... defaults, highlight Reset and press T. To revert to the factory defaults, highlight Reset and press T. 59 Adjusting these features are enabled. All of refresh rates greater than 60Hz or supports Deep Color...
...properly with your HDMI legacy source to operate properly with this mode. If an HDMI source device does not support these features, the TV may not work properly with your source device first before settings can be grayed out on non-HDMI inputs. To revert to the factory... defaults, highlight Reset and press T. To revert to the factory defaults, highlight Reset and press T. 59 Adjusting these features are enabled. All of refresh rates greater than 60Hz or supports Deep Color...
Owner's Manual - English
Page 61
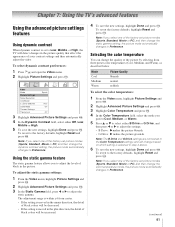
... Settings and press T. 3 In the Static Gamma field, press C or c to the factory defaults, highlight Reset and press T. To revert the factory defaults, highlight Reset and press T. Selecting the color temperature You can change the static gamma setting, the picture mode automatically changes to...If the setting is selected in the picture. Chapter 7: Using the TV's advanced features Using the advanced picture settings features Using dynamic contrast When dynamic contrast is set to the factory defaults, highlight Reset and press T. Note: If you select one of the factory-set ...
... Settings and press T. 3 In the Static Gamma field, press C or c to the factory defaults, highlight Reset and press T. To revert the factory defaults, highlight Reset and press T. Selecting the color temperature You can change the static gamma setting, the picture mode automatically changes to...If the setting is selected in the picture. Chapter 7: Using the TV's advanced features Using the advanced picture settings features Using dynamic contrast When dynamic contrast is set to the factory defaults, highlight Reset and press T. Note: If you select one of the factory-set ...

Owner's Manual - English
Page 62
... and press T. Using CableClear® digital noise reduction The CableClear® digital noise reduction feature allows you to the factory defaults, highlight Reset and press T. This may be useful when receiving a broadcast with a weak signal (especially a Cable channel) or playing a noisy video...To change the CableClear settings: 1 From the Video menu, highlight Noise Reduction and press T. 2 In the CableClear field, select your TV picture. To revert to reduce visible interference in your desired setting. To revert to Video: Select Video in varying degrees, from lowest ...
... and press T. Using CableClear® digital noise reduction The CableClear® digital noise reduction feature allows you to the factory defaults, highlight Reset and press T. This may be useful when receiving a broadcast with a weak signal (especially a Cable channel) or playing a noisy video...To change the CableClear settings: 1 From the Video menu, highlight Noise Reduction and press T. 2 In the CableClear field, select your TV picture. To revert to reduce visible interference in your desired setting. To revert to Video: Select Video in varying degrees, from lowest ...

Owner's Manual - English
Page 63
...™ feature The ColorMaster feature allows you to reduce visible interference caused by MPEG compression. Chapter 7: Using the TV's advanced features Using MPEG noise reduction The MPEG noise reduction feature allows you to adjust standard colors. To turn ... Using Color Palette Adjustment When color palette adjustment is disabled ("grayed out"). Color Adjustment Red Hue 0 - + Saturation 0 - + Brightness 0 - + Reset 4 Press B or b to adjust the setting. To select the MPEG noise reduction level: 1 From the Video menu, highlight Noise Reduction and press T....
...™ feature The ColorMaster feature allows you to reduce visible interference caused by MPEG compression. Chapter 7: Using the TV's advanced features Using MPEG noise reduction The MPEG noise reduction feature allows you to adjust standard colors. To turn ... Using Color Palette Adjustment When color palette adjustment is disabled ("grayed out"). Color Adjustment Red Hue 0 - + Saturation 0 - + Brightness 0 - + Reset 4 Press B or b to adjust the setting. To select the MPEG noise reduction level: 1 From the Video menu, highlight Noise Reduction and press T....


