User Manual
Page 9
...and movies by rating (V-Chip 36 Downloading an additional rating system 37 Displaying ratings 38 Unlocking programs 38 Locking specific channels 38 Locking video input 38 Setting a time limit for games 39 Locking the control panel 39 Using HDMI® CEC Control 39 Controlling HDMI® CEC ...playback devices 40 HDMI® CEC Control input source selection 40 Adjusting the amplifier's audio 41 Other HDMI® CEC Control functions 41 Using the HDMI® settings feature 41 Viewing...
...and movies by rating (V-Chip 36 Downloading an additional rating system 37 Displaying ratings 38 Unlocking programs 38 Locking specific channels 38 Locking video input 38 Setting a time limit for games 39 Locking the control panel 39 Using HDMI® CEC Control 39 Controlling HDMI® CEC ...playback devices 40 HDMI® CEC Control input source selection 40 Adjusting the amplifier's audio 41 Other HDMI® CEC Control functions 41 Using the HDMI® settings feature 41 Viewing...
User Manual
Page 11
...refer to an AV amplifier via HDMI connection (p. 39). •ColorStream® HD high-resolution component video input. •Digital Audio Out optical audio connection with 1080p input support (- p. 48). •Dynamic Volume (Audyssey Dynamic Volume®) eliminates inconsistent TV volume when changing ...). •ClearFrame™ 120 Hz anti-blur feature (-p. 50). •AutoView® lets you turn on ambient light conditions and input signal content (- p. 64). • ENERGY STAR® qualified Overview of external devices from the TV remote via an HDMI cable...
...refer to an AV amplifier via HDMI connection (p. 39). •ColorStream® HD high-resolution component video input. •Digital Audio Out optical audio connection with 1080p input support (- p. 48). •Dynamic Volume (Audyssey Dynamic Volume®) eliminates inconsistent TV volume when changing ...). •ClearFrame™ 120 Hz anti-blur feature (-p. 50). •AutoView® lets you turn on ambient light conditions and input signal content (- p. 64). • ENERGY STAR® qualified Overview of external devices from the TV remote via an HDMI cable...
User Manual
Page 12
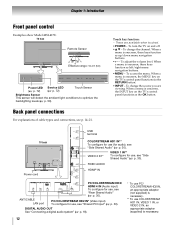
...you are available when touched. • POWER - To access the menu. FIXED AUDIO HDMI® IN PC/COLORSTREAM HD2/ HDMI 4 IN (Audio input) To configure for use , see "Side Shared Audio" (- p. 72) Touch Sensor Brightness Sensor This sensor will detect the ambient light conditions to... Touch key function: - These are viewing. Back panel connections For explanations of cable types and connections, see "Shared PC Input" (- ANT/CABLE LAN port PC/COLORSTREAM HD2 IN* (Video input) To configure for use COLORSTREAM HD1 IN, VIDEO 1 IN, or VIDEO 2 IN, an appropriate adapter (supplied) is ...
...you are available when touched. • POWER - To access the menu. FIXED AUDIO HDMI® IN PC/COLORSTREAM HD2/ HDMI 4 IN (Audio input) To configure for use , see "Side Shared Audio" (- p. 72) Touch Sensor Brightness Sensor This sensor will detect the ambient light conditions to... Touch key function: - These are viewing. Back panel connections For explanations of cable types and connections, see "Shared PC Input" (- ANT/CABLE LAN port PC/COLORSTREAM HD2 IN* (Video input) To configure for use COLORSTREAM HD1 IN, VIDEO 1 IN, or VIDEO 2 IN, an appropriate adapter (supplied) is ...
User Manual
Page 14
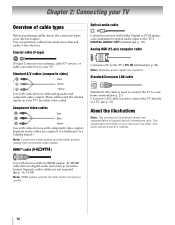
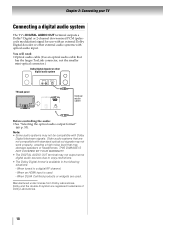
... to the TV's PC IN terminal (- HDMI® cable ( ) Connects a PC to your TV. Crossover LAN cable is a Toshiba brand.) Note: Component video cables provide better picture quality than composite video cables. Coaxial cable (F-type) Optical audio cable Connects receivers with component... video output. p. 20). p. 16, 19-20). These cables (and the related inputs on your devices may differ. About the illustrations Note: The connection illustrations shown are required. Use with devices with analog audio and ...
... to the TV's PC IN terminal (- HDMI® cable ( ) Connects a PC to your TV. Crossover LAN cable is a Toshiba brand.) Note: Component video cables provide better picture quality than composite video cables. Coaxial cable (F-type) Optical audio cable Connects receivers with component... video output. p. 20). p. 16, 19-20). These cables (and the related inputs on your devices may differ. About the illustrations Note: The connection illustrations shown are required. Use with devices with analog audio and ...
User Manual
Page 15
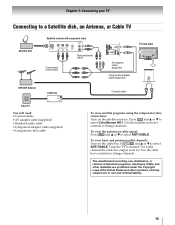
... B or b to select ANT/CABLE. To view basic and premium cable channels: Turn on the satellite receiver. Press INPUT and B or b to select ANT/CABLE. Tune the TV to channel 3 or 4 (the channel the cable box output is set to select ColorStream HD1. Use ...the cable box's controls to change channels. Press INPUT and B or b to ). Chapter 2: Connecting your TV Connecting to a Satellite dish, an Antenna, or Cable TV Satellite dish Satellite receiver with component video Y PB PR...
... B or b to select ANT/CABLE. To view basic and premium cable channels: Turn on the satellite receiver. Press INPUT and B or b to select ANT/CABLE. Tune the TV to channel 3 or 4 (the channel the cable box output is set to select ColorStream HD1. Use ...the cable box's controls to change channels. Press INPUT and B or b to ). Chapter 2: Connecting your TV Connecting to a Satellite dish, an Antenna, or Cable TV Satellite dish Satellite receiver with component video Y PB PR...
User Manual
Page 16
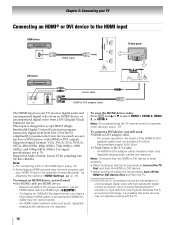
... cable with the TV. 16 An HDMI cable transfers video and audio. Separate analog audio cables are required. To view the HDMI device video: Press INPUT and B or b to -DVI adapter cable must not exceed 9.8 ft (3m). For proper operation, the length of the HDMI-to select HDMI 1, HDMI 2, HDMI...) device. A conventional HDMI/DVI cable may not work properly. - Chapter 2: Connecting your TV Connecting an HDMI® or DVI device to the HDMI input HDMI device HDMI OUT HDMI cable TV back panel DVI device OUT L R AUDIO DVI /HDCP OUT Audio cable HDMI-to-DVI adapter cable The HDMI...
... cable with the TV. 16 An HDMI cable transfers video and audio. Separate analog audio cables are required. To view the HDMI device video: Press INPUT and B or b to -DVI adapter cable must not exceed 9.8 ft (3m). For proper operation, the length of the HDMI-to select HDMI 1, HDMI 2, HDMI...) device. A conventional HDMI/DVI cable may not work properly. - Chapter 2: Connecting your TV Connecting an HDMI® or DVI device to the HDMI input HDMI device HDMI OUT HDMI cable TV back panel DVI device OUT L R AUDIO DVI /HDCP OUT Audio cable HDMI-to-DVI adapter cable The HDMI...
User Manual
Page 17
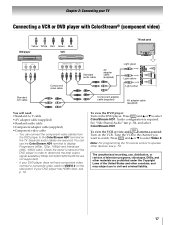
... p. 79. Separate audio cables are not supported). - If your DVD player does not have component video, connect a composite video cable to watch. Press INPUT and B or b to select ColorStream HD1. Check the owner's manual of the United States and other countries, and may subject you want to VIDEO 2... remote control to operate other materials are prohibited under the Copyright Laws of the DVD player in order to civil and criminal liability. 17 Press INPUT and B or b to select Video 2. See "Side Shared Audio" (- Tune the VCR to the channel you to determine the best output signal...
... p. 79. Separate audio cables are not supported). - If your DVD player does not have component video, connect a composite video cable to watch. Press INPUT and B or b to select ColorStream HD1. Check the owner's manual of the United States and other countries, and may subject you want to VIDEO 2... remote control to operate other materials are prohibited under the Copyright Laws of the DVD player in order to civil and criminal liability. 17 Press INPUT and B or b to select Video 2. See "Side Shared Audio" (- Tune the VCR to the channel you to determine the best output signal...
User Manual
Page 18
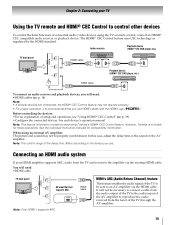
When an HDMI input is available in the following situations: - Older audio systems that are not compatible with standard optical out signals may not output some digital audio sources ... noise level that has the larger TosLink connector, not the smaller mini-optical connector.) Dolby Digital decoder or other external audio systems with optical audio input. When DLNA Certified products or widgets are registered trademarks of Dolby Laboratories. 18 Dolby and the double-D symbol are used . - Manufactured under license from Dolby...
When an HDMI input is available in the following situations: - Older audio systems that are not compatible with standard optical out signals may not output some digital audio sources ... noise level that has the larger TosLink connector, not the smaller mini-optical connector.) Dolby Digital decoder or other external audio systems with optical audio input. When DLNA Certified products or widgets are registered trademarks of Dolby Laboratories. 18 Dolby and the double-D symbol are used . - Manufactured under license from Dolby...
User Manual
Page 19
...time differs according to the device you will not be necessary to connect a cable from the audio output of the TV to the audio input of the AV amplifier to reproduce the audio received from the TV can be sent to control other devices To control the basic functions ...and sound may not operate properly. • For proper operation, it is recommended that supports ARC HDMI cable Note: Only HDMI 1 supports ARC. However, Toshiba is limited to the amplifier via the HDMI cable. Chapter 2: Connecting your HDMI amplifier supports ARC, audio from the tuner of the TV through the...
...time differs according to the device you will not be necessary to connect a cable from the audio output of the TV to the audio input of the AV amplifier to reproduce the audio received from the TV can be sent to control other devices To control the basic functions ...and sound may not operate properly. • For proper operation, it is recommended that supports ARC HDMI cable Note: Only HDMI 1 supports ARC. However, Toshiba is limited to the amplifier via the HDMI cable. Chapter 2: Connecting your HDMI amplifier supports ARC, audio from the tuner of the TV through the...
User Manual
Page 20
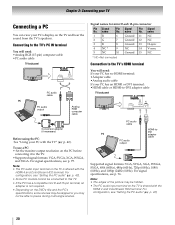
.... name Pin Signal No. Note: • The edges of the picture may not be hidden. • The PC audio input terminal on the TV is shared with the TV" (- Note: • The PC audio input terminal on the TV is shared with the HDMI 4 and ColorStream HD2 terminal. For configuration, see p. 75.
.... name Pin Signal No. Note: • The edges of the picture may not be hidden. • The PC audio input terminal on the TV is shared with the TV" (- Note: • The PC audio input terminal on the TV is shared with the HDMI 4 and ColorStream HD2 terminal. For configuration, see p. 75.
User Manual
Page 23
... control the device: TV, CABLE/SAT, BD/DVD, or AUX. Selects the picture size (- p. 45). These buttons are used to change inputs on and off the sound (- Note: The error message "NOT AVAILABLE" may appear if you can use these buttons select or adjust programming menus.... For the HDMI® CEC Control functions, see "Remote control functional key chart" (- When the Auto Input feature is onscreen, these keys to enter 2-part channel numbers (- Reduces or turns off . Accesses Netflix (- Accesses the main TV menu system...
... control the device: TV, CABLE/SAT, BD/DVD, or AUX. Selects the picture size (- p. 45). These buttons are used to change inputs on and off the sound (- Note: The error message "NOT AVAILABLE" may appear if you can use these buttons select or adjust programming menus.... For the HDMI® CEC Control functions, see "Remote control functional key chart" (- When the Auto Input feature is onscreen, these keys to enter 2-part channel numbers (- Reduces or turns off . Accesses Netflix (- Accesses the main TV menu system...
User Manual
Page 24
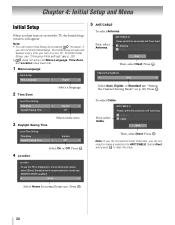
.... To finish Initial Setup, see "Changing Initial settings" (- Eastern Off Select On or Off. ANT/CABLE In Please confirm the connection with Tuner Input. OK Channel Tuning Mode Auto Select Auto, Digital, or Standard (- ANT/CABLE In Please confirm the connection with Tuner... Input. Press . p. 28). • does not work until Menu Language, Time Zone, and Location have been set. 1 Menu Language Quick Setup Menu Language English 2 Time Zone ...
.... To finish Initial Setup, see "Changing Initial settings" (- Eastern Off Select On or Off. ANT/CABLE In Please confirm the connection with Tuner Input. OK Channel Tuning Mode Auto Select Auto, Digital, or Standard (- ANT/CABLE In Please confirm the connection with Tuner... Input. Press . p. 28). • does not work until Menu Language, Time Zone, and Location have been set. 1 Menu Language Quick Setup Menu Language English 2 Time Zone ...

User Manual
Page 26
...-CEC Control Setup Network Setup Netflix Setup VUDU Deactivation Wallpaper Setup Channel Browser Setup PIN Setting Parental Control and Locks Display Settings AV Connection Auto Input Energy Saving Settings HDMI Information Display Page 62 60 64 32 33 42 43 39 56 61 61 69 32 36 36 42, 47 29...
...-CEC Control Setup Network Setup Netflix Setup VUDU Deactivation Wallpaper Setup Channel Browser Setup PIN Setting Parental Control and Locks Display Settings AV Connection Auto Input Energy Saving Settings HDMI Information Display Page 62 60 64 32 33 42 43 39 56 61 61 69 32 36 36 42, 47 29...
User Manual
Page 28
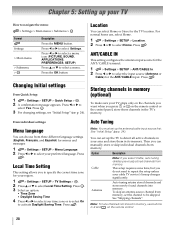
... your TV How to select your area and store them in the TV's memory. Press . Auto Tuning Note: You must set up the antenna/cable input source first. p. 24). OK 3 Select an option: • Time Zone • Daylight Saving Time 4 Press C or c to navigate the menu:...). Press C or c to select Yes. OK 2 A confirmation message appears. Press C or c to select Settings. ANT/CABLE IN This setting configures the antenna input source for the TV location. Press . Press . You can select Home or Store for the ANT/CABLE terminal. 1 > Settings > SETUP > ANT/CABLE In....
... your TV How to select your area and store them in the TV's memory. Press . Auto Tuning Note: You must set up the antenna/cable input source first. p. 24). OK 3 Select an option: • Time Zone • Daylight Saving Time 4 Press C or c to navigate the menu:...). Press C or c to select Yes. OK 2 A confirmation message appears. Press C or c to select Settings. ANT/CABLE IN This setting configures the antenna input source for the TV location. Press . Press . You can select Home or Store for the ANT/CABLE terminal. 1 > Settings > SETUP > ANT/CABLE In....
User Manual
Page 29
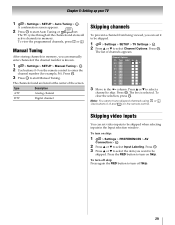
The TV cycles through all the channels and stores all active channels in the Input selection window. Press . Channel Options Ch. OK Note: You cannot tune skipped channels using CH or . on skip: 1 > Settings > PREFERENCES > AV Connection > . OK 2 Press .... To view the programmed channels, press CH or . Type Label 5-1 DTV 6 ATV 6-1 DTV 8 ATV 9 ATV 10 ATV 11 ATV 12 ATV 3 Move to select Input Labeling. OK 3 Press OK to start Auto Tuning or to turn off Skip. 29 The box is known. 1 > Settings > SETUP > Manual Tuning > . To turn...
The TV cycles through all the channels and stores all active channels in the Input selection window. Press . Channel Options Ch. OK Note: You cannot tune skipped channels using CH or . on skip: 1 > Settings > PREFERENCES > AV Connection > . OK 2 Press .... To view the programmed channels, press CH or . Type Label 5-1 DTV 6 ATV 6-1 DTV 8 ATV 9 ATV 10 ATV 11 ATV 12 ATV 3 Move to select Input Labeling. OK 3 Press OK to start Auto Tuning or to turn off Skip. 29 The box is known. 1 > Settings > SETUP > Manual Tuning > . To turn...
User Manual
Page 30
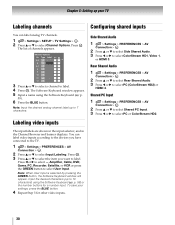
...press the GREEN button to select Channel Options. To save your TV Labeling channels Configuring shared inputs You can label video inputs according to the devices you want to label. OK 2 Press B or b to select User Input. Press . OK 2 Press B or b to select Side Shared Audio. 3 Press...Settings > PREFERENCES > AV Connection > . You can label analog TV channels. 1 > Settings > SETUP > TV Settings > . OK 2 Press B or b to select Shared PC Input. 3 Press C or c to select PC (ColorStream HD2) or HDMI 4. OK 2 Press B or b to select Rear Shared Audio. 3 Press C or c to select PC...
...press the GREEN button to select Channel Options. To save your TV Labeling channels Configuring shared inputs You can label video inputs according to the devices you want to label. OK 2 Press B or b to select User Input. Press . OK 2 Press B or b to select Side Shared Audio. 3 Press...Settings > PREFERENCES > AV Connection > . You can label analog TV channels. 1 > Settings > SETUP > TV Settings > . OK 2 Press B or b to select Shared PC Input. 3 Press C or c to select PC (ColorStream HD2) or HDMI 4. OK 2 Press B or b to select Rear Shared Audio. 3 Press C or c to select PC...

User Manual
Page 31
... button for 2 seconds and release it. OK 31 Auto Input settings options for other modes. Press . To turn off Auto Input: Select Off in Step 2. Chapter 5: Setting up your TV Setting the Auto Input feature You can change TV inputs using the MODE SELECT buttons on the remote control: TV,... CABLE/SAT, BD/ DVD, AUX. To set . 4 Press C or c to select an input source for that mode. 5 Repeat the procedure for each MODE SELECT button: Mode Inputs TV ANT/CABLE CABLE/SAT ANT/CABLE, Video 1, Video 2, ColorStream HD1, HDMI 1, HDMI 2, HDMI 3, HDMI 4, PC (...
... button for 2 seconds and release it. OK 31 Auto Input settings options for other modes. Press . To turn off Auto Input: Select Off in Step 2. Chapter 5: Setting up your TV Setting the Auto Input feature You can change TV inputs using the MODE SELECT buttons on the remote control: TV,... CABLE/SAT, BD/ DVD, AUX. To set . 4 Press C or c to select an input source for that mode. 5 Repeat the procedure for each MODE SELECT button: Mode Inputs TV ANT/CABLE CABLE/SAT ANT/CABLE, Video 1, Video 2, ColorStream HD1, HDMI 1, HDMI 2, HDMI 3, HDMI 4, PC (...

User Manual
Page 32
...the TV's channel memory (- OK Use the 0-9 buttons on the remote. OK •Press or . Note: This feature does not work unless you change inputs from the Inputs List. •Quickly select HDMI® CEC devices from the Channel Browser™ History List. •Surf via Browse mode (to immediately tune to... channels as you select one to tune to select Select Mode or Browse Mode. 4 Select a list. •History List • ANT/CABLE List • Inputs List • Favorites List • HDMI-CEC List Note: • The History List will be set to your channels and...
...the TV's channel memory (- OK Use the 0-9 buttons on the remote. OK •Press or . Note: This feature does not work unless you change inputs from the Inputs List. •Quickly select HDMI® CEC devices from the Channel Browser™ History List. •Surf via Browse mode (to immediately tune to... channels as you select one to tune to select Select Mode or Browse Mode. 4 Select a list. •History List • ANT/CABLE List • Inputs List • Favorites List • HDMI-CEC List Note: • The History List will be set to your channels and...

User Manual
Page 33
...Video 2 Channel Browser History List ANT ColorStream HD 9 5 6 HDMI 1 abs 88 1080i 1 Channels stored in the current list 2 Channel or input that is turned off, pressing will not display the Favorites Browser. • Pressing opens the Channel Browser™ Favorites list regardless of the last selected... list in the Channel Browser™. Previously tuned channels and inputs shift to a channel or input in Browse mode: 1 Highlight an item. OK 3 Press to the beginning of the Favorites list on the right...
...Video 2 Channel Browser History List ANT ColorStream HD 9 5 6 HDMI 1 abs 88 1080i 1 Channels stored in the current list 2 Channel or input that is turned off, pressing will not display the Favorites Browser. • Pressing opens the Channel Browser™ Favorites list regardless of the last selected... list in the Channel Browser™. Previously tuned channels and inputs shift to a channel or input in Browse mode: 1 Highlight an item. OK 3 Press to the beginning of the Favorites list on the right...
User Manual
Page 34
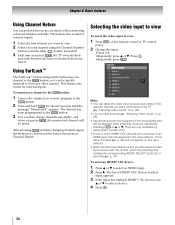
... You can switch between the last two channels that were tuned. Press . p. 31). The list of HDMI® CEC devices for external inputs. They are connected to the CH RTN button, so it can skip sources (- OK 34 To memorize a channel to the CH RTN button...MODE SELECT button for about 2 seconds until the message "Memorized" appears. OK • Repeatedly press . "Skipping video inputs" on the input selector. • When the Auto Input feature is cleared and the button functions as Channel Return. Using SurfLock™ The SurfLock™ feature temporarily memorizes one ...
... You can switch between the last two channels that were tuned. Press . p. 31). The list of HDMI® CEC devices for external inputs. They are connected to the CH RTN button, so it can skip sources (- OK 34 To memorize a channel to the CH RTN button...MODE SELECT button for about 2 seconds until the message "Memorized" appears. OK • Repeatedly press . "Skipping video inputs" on the input selector. • When the Auto Input feature is cleared and the button functions as Channel Return. Using SurfLock™ The SurfLock™ feature temporarily memorizes one ...


