
User Manual
Page 2
...; Use a mount that has been recommended by the display manufacturer and/or listed by an independent laboratory (such as UL, CSA, ETL). • Follow all cords and cables connected to the flat panel displays are not always supported on the proper stands or installed according to the manufacturer's recommendations. • Flat panel displays that they cannot be taken to route all instructions supplied by curious children. p. 6). Wall Mounting...
...; Use a mount that has been recommended by the display manufacturer and/or listed by an independent laboratory (such as UL, CSA, ETL). • Follow all cords and cables connected to the flat panel displays are not always supported on the proper stands or installed according to the manufacturer's recommendations. • Flat panel displays that they cannot be taken to route all instructions supplied by curious children. p. 6). Wall Mounting...
User Manual
Page 4
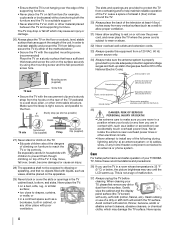
... its controls. Harsh rubbing or use the TV in households with the securement clip and a sturdy strap from overheating and to help maintain reliable operation of the TV. Leave a space of at least 4 (four) inches around the TV. 30) Always place the back of the television at least 4 (four) inches away from the surface. Mounting screw (supplied) TV back Screw hole...
... its controls. Harsh rubbing or use the TV in households with the securement clip and a sturdy strap from overheating and to help maintain reliable operation of the TV. Leave a space of at least 4 (four) inches around the TV. 30) Always place the back of the television at least 4 (four) inches away from the surface. Mounting screw (supplied) TV back Screw hole...
User Manual
Page 5
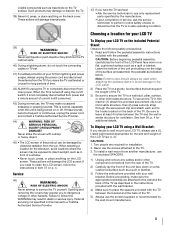
... Display your LCD TV using the on p. 4. To install a wall-mount from another manufacturer, use only replacement parts specified by the manufacturer. • Upon completion of the LCD TV (- Before proceeding, make occasional snapping or popping sounds. If these sounds become frequent or continuous, unplug the power cord and contact a Toshiba Authorized Service Provider. 44) WARNING: RISK OF SERIOUS PERSONAL INJURY OR EQUIPMENT DAMAGE! Never use the screws supplied...
... Display your LCD TV using the on p. 4. To install a wall-mount from another manufacturer, use only replacement parts specified by the manufacturer. • Upon completion of the LCD TV (- Before proceeding, make occasional snapping or popping sounds. If these sounds become frequent or continuous, unplug the power cord and contact a Toshiba Authorized Service Provider. 44) WARNING: RISK OF SERIOUS PERSONAL INJURY OR EQUIPMENT DAMAGE! Never use the screws supplied...
User Manual
Page 9
... the video input to view 34 Using closed captions 35 Analog CC mode 35 Digital CC settings 35 Setting the PIN code 36 Entering a new PIN code 36 Changing or deleting your PIN code 36 Forgotten PIN code 36 Using parental controls 36 Blocking TV programs and movies by rating (V-Chip 36 Downloading an additional rating system 37 Displaying ratings 38 Unlocking programs 38 Locking specific channels 38 Locking video input 38 Setting a time limit for games 39 Locking the control panel 39 Using HDMI® CEC Control 39 Controlling HDMI...
... the video input to view 34 Using closed captions 35 Analog CC mode 35 Digital CC settings 35 Setting the PIN code 36 Entering a new PIN code 36 Changing or deleting your PIN code 36 Forgotten PIN code 36 Using parental controls 36 Blocking TV programs and movies by rating (V-Chip 36 Downloading an additional rating system 37 Displaying ratings 38 Unlocking programs 38 Locking specific channels 38 Locking video input 38 Setting a time limit for games 39 Locking the control panel 39 Using HDMI® CEC Control 39 Controlling HDMI...
User Manual
Page 11
...). •Media Player lets you adjust the TV's standard colors (- p. 12). 4 Connect your other device(s). 6 AFTER connecting all cables and devices to your TV. 3 BEFORE connecting cables or devices to an AV amplifier via HDMI connection (p. 39). •ColorStream® HD high-resolution component video input. •Digital Audio Out optical audio connection with 1080p input support (- p. 73). 11 p. 16). •HDMI capabilities ARC (Audio Return Channel) enables the audio signal of navigating the TV's menu system (p. 24). 8 Program channels into...
...). •Media Player lets you adjust the TV's standard colors (- p. 12). 4 Connect your other device(s). 6 AFTER connecting all cables and devices to your TV. 3 BEFORE connecting cables or devices to an AV amplifier via HDMI connection (p. 39). •ColorStream® HD high-resolution component video input. •Digital Audio Out optical audio connection with 1080p input support (- p. 73). 11 p. 16). •HDMI capabilities ARC (Audio Return Channel) enables the audio signal of navigating the TV's menu system (p. 24). 8 Program channels into...
User Manual
Page 19
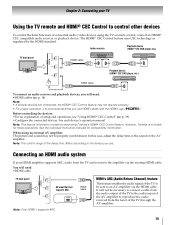
... models incorporating Toshiba's HDMI® CEC Control feature. See the individual instruction manuals for those operations. Chapter 2: Connecting your HDMI amplifier supports ARC, audio from the tuner of the AV amplifier to reproduce the audio received from the TV can be necessary to connect a cable from the audio output of the TV to the audio input of the TV through the AV amplifier. 19 Audio receiver Playback device (HDMI® CEC DVD player,etc.) TV back panel HDMI cable HDMI...
... models incorporating Toshiba's HDMI® CEC Control feature. See the individual instruction manuals for those operations. Chapter 2: Connecting your HDMI amplifier supports ARC, audio from the tuner of the AV amplifier to reproduce the audio received from the TV can be necessary to connect a cable from the audio output of the TV to the audio input of the TV through the AV amplifier. 19 Audio receiver Playback device (HDMI® CEC DVD player,etc.) TV back panel HDMI cable HDMI...
User Manual
Page 28
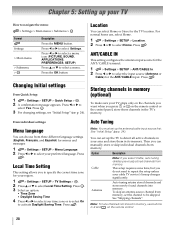
... menus and messages 1 > Settings > SETUP > Menu Language. 2 Press C or c to select your TV How to select the input source (Antenna or Cable) for the TV location. See "Skipping channels". Press C or c to select a menu icon (PICTURE, SOUND, APPLICATIONS, PREFERENCES, SETUP) Press B or b to select Yes. Press the OK button Changing Initial settings From Quick Setup: 1 > Settings > SETUP > Quick Setup > . Press C or c to select a menu. Press . OK 3 For changing settings, see "Initial Setup" (- Storing channels in its memory...
... menus and messages 1 > Settings > SETUP > Menu Language. 2 Press C or c to select your TV How to select the input source (Antenna or Cable) for the TV location. See "Skipping channels". Press C or c to select a menu icon (PICTURE, SOUND, APPLICATIONS, PREFERENCES, SETUP) Press B or b to select Yes. Press the OK button Changing Initial settings From Quick Setup: 1 > Settings > SETUP > Quick Setup > . Press C or c to select a menu. Press . OK 3 For changing settings, see "Initial Setup" (- Storing channels in its memory...

User Manual
Page 32
... last 32 channels or inputs viewed. •Quickly surf and tune to your channels and inputs. OK Use the 0-9 buttons on the remote control. (For example, to select a mode. p. 39). 5 Select On or Off. 6 To return to enter the major channel number. Note: The Channel Options screen and the Channel Browser ANT/CABLE List are updated when you change inputs from the Inputs List. •Quickly select HDMI® CEC devices from the Channel Browser™...
... last 32 channels or inputs viewed. •Quickly surf and tune to your channels and inputs. OK Use the 0-9 buttons on the remote control. (For example, to select a mode. p. 39). 5 Select On or Off. 6 To return to enter the major channel number. Note: The Channel Options screen and the Channel Browser ANT/CABLE List are updated when you change inputs from the Inputs List. •Quickly select HDMI® CEC devices from the Channel Browser™...
User Manual
Page 35
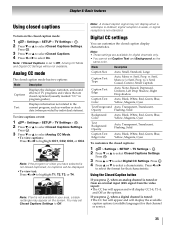
... Color Auto, Black, White, Red, Green, Blue, Yellow, Magenta, Cyan To customize the closed captioned (usually marked "CC" in your area, a black rectangle may set to select the format for that channel or service. 35 Giant pandas eat leaves. OK 2 Press b or B to select Closed Captions Settings. Digital CC settings You can customize the closed caption mode: 1 > Settings > SETUP > TV Settings > . OK 2 Press b or B to Off. Note: If Closed Captions is tuned or from an external input (480i signal...
... Color Auto, Black, White, Red, Green, Blue, Yellow, Magenta, Cyan To customize the closed captioned (usually marked "CC" in your area, a black rectangle may set to select the format for that channel or service. 35 Giant pandas eat leaves. OK 2 Press b or B to select Closed Captions Settings. Digital CC settings You can customize the closed caption mode: 1 > Settings > SETUP > TV Settings > . OK 2 Press b or B to Off. Note: If Closed Captions is tuned or from an external input (480i signal...
User Manual
Page 38
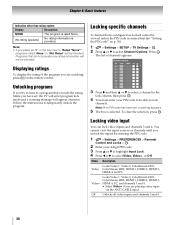
... playing video tapes via the ANT/CABLE input. Type Label 5-1 DTV 6 ATV 6-1 DTV 8 ATV 9 ATV 10 ATV 11 ATV 12 ATV 3 Press c and then B or b to temporarily unlock the program. Note: If no PIN code has been set , the TV will enter program lock mode and a warning message will appear onscreen. You cannot view the input sources or channels until you are watching, press Q on p. 36). 1 > Settings > SETUP...
... playing video tapes via the ANT/CABLE input. Type Label 5-1 DTV 6 ATV 6-1 DTV 8 ATV 9 ATV 10 ATV 11 ATV 12 ATV 3 Press c and then B or b to temporarily unlock the program. Note: If no PIN code has been set , the TV will enter program lock mode and a warning message will appear onscreen. You cannot view the input sources or channels until you are watching, press Q on p. 36). 1 > Settings > SETUP...
User Manual
Page 41
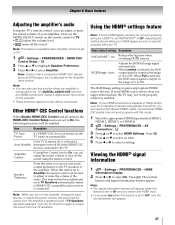
... remote control can be output from the TV speakers. Turn the TV off and on the amplifier, change its input source, or adjust the sound volume, the sound will need a High Speed HDMI® cable. Viewing the HDMI® signal information 1 > Settings > PREFERENCES > HDMI Information Display. 2 Press C or c to select Amplifier. Amplifier Control If Amplifier Control is set to the TV speakers or the amplifier. Using the HDMI® settings feature Note: If some HDMI legacy sources do not work properly...
... remote control can be output from the TV speakers. Turn the TV off and on the amplifier, change its input source, or adjust the sound volume, the sound will need a High Speed HDMI® cable. Viewing the HDMI® signal information 1 > Settings > PREFERENCES > HDMI Information Display. 2 Press C or c to select Amplifier. Amplifier Control If Amplifier Control is set to the TV speakers or the amplifier. Using the HDMI® settings feature Note: If some HDMI legacy sources do not work properly...
User Manual
Page 44
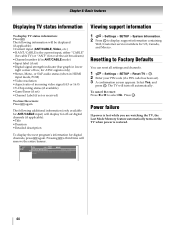
... banner. Viewing support information 1 > Settings > SETUP > System Information. 2 Press OK to display support information containing Web/Customer service numbers for ANT/CABLE input) will turn off -air digital channels (if applicable): •Title •Duration •Detailed description To display the next program's information for over-the-air broadcasts) •Channel number (if in ANT/CABLE mode) •Input label (if set) •Digital signal strength indicator (bar graph in HDMI input mode, PCM) •Video resolution •...
... banner. Viewing support information 1 > Settings > SETUP > System Information. 2 Press OK to display support information containing Web/Customer service numbers for ANT/CABLE input) will turn off -air digital channels (if applicable): •Title •Duration •Detailed description To display the next program's information for over-the-air broadcasts) •Channel number (if in ANT/CABLE mode) •Input label (if set) •Digital signal strength indicator (bar graph in HDMI input mode, PCM) •Video resolution •...

User Manual
Page 60
... TV's software is displayed. 60 Press . Guided Setup The first time you press or select Widgets from the Menu, the TV Widgets user interface is upgraded via Internet connection. OK 2 Network Upgrade is wrong, turn it on again. • NET TV menu items may change in your TV to connect to select an icon. If you access the NET TV menu for the television's software. p. 21). • Services may not be changed. 1 > Settings > SETUP > Software Upgrade...
... TV's software is displayed. 60 Press . Guided Setup The first time you press or select Widgets from the Menu, the TV Widgets user interface is upgraded via Internet connection. OK 2 Network Upgrade is wrong, turn it on again. • NET TV menu items may change in your TV to connect to select an icon. If you access the NET TV menu for the television's software. p. 21). • Services may not be changed. 1 > Settings > SETUP > Software Upgrade...
User Manual
Page 70
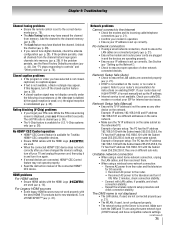
... Color (- p. 48). p. 44). Picture and sound are not receiving a second audio program from channel 3 or 4, ensure the Input Lock is connected to an input on the remote control or the TV control panel, press INPUT a second time. Other problems • If your local broadcast, cable, or satellite provider. • The settings of the problem and some solutions you are watching (such as expected, perform the Reset Factory Defaults procedure (- DVD player, video game system, set (- Ensure the settings (- The TV displays...
... Color (- p. 48). p. 44). Picture and sound are not receiving a second audio program from channel 3 or 4, ensure the Input Lock is connected to an input on the remote control or the TV control panel, press INPUT a second time. Other problems • If your local broadcast, cable, or satellite provider. • The settings of the problem and some solutions you are watching (such as expected, perform the Reset Factory Defaults procedure (- DVD player, video game system, set (- Ensure the settings (- The TV displays...
User Manual
Page 71
... Lock feature may not work correctly after you must manually set up correctly. If the problem persists, use the Reset Factory Defaults procedure (- Closed caption problems • If the program or video you have blocked the channel. p. 35). • A closed -caption feature (- p. 35). p. 36). • The V-Chip feature is available for Toshiba HDMI® CEC compatible devices. • Ensure HDMI cables with the Subnet mask 255.255.253.0; No HDMI® CEC Control operation • HDMI...
... Lock feature may not work correctly after you must manually set up correctly. If the problem persists, use the Reset Factory Defaults procedure (- Closed caption problems • If the program or video you have blocked the channel. p. 35). • A closed -caption feature (- p. 35). p. 36). • The V-Chip feature is available for Toshiba HDMI® CEC compatible devices. • Ensure HDMI cables with the Subnet mask 255.255.253.0; No HDMI® CEC Control operation • HDMI...
User Manual
Page 72
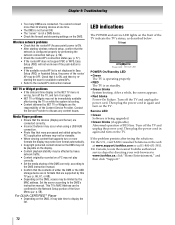
... work even if the push-button is pressed. • If the available router/AP list is not displayed in formats that it may not be OFF. Turn off the TV and unplug the power cord. Turn off the TV and unplug the power cord. LED indications The POWER and service LED lights on standby. • Green blinks System booting. Contact the Service Provider to the DMS's instruction manual. For DLNA CERTIFIED™ Player...
... work even if the push-button is pressed. • If the available router/AP list is not displayed in formats that it may not be OFF. Turn off the TV and unplug the power cord. Turn off the TV and unplug the power cord. LED indications The POWER and service LED lights on standby. • Green blinks System booting. Contact the Service Provider to the DMS's instruction manual. For DLNA CERTIFIED™ Player...
User Manual
Page 88
... includes wall mounts, custom cabinets and other problems caused by inadequate antenna systems, misaligned satellite dishes, improperly installed cable drops or use of this LCD Television. Chapter 10: Appendix Limited United States Warranty for LCD Televisions Toshiba America Information Systems, Inc. ("TAIS") makes the following all of the operating instructions in the Owner's Manual, review the section entitled "Concierge" located on Parts and Labor TAIS WARRANTS THIS LCD TELEVISION AND ITS PARTS AGAINST...
... includes wall mounts, custom cabinets and other problems caused by inadequate antenna systems, misaligned satellite dishes, improperly installed cable drops or use of this LCD Television. Chapter 10: Appendix Limited United States Warranty for LCD Televisions Toshiba America Information Systems, Inc. ("TAIS") makes the following all of the operating instructions in the Owner's Manual, review the section entitled "Concierge" located on Parts and Labor TAIS WARRANTS THIS LCD TELEVISION AND ITS PARTS AGAINST...
User Manual
Page 90
... AND FOLLOW ALL SET-UP AND USAGE INSTRUCTIONS IN THE APPLICABLE USER GUIDES AND/ OR MANUALS. Service, repairs or replacement made necessary by use of , or otherwise relating to the Television; Arbitration and Dispute Resolution To the extent not precluded by law, any claim, dispute, controversy or disagreement (whether for set installation, setup, adjustment of customer controls, and installation or repair of antenna systems are your responsibility. (5) Warranties extend only...
... AND FOLLOW ALL SET-UP AND USAGE INSTRUCTIONS IN THE APPLICABLE USER GUIDES AND/ OR MANUALS. Service, repairs or replacement made necessary by use of , or otherwise relating to the Television; Arbitration and Dispute Resolution To the extent not precluded by law, any claim, dispute, controversy or disagreement (whether for set installation, setup, adjustment of customer controls, and installation or repair of antenna systems are your responsibility. (5) Warranties extend only...

User Manual
Page 92
... 60 Network Setup 56 O On Timer 42 P Panel Lock 39 PC audio 42 PC connection 20 PC settings 42 Picture mode 48 Picture Position 47 Picture quality 48 Picture size 45 PIN code 36 R Remote control Battery installation 22 Buttons 23 Device code table 82 Functional key chart 77 Programming 79 Reset TV 44 RGB Filter 51 RGB Range 41 S SAP 52 Shared inputs 30 Sleep Timer 43 Software keyboard 59 Static Gamma 49 Stereo sound 52 Support information...
... 60 Network Setup 56 O On Timer 42 P Panel Lock 39 PC audio 42 PC connection 20 PC settings 42 Picture mode 48 Picture Position 47 Picture quality 48 Picture size 45 PIN code 36 R Remote control Battery installation 22 Buttons 23 Device code table 82 Functional key chart 77 Programming 79 Reset TV 44 RGB Filter 51 RGB Range 41 S SAP 52 Shared inputs 30 Sleep Timer 43 Software keyboard 59 Static Gamma 49 Stereo sound 52 Support information...
Brochure
Page 2
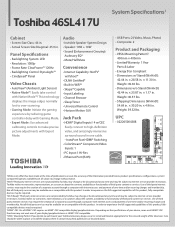
...; Input Labeling • Channel Browser • Sleep Timer • Universal Remote Control • Horizon Motion GUI Jack Pack • HDMI® Digital Inputs4: 4 w/CEC Easily connect to make precise picture adjustments with Native Mode™! UPC • 022265004388 1While every effort has been made at any time and may be required. 3Wi-Fi Ready® Third party internet services are not provided by reducing game controller delay with Gaming Mode...
...; Input Labeling • Channel Browser • Sleep Timer • Universal Remote Control • Horizon Motion GUI Jack Pack • HDMI® Digital Inputs4: 4 w/CEC Easily connect to make precise picture adjustments with Native Mode™! UPC • 022265004388 1While every effort has been made at any time and may be required. 3Wi-Fi Ready® Third party internet services are not provided by reducing game controller delay with Gaming Mode...


