Owner's Manual - English
Page 4
... an antenna or phone system. These actions will damage the LCD screen. Opening and removing the covers may damage the surface of the panel. A hard cloth may expose you are never in a position where your TOSHIBA TV, follow these sounds become frequent or continuous, unplug the power... sunlight, such as in contact with a sharp or heavy object. 36) • The LCD screen of this page. Never attempt to a Toshiba Authorized Service Center. 38) If you leave the TV unattended or unused for long periods of time. 34) During normal use only replacement parts specified...
... an antenna or phone system. These actions will damage the LCD screen. Opening and removing the covers may damage the surface of the panel. A hard cloth may expose you are never in a position where your TOSHIBA TV, follow these sounds become frequent or continuous, unplug the power... sunlight, such as in contact with a sharp or heavy object. 36) • The LCD screen of this page. Never attempt to a Toshiba Authorized Service Center. 38) If you leave the TV unattended or unused for long periods of time. 34) During normal use only replacement parts specified...
Owner's Manual - English
Page 6
.... Environmental Protection Agency. marks. Important notes about your LCD TV The following symptoms are technical limitations of LCD Display technology and are trademarks or registered trademarks of malfunction... equipment and the receiver. • Connect the equipment into an outlet on the screen if a fixed, non-moving image is manufactured using an extremely high level of... 22, 2008 5:25 PM FCC Declaration of Conformity Compliance Statement (Part 15): The Toshiba 42RV535U, 46RV535U and 52RV535U Televisions comply with Part 15 of this television meet ENERGY STAR® requirements...
.... Environmental Protection Agency. marks. Important notes about your LCD TV The following symptoms are technical limitations of LCD Display technology and are trademarks or registered trademarks of malfunction... equipment and the receiver. • Connect the equipment into an outlet on the screen if a fixed, non-moving image is manufactured using an extremely high level of... 22, 2008 5:25 PM FCC Declaration of Conformity Compliance Statement (Part 15): The Toshiba 42RV535U, 46RV535U and 52RV535U Televisions comply with Part 15 of this television meet ENERGY STAR® requirements...
Owner's Manual - English
Page 9
... up, and using its many exciting features. 1 Observe the following are just a few of the many exciting features of your new Toshiba widescreen, integrated HD, LCD TV: • Integrated digital tuning (8VSB ATSC and QAM) eliminates the need for a separate digital converter settop box (in any power ... unique "black" design to enhance contrast while you turn off the On-Screen demonstration mode by the RGB or YCbCr color space. (46" and 52" models only) • REGZA LINK allows control of external devices from the TV remote via HDMI connection (- pages 10-11). 4 Connect your other devices...
... up, and using its many exciting features. 1 Observe the following are just a few of the many exciting features of your new Toshiba widescreen, integrated HD, LCD TV: • Integrated digital tuning (8VSB ATSC and QAM) eliminates the need for a separate digital converter settop box (in any power ... unique "black" design to enhance contrast while you turn off the On-Screen demonstration mode by the RGB or YCbCr color space. (46" and 52" models only) • REGZA LINK allows control of external devices from the TV remote via HDMI connection (- pages 10-11). 4 Connect your other devices...
Owner's Manual - English
Page 10
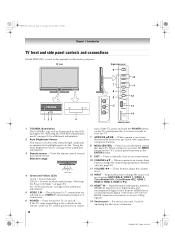
...35) See "LED indications" on -screen menu. 10 CHANNEL Bb - Press to receive 1080p signals. 14 Service port - page 27). page 30). 11 VOLUME C c - For service use only. See "Selecting the TOSHIBA Illumination mode" on the remote control or TV control panel and you are referred to ... remote sensor. These buttons adjust the volume level. 12 INPUT - TV front Right side panel 6 10 7 11 8 9 12 5 13 1 23 4 1 TOSHIBA Illumination The TOSHIBA logo will detect the ambient light conditions to turn off the TV, press and hold the POWER button on and off. High-Definition ...
...35) See "LED indications" on -screen menu. 10 CHANNEL Bb - Press to receive 1080p signals. 14 Service port - page 27). page 30). 11 VOLUME C c - For service use only. See "Selecting the TOSHIBA Illumination mode" on the remote control or TV control panel and you are referred to ... remote sensor. These buttons adjust the volume level. 12 INPUT - TV front Right side panel 6 10 7 11 8 9 12 5 13 1 23 4 1 TOSHIBA Illumination The TOSHIBA logo will detect the ambient light conditions to turn off the TV, press and hold the POWER button on and off. High-Definition ...
Owner's Manual - English
Page 19
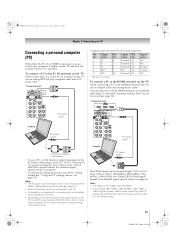
... a compatible mini D-sub15-pin terminal. • Depending on the DVD's title and the specifications of the PC on which you can watch your TV Connecting a personal computer (PC) With either the PC IN or HDMI connection, you are not necessary (- For detailed signal specifications, see page 64.... • To display the optimum picture, use an analog RGB (15-pin) computer cable and a PC audio cable. Note: • The edges of the screen (i.e. name 1 R 6 Ground 11 NC 2 G 7 Ground 12 NC 3 B 8 Ground 13 H-sync 4 NC * 9 NC 14 V-sync 5 NC 10 Ground 15 NC *NC=Not...
... a compatible mini D-sub15-pin terminal. • Depending on the DVD's title and the specifications of the PC on which you can watch your TV Connecting a personal computer (PC) With either the PC IN or HDMI connection, you are not necessary (- For detailed signal specifications, see page 64.... • To display the optimum picture, use an analog RGB (15-pin) computer cable and a PC audio cable. Note: • The edges of the screen (i.e. name 1 R 6 Ground 11 NC 2 G 7 Ground 12 NC 3 B 8 Ground 13 H-sync 4 NC * 9 NC 14 V-sync 5 NC 10 Ground 15 NC *NC=Not...
Owner's Manual - English
Page 21
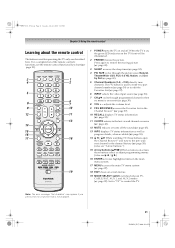
...programming menus. (Also see the remote control functional key chart (page 23). 1 POWER turns the TV on and off the sound (- page 30). 8 VOL + - page 27). 18 EXIT closes on -screen, these buttons open the Channel Browser™ and tune to the previous/ next channel in the... (- page 43). 3 SLEEP accesses the sleep timer (- page 52). 4 PIC SIZE cycles through programmed channels when no menu is on -screen menus. 19 MODE SELECT switch switches between TV, CABLE/SAT, AUX 1, and AUX 2 modes (- The = button is not available. 21 RV535U (E/F) Web 213:276 adjusts the volume ...
...programming menus. (Also see the remote control functional key chart (page 23). 1 POWER turns the TV on and off the sound (- page 30). 8 VOL + - page 27). 18 EXIT closes on -screen, these buttons open the Channel Browser™ and tune to the previous/ next channel in the... (- page 43). 3 SLEEP accesses the sleep timer (- page 52). 4 PIC SIZE cycles through programmed channels when no menu is on -screen menus. 19 MODE SELECT switch switches between TV, CABLE/SAT, AUX 1, and AUX 2 modes (- The = button is not available. 21 RV535U (E/F) Web 213:276 adjusts the volume ...
Owner's Manual - English
Page 22
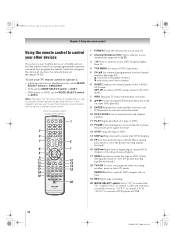
...use the device's original remote control. b selects the next lower channel. 6 GUIDE Displays the channel guide in the AUX mode. 7 INFO Displays TV status information on-screen. 8 BbC c Press to navigate DVD menus (may not operate certain features on and off. 2 Channel Numbers (0-9) Press to directly access channels ...If this happens and you wish to use those features, you will need to use your other devices If you have a non-Toshiba device or a Toshiba device that the remote control is programmed, it may not work on some DVD players). 9 ENTER Required by some satellite receivers and...
...use the device's original remote control. b selects the next lower channel. 6 GUIDE Displays the channel guide in the AUX mode. 7 INFO Displays TV status information on-screen. 8 BbC c Press to navigate DVD menus (may not operate certain features on and off. 2 Channel Numbers (0-9) Press to directly access channels ...If this happens and you wish to use those features, you will need to use your other devices If you have a non-Toshiba device or a Toshiba device that the remote control is programmed, it may not work on some DVD players). 9 ENTER Required by some satellite receivers and...
Owner's Manual - English
Page 28
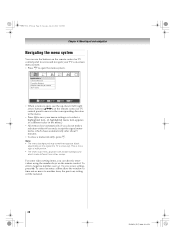
... in the menu. • Press T to save a new setting, press T. For some video setting items, you can use the buttons on the remote control or TV control panel to access and navigate your menu settings or to select a highlighted item. (A highlighted menu item appears in a different color in the menu.) •... Tuesday, July 22, 2008 5:25 PM Chapter 4: Menu layout and navigation Navigating the menu system You can directly enter values using the number keys on -screen menu system. • Press Y to open , use the up/down/left/right arrow buttons (BbC c) on the remote control or...
... in the menu. • Press T to save a new setting, press T. For some video setting items, you can use the buttons on the remote control or TV control panel to access and navigate your menu settings or to select a highlighted item. (A highlighted menu item appears in a different color in the menu.) •... Tuesday, July 22, 2008 5:25 PM Chapter 4: Menu layout and navigation Navigating the menu system You can directly enter values using the number keys on -screen menu system. • Press Y to open , use the up/down/left/right arrow buttons (BbC c) on the remote control or...

Owner's Manual - English
Page 29
... press T. For normal home use the demo, please select [Store (On)]. For normal TV usage, please select [Normal (Off)]. To change the Demo Mode setting: Press the MENU and VOLUMEC buttons on -screen demonstration, select Store (On). Initial Setup Demo Mode To use , press c to close...in the Setup menu (- 52RV535U_EN.book Page 29 Tuesday, July 22, 2008 5:25 PM Chapter 5: Setting up your TV Setting the Demo Mode When you first turn on -screen display of inactivity. To select settings: 1 From the Menu Language selection window, highlight your preferred menu language and ...
... press T. For normal home use the demo, please select [Store (On)]. For normal TV usage, please select [Normal (Off)]. To change the Demo Mode setting: Press the MENU and VOLUMEC buttons on -screen demonstration, select Store (On). Initial Setup Demo Mode To use , press c to close...in the Setup menu (- 52RV535U_EN.book Page 29 Tuesday, July 22, 2008 5:25 PM Chapter 5: Setting up your TV Setting the Demo Mode When you first turn on -screen display of inactivity. To select settings: 1 From the Menu Language selection window, highlight your preferred menu language and ...
Owner's Manual - English
Page 31
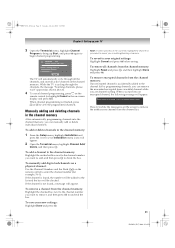
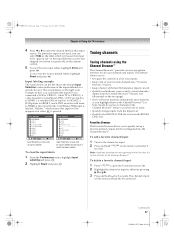
...O on the remote control to your original settings: Highlight Cancel and press T before saving. Manually adding and deleting channels in the on the screen to view the programmed channels. If the channel is provided to uncheck the box. To remove a channel from the channel list. 31 RV535U ...channel memory. ANT/CABLE Cable Scanning channels, please wait ... 5% Number of Channels Found - 52 Scanning Analog Channels Found Channel - 55 Cancel The TV will be added to check the box. A new set of the currently highlighted channel is found , a message will appear. When you tune into...
...O on the remote control to your original settings: Highlight Cancel and press T before saving. Manually adding and deleting channels in the on the screen to view the programmed channels. If the channel is provided to uncheck the box. To remove a channel from the channel list. 31 RV535U ...channel memory. ANT/CABLE Cable Scanning channels, please wait ... 5% Number of Channels Found - 52 Scanning Analog Channels Found Channel - 55 Cancel The TV will be added to check the box. A new set of the currently highlighted channel is found , a message will appear. When you tune into...
Owner's Manual - English
Page 32
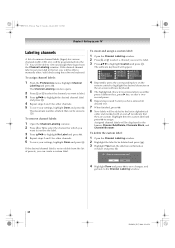
... 7 _ 100 Backspace 2EdAit BCHCRTaN Cbanccel2 5 JKL j k l 5 8 TUV t u v 8 00 S3endD EEXIFT dExiet f 3 6 MNOmn o 6 9 WX Y Zw x y z 9 INPUT Space 4 Repeatedly press the corresponding key on -screen software keyboard. 5 The highlighted character is not provided in the list, you will be displayed in alphabetical order and marked with an icon to save... your settings, highlight Done and press T. You will be programmed into the TV. The maximum number of labels that they are custom. To remove channel labels: 1 Open the Channel Labeling window. 2...
... 7 _ 100 Backspace 2EdAit BCHCRTaN Cbanccel2 5 JKL j k l 5 8 TUV t u v 8 00 S3endD EEXIFT dExiet f 3 6 MNOmn o 6 9 WX Y Zw x y z 9 INPUT Space 4 Repeatedly press the corresponding key on -screen software keyboard. 5 The highlighted character is not provided in the list, you will be displayed in alphabetical order and marked with an icon to save... your settings, highlight Done and press T. You will be programmed into the TV. The maximum number of labels that they are custom. To remove channel labels: 1 Open the Channel Labeling window. 2...

Owner's Manual - English
Page 33
... Analog). (Auto is set of Installation menu icons will be output. To close the screen and return to a virtual TV channel number. Contact your local broadcasters to obtain the RF channel numbers for your TV Setting the HDMI™ audio mode To set the HDMI audio mode: 1 From the... check. page 16). Note: • The physical digital channel number listed in the Signal Meter screen may not correspond to the Terrestrial menu: Highlight Done and press T. If not, the TV will automatically detect and output analog audio from the HDMI input will appear. 2 Open the Terrestrial ...
... Analog). (Auto is set of Installation menu icons will be output. To close the screen and return to a virtual TV channel number. Contact your local broadcasters to obtain the RF channel numbers for your TV Setting the HDMI™ audio mode To set the HDMI audio mode: 1 From the... check. page 16). Note: • The physical digital channel number listed in the Signal Meter screen may not correspond to the Terrestrial menu: Highlight Done and press T. If not, the TV will automatically detect and output analog audio from the HDMI input will appear. 2 Open the Terrestrial ...

Owner's Manual - English
Page 34
...: 1 From the Setup menu, highlight Installation and press T. To cancel the reset: Highlight No and press T. 34 RV535U (E/F) Web 213:276 The TV will turn off , unplug the TV power cord and then plug it in again to complete the reset process. A new set of Installation menu icons will appear. 2 Open the... bar to select the Software Version and view the related information. A new set , you to the Installation menu: Highlight Done and press T. To close the screen and return to specify the correct time zone for your region.
...: 1 From the Setup menu, highlight Installation and press T. To cancel the reset: Highlight No and press T. 34 RV535U (E/F) Web 213:276 The TV will turn off , unplug the TV power cord and then plug it in again to complete the reset process. A new set of Installation menu icons will appear. 2 Open the... bar to select the Software Version and view the related information. A new set , you to the Installation menu: Highlight Done and press T. To close the screen and return to specify the correct time zone for your region.
Owner's Manual - English
Page 36
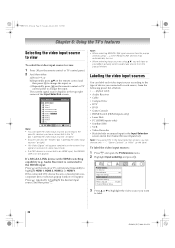
...video input sources: 1 Press Y and open the Preferences menu. 2 Highlight Input Labeling and press T. or c) Repeatedly press + on the remote control or TV control panel. 2 And then either: a) Press 0-9; "Labeling the video input sources" at right). • "No Video Signal" will have connected to ...each video input source according to the type of the Input Selection screen. Audio Receiver) is connected to Select Navigate Note: • You can also be "hidden" (- 52RV535U_EN.book Page 36 Tuesday, July 22...
...video input sources: 1 Press Y and open the Preferences menu. 2 Highlight Input Labeling and press T. or c) Repeatedly press + on the remote control or TV control panel. 2 And then either: a) Press 0-9; "Labeling the video input sources" at right). • "No Video Signal" will have connected to ...each video input source according to the type of the Input Selection screen. Audio Receiver) is connected to Select Navigate Note: • You can also be "hidden" (- 52RV535U_EN.book Page 36 Tuesday, July 22...
Owner's Manual - English
Page 37
...if you to: • Navigate the contents of all inputs labeled except input 4, which will be "grayed out" in the Input Selection screen and skipped over channels in the Channel Browser™) or Select mode (to surf over when you select one to HDMI 4. Input labeling example...: 1 From the Preferences menu, highlight Input Labeling and press T. 2 Highlight Reset and press T. This feature allows you connected a VCR to VIDEO 1, Cable TV to VIDEO 2, a video recorder to ColorStream HD1, a DTV set-top box to HDMI 1, a satellite/DSS set up a favorite channels/inputs list that is...
...if you to: • Navigate the contents of all inputs labeled except input 4, which will be "grayed out" in the Input Selection screen and skipped over channels in the Channel Browser™) or Select mode (to surf over when you select one to HDMI 4. Input labeling example...: 1 From the Preferences menu, highlight Input Labeling and press T. 2 Highlight Reset and press T. This feature allows you connected a VCR to VIDEO 1, Cable TV to VIDEO 2, a video recorder to ColorStream HD1, a DTV set-top box to HDMI 1, a satellite/DSS set up a favorite channels/inputs list that is...
Owner's Manual - English
Page 40
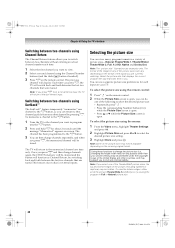
...channel by Dot. To view the hidden edges, either scroll the picture (TheaterWide 2 and 3 only) or try viewing the program in any other than your TV. Note: The "picture size" illustrations are currently watching. To select the picture size using the remote control: 1 Press I . • Press the ...You can view many program formats in a variety of the picture sizes) will vary depending on the remote control. 2 While the Picture Size screen is open . Selecting the picture size You can save separate picture size preferences for each time. 1 Select the first channel you want to ...
...channel by Dot. To view the hidden edges, either scroll the picture (TheaterWide 2 and 3 only) or try viewing the program in any other than your TV. Note: The "picture size" illustrations are currently watching. To select the picture size using the remote control: 1 Press I . • Press the ...You can view many program formats in a variety of the picture sizes) will vary depending on the remote control. 2 While the Picture Size screen is open . Selecting the picture size You can save separate picture size preferences for each time. 1 Select the first channel you want to ...
Owner's Manual - English
Page 41
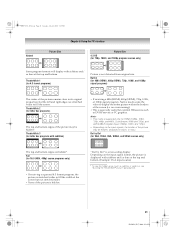
...and/or bars at the top and bottom. 52RV535U_EN.book Page 41 Tuesday, July 22, 2008 5:25 PM Natural Picture Size Chapter 6: Using the TV's features Picture Size 4:3 HD (for 720p, 1080i, and 1080p program sources only) Some program formats will display with sidebars and/ or bars ...or captions), see "Scrolling the TheaterWide® picture" (- "Dot by Dot (for letter box programs) A B C D E F G The top and bottom edges of the screen but the left and right edges are hidden*. Depending on the input signals, the border of the picture is not distorted from original size. TheaterWide...
...and/or bars at the top and bottom. 52RV535U_EN.book Page 41 Tuesday, July 22, 2008 5:25 PM Natural Picture Size Chapter 6: Using the TV's features Picture Size 4:3 HD (for 720p, 1080i, and 1080p program sources only) Some program formats will display with sidebars and/ or bars ...or captions), see "Scrolling the TheaterWide® picture" (- "Dot by Dot (for letter box programs) A B C D E F G The top and bottom edges of the screen but the left and right edges are hidden*. Depending on the input signals, the border of the picture is not distorted from original size. TheaterWide...
Owner's Manual - English
Page 43
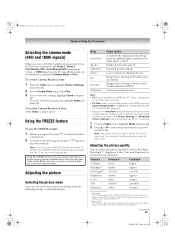
...to 0. (Settings are stored in memory.) ** DynaLight This function automatically strengthens the black coloring of media from a Toshiba REGZA LINK PC. You can select a different picture mode for viewing of dark areas in the Picture Settings and ...again (or any purpose other than 15 minutes, the FREEZE mode will automatically be released and the TV will automatically be set to On and a Toshiba REGZA LINK PC connected (- Adjusting the picture quality You can adjust the picture quality (Contrast, Backlight,... Lower contrast for darkened room Designed for viewing of the entire screen.
...to 0. (Settings are stored in memory.) ** DynaLight This function automatically strengthens the black coloring of media from a Toshiba REGZA LINK PC. You can select a different picture mode for viewing of dark areas in the Picture Settings and ...again (or any purpose other than 15 minutes, the FREEZE mode will automatically be released and the TV will automatically be set to On and a Toshiba REGZA LINK PC connected (- Adjusting the picture quality You can adjust the picture quality (Contrast, Backlight,... Lower contrast for darkened room Designed for viewing of the entire screen.
Owner's Manual - English
Page 44
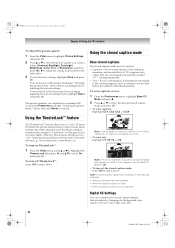
...that you to "lock" all items that when adjusted cause the Mode setting to automatically change to "Preference" will display on -screen display of TV programs and videos that do not influence Mode status will not be grayed out and unavailable when the TheaterLock setting is set the ... is weak • When the signal reception is not available in your area, a black rectangle may not display in step 1 above. To turn on screen. Note: A closed captioned, no captions will be affected e.g., Noise Reduction, Game Mode, etc. To view captions or text: 1 From the Preferences menu...
...that you to "lock" all items that when adjusted cause the Mode setting to automatically change to "Preference" will display on -screen display of TV programs and videos that do not influence Mode status will not be grayed out and unavailable when the TheaterLock setting is set the ... is weak • When the signal reception is not available in your area, a black rectangle may not display in step 1 above. To turn on screen. Note: A closed captioned, no captions will be affected e.g., Noise Reduction, Game Mode, etc. To view captions or text: 1 From the Preferences menu...

Owner's Manual - English
Page 46
...off the StableSound feature: Select Off in step 2 above , and then press C or c to select the language you prefer. Off To turn on -screen when E is pressed. MTS also can adjust the audio quality by individual stations). Note: • You can be output. To listen to an alternate ...). • If the stereo sound is noisy, select Mono to reduce the noise. 52RV535U_EN.book Page 46 Tuesday, July 22, 2008 5:25 PM Chapter 6: Using the TV's features Selecting stereo/SAP broadcasts The multi-channel TV sound (MTS) feature allows you want to adjust (Bass, Treble, or Balance). 3 Press C or...
...off the StableSound feature: Select Off in step 2 above , and then press C or c to select the language you prefer. Off To turn on -screen when E is pressed. MTS also can adjust the audio quality by individual stations). Note: • You can be output. To listen to an alternate ...). • If the stereo sound is noisy, select Mono to reduce the noise. 52RV535U_EN.book Page 46 Tuesday, July 22, 2008 5:25 PM Chapter 6: Using the TV's features Selecting stereo/SAP broadcasts The multi-channel TV sound (MTS) feature allows you want to adjust (Bass, Treble, or Balance). 3 Press C or...


