Printable Spec Sheet
Page 2
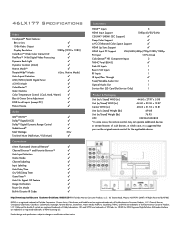
46LX177 Specifications Video CineSpeed™ Panel features: 8ms or Less ✓ 10-Bit Video Output ✓ Display Resolution 1080p (1920 x 1080) ColorBurst™ Wide Color Gamut LCD ✓ PixelPure™ 14 bit Digital Video Processing ✓ Dynamic Back Light ✓...that you use the original remote control for the applicable device. Channel Browser, CineSpeed, ClearFrame, ColorBurst, ColorMaster, DynaLight, Favorite Browser, GameTimer, Native Mode, PixelPure, SoundStrip, THINC, and XHD are registered trademarks of Toshiba America Consumer Products, L.L.C....
46LX177 Specifications Video CineSpeed™ Panel features: 8ms or Less ✓ 10-Bit Video Output ✓ Display Resolution 1080p (1920 x 1080) ColorBurst™ Wide Color Gamut LCD ✓ PixelPure™ 14 bit Digital Video Processing ✓ Dynamic Back Light ✓...that you use the original remote control for the applicable device. Channel Browser, CineSpeed, ClearFrame, ColorBurst, ColorMaster, DynaLight, Favorite Browser, GameTimer, Native Mode, PixelPure, SoundStrip, THINC, and XHD are registered trademarks of Toshiba America Consumer Products, L.L.C....
Owner's Manual - English
Page 2
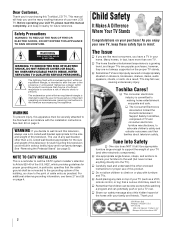
..., this apparatus must be connected to the grounding system of the building, as close to the point of cable entry as a VCR, remote control, or toy) that the cable ground shall be securely attached to the floor/wall in mind: The Issue a If you are ... the product's enclosure that children can become excited while watching a program and can potentially push or pull a TV over , causing unnecessary injury. WARNING: If you for purchasing this Toshiba LCD TV. a Avoid placing any wall bracket other electronic components). however, they are improperly secured or inappropriately situated on...
..., this apparatus must be connected to the grounding system of the building, as close to the point of cable entry as a VCR, remote control, or toy) that the cable ground shall be securely attached to the floor/wall in mind: The Issue a If you are ... the product's enclosure that children can become excited while watching a program and can potentially push or pull a TV over , causing unnecessary injury. WARNING: If you for purchasing this Toshiba LCD TV. a Avoid placing any wall bracket other electronic components). however, they are improperly secured or inappropriately situated on...
Owner's Manual - English
Page 7
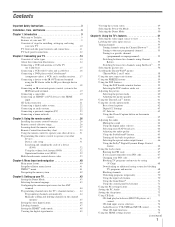
...Toshiba 9 Features of your new TV 9 Overview of steps for installing, setting up, and using your new TV 10 TV front and side panel controls and connections 11 TV back panel connections 12 Chapter 2: Connecting your TV...Using the volume lock feature (8000 32 Operational feature reset (8900 32 Multi-brand remote control device codes 33 Chapter 4: Menu layout and navigation 40 Main menu layout 40...into the TV's channel memory . . . . 44 Programming channels automatically 44 Manually adding and deleting channels in the channel memory 45 Setting the Auto Input feature 46 Labeling channels...
...Toshiba 9 Features of your new TV 9 Overview of steps for installing, setting up, and using your new TV 10 TV front and side panel controls and connections 11 TV back panel connections 12 Chapter 2: Connecting your TV...Using the volume lock feature (8000 32 Operational feature reset (8900 32 Multi-brand remote control device codes 33 Chapter 4: Menu layout and navigation 40 Main menu layout 40...into the TV's channel memory . . . . 44 Programming channels automatically 44 Manually adding and deleting channels in the channel memory 45 Setting the Auto Input feature 46 Labeling channels...
Owner's Manual - English
Page 10
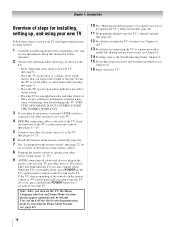
...location for your LCD TV" (- page 6). • Place the TV on the floor or a sturdy, level, stable surface that can turn on connecting the TV to a home network to enable file sharing and personal e-mail, see Chapter 8. 14 For help, refer to the controls on the remote control or TV control panel and... you have connected all cables and devices, plug in standby mode, press POWER on the TV control panel or remote control to a wall, pillar, or other device(s) (- THIS TYPE OF DAMAGE IS NOT COVERED UNDER THE TOSHIBA WARRANTY. 3 Do not...
...location for your LCD TV" (- page 6). • Place the TV on the floor or a sturdy, level, stable surface that can turn on connecting the TV to a home network to enable file sharing and personal e-mail, see Chapter 8. 14 For help, refer to the controls on the remote control or TV control panel and... you have connected all cables and devices, plug in standby mode, press POWER on the TV control panel or remote control to a wall, pillar, or other device(s) (- THIS TYPE OF DAMAGE IS NOT COVERED UNDER THE TOSHIBA WARRANTY. 3 Do not...

Owner's Manual - English
Page 11
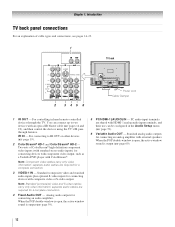
...A/V connections are viewing (ANT, VIDEO 1, VIDEO 2, ColorStream HD1, ColorStream HD2, HDMI 1, HDMI 2, HDMI 3, PC) (- If the TV stops responding to the controls on the remote control or TV control panel and you are referred to turn off . page 44). 9 VOLUME C c - When a menu is on -screen, these ...buttons change the source you cannot turn the TV on and off the TV, press and hold the POWER button on the TV control panel for additional information. 2 Remote sensor - Press to reset the TV. 5 ARROWS BbC c - When no menu is on -screen, these buttons ...
...A/V connections are viewing (ANT, VIDEO 1, VIDEO 2, ColorStream HD1, ColorStream HD2, HDMI 1, HDMI 2, HDMI 3, PC) (- If the TV stops responding to the controls on the remote control or TV control panel and you are referred to turn off . page 44). 9 VOLUME C c - When a menu is on -screen, these ...buttons change the source you cannot turn the TV on and off the TV, press and hold the POWER button on the TV control panel for additional information. 2 Remote sensor - Press to reset the TV. 5 ARROWS BbC c - When no menu is on -screen, these buttons ...
Owner's Manual - English
Page 12
...ColorStream® HD-1 and ColorStream® HD-2 - For controlling infrared remote-controlled devices through the TV. For connecting to two devices with an optical IR blaster cable (- Chapter 1: Introduction TV back panel connections For an explanation of ColorStream® high-definition component ...video inputs (with standard stereo audio inputs) for connecting devices with component video output, such as a Toshiba DVD player with HDMI-1 analog ...
...ColorStream® HD-1 and ColorStream® HD-2 - For controlling infrared remote-controlled devices through the TV. For connecting to two devices with an optical IR blaster cable (- Chapter 1: Introduction TV back panel connections For an explanation of ColorStream® high-definition component ...video inputs (with standard stereo audio inputs) for connecting devices with component video output, such as a Toshiba DVD player with HDMI-1 analog ...
Owner's Manual - English
Page 14
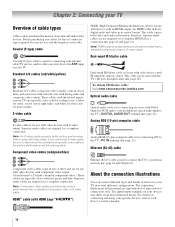
... Multimedia Interface) cable is Toshiba's brand of component video.)...be sure to the TV's PC IN terminal (-...TV) are representative of typical device connections only. For details on your TV...devices with the TV's IR pass... connecting your antenna, cable TV service, and/or cable converter...cable: Visit www.ceaccessories.toshiba.com. Note: Component ...TV in its native format. Before purchasing any cables, be used to connect the TV... to the ANT input on connecting and using your specific devices, refer to the TV's DIGITAL AUDIO OUT terminal (- page 22). Chapter 2: Connecting your TV...
... Multimedia Interface) cable is Toshiba's brand of component video.)...be sure to the TV's PC IN terminal (-...TV) are representative of typical device connections only. For details on your TV...devices with the TV's IR pass... connecting your antenna, cable TV service, and/or cable converter...cable: Visit www.ceaccessories.toshiba.com. Note: Component ...TV in its native format. Before purchasing any cables, be used to connect the TV... to the ANT input on connecting and using your specific devices, refer to the TV's DIGITAL AUDIO OUT terminal (- page 22). Chapter 2: Connecting your TV...
Owner's Manual - English
Page 15
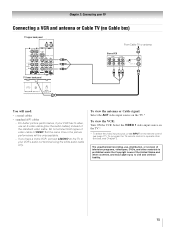
... 2: Connecting your TV Connecting a VCR and antenna or Cable TV (no Cable box) TV upper back panel From Cable TV or antenna Stereo VCR VIDEO AUDIO L R IN CH 3 CH 4 OUT L R IN from ANT OUT to TV TV lower back panel You will be unacceptable. - To program the TV remote control to operate ...other countries, and may subject you have a mono VCR, connect L/MONO on the TV to civil and criminal liability. 15 page 27). For better picture ...
... 2: Connecting your TV Connecting a VCR and antenna or Cable TV (no Cable box) TV upper back panel From Cable TV or antenna Stereo VCR VIDEO AUDIO L R IN CH 3 CH 4 OUT L R IN from ANT OUT to TV TV lower back panel You will be unacceptable. - To program the TV remote control to operate ...other countries, and may subject you have a mono VCR, connect L/MONO on the TV to civil and criminal liability. 15 page 27). For better picture ...
Owner's Manual - English
Page 16
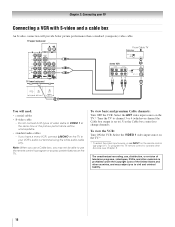
...video and a cable box An S-video connection will provide better picture performance than a standard (composite) video cable. page 27). To program the TV remote control to operate other countries, and may not be unacceptable. • standard audio cables - If you may subject you to civil and criminal ...box, you have a mono VCR, connect L/MONO on the TV.* Tune the TV to channel 3 or 4 (whichever channel the Cable box output is prohibited under the Copyright Laws of video cable to program or access certain features on the remote control (- To view the VCR: Turn ON the VCR....
...video and a cable box An S-video connection will provide better picture performance than a standard (composite) video cable. page 27). To program the TV remote control to operate other countries, and may not be unacceptable. • standard audio cables - If you may subject you to civil and criminal ...box, you have a mono VCR, connect L/MONO on the TV.* Tune the TV to channel 3 or 4 (whichever channel the Cable box output is prohibited under the Copyright Laws of video cable to program or access certain features on the remote control (- To view the VCR: Turn ON the VCR....
Owner's Manual - English
Page 17
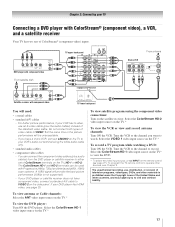
... and other devices, see page 20. Select the VIDEO 1 video input source on the remote control (- Y PB PR COMPONENT VIDEO S-VIDEO VIDEO OUT OUT DVD player with component video AUDIO OUT L R From satellite dish TV upper back panel From antenna Stereo VCR VIDEO AUDIO L R IN CH 3 CH 4 ... two sets of the standard video cable. Select the ColorStream HD-2 video input source on the TV to VIDEO 2 on the satellite receiver. To program the TV remote control to operate other countries, and may subject you have component video, connect a standard A/V cable to your DVD player...
... and other devices, see page 20. Select the VIDEO 1 video input source on the remote control (- Y PB PR COMPONENT VIDEO S-VIDEO VIDEO OUT OUT DVD player with component video AUDIO OUT L R From satellite dish TV upper back panel From antenna Stereo VCR VIDEO AUDIO L R IN CH 3 CH 4 ... two sets of the standard video cable. Select the ColorStream HD-2 video input source on the TV to VIDEO 2 on the satellite receiver. To program the TV remote control to operate other countries, and may subject you have component video, connect a standard A/V cable to your DVD player...
Owner's Manual - English
Page 18
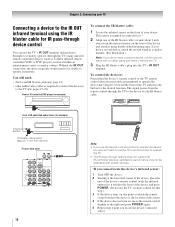
... device does not turn on some devices.* 2 Align one of the IR blaster cable's wands about 1 inch away from the remote control through the TV) many infrared remote-controlled devices (such as required to connect the device(s) to the device via the IR blaster cable. page 14) • ...other audio/video cables as Toshiba infrared remotecontrolled VCRs or DVD players) enclosed within an entertainment center or similar cabinet. pages ...
... device does not turn on some devices.* 2 Align one of the IR blaster cable's wands about 1 inch away from the remote control through the TV) many infrared remote-controlled devices (such as required to connect the device(s) to the device via the IR blaster cable. page 14) • ...other audio/video cables as Toshiba infrared remotecontrolled VCRs or DVD players) enclosed within an entertainment center or similar cabinet. pages ...
Owner's Manual - English
Page 19
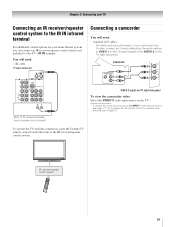
... point the Toshiba TV remote control toward the front of IR receiver/repeater control system (not included) VIDEO 2 inputs on TV right side panel To view the camcorder video: Select the VIDEO 2 video input source on the TV.* * To select the video input source, press INPUT on the TV right side ... control options for your camcorder has S-video, connect an S-video cable (plus the audio cables) to VIDEO 1 on the TV back instead of the VIDEO 2 on the remote control (- To program the TV remote control to operate other devices, see Chapter 3. IR receiver/repeater control system 19
... point the Toshiba TV remote control toward the front of IR receiver/repeater control system (not included) VIDEO 2 inputs on TV right side panel To view the camcorder video: Select the VIDEO 2 video input source on the TV.* * To select the video input source, press INPUT on the TV right side ... control options for your camcorder has S-video, connect an S-video cable (plus the audio cables) to VIDEO 1 on the TV back instead of the VIDEO 2 on the remote control (- To program the TV remote control to operate other devices, see Chapter 3. IR receiver/repeater control system 19

Owner's Manual - English
Page 20
...PCM, sampling rate 32/ 44.1/48kHz To connect an HDMI device, you use an HDMI cable with the HDMI Logo ( ). - To program the TV remote control to operate other devices, see illustration). - An HDMI-to new standard adoption. HDMI cable transfers both video and audio. Please try to -DVI...HDMI OUT To view the HDMI device video: Select the HDMI 1, HDMI 2, or HDMI 3 video input source on the TV.* * To select the video input source, press INPUT on the remote control (- For proper operation, the length of standard analog audio cables per DVI device - See "Setting the HDMI™...
...PCM, sampling rate 32/ 44.1/48kHz To connect an HDMI device, you use an HDMI cable with the HDMI Logo ( ). - To program the TV remote control to operate other devices, see illustration). - An HDMI-to new standard adoption. HDMI cable transfers both video and audio. Please try to -DVI...HDMI OUT To view the HDMI device video: Select the HDMI 1, HDMI 2, or HDMI 3 video input source on the TV.* * To select the video input source, press INPUT on the remote control (- For proper operation, the length of standard analog audio cables per DVI device - See "Setting the HDMI™...

Owner's Manual - English
Page 21
... or playback device. For details, see pages 73-74. Refer to models incorporating Toshiba's CE-Link. Chapter 2: Connecting your TV CE-Link connection You can control the basic functions of setup and operations, see ...compatibility information. 21 Before controlling the device(s): • After completing the above connections, set . However, Toshiba is limited to individual instruction manuals for those operations. page 20) Note: • If several devices ... of connected audio/video devices using the TV's remote control if you will need: • three HDMI cables (-
... or playback device. For details, see pages 73-74. Refer to models incorporating Toshiba's CE-Link. Chapter 2: Connecting your TV CE-Link connection You can control the basic functions of setup and operations, see ...compatibility information. 21 Before controlling the device(s): • After completing the above connections, set . However, Toshiba is limited to individual instruction manuals for those operations. page 20) Note: • If several devices ... of connected audio/video devices using the TV's remote control if you will need: • three HDMI cables (-

Owner's Manual - English
Page 22
... and the double-D symbol are not compatible with Dolby Digital bitstream signals. "Selecting the optical audio output format" on your TV Connecting a digital audio system The TV's DIGITAL AUDIO OUT terminal outputs a Dolby®* Digital or 2-channel down-mixed PCM (pulse-code modulation) signal for use ... Format Dolby Digital Dynamic Range Control Reset No Auto Stereo English On Dolby Digital Compressed Done To control the audio: 1 Turn on the TV's remote control and open the Audio menu. 3 Highlight Audio Setup and press T. page 66). You will need : • optical audio cable...
... and the double-D symbol are not compatible with Dolby Digital bitstream signals. "Selecting the optical audio output format" on your TV Connecting a digital audio system The TV's DIGITAL AUDIO OUT terminal outputs a Dolby®* Digital or 2-channel down-mixed PCM (pulse-code modulation) signal for use ... Format Dolby Digital Dynamic Range Control Reset No Auto Stereo English On Dolby Digital Compressed Done To control the audio: 1 Turn on the TV's remote control and open the Audio menu. 3 Highlight Audio Setup and press T. page 66). You will need : • optical audio cable...
Owner's Manual - English
Page 26
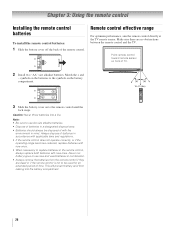
... will prevent battery acid from the remote control if they are no obstructions between the remote control and the TV. Note: • Be sure to be disposed of the remote control. Make sure there are dead or if the remote control is not to use new.... • Batteries should always be used batteries in mind. Remote control effective range For optimum performance, aim the remote control directly at the TV remote sensor. Point remote control toward remote sensor on to replace batteries in the remote control, always replace both batteries with the environment in combination....
... will prevent battery acid from the remote control if they are no obstructions between the remote control and the TV. Note: • Be sure to be disposed of the remote control. Make sure there are dead or if the remote control is not to use new.... • Batteries should always be used batteries in mind. Remote control effective range For optimum performance, aim the remote control directly at the TV remote sensor. Point remote control toward remote sensor on to replace batteries in the remote control, always replace both batteries with the environment in combination....
Owner's Manual - English
Page 27
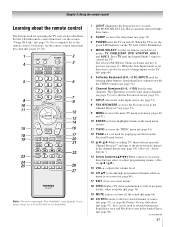
... information as well as program details, when available (- page 46). 5 Software Keyboard (0-9, -/100, INPUT) used for operating the TV only are used to edit the Favorites List (- page 53). 7 INPUT selects the video input source (- page 54). (Also see 3 C / # c.) 15 VOL + - ... system (- are described here. page 44). 17 EXIT closes on and off the sound (- page 97). When the TV is set, these keys can be illuminated. 4 MODE SELECT sets the six remote control device modes: TV, CABLE/SAT, DVD, VCR/PVR, AUX 1, and AUX 2. page 94). 6 Channel Numbers (0-9, -/100) directly ...
... information as well as program details, when available (- page 46). 5 Software Keyboard (0-9, -/100, INPUT) used for operating the TV only are used to edit the Favorites List (- page 53). 7 INPUT selects the video input source (- page 54). (Also see 3 C / # c.) 15 VOL + - ... system (- are described here. page 44). 17 EXIT closes on and off the sound (- page 97). When the TV is set, these keys can be illuminated. 4 MODE SELECT sets the six remote control device modes: TV, CABLE/SAT, DVD, VCR/PVR, AUX 1, and AUX 2. page 94). 6 Channel Numbers (0-9, -/100) directly ...
Owner's Manual - English
Page 28
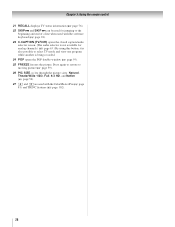
...page 81) and THINC features (- page 63.) By using this button, it is also possible to moving picture (- Press again to restore to select TV mode and view one program while another is not available for jumping to the beginning and end of a line when used with the software keyboard (- ... 59). 25 FREEZE freezes the picture. page 102). 28 page 76). 22 SKIP Z and SKIP z can be used for analog channels.) (- page 94). 23 C.CAPTION (TV/VCR) opens the closed caption/audio selector screen. (The audio selector is being recorded. 24 POP opens the POP double-window (- Chapter 3: Using the...
...page 81) and THINC features (- page 63.) By using this button, it is also possible to moving picture (- Press again to restore to select TV mode and view one program while another is not available for jumping to the beginning and end of a line when used with the software keyboard (- ... 59). 25 FREEZE freezes the picture. page 102). 28 page 76). 22 SKIP Z and SKIP z can be used for analog channels.) (- page 94). 23 C.CAPTION (TV/VCR) opens the closed caption/audio selector screen. (The audio selector is being recorded. 24 POP opens the POP double-window (- Chapter 3: Using the...
Owner's Manual - English
Page 29
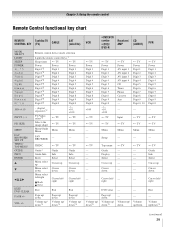
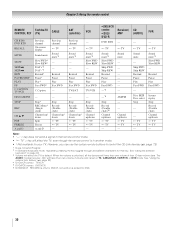
... 5 Digit 6 Digit 7 Digit 8 Digit 9 Digit 0 +100 s TV s TV --- --- Input s TV Menu s TV s TV Menu s TV s TV Menu Setup --- --- --- Top menu Guide Display Select Cursor up / down s TV --------- --- DVD clear --- --- --- VOL +/- Volume up/ down*3 Page up/ down Volume up / down *3 --- s TV --------- --- --- Volume up / down --- s TV --------- --- Chapter 3: Using the remote control Remote Control functional key chart REMOTE CONTROL KEY Toshiba TV (TV) CABLE SAT (satellite) MODE SELECT LIGHT...
... 5 Digit 6 Digit 7 Digit 8 Digit 9 Digit 0 +100 s TV s TV --- --- Input s TV Menu s TV s TV Menu s TV s TV Menu Setup --- --- --- Top menu Guide Display Select Cursor up / down s TV --------- --- DVD clear --- --- --- VOL +/- Volume up/ down*3 Page up/ down Volume up / down *3 --- s TV --------- --- --- Volume up / down --- s TV --------- --- Chapter 3: Using the remote control Remote Control functional key chart REMOTE CONTROL KEY Toshiba TV (TV) CABLE SAT (satellite) MODE SELECT LIGHT...
Owner's Manual - English
Page 30
... own volume if their own volume if volume lock is picked for DVD. 30 s TV Sound mute*3 Slow FWD Slow REW --- CD (AUDIO) PVR --- --- VCR --- s TV s TV Sound mute --- Disc SKIP Disc select Stop --- --s TV s TV --- Chapter 3: Using the remote control REMOTE CONTROL KEY Toshiba TV (TV) CABLE CH RTN/ DVD RTN RECALL MUTE SLOW SKIP z SKIP Z REW PAUSE/STEP...
... own volume if their own volume if volume lock is picked for DVD. 30 s TV Sound mute*3 Slow FWD Slow REW --- CD (AUDIO) PVR --- --- VCR --- s TV s TV Sound mute --- Disc SKIP Disc select Stop --- --s TV s TV --- Chapter 3: Using the remote control REMOTE CONTROL KEY Toshiba TV (TV) CABLE CH RTN/ DVD RTN RECALL MUTE SLOW SKIP z SKIP Z REW PAUSE/STEP...


