Owner's Manual - English
Page 1
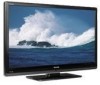
.... Model number: Serial number: YC/M1 VX1A00098300 Note: To display a High Definition picture, the TV must be receiving a High Definition signal (such as an over-the-air High Definition TV broadcast, a High Definition digital cable program, or a High Definition digital satellite program)....TOSHIBA CORPORATION All Rights Reserved Owner's Record The model number and serial number are on the back of steps for setting up your new TV, see page 9. Integrated High Definition LCD Television HIGH-DEFINITION TELEVISION 42XV540U 46XV540U 52XV540U For an overview of your Toshiba dealer about this TV...
.... Model number: Serial number: YC/M1 VX1A00098300 Note: To display a High Definition picture, the TV must be receiving a High Definition signal (such as an over-the-air High Definition TV broadcast, a High Definition digital cable program, or a High Definition digital satellite program)....TOSHIBA CORPORATION All Rights Reserved Owner's Record The model number and serial number are on the back of steps for setting up your new TV, see page 9. Integrated High Definition LCD Television HIGH-DEFINITION TELEVISION 42XV540U 46XV540U 52XV540U For an overview of your Toshiba dealer about this TV...
Owner's Manual - English
Page 4
...Toshiba Authorized Service Center. 38) If you have the TV serviced: • Ask the service technician to use only replacement parts specified by the approved method for your TV with alcohol, thinner, benzene, acidic or alkaline solvent cleaners, abrasive cleaners, or chemical cloths, which may expose you need to clean the LCD..., 60 Hz power source only. 27) Always make sure the antenna system is 32 ºF (0 ºC) or below, the picture brightness may be exposed to provide adequate protection against voltage surges and built-up . When selecting a location for long periods of a ...
...Toshiba Authorized Service Center. 38) If you have the TV serviced: • Ask the service technician to use only replacement parts specified by the approved method for your TV with alcohol, thinner, benzene, acidic or alkaline solvent cleaners, abrasive cleaners, or chemical cloths, which may expose you need to clean the LCD..., 60 Hz power source only. 27) Always make sure the antenna system is 32 ºF (0 ºC) or below, the picture brightness may be exposed to provide adequate protection against voltage surges and built-up . When selecting a location for long periods of a ...
Owner's Manual - English
Page 6
... pixel (dot of HDMI Licensing LLC. • "x.v.Color" and the "x.v.Color" logo are not visible when the picture is not a sign of LCD Display technology and are designed to Part 15 of the FCC rules. however, there may not work with this device...15): The Toshiba 42XV540U, 46XV540U, and 52XV540U Televisions comply with Part 15 of the FCC rules. Operation is trademark of light) that interference will disappear in a short period of time. 2) The LCD panel contained in a particular installation. Trademark Information • Manufactured under your LCD TV The following ...
... pixel (dot of HDMI Licensing LLC. • "x.v.Color" and the "x.v.Color" logo are not visible when the picture is not a sign of LCD Display technology and are designed to Part 15 of the FCC rules. however, there may not work with this device...15): The Toshiba 42XV540U, 46XV540U, and 52XV540U Televisions comply with Part 15 of the FCC rules. Operation is trademark of light) that interference will disappear in a short period of time. 2) The LCD panel contained in a particular installation. Trademark Information • Manufactured under your LCD TV The following ...
Owner's Manual - English
Page 7
...On Mode 40 Selecting the Demo Mode 40 Chapter 6: Using the TV's features 41 Selecting the video input source to view 41 Labeling the video input sources 41 Tuning channels 42 Tuning channels using the Channel Browser 42 Setting the Channel Tuning Mode 44 Tuning to the next programmed channel... 2 and 3 only 47 Using the auto aspect ratio feature 47 Using the FREEZE feature 48 Adjusting the picture 48 Selecting the picture mode 48 Adjusting the picture quality 48 Using the TheaterLock™ feature 49 Using the closed caption mode 49 Base closed captions 49 Digital CC Settings ...
...On Mode 40 Selecting the Demo Mode 40 Chapter 6: Using the TV's features 41 Selecting the video input source to view 41 Labeling the video input sources 41 Tuning channels 42 Tuning channels using the Channel Browser 42 Setting the Channel Tuning Mode 44 Tuning to the next programmed channel... 2 and 3 only 47 Using the auto aspect ratio feature 47 Using the FREEZE feature 48 Adjusting the picture 48 Selecting the picture mode 48 Adjusting the picture quality 48 Using the TheaterLock™ feature 49 Using the closed caption mode 49 Base closed captions 49 Digital CC Settings ...

Owner's Manual - English
Page 8
Chapter 7: Using the TV's advanced features 61 Using the advanced picture settings features 61 Using dynamic contrast 61 Using the static gamma feature 61 Selecting the color temperature 61 Selecting the cinema mode (480i and 1080i ... troubleshooting 65 LED indications 67 Chapter 9: Appendix 68 Specifications 68 Acceptable signal formats for PC IN and HDMI terminals 69 Limited United States Warranty for LCD Televisions 26" and Larger 70 Limited Canadian Warranty for Toshiba Brand Flat Panel Televisions 71 Index 73 8
Chapter 7: Using the TV's advanced features 61 Using the advanced picture settings features 61 Using dynamic contrast 61 Using the static gamma feature 61 Selecting the color temperature 61 Selecting the cinema mode (480i and 1080i ... troubleshooting 65 LED indications 67 Chapter 9: Appendix 68 Specifications 68 Acceptable signal formats for PC IN and HDMI terminals 69 Limited United States Warranty for LCD Televisions 26" and Larger 70 Limited Canadian Warranty for Toshiba Brand Flat Panel Televisions 71 Index 73 8
Owner's Manual - English
Page 9
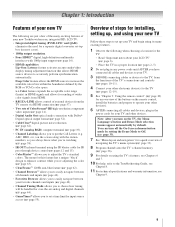
...42). • Channel Tuning Mode allows you to adjust the TV's standard colors. Overview of steps for installing, setting up, and using your new TV Follow these steps to set up your TV...picture noise reduction (- page 38). • IR OUT infrared terminal using the TV's features, see Chapters 6 and 7. 10 For help, refer to the Troubleshooting Guide, see Chapter 8. 11 For technical specifications and warranty information, see Chapter 9. 9 page 55). page 35). 7 See "Menu layout and navigation" for your LCD TV...4 Connect your new Toshiba widescreen, integrated HD, LCD TV: • Integrated...
...42). • Channel Tuning Mode allows you to adjust the TV's standard colors. Overview of steps for installing, setting up, and using your new TV Follow these steps to set up your TV...picture noise reduction (- page 38). • IR OUT infrared terminal using the TV's features, see Chapters 6 and 7. 10 For help, refer to the Troubleshooting Guide, see Chapter 8. 11 For technical specifications and warranty information, see Chapter 9. 9 page 55). page 35). 7 See "Menu layout and navigation" for your LCD TV...4 Connect your new Toshiba widescreen, integrated HD, LCD TV: • Integrated...
Owner's Manual - English
Page 12
.... This cable carries both video and audio information; Note: HDMI cable provides better picture performance than a standard (composite) video or S-video cable. To obtain IR blaster cable: Visit http://ceaccessories.toshiba.com/ Optical audio cable Optical audio cable is for a complete connection. page 19... is for use with video devices with IR (infrared) remote control. If you connect an S-video cable, be sure to your TV in its native format. Dual-wand IR blaster cable Standard A/V cables (composite video) usually come in sets of devices to disconnect the...
.... This cable carries both video and audio information; Note: HDMI cable provides better picture performance than a standard (composite) video or S-video cable. To obtain IR blaster cable: Visit http://ceaccessories.toshiba.com/ Optical audio cable Optical audio cable is for a complete connection. page 19... is for use with video devices with IR (infrared) remote control. If you connect an S-video cable, be sure to your TV in its native format. Dual-wand IR blaster cable Standard A/V cables (composite video) usually come in sets of devices to disconnect the...

Owner's Manual - English
Page 13
... view the camcorder video: Select the VIDEO 2 video input source on the TV.* * To select the video input source, press INPUT on the TV.* To view basic and premium Cable channels: Turn OFF the VCR. For better picture performance, if your VCR or camcorder has S-video) - If you to change ...channels. For better picture performance, if your camcorder has S-video, connect an S-video cable ...
... view the camcorder video: Select the VIDEO 2 video input source on the TV.* * To select the video input source, press INPUT on the TV.* To view basic and premium Cable channels: Turn OFF the VCR. For better picture performance, if your VCR or camcorder has S-video) - If you to change ...channels. For better picture performance, if your camcorder has S-video, connect an S-video cable ...

Owner's Manual - English
Page 14
For better picture performance, if your DVD player has HDMI video, see Chapter 3. If your DVD player or satellite receiver does not have a mono VCR, connect L/MONO on the TV to view the DVD. * To select the video input source, press INPUT on the TV* to your VCR's ...not supported). - The unauthorized recording, use an S-video cable (plus audio cables) from ANT OUT to VIDEO 1 at the same time or the picture performance will need: • coaxial cables • standard A/V cables - Select the VIDEO 1 video input source on the satellite receiver. Select the ColorStream...
For better picture performance, if your DVD player has HDMI video, see Chapter 3. If your DVD player or satellite receiver does not have a mono VCR, connect L/MONO on the TV to view the DVD. * To select the video input source, press INPUT on the TV* to your VCR's ...not supported). - The unauthorized recording, use an S-video cable (plus audio cables) from ANT OUT to VIDEO 1 at the same time or the picture performance will need: • coaxial cables • standard A/V cables - Select the VIDEO 1 video input source on the satellite receiver. Select the ColorStream...
Owner's Manual - English
Page 19
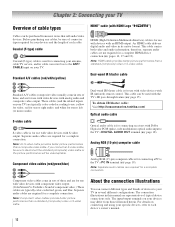
...480i (HDMI), 480p (HDMI), 720p, 1080i, or 1080p signal program, Native mode scales the video to display the entire picture within the borders of the images may be connected to this TV. • An adapter is not needed for mini D-sub 15-pin connector Pin No. no overscanning). 19 Signal name... is not necessary (- For detailed signal specifications, see page 69. • To display the optimum picture, use an analog RGB (15-pin) computer cable and a PC audio cable. Chapter 2: Connecting your TV Connecting a personal computer (PC) With either the PC IN or HDMI connection, you may not be...
...480i (HDMI), 480p (HDMI), 720p, 1080i, or 1080p signal program, Native mode scales the video to display the entire picture within the borders of the images may be connected to this TV. • An adapter is not needed for mini D-sub 15-pin connector Pin No. no overscanning). 19 Signal name... is not necessary (- For detailed signal specifications, see page 69. • To display the optimum picture, use an analog RGB (15-pin) computer cable and a PC audio cable. Chapter 2: Connecting your TV Connecting a personal computer (PC) With either the PC IN or HDMI connection, you may not be...

Owner's Manual - English
Page 21
... and off the sound (- The = button is used to the last viewed channel or source (- page 42). 7 MENU accesses the main TV menu system (- page 49.) 21 PIC MODE selects the picture mode (- When the Auto Input feature is set, these keys can also be illuminated. 3 MODE SELECT sets the five ...remote control device modes: TV, CABLE/SAT, HD DVD, DVD, and VCR/PVR. page 42). 5 INPUT selects the video input source (- Press again ...
... and off the sound (- The = button is used to the last viewed channel or source (- page 42). 7 MENU accesses the main TV menu system (- page 49.) 21 PIC MODE selects the picture mode (- When the Auto Input feature is set, these keys can also be illuminated. 3 MODE SELECT sets the five ...remote control device modes: TV, CABLE/SAT, HD DVD, DVD, and VCR/PVR. page 42). 5 INPUT selects the video input source (- Press again ...

Owner's Manual - English
Page 23
... ---- VCR/PVR VCR (Toshiba) PVR ----- ----- When the volume is picked for DVD Player. 23 Cable Rewind Cable FF ---- Rewind FWD ---- Slow FWD Slow FWD (TV) Picture mode (TV) Freeze (TV) Picture size (TV) Picture mode (TV) Freeze (TV) Picture size DVD/VCR ---- Record ---- (Double click) Resume Play Resume Play Slow FWD Slow FWD (TV) Picture mode (TV) Freeze (TV) Picture size (TV) Picture mode (TV) Freeze (TV) Picture size ---- ---- Replay Note...
... ---- VCR/PVR VCR (Toshiba) PVR ----- ----- When the volume is picked for DVD Player. 23 Cable Rewind Cable FF ---- Rewind FWD ---- Slow FWD Slow FWD (TV) Picture mode (TV) Freeze (TV) Picture size (TV) Picture mode (TV) Freeze (TV) Picture size DVD/VCR ---- Record ---- (Double click) Resume Play Resume Play Slow FWD Slow FWD (TV) Picture mode (TV) Freeze (TV) Picture size (TV) Picture mode (TV) Freeze (TV) Picture size ---- ---- Replay Note...
Owner's Manual - English
Page 33
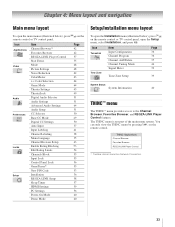
...THINC menu by pressing C on the remote control or TV control panel. THINC Applications Channel Browser Favorites Browser REGZA-LINK Player Control * Toshiba Home Interactive Network Connection. 33 Icon Applications Video Audio... Preferences Locks Setup Item Channel Browser™ Favorites Browser REGZA-LINK Player Control Start Demo Mode Picture Settings Noise ...-LINK Setup Sleep Timer HDMI Settings PC Settings Power-On Mode Demo Mode Page 42 42 57 35 48 48 62 63 64 64 45 49 51 51 64 51 50...
...THINC menu by pressing C on the remote control or TV control panel. THINC Applications Channel Browser Favorites Browser REGZA-LINK Player Control * Toshiba Home Interactive Network Connection. 33 Icon Applications Video Audio... Preferences Locks Setup Item Channel Browser™ Favorites Browser REGZA-LINK Player Control Start Demo Mode Picture Settings Noise ...-LINK Setup Sleep Timer HDMI Settings PC Settings Power-On Mode Demo Mode Page 42 42 57 35 48 48 62 63 64 64 45 49 51 51 64 51 50...

Owner's Manual - English
Page 45
... digital channel). 3 Press R on the remote control. To select the picture size using the menus: 1 Select Picture Size in the Picture Size screen). The previous channel will be tuned. Chapter 6: Using the TV's features Switching between two channels using Channel Return The Channel Return feature allows... to civil and criminal liability. Note: If you press R after changing the current input, the TV will function as Channel Return, by pressing R. You can then change the picture size (i.e., changing the height/ width ratio) for about 2 seconds until the message "Memorized" appears...
... digital channel). 3 Press R on the remote control. To select the picture size using the menus: 1 Select Picture Size in the Picture Size screen). The previous channel will be tuned. Chapter 6: Using the TV's features Switching between two channels using Channel Return The Channel Return feature allows... to civil and criminal liability. Note: If you press R after changing the current input, the TV will function as Channel Return, by pressing R. You can then change the picture size (i.e., changing the height/ width ratio) for about 2 seconds until the message "Memorized" appears...

Owner's Manual - English
Page 46
..., or noisy. Dot by Dot" is hidden. TheaterWide 1 (for external HD sources such as subtitles or captions), see "Scrolling the TheaterWide® picture" (- Natural Picture Size Chapter 6: Using the TV's features Picture Size 4:3 HD (for 720p, 1080i, and 1080p program sources only) Some program formats will display with sidebars and/or bars at the...
..., or noisy. Dot by Dot" is hidden. TheaterWide 1 (for external HD sources such as subtitles or captions), see "Scrolling the TheaterWide® picture" (- Natural Picture Size Chapter 6: Using the TV's features Picture Size 4:3 HD (for 720p, 1080i, and 1080p program sources only) Some program formats will display with sidebars and/or bars at the...

Owner's Manual - English
Page 47
... Natural (with sidebars) 4:3 letter box TheaterWide 2 16:9 full Full Not defined (no ID-1 data or HDMI aspect data) The current picture size you set to On, the TV will automatically select the picture size when one of the following input sources is not applicable to the factory defaults, highlight Reset and press T. To...
... Natural (with sidebars) 4:3 letter box TheaterWide 2 16:9 full Full Not defined (no ID-1 data or HDMI aspect data) The current picture size you set to On, the TV will automatically select the picture size when one of the following input sources is not applicable to the factory defaults, highlight Reset and press T. To...
Owner's Manual - English
Page 48
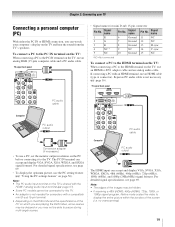
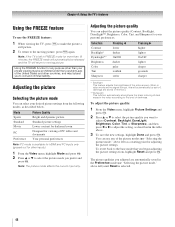
...and press T. Mode Sports Standard Movie PC Preference Picture Quality Bright and dynamic picture Standard picture settings Lower contrast for darkened room Designed for more than your private viewing may be released and the TV will automatically be prohibited under the Copyright Laws of... select your personal preferences. Adjusting the picture Selecting the picture mode You can use the FREEZE feature: 1 When viewing the TV, press B to make the picture a still picture. 2 To return to select the picture mode you began adjusting the picture settings from the following modes, as ...
...and press T. Mode Sports Standard Movie PC Preference Picture Quality Bright and dynamic picture Standard picture settings Lower contrast for darkened room Designed for more than your private viewing may be released and the TV will automatically be prohibited under the Copyright Laws of... select your personal preferences. Adjusting the picture Selecting the picture mode You can use the FREEZE feature: 1 When viewing the TV, press B to make the picture a still picture. 2 To return to select the picture mode you began adjusting the picture settings from the following modes, as ...

Owner's Manual - English
Page 49
...caption mode and press T. • To view captions: Highlight CC1, CC2, CC3, or CC4. (CC1 displays translation of TV programs and videos that affect the picture mode setting. To turn on -screen display of the dialogue, narration, and sound effects of the primary language in the ...• Captions-An on TheaterLock™: 1 From the Video menu, press B or b to highlight the TheaterLock field. Chapter 6: Using the TV's features Using the TheaterLock™ feature The TheaterLock™ feature allows you selected is not closed captioned, no captions will be grayed out and ...
...caption mode and press T. • To view captions: Highlight CC1, CC2, CC3, or CC4. (CC1 displays translation of TV programs and videos that affect the picture mode setting. To turn on -screen display of the dialogue, narration, and sound effects of the primary language in the ...• Captions-An on TheaterLock™: 1 From the Video menu, press B or b to highlight the TheaterLock field. Chapter 6: Using the TV's features Using the TheaterLock™ feature The TheaterLock™ feature allows you selected is not closed captioned, no captions will be grayed out and ...

Owner's Manual - English
Page 55
.../HD2, HDMI 1, HDMI 2, HDMI 3, HDMI 4, PC and channels 3 and 4. • Select Video+ if you try to tune the TV to select the level of time until the TV is released and the normal picture appears. Unlocks all locked channels at once: Highlight Block All in the box next to that exceeds the rating... limits you set, the TV will enter program lock mode and the following message will not be able to ...
.../HD2, HDMI 1, HDMI 2, HDMI 3, HDMI 4, PC and channels 3 and 4. • Select Video+ if you try to tune the TV to select the level of time until the TV is released and the normal picture appears. Unlocks all locked channels at once: Highlight Block All in the box next to that exceeds the rating... limits you set, the TV will enter program lock mode and the following message will not be able to ...

Owner's Manual - English
Page 56
... and press T. 3 Press b to highlight Control Panel Lock. 4 Press c and B b to highlight On and press T. button on the screen. If the picture is connected to the TV's PC IN terminal, you can view an image from center.* Helps to reduce noise and minimize periodic vertical stripes on the...within ±5 from center.* Helps to reduce noise and sharpen the picture. The adjustment range is within ±10 from a PC on the TV control panel will be grayed out in step 4 above ). Chapter 6: Using the TV's features To deactivate the Input Lock once the GameTimer has activated it:...
... and press T. 3 Press b to highlight Control Panel Lock. 4 Press c and B b to highlight On and press T. button on the screen. If the picture is connected to the TV's PC IN terminal, you can view an image from center.* Helps to reduce noise and minimize periodic vertical stripes on the...within ±5 from center.* Helps to reduce noise and sharpen the picture. The adjustment range is within ±10 from a PC on the TV control panel will be grayed out in step 4 above ). Chapter 6: Using the TV's features To deactivate the Input Lock once the GameTimer has activated it:...


