Owner's Manual - English
Page 2
... weight of this Toshiba LCD TV. REFER SERVICING TO QUALIFIED SERVICE PERSONNEL. WARNING To prevent injury, this product. • Don't allow children to Article 820-40 of two people are required for installation. The use a UL Listed wall bracket appropriate for the size and weight of this television for wall mounting this manual completely, and keep these safety tips in accordance with furniture and television sets. • Don't place flat panel displays...
... weight of this Toshiba LCD TV. REFER SERVICING TO QUALIFIED SERVICE PERSONNEL. WARNING To prevent injury, this product. • Don't allow children to Article 820-40 of two people are required for installation. The use a UL Listed wall bracket appropriate for the size and weight of this television for wall mounting this manual completely, and keep these safety tips in accordance with furniture and television sets. • Don't place flat panel displays...

Owner's Manual - English
Page 3
... this equipment under the rules of plug to operate this product at least 4 (four) inches around the TV. (continued) 3 fully insert. 16) WARNING: To prevent the spread of fire, keep candles or other outlet unless the blades can support the weight of at all times. Sturdy strap (as short as power-supply cord or plug is used, use caution when moving the cart...
... this equipment under the rules of plug to operate this product at least 4 (four) inches around the TV. (continued) 3 fully insert. 16) WARNING: To prevent the spread of fire, keep candles or other outlet unless the blades can support the weight of at all times. Sturdy strap (as short as power-supply cord or plug is used, use caution when moving the cart...
Owner's Manual - English
Page 4
... the power cord and disconnect the antenna from the TV if you are in the LCD panel contains a small amount of mercury. When selecting a location for the television, avoid locations where the screen may damage the surface. When the TV reaches the end of its useful life, dispose of the used TV by ultraviolet radiation from the sun. Care For better performance and safer operation...
... the power cord and disconnect the antenna from the TV if you are in the LCD panel contains a small amount of mercury. When selecting a location for the television, avoid locations where the screen may damage the surface. When the TV reaches the end of its useful life, dispose of the used TV by ultraviolet radiation from the sun. Care For better performance and safer operation...
Owner's Manual - English
Page 5
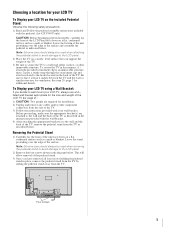
... your LCD TV using a Wall Bracket: If you have removed all four screws holding the pedestal stand in place, remove the pedestal stand from the TV by sliding the pedestal stand away from the TV. Choosing a location for your LCD TV To Display your LCD TV on the included Pedestal Stand: Observe the following safety precautions: 1) Read and Follow the pedestal assembly instructions included with the pedestal. (for installation. 2) Unplug and remove any cables and...
... your LCD TV using a Wall Bracket: If you have removed all four screws holding the pedestal stand in place, remove the pedestal stand from the TV by sliding the pedestal stand away from the TV. Choosing a location for your LCD TV To Display your LCD TV on the included Pedestal Stand: Observe the following safety precautions: 1) Read and Follow the pedestal assembly instructions included with the pedestal. (for installation. 2) Unplug and remove any cables and...
Owner's Manual - English
Page 7
... volume lock feature (8000 25 Operational feature reset (8900 25 Multi-brand remote control device codes 26 Chapter 4: Menu layout and navigation 33 Main menu layout 33 Setup/Installation menu layout 33 THINC™ menu 33 Navigating the menu system 34 Chapter 5: Setting up your TV 35 Setting the Demo Mode 35 Selecting the menu language 35 Configuring the input source for the ANT/CABLE terminal 36 Programming channels into the TV's channel memory . . . . 36 Programming channels automatically 36 Manually...
... volume lock feature (8000 25 Operational feature reset (8900 25 Multi-brand remote control device codes 26 Chapter 4: Menu layout and navigation 33 Main menu layout 33 Setup/Installation menu layout 33 THINC™ menu 33 Navigating the menu system 34 Chapter 5: Setting up your TV 35 Setting the Demo Mode 35 Selecting the menu language 35 Configuring the input source for the ANT/CABLE terminal 36 Programming channels into the TV's channel memory . . . . 36 Programming channels automatically 36 Manually...
Owner's Manual - English
Page 9
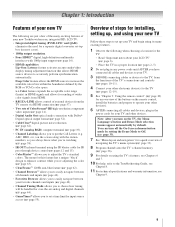
... connected all channels and inputs (- page 20) for an overview of the buttons on the screen along with Dolby® Digital optical output format (- page 33). 8 Program channels into the TV's channel memory (- page 57). • Two sets of navigating the TV's menu system (- Overview of steps for installing, setting up your TV and begin using your other devices. You can turn on using the IR blaster cable for IR pass-through device control...
... connected all channels and inputs (- page 20) for an overview of the buttons on the screen along with Dolby® Digital optical output format (- page 33). 8 Program channels into the TV's channel memory (- page 57). • Two sets of navigating the TV's menu system (- Overview of steps for installing, setting up your TV and begin using your other devices. You can turn on using the IR blaster cable for IR pass-through device control...
Owner's Manual - English
Page 10
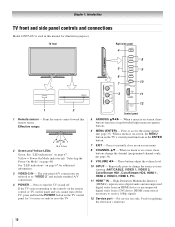
... panel A/V connections are viewing (ANT/CABLE, VIDEO 1, VIDEO 2, ColorStream HD1, ColorStream HD2, HDMI 1, HDMI 2, HDMI 3, HDMI 4, PC). 11 HDMI™ IN - Press to as the ENTER button. 7 EXIT - Press to change the channel (programmed channels only; - page 36). 9 VOLUME C c - These buttons adjust the volume level. 10 INPUT - When a menu is on-screen, the MENU button on -screen menu. 8 CHANNEL Bb - When no menu is necessary to reset the TV. 12 Control panel 5 ARROWS BbC c - For service use only. Effective range: 16.4 ft (5m) 2 Green and Yellow LEDs Green...
... panel A/V connections are viewing (ANT/CABLE, VIDEO 1, VIDEO 2, ColorStream HD1, ColorStream HD2, HDMI 1, HDMI 2, HDMI 3, HDMI 4, PC). 11 HDMI™ IN - Press to as the ENTER button. 7 EXIT - Press to change the channel (programmed channels only; - page 36). 9 VOLUME C c - These buttons adjust the volume level. 10 INPUT - When a menu is on-screen, the MENU button on -screen menu. 8 CHANNEL Bb - When no menu is necessary to reset the TV. 12 Control panel 5 ARROWS BbC c - For service use only. Effective range: 16.4 ft (5m) 2 Green and Yellow LEDs Green...

Owner's Manual - English
Page 11
.... Optical audio output in the Audio Setup menu (- separate audio cables are required for a complete connection. 7 FIXED AUDIO OUT - page 12), and then control the devices using the TV's IR pass-through the TV. For use can connect up to receive 1080p signals. 3 PC IN - Two sets of cable types and connections, see pages 12-19. 1 TV back 2 3 4 Power cord Cable Strap 5 67 8 1 DIGITAL AUDIO OUT - Standard (composite) video and standard audio inputs plus optional S-video inputs for connecting devices with HDMI 1 analog audio input terminal, and its use when connecting...
.... Optical audio output in the Audio Setup menu (- separate audio cables are required for a complete connection. 7 FIXED AUDIO OUT - page 12), and then control the devices using the TV's IR pass-through the TV. For use can connect up to receive 1080p signals. 3 PC IN - Two sets of cable types and connections, see pages 12-19. 1 TV back 2 3 4 Power cord Cable Strap 5 67 8 1 DIGITAL AUDIO OUT - Standard (composite) video and standard audio inputs plus optional S-video inputs for connecting devices with HDMI 1 analog audio input terminal, and its use when connecting...
Owner's Manual - English
Page 12
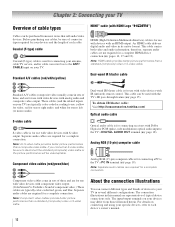
... this manual are required for connecting receivers with analog audio and composite video output. For details on connecting and using your specific devices, refer to the ANT/ CABLE input on your TV. Coaxial (F-type) cable Coaxial (F-type) cable is for a complete connection. Note: HDMI cable provides better picture performance than a composite video cable. page 15). Component video cables come in sets of three, and are typically color-coded according to use with video devices with IR (infrared) remote control. S-video cable S-video cable is Toshiba's brand of component video...
... this manual are required for connecting receivers with analog audio and composite video output. For details on connecting and using your specific devices, refer to the ANT/ CABLE input on your TV. Coaxial (F-type) cable Coaxial (F-type) cable is for a complete connection. Note: HDMI cable provides better picture performance than a composite video cable. page 15). Component video cables come in sets of three, and are typically color-coded according to use with video devices with IR (infrared) remote control. S-video cable S-video cable is Toshiba's brand of component video...

Owner's Manual - English
Page 13
... the VIDEO 1 video input source on the TV.* To view the camcorder video: Select the VIDEO 2 video input source on the TV.* * To select the video input source, press INPUT on the TV.* To view basic and premium Cable channels: Turn OFF the VCR. To program the TV remote control to change channels. The unauthorized recording, use a Cable box, you to program or access certain features on the TV. Do not connect both types of the United States and other devices, see Chapter 3. Use the Cable box controls to operate...
... the VIDEO 1 video input source on the TV.* To view the camcorder video: Select the VIDEO 2 video input source on the TV.* * To select the video input source, press INPUT on the TV.* To view basic and premium Cable channels: Turn OFF the VCR. To program the TV remote control to change channels. The unauthorized recording, use a Cable box, you to program or access certain features on the TV. Do not connect both types of the United States and other devices, see Chapter 3. Use the Cable box controls to operate...
Owner's Manual - English
Page 19
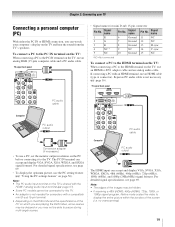
... the TV, use a PC, set the monitor output resolution on the TV and hear the sound from the TV's speakers. Chapter 2: Connecting your computer's display on the PC before connecting it to display the entire picture within the borders of the PC on page 56). Computer PC audio output The HDMI input can accept and display VGA, SVGA, XGA, WXGA, and SXGA signal formats. TV upper back panel • Signal names for computers with a compatible mini...
... the TV, use a PC, set the monitor output resolution on the TV and hear the sound from the TV's speakers. Chapter 2: Connecting your computer's display on the PC before connecting it to display the entire picture within the borders of the PC on page 56). Computer PC audio output The HDMI input can accept and display VGA, SVGA, XGA, WXGA, and SXGA signal formats. TV upper back panel • Signal names for computers with a compatible mini...
Owner's Manual - English
Page 22
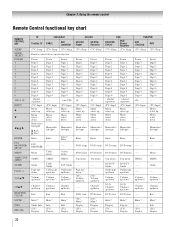
...----- Volume up/down*1 Channel up Menu select down Guide ---- Menu Cable menu Action, menu DVD menu DVD menu DVD menu DVD menu ----- Chapter 3: Using the remote control Remote Control functional key chart REMOTE CONTROL KEY SLEEP MODE SELECT POWER 1 2 3 4 5 6 7 8 9 0 100/-/+10 INPUT B b C3 #c ENTER FAV BROWSER/ SETUP MENU THINC/TOP MENU GUIDE PAGE +/- VOLB/b CHB/b EXIT/DVD CLEAR MUTE INFO RECALL TV Toshiba TV (TV) Sleep CABLE/SAT CABLE SAT (satellite) (TV) Sleep (TV) Sleep HD DVD HD DVD Player HD DVD Recorder (TV) Sleep (TV) Sleep DVD DVD/VCR (Orion) DVD Player...
...----- Volume up/down*1 Channel up Menu select down Guide ---- Menu Cable menu Action, menu DVD menu DVD menu DVD menu DVD menu ----- Chapter 3: Using the remote control Remote Control functional key chart REMOTE CONTROL KEY SLEEP MODE SELECT POWER 1 2 3 4 5 6 7 8 9 0 100/-/+10 INPUT B b C3 #c ENTER FAV BROWSER/ SETUP MENU THINC/TOP MENU GUIDE PAGE +/- VOLB/b CHB/b EXIT/DVD CLEAR MUTE INFO RECALL TV Toshiba TV (TV) Sleep CABLE/SAT CABLE SAT (satellite) (TV) Sleep (TV) Sleep HD DVD HD DVD Player HD DVD Recorder (TV) Sleep (TV) Sleep DVD DVD/VCR (Orion) DVD Player...
Owner's Manual - English
Page 33
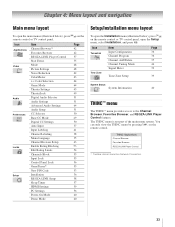
...; Favorites Browser REGZA-LINK Player Control Start Demo Mode Picture Settings Noise Reduction ColorMaster x.v.Color Selection Game Mode Theater Settings TheaterLock Digital Audio Selector Audio Settings Advanced Audio Settings Audio Setup CC Selector Base CC Mode Digital CC Settings Auto Input Input Labeling Channel Labeling Menu Language Channel Browser Setup Enable Rating Blocking Edit Rating Limits Channels Block Input Lock Control Panel Lock GameTimer® New PIN Code Installation REGZA-LINK Setup Sleep Timer HDMI Settings PC Settings Power-On Mode Demo Mode Page 42 42 57 35 48 48 62...
...; Favorites Browser REGZA-LINK Player Control Start Demo Mode Picture Settings Noise Reduction ColorMaster x.v.Color Selection Game Mode Theater Settings TheaterLock Digital Audio Selector Audio Settings Advanced Audio Settings Audio Setup CC Selector Base CC Mode Digital CC Settings Auto Input Input Labeling Channel Labeling Menu Language Channel Browser Setup Enable Rating Blocking Edit Rating Limits Channels Block Input Lock Control Panel Lock GameTimer® New PIN Code Installation REGZA-LINK Setup Sleep Timer HDMI Settings PC Settings Power-On Mode Demo Mode Page 42 42 57 35 48 48 62...

Owner's Manual - English
Page 36
... Setup menu. 2 Highlight Installation and press T. A new set of Installation menu icons will appear, as shown below to program channels into the TV's channel memory. Programming channels into the TV's memory.) To remove an Antenna source channel from the memory, you must use the Channel Number buttons on the remote control or TV control panel, your original settings, highlight Cancel and press T. After the channels are programmed automatically, you press < or , on the remote control. • Programming channels when the ANT/CABLE input is set to Antenna...
... Setup menu. 2 Highlight Installation and press T. A new set of Installation menu icons will appear, as shown below to program channels into the TV's channel memory. Programming channels into the TV's memory.) To remove an Antenna source channel from the memory, you must use the Channel Number buttons on the remote control or TV control panel, your original settings, highlight Cancel and press T. After the channels are programmed automatically, you press < or , on the remote control. • Programming channels when the ANT/CABLE input is set to Antenna...
Owner's Manual - English
Page 39
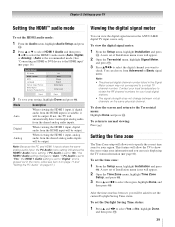
... be output. After the time zone has been set of Installation menu icons will allow the TV to a virtual TV channel number. Audio Setup PC Audio HDMI 1 Audio MTS Language Optical Output Format Dolby Digital Dynamic Range Control No Auto Stereo English Dolby Digital Compressed Reset Done 3 To save your local digital stations. • The signal strength does not change between virtual channels on page 57.) Viewing the digital signal meter You can choose from the shared analog audio inputs will be output...
... be output. After the time zone has been set of Installation menu icons will allow the TV to a virtual TV channel number. Audio Setup PC Audio HDMI 1 Audio MTS Language Optical Output Format Dolby Digital Dynamic Range Control No Auto Stereo English Dolby Digital Compressed Reset Done 3 To save your local digital stations. • The signal strength does not change between virtual channels on page 57.) Viewing the digital signal meter You can choose from the shared analog audio inputs will be output...
Owner's Manual - English
Page 65
...;, HDMI 1, HDMI 2, HDMI 3, HDMI 4, PC or from channels 3 or 4, make sure the Input Lock is set to reset the TV. Chapter 8: Troubleshooting General troubleshooting Before calling a service technician, please check this phenomenon: - Picture problems General picture problems • Check the antenna/cable connections (- If no color • The station may be on the remote control or TV and select a valid video input source (- page 48). • If you are not receiving a second audio program from standby • When you cannot view signals from external...
...;, HDMI 1, HDMI 2, HDMI 3, HDMI 4, PC or from channels 3 or 4, make sure the Input Lock is set to reset the TV. Chapter 8: Troubleshooting General troubleshooting Before calling a service technician, please check this phenomenon: - Picture problems General picture problems • Check the antenna/cable connections (- If no color • The station may be on the remote control or TV and select a valid video input source (- page 48). • If you are not receiving a second audio program from standby • When you cannot view signals from external...
Owner's Manual - English
Page 70
... this LCD Television and connected equipment; DURING THIS PERIOD, TACP WILL, AT TACP'S OPTION, REPAIR OR REPLACE A DEFECTIVE PART WITH A NEW OR REFURBISHED PART WITHOUT CHARGE TO YOU. Reception problems caused by inadequate antenna systems, misaligned satellite dishes, cable 70 television distribution, VCRs, DVD players/recorders, personal computer level IEEE-1394 devices, and any other connected signal source device are effective only if this LCD Television is needed: (1) To...
... this LCD Television and connected equipment; DURING THIS PERIOD, TACP WILL, AT TACP'S OPTION, REPAIR OR REPLACE A DEFECTIVE PART WITH A NEW OR REFURBISHED PART WITHOUT CHARGE TO YOU. Reception problems caused by inadequate antenna systems, misaligned satellite dishes, cable 70 television distribution, VCRs, DVD players/recorders, personal computer level IEEE-1394 devices, and any other connected signal source device are effective only if this LCD Television is needed: (1) To...
Owner's Manual - English
Page 71
... follow the specifications, User manuals or guides as new and unopened from TCL or from TCL are used for Commercial Units TCL warrants Televisions that result in your responsibility. (5) Warranties extend only to material defects in materials or workmanship as set installation, setup, adjustment of customer controls, and installation or repair of shipment to you . Depending on Parts and Labour Subject to you . Replacement of missing...
... follow the specifications, User manuals or guides as new and unopened from TCL or from TCL are used for Commercial Units TCL warrants Televisions that result in your responsibility. (5) Warranties extend only to material defects in materials or workmanship as set installation, setup, adjustment of customer controls, and installation or repair of shipment to you . Depending on Parts and Labour Subject to you . Replacement of missing...
Owner's Manual - English
Page 72
... of this software are collectively referred to as agreed to persons or loss of TCL. YOU MUST READ AND FOLLOW ALL SET-UP AND USAGE INSTRUCTIONS IN THE APPLICABLE USER GUIDES AND/OR MANUALS. THIS WARRANTY WILL NOT COVER ANY SERVICE THAT IS REQUIRED, IN PART OR IN ...toshiba.ca, or call toll free 1-800-268-3404 (2) Present your bill of the courts). There will be conducted in the forum and in this manual and checking the "Troubleshooting" section, you , without the prior written consent of life or catastrophic property damage. This software is not designed for breach of warranty...
... of this software are collectively referred to as agreed to persons or loss of TCL. YOU MUST READ AND FOLLOW ALL SET-UP AND USAGE INSTRUCTIONS IN THE APPLICABLE USER GUIDES AND/OR MANUALS. THIS WARRANTY WILL NOT COVER ANY SERVICE THAT IS REQUIRED, IN PART OR IN ...toshiba.ca, or call toll free 1-800-268-3404 (2) Present your bill of the courts). There will be conducted in the forum and in this manual and checking the "Troubleshooting" section, you , without the prior written consent of life or catastrophic property damage. This software is not designed for breach of warranty...

Owner's Manual - English
Page 73
... feature 51 MUTE button 50 O Optical audio output format 52 P PC Audio 57 PC connection 19 PC settings 56 Picture mode 48 Picture quality 48 Picture scroll 47 Picture size selection 45 POWER button 10, 21 Power-On Mode 40 R RECALL button 60 REGZA-LINK connection 17 REGZA-LINK feature 57 Remote control Battery installation 20 Learning about the buttons .......21 Operational feature 25 Volume lock feature 25 Reset Factory Defaults 40 S SAP sound 51 Satellite receiver connection 14 Scroll settings 47 Sleep timer 57 StableSound 52...
... feature 51 MUTE button 50 O Optical audio output format 52 P PC Audio 57 PC connection 19 PC settings 56 Picture mode 48 Picture quality 48 Picture scroll 47 Picture size selection 45 POWER button 10, 21 Power-On Mode 40 R RECALL button 60 REGZA-LINK connection 17 REGZA-LINK feature 57 Remote control Battery installation 20 Learning about the buttons .......21 Operational feature 25 Volume lock feature 25 Reset Factory Defaults 40 S SAP sound 51 Satellite receiver connection 14 Scroll settings 47 Sleep timer 57 StableSound 52...


