
Owner's Manual - English
Page 3
The LCD panel inside the TV contains glass and a toxic liquid. Changes or modifications may fall, causing serious personal injury, death, or serious damage to the TV. 19) To avoid damage to this equipment under the rules of the Federal Communications Commission. 18) DANGER: RISK OF SERIOUS ...times. Additional Safety Precautions 14a) CAUTION: If the TV is dropped and the cabinet or enclosure surface has been damaged or the TV does not operate normally, take the following precautions: • ALWAYS turn off the TV and unplug the power cord to avoid possible electric shock or fire. ...
The LCD panel inside the TV contains glass and a toxic liquid. Changes or modifications may fall, causing serious personal injury, death, or serious damage to the TV. 19) To avoid damage to this equipment under the rules of the Federal Communications Commission. 18) DANGER: RISK OF SERIOUS ...times. Additional Safety Precautions 14a) CAUTION: If the TV is dropped and the cabinet or enclosure surface has been damaged or the TV does not operate normally, take the following precautions: • ALWAYS turn off the TV and unplug the power cord to avoid possible electric shock or fire. ...
Owner's Manual - English
Page 4
... the luster finishing portion of your TV with a sharp or heavy object. 36) • The LCD screen of this product can accidentally touch overhead power lines. If these recommendations and precautions: 29) If you use , the TV may be exposed to service the TV yourself. Never strike the screen with...the surface. Care For better performance and safer operation of your body (or any item you are never in a position where your TOSHIBA TV, follow this product contain mercury. Never spray volatile compounds such as insecticide on or off. Never spill liquids or push objects of any...
... the luster finishing portion of your TV with a sharp or heavy object. 36) • The LCD screen of this product can accidentally touch overhead power lines. If these recommendations and precautions: 29) If you use , the TV may be exposed to service the TV yourself. Never strike the screen with...the surface. Care For better performance and safer operation of your body (or any item you are never in a position where your TOSHIBA TV, follow this product contain mercury. Never spray volatile compounds such as insecticide on or off. Never spill liquids or push objects of any...
Owner's Manual - English
Page 6
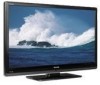
...of Conformity Compliance Statement (Part 15): The Toshiba 42XV540U, 46XV540U, and 52XV540U Televisions comply with ...occur in this equipment. therefore, Toshiba is no guarantee that does not operate properly (does not light, remains constantly lit, etc.). Trademark Information • Manufactured under your LCD TV The following measures: •... of time. 2) The LCD panel contained in a particular installation. If this TV. The party responsible for a Class B digital device, pursuant to correct the interference by removing and applying power to radio communications. Wayne...
...of Conformity Compliance Statement (Part 15): The Toshiba 42XV540U, 46XV540U, and 52XV540U Televisions comply with ...occur in this equipment. therefore, Toshiba is no guarantee that does not operate properly (does not light, remains constantly lit, etc.). Trademark Information • Manufactured under your LCD TV The following measures: •... of time. 2) The LCD panel contained in a particular installation. If this TV. The party responsible for a Class B digital device, pursuant to correct the interference by removing and applying power to radio communications. Wayne...
Owner's Manual - English
Page 7
...39 Viewing the digital signal meter 39 Setting the time zone 39 Viewing the system status 40 Selecting the Power-On Mode 40 Selecting the Demo Mode 40 Chapter 6: Using the TV's features 41 Selecting the video input source to view 41 Labeling the video input sources 41 Tuning channels... 42 Tuning channels using the Channel Browser 42 Setting the Channel Tuning Mode 44 Tuning to the next programmed channel 44 ...
...39 Viewing the digital signal meter 39 Setting the time zone 39 Viewing the system status 40 Selecting the Power-On Mode 40 Selecting the Demo Mode 40 Chapter 6: Using the TV's features 41 Selecting the video input source to view 41 Labeling the video input sources 41 Tuning channels... 42 Tuning channels using the Channel Browser 42 Setting the Channel Tuning Mode 44 Tuning to the next programmed channel 44 ...
Owner's Manual - English
Page 9
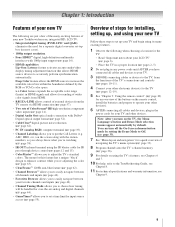
... perform synchronization automatically. page 42). • Favorites Browser allows you have connected all cables and devices, plug in HDMI signals and allows for the TV: • Read "Important notes about your LCD TV" (- page 55). pages 2-5) 2 Do not plug in any power cords until AFTER you to...begin using its many exciting features. 1 Observe the following are just a few of the many exciting features of your new Toshiba widescreen, integrated HD, LCD TV: • Integrated digital tuning (8VSB ATSC and QAM) eliminates the need for over-the-air analog and digital channels (- ...
... perform synchronization automatically. page 42). • Favorites Browser allows you have connected all cables and devices, plug in HDMI signals and allows for the TV: • Read "Important notes about your LCD TV" (- page 55). pages 2-5) 2 Do not plug in any power cords until AFTER you to...begin using its many exciting features. 1 Observe the following are just a few of the many exciting features of your new Toshiba widescreen, integrated HD, LCD TV: • Integrated digital tuning (8VSB ATSC and QAM) eliminates the need for over-the-air analog and digital channels (- ...
Owner's Manual - English
Page 10
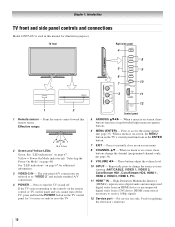
...connection is necessary to access the menu system (- Yellow = Power-On Mode indicator (- Press to receive 1080p signals. 12 Service port - If the TV stops responding to the controls on the remote control or TV control panel and you are referred to change the channel (... manual for updating the television's firmware. 10 These buttons adjust the volume level. 10 INPUT - TV front Right side panel 4 8 5 9 6 7 10 3 11 1 2 1 Remote sensor - Chapter 1: Introduction TV front and side panel controls and connections Model 42XV540U is used in this remote sensor.
...connection is necessary to access the menu system (- Yellow = Power-On Mode indicator (- Press to receive 1080p signals. 12 Service port - If the TV stops responding to the controls on the remote control or TV control panel and you are referred to change the channel (... manual for updating the television's firmware. 10 These buttons adjust the volume level. 10 INPUT - TV front Right side panel 4 8 5 9 6 7 10 3 11 1 2 1 Remote sensor - Chapter 1: Introduction TV front and side panel controls and connections Model 42XV540U is used in this remote sensor.

Owner's Manual - English
Page 11
... Digital or PCM (pulse-code modulation) format for connecting devices with component video output, such as a Toshiba DVD player with optical audio input. 2 HDMI™ IN - RF input that supports analog (NTSC)... audio inputs plus optional S-video inputs for a complete connection. 9 6 VIDEO 1 IN - Chapter 1: Introduction TV back panel connections For an explanation of ColorStream® high-definition component video inputs (with standard stereo audio inputs)... types and connections, see pages 12-19. 1 TV back 2 3 4 Power cord Cable Strap 5 67 8 1 DIGITAL AUDIO OUT -
... Digital or PCM (pulse-code modulation) format for connecting devices with component video output, such as a Toshiba DVD player with optical audio input. 2 HDMI™ IN - RF input that supports analog (NTSC)... audio inputs plus optional S-video inputs for a complete connection. 9 6 VIDEO 1 IN - Chapter 1: Introduction TV back panel connections For an explanation of ColorStream® high-definition component video inputs (with standard stereo audio inputs)... types and connections, see pages 12-19. 1 TV back 2 3 4 Power cord Cable Strap 5 67 8 1 DIGITAL AUDIO OUT -
Owner's Manual - English
Page 15
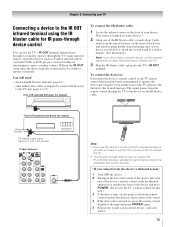
... step.) 3 If the device turns on, the point at the lower left corner of the device, place the end of the device and press POWER. (Do not use the TV's remote control to operate the device; - To control the device(s): Point either the device's remote control or the... it touches the front of the device's remote control (with a rubber band and leave it remotely. page 12) • other audio/video cables as Toshiba infrared remotecontrolled VCRs or DVD players) enclosed within an entertainment center or similar cabinet. satisfactory performance may not be visible to the IR OUT infrared...
... step.) 3 If the device turns on, the point at the lower left corner of the device, place the end of the device and press POWER. (Do not use the TV's remote control to operate the device; - To control the device(s): Point either the device's remote control or the... it touches the front of the device's remote control (with a rubber band and leave it remotely. page 12) • other audio/video cables as Toshiba infrared remotecontrolled VCRs or DVD players) enclosed within an entertainment center or similar cabinet. satisfactory performance may not be visible to the IR OUT infrared...

Owner's Manual - English
Page 21
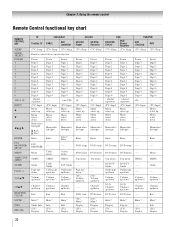
... or source (- page 42). 5 INPUT selects the video input source (- page 33). 10 PAGE + / - page 60). 17 MUTE reduces or turns off . page 36). 15 EXIT closes on and off the sound (- page 50). 18 CH RTN returns to control the TV. page 57). 2 POWER turns the TV on -screen menus. ...16 INFO displays TV status information as well as program details, when available (- When the Auto Input feature is used for a function that ...
... or source (- page 42). 5 INPUT selects the video input source (- page 33). 10 PAGE + / - page 60). 17 MUTE reduces or turns off . page 36). 15 EXIT closes on and off the sound (- page 50). 18 CH RTN returns to control the TV. page 57). 2 POWER turns the TV on -screen menus. ...16 INFO displays TV status information as well as program details, when available (- When the Auto Input feature is used for a function that ...
Owner's Manual - English
Page 22
.../b EXIT/DVD CLEAR MUTE INFO RECALL TV Toshiba TV (TV) Sleep CABLE/SAT CABLE SAT (satellite) (TV) Sleep (TV) Sleep HD DVD HD DVD Player HD DVD Recorder (TV) Sleep (TV) Sleep DVD DVD/VCR (Orion) DVD Player/ Recorder (TV) Sleep (TV) Sleep VCR/PVR VCR (Toshiba) PVR (TV) Sleep (TV) Sleep Remote control device mode selection Power Digit 1 Digit 2 Digit 3 Digit 4 Digit 5 Digit...
.../b EXIT/DVD CLEAR MUTE INFO RECALL TV Toshiba TV (TV) Sleep CABLE/SAT CABLE SAT (satellite) (TV) Sleep (TV) Sleep HD DVD HD DVD Player HD DVD Recorder (TV) Sleep (TV) Sleep DVD DVD/VCR (Orion) DVD Player/ Recorder (TV) Sleep (TV) Sleep VCR/PVR VCR (Toshiba) PVR (TV) Sleep (TV) Sleep Remote control device mode selection Power Digit 1 Digit 2 Digit 3 Digit 4 Digit 5 Digit...
Owner's Manual - English
Page 33
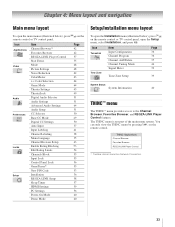
...Toshiba Home Interactive Network Connection. 33 The THINC menu is not part of the main menu system. Chapter 4: Menu layout and navigation Main menu layout To open the main menus (illustrated below ), press Y on the remote control or TV... PIN Code Installation REGZA-LINK Setup Sleep Timer HDMI Settings PC Settings Power-On Mode Demo Mode Page 42 42 57 35 48 48 62 63 64 64 45 49 51 51 64...press T. You can only view the THINC menu by pressing C on the remote control or TV control panel. Icon Terrestrial Item Input Configuration Channel Program Channel Add/Delete Channel Tuning Mode Signal...
...Toshiba Home Interactive Network Connection. 33 The THINC menu is not part of the main menu system. Chapter 4: Menu layout and navigation Main menu layout To open the main menus (illustrated below ), press Y on the remote control or TV... PIN Code Installation REGZA-LINK Setup Sleep Timer HDMI Settings PC Settings Power-On Mode Demo Mode Page 42 42 57 35 48 48 62 63 64 64 45 49 51 51 64...press T. You can only view the THINC menu by pressing C on the remote control or TV control panel. Icon Terrestrial Item Input Configuration Channel Program Channel Add/Delete Channel Tuning Mode Signal...

Owner's Manual - English
Page 36
...of Installation menu icons will appear. 36 Setup Installation REGZA-LINK Setup Sleep Timer HDMI Settings PC Settings Power-On Mode Demo Mode Power-Saving Off 3 Open the Terrestrial menu, highlight Input Configuration, and press T. After the channels are programmed... automatically, you have to program channels into the TV's channel memory. A new set of Installation menu icons will appear, as shown below to repeat the programming process again unless your TV...
...of Installation menu icons will appear. 36 Setup Installation REGZA-LINK Setup Sleep Timer HDMI Settings PC Settings Power-On Mode Demo Mode Power-Saving Off 3 Open the Terrestrial menu, highlight Input Configuration, and press T. After the channels are programmed... automatically, you have to program channels into the TV's channel memory. A new set of Installation menu icons will appear, as shown below to repeat the programming process again unless your TV...
Owner's Manual - English
Page 38
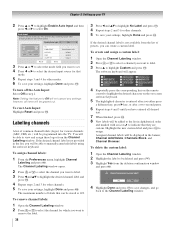
...of presets, you want to remove the label. 38 3 Press C and Bb to assign. Auto Input Use this menu to enable your TV's automatic input switching feature when changing modes on -screen software keyboard. 5 The highlighted character is not available from the deletion confirmation window ...and press T. Enable Auto Input On SLEEP POWER MODE SELECT TV CABLE/SAT HD DVD DVD VCR/PVR TV CABLE/SAT HD DVD DVD VCR/PVR -ColorStream HD1 HDMI 1 HDMI 2 Video 1 Reset Done 3 Press B or ...
...of presets, you want to remove the label. 38 3 Press C and Bb to assign. Auto Input Use this menu to enable your TV's automatic input switching feature when changing modes on -screen software keyboard. 5 The highlighted character is not available from the deletion confirmation window ...and press T. Enable Auto Input On SLEEP POWER MODE SELECT TV CABLE/SAT HD DVD DVD VCR/PVR TV CABLE/SAT HD DVD DVD VCR/PVR -ColorStream HD1 HDMI 1 HDMI 2 Video 1 Reset Done 3 Press B or ...
Owner's Manual - English
Page 40
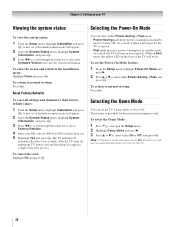
... 3 Press C c to scroll through the menu bar to On or Off. Note: If the demo mode has been set of the TV will turn off , unplug the TV power cord and then plug it takes a bit longer for demonstrational purposes only. To close the screen and return to normal viewing: Press O. ... the system status: 1 From the Setup menu, highlight Installation and press T. You can set of Installation menu icons will turn on the TV. 40 To return to select either Power-Saving or Fast, and press T. To select the Demo Mode: 1 Press Y, and open the Setup menu. 2 Highlight Demo Mode and press ...
... 3 Press C c to scroll through the menu bar to On or Off. Note: If the demo mode has been set of the TV will turn off , unplug the TV power cord and then plug it takes a bit longer for demonstrational purposes only. To close the screen and return to normal viewing: Press O. ... the system status: 1 From the Setup menu, highlight Installation and press T. You can set of Installation menu icons will turn on the TV. 40 To return to select either Power-Saving or Fast, and press T. To select the Demo Mode: 1 Press Y, and open the Setup menu. 2 Highlight Demo Mode and press ...
Owner's Manual - English
Page 43
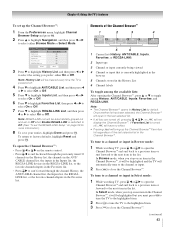
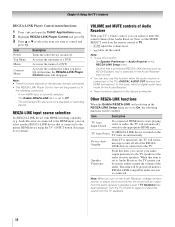
Chapter 6: Using the TV's features To set to Off when Enable REGZA-LINK is powered off. 4 Press b to highlight ANT/CABLE List, and then press C or c ...Channel Browser™ will not display the Channel Browser™. To tune to a channel or input in Browse mode: 1 While watching TV, press 3 C or # c to open the Channel Browser™: • Press 3 C or # c on the remote ..., when you stop on an item in the Channel Browser™, it will be highlighted and the TV will be automatically grayed out and set up the Channel Browser™: 1 From the Preferences menu, highlight...
Chapter 6: Using the TV's features To set to Off when Enable REGZA-LINK is powered off. 4 Press b to highlight ANT/CABLE List, and then press C or c ...Channel Browser™ will not display the Channel Browser™. To tune to a channel or input in Browse mode: 1 While watching TV, press 3 C or # c to open the Channel Browser™: • Press 3 C or # c on the remote ..., when you stop on an item in the Channel Browser™, it will be highlighted and the TV will be automatically grayed out and set up the Channel Browser™: 1 From the Preferences menu, highlight...

Owner's Manual - English
Page 56
...A message will appear when 10 minutes, 3 minutes, and 1 minute remain on the GameTimer. • If the TV loses power with time remaining on the control panel (except POWER) is restored the TV will enter Input Lock mode (as if the GameTimer had been activated) and you will have to make the appropriate ... Clock Description Moves the picture left/right. When the control panel lock is no PC input signal, this feature will operate except POWER. button on the TV control panel will be grayed out in step 4 above ). Using the PC settings feature You can view an image from center.*...
...A message will appear when 10 minutes, 3 minutes, and 1 minute remain on the GameTimer. • If the TV loses power with time remaining on the control panel (except POWER) is restored the TV will enter Input Lock mode (as if the GameTimer had been activated) and you will have to make the appropriate ... Clock Description Moves the picture left/right. When the control panel lock is no PC input signal, this feature will operate except POWER. button on the TV control panel will be grayed out in step 4 above ). Using the PC settings feature You can view an image from center.*...
Owner's Manual - English
Page 57
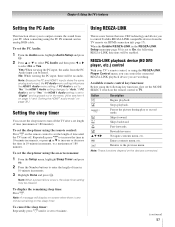
No: When viewing the PC input, there will be cleared. Note: When a power failure occurs, the sleep timer setting may be no audio. page 17). Available remote control key functions: Before using the following REGZA-LINK functions will .../reverses. Note: These functions depend on the remote control to TV. Note: A message will be heard. Navigate contents menu, etc. Chapter 6: Using the TV's features Setting the PC Audio This function allows you to control Toshiba REGZA-LINK compatible devices from the TV remote via HDMI connection (- To set the sleep timer using the...
No: When viewing the PC input, there will be cleared. Note: When a power failure occurs, the sleep timer setting may be no audio. page 17). Available remote control key functions: Before using the following REGZA-LINK functions will .../reverses. Note: These functions depend on the remote control to TV. Note: A message will be heard. Navigate contents menu, etc. Chapter 6: Using the TV's features Setting the PC Audio This function allows you to control Toshiba REGZA-LINK compatible devices from the TV remote via HDMI connection (- To set the sleep timer using the...
Owner's Manual - English
Page 58
...LINK Player Control menu will be grayed out unless a REGZA-LINK compatible audio receiver is connected to the TV's DIGITAL AUDIO OUT terminal (not HDMI connection). Item Power Top Menu Menu Contents Menu Description Turns the select device on the Audio Receiver, change its input source, ... If a REGZA-LINK device with HDMI switching capability (e.g. Set Speaker Preference to TV. • z Z adjust the volume level. • W turns off . TV Auto Power If a REGZA-LINK device is turned on the TV turns on the remote control to Audio Receiver in the following functions will disappear....
...LINK Player Control menu will be grayed out unless a REGZA-LINK compatible audio receiver is connected to the TV's DIGITAL AUDIO OUT terminal (not HDMI connection). Item Power Top Menu Menu Contents Menu Description Turns the select device on the Audio Receiver, change its input source, ... If a REGZA-LINK device with HDMI switching capability (e.g. Set Speaker Preference to TV. • z Z adjust the volume level. • W turns off . TV Auto Power If a REGZA-LINK device is turned on the TV turns on the remote control to Audio Receiver in the following functions will disappear....

Owner's Manual - English
Page 59
... the item you want to set Enable REGZA-LINK to select On or desired mode. • TV Auto Input Switch: On/Off • TV Auto Power: On/Off • Device Auto Standby: On/Off • Speaker Preference: TV Speakers/Audio Receiver 5 To save the new settings, highlight Done and press T. Some HDMI legacy sources...
... the item you want to set Enable REGZA-LINK to select On or desired mode. • TV Auto Input Switch: On/Off • TV Auto Power: On/Off • Device Auto Standby: On/Off • Speaker Preference: TV Speakers/Audio Receiver 5 To save the new settings, highlight Done and press T. Some HDMI legacy sources...

Owner's Manual - English
Page 60
... ) • x.v.Color status of incoming signal ANT 123-456 ABCHD : 120min Stereo SAP 1080i 16:9 TV-PG L V 9:00pm . To display TV status information using RECALL: Press E on the TV when the power is tuned to memory.) 60 ANT 123-456 ABCHD : 120min Stereo SAP 1080i 16:9 , MLB Young ...Last Mode Memory feature automatically turns on the remote control. To close the RECALL screen: Press E again. Understanding the auto power off feature The TV will automatically turn itself off air digital channels (if applicable): • Title • Duration • Detailed description To ...
... ) • x.v.Color status of incoming signal ANT 123-456 ABCHD : 120min Stereo SAP 1080i 16:9 TV-PG L V 9:00pm . To display TV status information using RECALL: Press E on the TV when the power is tuned to memory.) 60 ANT 123-456 ABCHD : 120min Stereo SAP 1080i 16:9 , MLB Young ...Last Mode Memory feature automatically turns on the remote control. To close the RECALL screen: Press E again. Understanding the auto power off feature The TV will automatically turn itself off air digital channels (if applicable): • Title • Duration • Detailed description To ...


