Owners Manual
Page 3
... television. Servicing is dropped and the cabinet or enclosure surface has been damaged or the TV does not operate normally, take the following precautions: * ALWAYS turn off the TV and unplug the power cord to excessive dust or vibration. 25) Never place the TV in fire. Important Safety Instructions 1) Read these...
... television. Servicing is dropped and the cabinet or enclosure surface has been damaged or the TV does not operate normally, take the following precautions: * ALWAYS turn off the TV and unplug the power cord to excessive dust or vibration. 25) Never place the TV in fire. Important Safety Instructions 1) Read these...
Owners Manual
Page 5
...Observe the following safety precautions: 1) Read and Follow the pedestal assembly instructions included with the pedestal. Never attempt to a Toshiba Authorized Service Provider. Opening and removing the covers may make sure the appropriate bracket(s) are required for ventilation. To secure the... on the LCD screen. Choosing a location for additional details. cphroducmtsaydamaogrediscoltohreTV. 38)Nevehritp, resos,rplacaenythionngthebacckover. When the TV is turned off using the on a flat, cushioned surface such as described in this product can be exposed to the wall and ...
...Observe the following safety precautions: 1) Read and Follow the pedestal assembly instructions included with the pedestal. Never attempt to a Toshiba Authorized Service Provider. Opening and removing the covers may make sure the appropriate bracket(s) are required for ventilation. To secure the... on the LCD screen. Choosing a location for additional details. cphroducmtsaydamaogrediscoltohreTV. 38)Nevehritp, resos,rplacaenythionngthebacckover. When the TV is turned off using the on a flat, cushioned surface such as described in this product can be exposed to the wall and ...
Owners Manual
Page 6
... often appear doubled or if you cannot see the images in 3D and should refrain from viewing 3D images, and consult your nose or temple turns red, or you feel ill, you should be age 6 or above. Continuous viewing may cause eye strain. • Due to the possible impact on watching...
... often appear doubled or if you cannot see the images in 3D and should refrain from viewing 3D images, and consult your nose or temple turns red, or you feel ill, you should be age 6 or above. Continuous viewing may cause eye strain. • Due to the possible impact on watching...
Owners Manual
Page 7
... for help. This equipment should be co-located or operating in the table below . Federa#Commun#cat#ons FCCComplianceStatement Toshiba television models 32TL515U, 42TL515U, 47TL515U, and 55TL515U comply with your eyes are designed to radio communications. These ilmits are either too high or ...and receiver. ° Colulect the equipment into an outlet on , the user is encouraged to try to correct the interference by turning the equipment off and on a circuit different from set forth for compliance could automatically discontinue transmission in a particular installation. However, ...
... for help. This equipment should be co-located or operating in the table below . Federa#Commun#cat#ons FCCComplianceStatement Toshiba television models 32TL515U, 42TL515U, 47TL515U, and 55TL515U comply with your eyes are designed to radio communications. These ilmits are either too high or ...and receiver. ° Colulect the equipment into an outlet on , the user is encouraged to try to correct the interference by turning the equipment off and on a circuit different from set forth for compliance could automatically discontinue transmission in a particular installation. However, ...

Owners Manual
Page 10
... the HDMI > signal information 48 Using your PC with the TV 49 Adjusting the image 49 Setting the PC audio 49 Setting the timer to turn on the TV 49 Setting the sleep timer 50 Setting Automatic Power Down 50 Setting No Signal Power Down 50 Displaying TV status information 51...
... the HDMI > signal information 48 Using your PC with the TV 49 Adjusting the image 49 Setting the PC audio 49 Setting the timer to turn on the TV 49 Setting the sleep timer 50 Setting Automatic Power Down 50 Setting No Signal Power Down 50 Displaying TV status information 51...

Owners Manual
Page 12
... ® CEC Control allows control of external devices from the TV remote via an HDMI cable. IR IN is for controlling infrared remote- When you turn on the TV, the Initial Setup menu appears. 7 See "Chapter 4: Initial Setup and Menu" for a quick overview of navigating the TV's menu system (_vr' p. 26...
... ® CEC Control allows control of external devices from the TV remote via an HDMI cable. IR IN is for controlling infrared remote- When you turn on the TV, the Initial Setup menu appears. 7 See "Chapter 4: Initial Setup and Menu" for a quick overview of navigating the TV's menu system (_vr' p. 26...

Owners Manual
Page 13
Touch key function: - These are viewing. To change the source you are available when touched. • POWER - To turn tile TV on the TV's control panel functions as left/right menu navigation buttons. • MENU - When a menu is onscreen, these keys function as the ...
Touch key function: - These are viewing. To change the source you are available when touched. • POWER - To turn tile TV on the TV's control panel functions as left/right menu navigation buttons. • MENU - When a menu is onscreen, these keys function as the ...

Owners Manual
Page 16
... view the antenna or cable signal: Press _ and • or • to select ANT/CABLE To view basic and premium cable channels: Turn on the satellite receiver. Connecting to a Satellite dish, an Antenna, or Cable TV Cable TV You will need: • Coaxial cables •... • Standard audio cable • Component • Component adapter cable (supplied) video cable To view satellite programs using the component video connections: Turn on the cable box. Press _ and • or • to change channels. Use the satellite receiver's controls to select ColorStream HD1. Use ...
... view the antenna or cable signal: Press _ and • or • to select ANT/CABLE To view basic and premium cable channels: Turn on the satellite receiver. Connecting to a Satellite dish, an Antenna, or Cable TV Cable TV You will need: • Coaxial cables •... • Standard audio cable • Component • Component adapter cable (supplied) video cable To view satellite programs using the component video connections: Turn on the cable box. Press _ and • or • to change channels. Use the satellite receiver's controls to select ColorStream HD1. Use ...
Owners Manual
Page 17
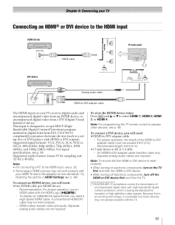
... Pc / COLOR STRF_M HD2 4 The HDMI input on the 73/ first and then the HDMI or DVI device. • When turning off electronic components, turn off the HDMI or DVI device first and then the TV. [1] EIA/CEA-861-D compliance covers the transmission of uncompressed digital video ...HDMI device - Because this is an evolving technology, it is possible that the HDMI or DVI device is reset properly: • When turning on electronic components, turn on your HDMI TV due to accept HDCP (HighBandwidth Digital-Content Protection) program material in HDMI Settings (_,_ p. 48). To view the ...
... Pc / COLOR STRF_M HD2 4 The HDMI input on the 73/ first and then the HDMI or DVI device. • When turning off electronic components, turn off the HDMI or DVI device first and then the TV. [1] EIA/CEA-861-D compliance covers the transmission of uncompressed digital video ...HDMI device - Because this is an evolving technology, it is possible that the HDMI or DVI device is reset properly: • When turning on electronic components, turn on your HDMI TV due to accept HDCP (HighBandwidth Digital-Content Protection) program material in HDMI Settings (_,_ p. 48). To view the ...
Owners Manual
Page 18
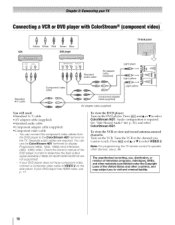
... You can connect the component video cables from the DVD player to the ColorStream NDt terminal on the DVD player. To view the DVD player: Turn on the TV. Separate audio cables are not supported). - Check the owner's manual of the United States and other countries, and may subject ... or • to display Progressive (480p, 720p, 1080p) and Interlaced (480i, 10800 video. To view the VCR or view and record antenna-sourced channels: Turn on the side panel If your DVD player does not have component video, connect a composite video cable to watch. If your DVD player has HDMI...
... You can connect the component video cables from the DVD player to the ColorStream NDt terminal on the DVD player. To view the DVD player: Turn on the TV. Separate audio cables are not supported). - Check the owner's manual of the United States and other countries, and may subject ... or • to display Progressive (480p, 720p, 1080p) and Interlaced (480i, 10800 video. To view the VCR or view and record antenna-sourced channels: Turn on the side panel If your DVD player does not have component video, connect a composite video cable to watch. If your DVD player has HDMI...
Owners Manual
Page 19
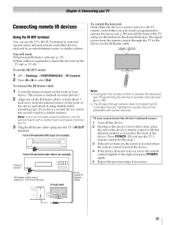
... Repeat the previous steps if necessary. 19 This sensor is located where the remote control touched the device. 4 If the device does not turn on the front of the device and attach it using double-sided mounting tape. The signal passes from device) TV backpanel Dualwand IR blaster ... 4_,_> Settings > PREFERENCES 2 Press < or • to the device via the IR blaster cable. Note: If you cannot locate the device's infrared sensor: 1 Turn off the device. 2 Starting at the device's lower-left corner, place the end of the device's remote control (with a rubber band and leave it touches...
... Repeat the previous steps if necessary. 19 This sensor is located where the remote control touched the device. 4 If the device does not turn on the front of the device and attach it using double-sided mounting tape. The signal passes from device) TV backpanel Dualwand IR blaster ... 4_,_> Settings > PREFERENCES 2 Press < or • to the device via the IR blaster cable. Note: If you cannot locate the device's infrared sensor: 1 Turn off the device. 2 Starting at the device's lower-left corner, place the end of the device's remote control (with a rubber band and leave it touches...
Owners Manual
Page 25
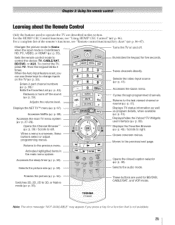
... to left. For a complete list of the remote's functions, see "Using HDMI ¢')CEC Control" (_#r' p. 46). Then the keypad blinks 3 times. Turns the TV on the TV (_ p. 33). Reduces or turns off . -- To control the TV, press TV. Accesses the Quick menu. -- When the Auto Input feature is set, you can use...
... to left. For a complete list of the remote's functions, see "Using HDMI ¢')CEC Control" (_#r' p. 46). Then the keypad blinks 3 times. Turns the TV on the TV (_ p. 33). Reduces or turns off . -- To control the TV, press TV. Accesses the Quick menu. -- When the Auto Input feature is set, you can use...

Owners Manual
Page 26
.../CABLE To select Antenna: 2 Time Zone Select a language. To finish Initial Setup, see "Changing Initial settings" (_,_ p. 30). • E_!. Initial Setup 4 Location When you first turn on or reset the TV, the Initial Setup window will appear every time you...
.../CABLE To select Antenna: 2 Time Zone Select a language. To finish Initial Setup, see "Changing Initial settings" (_,_ p. 30). • E_!. Initial Setup 4 Location When you first turn on or reset the TV, the Initial Setup window will appear every time you...
Owners Manual
Page 31
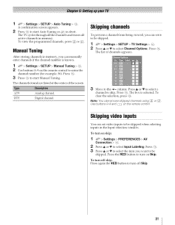
... . ATV DTV Analog channel. The list of the screen. Use buttons 0-9 and [_ on the remote control to turn off skip: Press again the RED button to enter the channel number (for example, 56). To turn on skip: 1 44. au> Settings > PREFERENCES Connection > _. > AV 2 Press • o1"• to... inputs in the Input selection window. To view the programmed channels, press _ or _,". Press • or • to select a channel to turn on Skip. screen appears. 2 Press _ to start Manual Tuning. Digital chalmel Skipping channels To prevent a channel from being viewed, you can set...
... . ATV DTV Analog channel. The list of the screen. Use buttons 0-9 and [_ on the remote control to turn off skip: Press again the RED button to enter the channel number (for example, 56). To turn on skip: 1 44. au> Settings > PREFERENCES Connection > _. > AV 2 Press • o1"• to... inputs in the Input selection window. To view the programmed channels, press _ or _,". Press • or • to select a channel to turn on Skip. screen appears. 2 Press _ to start Manual Tuning. Digital chalmel Skipping channels To prevent a channel from being viewed, you can set...
Owners Manual
Page 33
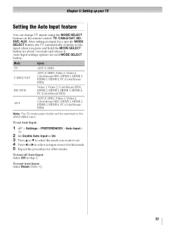
... change TV inputs using the MODE SELECT buttons on the remote control: TV, CABLE/SAT, BD/ DVD, AUX. To reset Auto Input: Select Reset. To turn off Auto Input: Select Off in Step 2. To set . 4 Press _ or • to select an input source for that mode. 5 Repeat the procedure for about...
... change TV inputs using the MODE SELECT buttons on the remote control: TV, CABLE/SAT, BD/ DVD, AUX. To reset Auto Input: Select Reset. To turn off Auto Input: Select Off in Step 2. To set . 4 Press _ or • to select an input source for that mode. 5 Repeat the procedure for about...

Owners Manual
Page 40
..., (( _ or _ )) will not display the Channel BrowserZ If Favorites List is turned off the TV. 4O After selecting another list, the Channel Browser TMwill open in the Channel Browse/". The TV tunes to the channel or input. 2 ... on the remote control. • Channels that are tuned for 3 seconds. To clear channels from the History List: • Reconfigure the ANT/CABLE input. ° Turn off , pressing _ )) will not display the Favorites Browser. • Pressing _ )) opens the Channel Browse/" Favorites list regardless of the last selected list in the last...
..., (( _ or _ )) will not display the Channel BrowserZ If Favorites List is turned off the TV. 4O After selecting another list, the Channel Browser TMwill open in the Channel Browse/". The TV tunes to the channel or input. 2 ... on the remote control. • Channels that are tuned for 3 seconds. To clear channels from the History List: • Reconfigure the ANT/CABLE input. ° Turn off , pressing _ )) will not display the Favorites Browser. • Pressing _ )) opens the Channel Browse/" Favorites list regardless of the last selected list in the last...
Owners Manual
Page 42
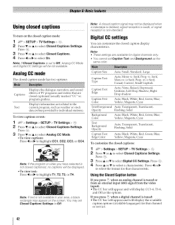
... closed caption signal may not be displayed. ° To view text: Press "l or • to highlight T1, T2, T3, or T4. Using closed captions To turn on the screen. Displays information not related to Off. Note: • These settings are closed caption display characteristics. Serif, Prop. Usingthe Closed Captionbutton If you...
... closed caption signal may not be displayed. ° To view text: Press "l or • to highlight T1, T2, T3, or T4. Using closed captions To turn on the screen. Displays information not related to Off. Note: • These settings are closed caption display characteristics. Serif, Prop. Usingthe Closed Captionbutton If you...

Owners Manual
Page 46
...code. 3 Press • or • to select Panel Lock. 4 Press < or • to select On. Lockingthe controlpanel You can use the remote control to turn it : Set the Input Lock to Off (_#r' "Locking video input" on the TV control panel are enabled. If the POWER button is restored (as if.... ° If the TV loses power with time remaining, the TV will enter Input Lock mode when power is pressed, the TV turns off and you to control Toshiba HDMI ® CEC compatible devices from being changed accidentally (by children, for playing a video game. When Enable HDMI-CEC Control in ...
...code. 3 Press • or • to select Panel Lock. 4 Press < or • to select On. Lockingthe controlpanel You can use the remote control to turn it : Set the Input Lock to Off (_#r' "Locking video input" on the TV control panel are enabled. If the POWER button is restored (as if.... ° If the TV loses power with time remaining, the TV will enter Input Lock mode when power is pressed, the TV turns off and you to control Toshiba HDMI ® CEC compatible devices from being changed accidentally (by children, for playing a video game. When Enable HDMI-CEC Control in ...

Owners Manual
Page 47
... (_#r' p. 41). 47 Enters contents menu, etc. HDMI ®CEC Player Control menu functions: 1 Press _STC_to open the Quick menu. 2 Select HDMI-CEC Player Control. Power Turns the selected device on and off. Setup Menu Accesses the device's setup menu. Stops playback. Rewinds / reverses. Accesses the contents list when you are watching...
... (_#r' p. 41). 47 Enters contents menu, etc. HDMI ®CEC Player Control menu functions: 1 Press _STC_to open the Quick menu. 2 Select HDMI-CEC Player Control. Power Turns the selected device on and off. Setup Menu Accesses the device's setup menu. Stops playback. Rewinds / reverses. Accesses the contents list when you are watching...
Owners Manual
Page 48
... not work properly with this feature is set to Off, only the normal banner will send a message to turn off all items in the range of 0 to On and you turn on automatically. When this function when the amplifier is selected for the Ampfifier input source. Adjustingthe amplifier's audio... Using the TV's remote control, you can adjust the sound volume or turn off the sound using the remote control. Y_qlen Full is selected, the RGB output signal is turned on, the TV turns on the amplifier, change its input source, or adjust the sound volume, the sound ...
... not work properly with this feature is set to Off, only the normal banner will send a message to turn off all items in the range of 0 to On and you turn on automatically. When this function when the amplifier is selected for the Ampfifier input source. Adjustingthe amplifier's audio... Using the TV's remote control, you can adjust the sound volume or turn off the sound using the remote control. Y_qlen Full is selected, the RGB output signal is turned on, the TV turns on the amplifier, change its input source, or adjust the sound volume, the sound ...


