Brochure
Page 2
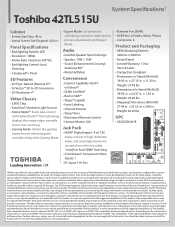
... . Use of the television. Depending on the specifications of your Toshiba television, always use a UL Listed wall bracket appropriate for the size and weight of third party internet services may be age 6 or above. Care should be available on or compatible with internet access and payment of 3D video images should contact a health care provider before using the 3D function. InstaPort Fast HDMI® Switching • ColorStream® Component Video Inputs: 1 • PC Input...
... . Use of the television. Depending on the specifications of your Toshiba television, always use a UL Listed wall bracket appropriate for the size and weight of third party internet services may be age 6 or above. Care should be available on or compatible with internet access and payment of 3D video images should contact a health care provider before using the 3D function. InstaPort Fast HDMI® Switching • ColorStream® Component Video Inputs: 1 • PC Input...
Owners Manual
Page 2
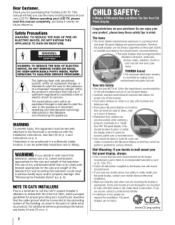
... safely install your flat panel display,contact your new LCD TV. WARNING: TO REDUCE THE RiSK OF ELECTRIC SHOCK_ DO NOT REMOVE COVER (OR BACK), NO USER=SERVICEABLE PARTS iNSIDE, REFER SERVICING TO QUALIFIED SERVICE PERSONNEL, The lightning flash with the installation instructions. WARNING To prevent injury, this apparatus must be pushed, pulled over and cause injury. TOSHIBA Cares! Dear Customer, Thank you for wall mounting this television...
... safely install your flat panel display,contact your new LCD TV. WARNING: TO REDUCE THE RiSK OF ELECTRIC SHOCK_ DO NOT REMOVE COVER (OR BACK), NO USER=SERVICEABLE PARTS iNSIDE, REFER SERVICING TO QUALIFIED SERVICE PERSONNEL, The lightning flash with the installation instructions. WARNING To prevent injury, this apparatus must be pushed, pulled over and cause injury. TOSHIBA Cares! Dear Customer, Thank you for wall mounting this television...
Owners Manual
Page 4
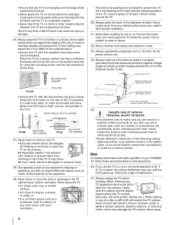
...,table surfactheact ansuppothrteweighotftheunitI.nordetor cord, and never place the TV where the power cord is tight, secure, and parallel to drapes, curtains, or walls; This is properly grounded to wear or abuse. maintasitnabilaitnydprevetnhteTVfromfallinogver, secutrheeTVbyeitheorfthemethobdeslow: 32) Never overload wall outlets and extension cords. *SecutrheeTVwiththesuppliemdountisncgrew. 33) Always operate this equipment from overheating and to install any of your TV, please first remove...
...,table surfactheact ansuppothrteweighotftheunitI.nordetor cord, and never place the TV where the power cord is tight, secure, and parallel to drapes, curtains, or walls; This is properly grounded to wear or abuse. maintasitnabilaitnydprevetnhteTVfromfallinogver, secutrheeTVbyeitheorfthemethobdeslow: 32) Never overload wall outlets and extension cords. *SecutrheeTVwiththesuppliemdountisncgrew. 33) Always operate this equipment from overheating and to install any of your TV, please first remove...
Owners Manual
Page 5
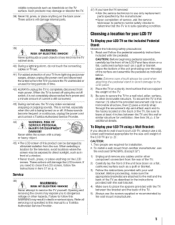
... usinga Wall Bracket: If you leave the TV unattended or unused for ventilation. If these sounds become frequent or continuous, unplug the power cord and contact a Toshiba Authorized Service Provider. 44) WARNING: RISK OF SERIOUS PERSONAL INJURY OR EQUIPMENT DAMAGE! These actions will damage the LCD screen. Never attempt to wail mount your LCD TV, always use the screws supplied or recommended by the wall mount...
... usinga Wall Bracket: If you leave the TV unattended or unused for ventilation. If these sounds become frequent or continuous, unplug the power cord and contact a Toshiba Authorized Service Provider. 44) WARNING: RISK OF SERIOUS PERSONAL INJURY OR EQUIPMENT DAMAGE! These actions will damage the LCD screen. Never attempt to wail mount your LCD TV, always use the screws supplied or recommended by the wall mount...

Owners Manual
Page 10
... input to view 41 Using closed captions 42 Analog CC mode 42 Digital CC settings 42 Setting the PIN code 43 Entering a new PIN code 43 Changing or deleting your PIN code 43 Forgotten PIN code 43 Using parental controls 43 Blocking TV programs and movies by rating (V-Chip 43 Downloading an additional rating system ........ 44 Displaying ratings 45 Unlocking programs 45 Locking specific channels 45 Locking video input 45 Setting a time limit for games 46 Locking the control panel 46 Using HDMF '_CEC Control 46 Controlling HDMI...
... input to view 41 Using closed captions 42 Analog CC mode 42 Digital CC settings 42 Setting the PIN code 43 Entering a new PIN code 43 Changing or deleting your PIN code 43 Forgotten PIN code 43 Using parental controls 43 Blocking TV programs and movies by rating (V-Chip 43 Downloading an additional rating system ........ 44 Displaying ratings 45 Unlocking programs 45 Locking specific channels 45 Locking video input 45 Setting a time limit for games 46 Locking the control panel 46 Using HDMF '_CEC Control 46 Controlling HDMI...

Owners Manual
Page 12
... you automatically adjust picture settings based on ambient light conditions and input signal content (_#r' p. 55). • Dynamic Volume (Audyssey Dynamic Volume@} eliminates inconsistent TV volume when changing channels or viewing commercials (_#r' p. 60). • Media Player lets you have connected all cables and devices, plug in the power cords for your TV and other electronic device(s) to the TV (_ p. 15-23). 5 See "Chapter 3: Using the remote control" (_#r' p. 24) for an overview of external devices from...
... you automatically adjust picture settings based on ambient light conditions and input signal content (_#r' p. 55). • Dynamic Volume (Audyssey Dynamic Volume@} eliminates inconsistent TV volume when changing channels or viewing commercials (_#r' p. 60). • Media Player lets you have connected all cables and devices, plug in the power cords for your TV and other electronic device(s) to the TV (_ p. 15-23). 5 See "Chapter 3: Using the remote control" (_#r' p. 24) for an overview of external devices from...

Owners Manual
Page 16
..., an Antenna, or Cable TV Cable TV You will need: • Coaxial cables • AV adapter cable (supplied) • Standard audio cable • Component • Component adapter cable (supplied) video cable To view satellite programs using the component video connections: Turn on the cable box. To view the antenna or cable signal: Press _ and • or • to civil and criminal liability. 16 The unauthorized recording, use, distribution, or revision of television programs, videotapes, DVDs, and other materials is set to change channels. Use the cable box's controls to...
..., an Antenna, or Cable TV Cable TV You will need: • Coaxial cables • AV adapter cable (supplied) • Standard audio cable • Component • Component adapter cable (supplied) video cable To view satellite programs using the component video connections: Turn on the cable box. To view the antenna or cable signal: Press _ and • or • to civil and criminal liability. 16 The unauthorized recording, use, distribution, or revision of television programs, videotapes, DVDs, and other materials is set to change channels. Use the cable box's controls to...
Owners Manual
Page 25
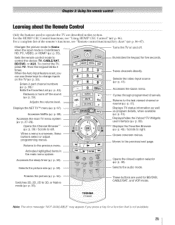
... keypad blinks 3 times. Reduces or turns off . -- When a menu is ColorStream HD, PC, VIDEO, or HDMI Ce(_ p. 55). Sets the remote control mode to left. To control the TV, press TV. Opens the Channel Browser ''_ (_ p. 39) / Scrolls to control the device: TV, CABLE/SAT, BD/DVD, or AUX. Accesses the Quick menu. -- Learningaboutthe RemoteControl Only the buttons used to Game when the input mode is onscreen, these keys to change inputs on and off the sound...
... keypad blinks 3 times. Reduces or turns off . -- When a menu is ColorStream HD, PC, VIDEO, or HDMI Ce(_ p. 55). Sets the remote control mode to left. To control the TV, press TV. Opens the Channel Browser ''_ (_ p. 39) / Scrolls to control the device: TV, CABLE/SAT, BD/DVD, or AUX. Accesses the Quick menu. -- Learningaboutthe RemoteControl Only the buttons used to Game when the input mode is onscreen, these keys to change inputs on and off the sound...
Owners Manual
Page 29
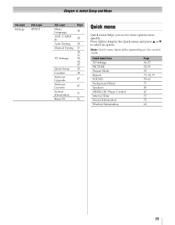
... select an option. Settings SETUP Menu 30 Language ANT/CABLE 30 In Auto Tuning 30 Manual Tuning 31 30, 31, TV Settings 39, 42, 45 Quick Setup 30 Location 30 Software 67 Upgrade Software 67 Licenses System 51 Information Reset TV 51 Quick menu Quick menu helps you access some options more quickly. Note: Quick menu items differ depending on the current mode. 3D Settings PICTURE Picture Mode Repeat SOUND Background Music Speakers HDMI-CEC Player Control Interval Time Device Information Wireless Information 36-37...
... select an option. Settings SETUP Menu 30 Language ANT/CABLE 30 In Auto Tuning 30 Manual Tuning 31 30, 31, TV Settings 39, 42, 45 Quick Setup 30 Location 30 Software 67 Upgrade Software 67 Licenses System 51 Information Reset TV 51 Quick menu Quick menu helps you access some options more quickly. Note: Quick menu items differ depending on the current mode. 3D Settings PICTURE Picture Mode Repeat SOUND Background Music Speakers HDMI-CEC Player Control Interval Time Device Information Wireless Information 36-37...
Owners Manual
Page 30
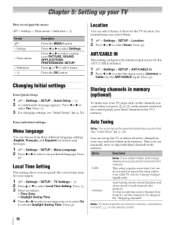
... memory, set up the antenna/cable input source first. Note: To tune channels not stored in the TV's memory. Press the OK button Location You can manually store or skip individual channels from memory. See "Initial Setup" (_,_"p. 26). Auto tuning retains stored channels and stores newly found channels into 1YlelYlory. Press _ or • to select menu. Press _). 3 For changing settings, see "Initial Setup" (_-v p. 26). Then you select Cable, auto tuning...
... memory, set up the antenna/cable input source first. Note: To tune channels not stored in the TV's memory. Press the OK button Location You can manually store or skip individual channels from memory. See "Initial Setup" (_,_"p. 26). Auto tuning retains stored channels and stores newly found channels into 1YlelYlory. Press _ or • to select menu. Press _). 3 For changing settings, see "Initial Setup" (_-v p. 26). Then you select Cable, auto tuning...
Owners Manual
Page 31
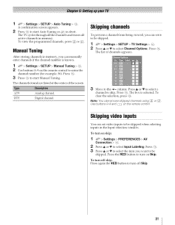
Digital chalmel Skipping channels To prevent a channel from being viewed, you can set video inputs to be skipped. 1 s_a0> Settings > SETUP > 13/Settings > @. 2 Press • or • to enter the channel number (for example, 56). Press @. Use buttons 0-9 and [_ on Skip. Press the RED button to turn off skip: Press again the RED button to turn on the remote control to select Channel Options. The TV cycles through all the channels and stores all active...
Digital chalmel Skipping channels To prevent a channel from being viewed, you can set video inputs to be skipped. 1 s_a0> Settings > SETUP > 13/Settings > @. 2 Press • or • to enter the channel number (for example, 56). Press @. Use buttons 0-9 and [_ on Skip. Press the RED button to turn off skip: Press again the RED button to turn on the remote control to select Channel Options. The TV cycles through all the channels and stores all active...
Owners Manual
Page 39
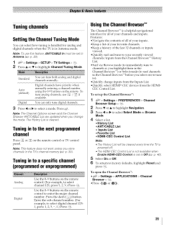
... your channels and inputs. To tune mlalog chalmels, use this feature, ANT/CABLE In must be cleared every time the TV is powered off. • The HDMI-CEC Control List is not available when Enable HDMI-CEC Control is in to factory defaults, highlight Reset and press _. Digital channels have priority when manually entering a chmmel number using the 0-9 buttons on the remote control or TV control panel. Enter the sub-channel number. (For example, to select a mode...
... your channels and inputs. To tune mlalog chalmels, use this feature, ANT/CABLE In must be cleared every time the TV is powered off. • The HDMI-CEC Control List is not available when Enable HDMI-CEC Control is in to factory defaults, highlight Reset and press _. Digital channels have priority when manually entering a chmmel number using the 0-9 buttons on the remote control or TV control panel. Enter the sub-channel number. (For example, to select a mode...
Owners Manual
Page 43
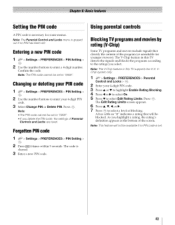
... in this TV supports the U.S. Press _. Entering a new PIN code 1 ¢€_u> Settings > PREFERENCES > PIN Setting > _o_. 2 Use the number buttons to enter your 4-digit PIN code. 3 Select Change PIN or Delete PIN. Changing or deleting your PIN code 1 4_"u > Settings > PREFERENCES > PIN Setting > i_. 2 Use the number buttons to enter a 4-digit number. Press _. VChip system only. 1 _,o > Settings > PREFERENCES Control and Locks > _. 2 Enter you select. The Edit Rating Limits screen appears. 6 Press...
... in this TV supports the U.S. Press _. Entering a new PIN code 1 ¢€_u> Settings > PREFERENCES > PIN Setting > _o_. 2 Use the number buttons to enter your 4-digit PIN code. 3 Select Change PIN or Delete PIN. Changing or deleting your PIN code 1 4_"u > Settings > PREFERENCES > PIN Setting > i_. 2 Use the number buttons to enter a 4-digit number. Press _. VChip system only. 1 _,o > Settings > PREFERENCES Control and Locks > _. 2 Enter you select. The Edit Rating Limits screen appears. 6 Press...
Owners Manual
Page 45
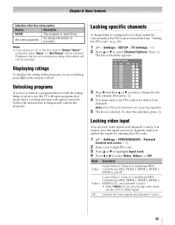
... will enter program lock mode and a warning message will appear onscreen. You cannot view the input sources or channels until you unlock the inputs by entering the PIN code. 1 _.o > Settings > PREFERENCES Control and Locks > _o_. 2 Enter you have set , a warning appears. 5 The box is selected. Unlocking programs If you try to tune to a program that exceeds the rating limits you ," 4-digit PIN code. > Parental 3 Press • or • to highlight Input Lock. 4 Press...
... will enter program lock mode and a warning message will appear onscreen. You cannot view the input sources or channels until you unlock the inputs by entering the PIN code. 1 _.o > Settings > PREFERENCES Control and Locks > _o_. 2 Enter you have set , a warning appears. 5 The box is selected. Unlocking programs If you try to tune to a program that exceeds the rating limits you ," 4-digit PIN code. > Parental 3 Press • or • to highlight Input Lock. 4 Press...
Owners Manual
Page 48
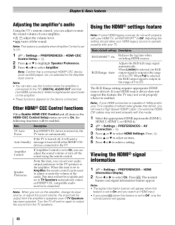
... an HDMI _ CEC compatible audio receiver is connected to On, the following functions will be enabled. Turn the TV off the sound. Select a digital audio input mode on the amplifier. • These functions depend on the amplifier, change its input source, or adjust the sound volume, the sound will be output from the TV speakers. This item will need a High Speed HDMI ® cable. Usingthe HDMI® settingsfeature Note: If some HDMI legacy sources do not work...
... an HDMI _ CEC compatible audio receiver is connected to On, the following functions will be enabled. Turn the TV off the sound. Select a digital audio input mode on the amplifier. • These functions depend on the amplifier, change its input source, or adjust the sound volume, the sound will be output from the TV speakers. This item will need a High Speed HDMI ® cable. Usingthe HDMI® settingsfeature Note: If some HDMI legacy sources do not work...
Owners Manual
Page 50
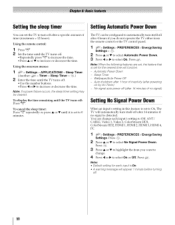
...; to change. Press _.). 2 Press • or • to increase or decrease the time. Press < or • to select Automatic Power Down. 3 Press Settings > PREFERENCES > Energy Saving Settings. Note: • Default setting for each input is set the TV to 0 minutes. Setting Automatic Power Down The TV can set to turn itself off . • Use the number buttons. • Press < or • to select No Signal Power Down. Press...
...; to change. Press _.). 2 Press • or • to increase or decrease the time. Press < or • to select Automatic Power Down. 3 Press Settings > PREFERENCES > Energy Saving Settings. Note: • Default setting for each input is set the TV to 0 minutes. Setting Automatic Power Down The TV can set to turn itself off . • Use the number buttons. • Press < or • to select No Signal Power Down. Press...
Owners Manual
Page 51
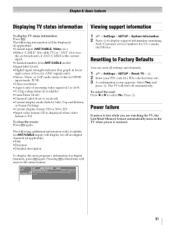
... display format (3D or 3D to select No. Select Yes, and press _. Powerfailure If power is lost while you are watching Last Mod e Memory feature automatically TV when power is the current input. • Channel number (if in ANT/CABLE mode) • Input label (if set) • Digital signal strength indicator (bar graph in HDMI input mode, PCM) • Video resolution • Aspect ratio of box; Pressing _ a third time will...
... display format (3D or 3D to select No. Select Yes, and press _. Powerfailure If power is lost while you are watching Last Mod e Memory feature automatically TV when power is the current input. • Channel number (if in ANT/CABLE mode) • Input label (if set) • Digital signal strength indicator (bar graph in HDMI input mode, PCM) • Video resolution • Aspect ratio of box; Pressing _ a third time will...

Owners Manual
Page 78
... set to the correctdevicemode (_-_p. 88). ° Removeall obstructionsbetweenthe remotecontrolandthe TV. * Replacethe remotecontrol'sbatteries(_ p. 24). ° YourTV'sremotecontrolmaynotoperatecertainfeatureson yourexternaldevice.Referto the owner'smanualfor your ISP for Internet service issues. If the problempersists,usethe Reset FactoryDefaultsprocedure(_-_p.51). V-Chip systems only (_-_--p_. 43). For Legacy HDMI sources * SomelegacyHDMIsourcesmay not work correctly after you cannottunedigitalchannelsc, heckthe antenna configuration(c_-_p.30). Network Setup fails (Auto...
... set to the correctdevicemode (_-_p. 88). ° Removeall obstructionsbetweenthe remotecontrolandthe TV. * Replacethe remotecontrol'sbatteries(_ p. 24). ° YourTV'sremotecontrolmaynotoperatecertainfeatureson yourexternaldevice.Referto the owner'smanualfor your ISP for Internet service issues. If the problempersists,usethe Reset FactoryDefaultsprocedure(_-_p.51). V-Chip systems only (_-_--p_. 43). For Legacy HDMI sources * SomelegacyHDMIsourcesmay not work correctly after you cannottunedigitalchannelsc, heckthe antenna configuration(c_-_p.30). Network Setup fails (Auto...
Owners Manual
Page 97
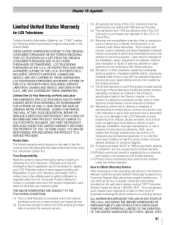
... is required for warranty service. (3) All warranty servicing of the operating instructions in the Owner's Manual, reviewthe section entitled %oncierge" located on our Customer Support Web site at www.support.toshiba.com. or to the LCD Television or parts caused by an Authorized TAIS Service Provider. (4) The warranties from TAIS are not covered by TAIS; Limited United States Warranty for direct and immediate access to Obtain Warranty Service After following limited...
... is required for warranty service. (3) All warranty servicing of the operating instructions in the Owner's Manual, reviewthe section entitled %oncierge" located on our Customer Support Web site at www.support.toshiba.com. or to the LCD Television or parts caused by an Authorized TAIS Service Provider. (4) The warranties from TAIS are not covered by TAIS; Limited United States Warranty for direct and immediate access to Obtain Warranty Service After following limited...
Owners Manual
Page 101
... 67 Network Setup 63 O On Timer 49 P Panel Lock 46 PC Audio 49 PC connection 22 PC settings 49 Picture mode 55 Picture Position 54 Picture quality 55 Picture size 52 PIN code 43 R Remote control Battery installation 24 Buttons 25 Device codes table 91 Functional key chart 86 Programming 88 Reset TV 51 RGB Filter 58 RGB Range 48 S SAP 59 Shared inputs 32 Sleep Timer 50 Software keyboard 66 Static Gamma 56 Stereo sound 59 Support information...
... 67 Network Setup 63 O On Timer 49 P Panel Lock 46 PC Audio 49 PC connection 22 PC settings 49 Picture mode 55 Picture Position 54 Picture quality 55 Picture size 52 PIN code 43 R Remote control Battery installation 24 Buttons 25 Device codes table 91 Functional key chart 86 Programming 88 Reset TV 51 RGB Filter 58 RGB Range 48 S SAP 59 Shared inputs 32 Sleep Timer 50 Software keyboard 66 Static Gamma 56 Stereo sound 59 Support information...


