Owners Manual
Page 3
... structure. Servicing is dropped and the cabinet or enclosure surface has been damaged or the TV does not operate normally, take the following precautions: • ALWAYS turn off the TV and unplug the power cord to avoid possible electric shock or fire. • NEVER ...an extension cord, receptacle, or other open flames away from tip-over. 13) Unplug this apparatus near any ventilation openings. The LCD panel inside the TV contains glass and a toxic liquid. Important Safety Instructions 1) Read these instructions. 2) Keep these recommendations and precautions and heed all...
... structure. Servicing is dropped and the cabinet or enclosure surface has been damaged or the TV does not operate normally, take the following precautions: • ALWAYS turn off the TV and unplug the power cord to avoid possible electric shock or fire. • NEVER ...an extension cord, receptacle, or other open flames away from tip-over. 13) Unplug this apparatus near any ventilation openings. The LCD panel inside the TV contains glass and a toxic liquid. Important Safety Instructions 1) Read these instructions. 2) Keep these recommendations and precautions and heed all...
Owners Manual
Page 4
... touch overhead power lines. Failure to properly dispose of the TV. or b) cables, wires, or any item you need to clean the LCD screen, follow these sounds become frequent or continuous, unplug the power cord and contact a Toshiba Authorized Service Center. 35) DANGER: RISK OF SERIOUS PERSONAL ... antenna or phone system. A hard cloth may damage or discolor the cabinet. 31) WARNING: RISK OF ELECTRIC SHOCK! This is being turned on the LCD screen. This is normal, especially when the unit is not a sign of the panel. Note: The lamp(s) inside this product contain ...
... touch overhead power lines. Failure to properly dispose of the TV. or b) cables, wires, or any item you need to clean the LCD screen, follow these sounds become frequent or continuous, unplug the power cord and contact a Toshiba Authorized Service Center. 35) DANGER: RISK OF SERIOUS PERSONAL ... antenna or phone system. A hard cloth may damage or discolor the cabinet. 31) WARNING: RISK OF ELECTRIC SHOCK! This is being turned on the LCD screen. This is normal, especially when the unit is not a sign of the panel. Note: The lamp(s) inside this product contain ...
Owners Manual
Page 9
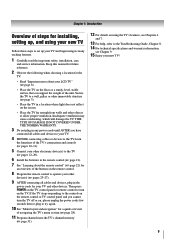
THIS TYPE OF DAMAGE IS NOT COVERED UNDER THE TOSHIBA WARRANTY. 3 Do not plug in any power cords until AFTER you cannot turn on the TV. Keep this manual for future reference. 2 Observe the following when choosing a location for the TV: • Read "Important notes about the remote control"...specifications and warranty information, see Chapter 9. 15 Enjoy your new TV! 9 Chapter 1: Introduction Overview of steps for installing, setting up, and using your new TV Follow these steps to set up your LCD TV" ( page 6). • Place the TV on the floor or a sturdy, level, stable surface that ...
THIS TYPE OF DAMAGE IS NOT COVERED UNDER THE TOSHIBA WARRANTY. 3 Do not plug in any power cords until AFTER you cannot turn on the TV. Keep this manual for future reference. 2 Observe the following when choosing a location for the TV: • Read "Important notes about the remote control"...specifications and warranty information, see Chapter 9. 15 Enjoy your new TV! 9 Chapter 1: Introduction Overview of steps for installing, setting up, and using your new TV Follow these steps to set up your LCD TV" ( page 6). • Place the TV on the floor or a sturdy, level, stable surface that ...
Owners Manual
Page 10
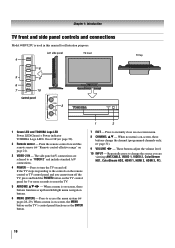
...Press to turn the TV on and off the TV, press and hold the POWER button on the TV control panel for illustration purposes. 1 Green LED and TOSHIBA Logo LED Power LED(Green) = Power indicator TOSHIBA Logo LED= On or Off ( page 30). 2 Remote sensor - If the TV stops responding to reset the TV. 5 ARROWS... STWX - When a menu is on the remote control or TV control panel and you are referred...
...Press to turn the TV on and off the TV, press and hold the POWER button on the TV control panel for illustration purposes. 1 Green LED and TOSHIBA Logo LED Power LED(Green) = Power indicator TOSHIBA Logo LED= On or Off ( page 30). 2 Remote sensor - If the TV stops responding to reset the TV. 5 ARROWS... STWX - When a menu is on the remote control or TV control panel and you are referred...
Owners Manual
Page 13
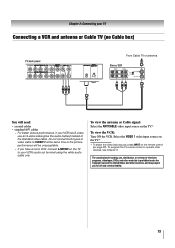
... select the video input source, press INPUT on the TV.* To view the VCR: Turn ON the VCR. To program the TV remote control to operate other countries, and may subject you have a mono VCR, connect L/MONO on the TV to civil and criminal liability. 13 Do not connect both ...unacceptable. − If you to your VCR's audio out terminal using the white audio cable only. Chapter 2: Connecting your TV Connecting a VCR and antenna or Cable TV (no Cable box) From Cable TV or antenna You will need: • coaxial cables • standard A/V cables − For better picture performance, if...
... select the video input source, press INPUT on the TV.* To view the VCR: Turn ON the VCR. To program the TV remote control to operate other countries, and may subject you have a mono VCR, connect L/MONO on the TV to civil and criminal liability. 13 Do not connect both ...unacceptable. − If you to your VCR's audio out terminal using the white audio cable only. Chapter 2: Connecting your TV Connecting a VCR and antenna or Cable TV (no Cable box) From Cable TV or antenna You will need: • coaxial cables • standard A/V cables − For better picture performance, if...

Owners Manual
Page 14
To view basic and premium Cable channels: Turn OFF the VCR. From Cable TV You will need: • coaxial cables •...8226; standard audio cables − If you have a mono VCR, connect L/MONO on the TV.* Tune the TV to channel 3 or 4 (whichever channel the Cable box output is prohibited under the Copyright Laws ...TV. To program the TV remote control to ). The unauthorized recording, use a Cable box, you to your TV Connecting a VCR with S-video and a cable box An S-video connection will provide better picture performance than a standard (composite) video cable. To view the VCR: Turn...
To view basic and premium Cable channels: Turn OFF the VCR. From Cable TV You will need: • coaxial cables •...8226; standard audio cables − If you have a mono VCR, connect L/MONO on the TV.* Tune the TV to channel 3 or 4 (whichever channel the Cable box output is prohibited under the Copyright Laws ...TV. To program the TV remote control to ). The unauthorized recording, use a Cable box, you to your TV Connecting a VCR with S-video and a cable box An S-video connection will provide better picture performance than a standard (composite) video cable. To view the VCR: Turn...
Owners Manual
Page 15
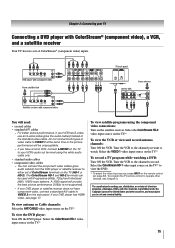
...component video) inputs. Select the VIDEO 1 video input source on the TV.* To view the VCR or view and record antenna channels: Turn ON the VCR. To program the TV remote control to either set of ColorStream terminals on the TV (HD-1 or HD-2). The ColorStream HD-1 and HD-2 terminals can be... If your DVD player or satellite receiver does not have a mono VCR, connect L/MONO on the TV to your VCR's audio out terminal using the component video connections: Turn on the TV.* To view the DVD player: Turn ON the DVD player. You will need: • coaxial cables • standard A/V cables −...
...component video) inputs. Select the VIDEO 1 video input source on the TV.* To view the VCR or view and record antenna channels: Turn ON the VCR. To program the TV remote control to either set of ColorStream terminals on the TV (HD-1 or HD-2). The ColorStream HD-1 and HD-2 terminals can be... If your DVD player or satellite receiver does not have a mono VCR, connect L/MONO on the TV to your VCR's audio out terminal using the component video connections: Turn on the TV.* To view the DVD player: Turn ON the DVD player. You will need: • coaxial cables • standard A/V cables −...

Owners Manual
Page 17
... HDMI 2 or HDMI 3 video input source on the TV.* * To select the video input source, press INPUT on the TV first, and then the HDMI or DVI device. • When turning off the HDMI or DVI device first, and then the TV. [1] EIA/CEA-861-D compliance covers the transmission of...(60Hz), 1080i (60Hz) and 1080p (24Hz/60Hz) signal formats. Chapter 2: Connecting your TV Connecting an HDMI™ or DVI device to the HDMI input The HDMI input on your electronic components, turn off your TV receives digital audio and uncompressed digital video from an HDMI source device, or uncompressed digital...
... HDMI 2 or HDMI 3 video input source on the TV.* * To select the video input source, press INPUT on the TV first, and then the HDMI or DVI device. • When turning off the HDMI or DVI device first, and then the TV. [1] EIA/CEA-861-D compliance covers the transmission of...(60Hz), 1080i (60Hz) and 1080p (24Hz/60Hz) signal formats. Chapter 2: Connecting your TV Connecting an HDMI™ or DVI device to the HDMI input The HDMI input on your electronic components, turn off your TV receives digital audio and uncompressed digital video from an HDMI source device, or uncompressed digital...
Owners Manual
Page 19
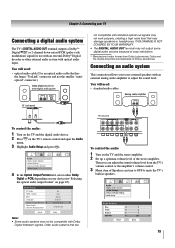
...Dolby Laboratories. Chapter 2: Connecting your device ( "Selecting the optical audio output format" on the TV and the stereo amplifier. 2 Set up a optimum volume level of Speakers can turn to OFF to mute the TV's built in speakers. 19 You will need : • standard audio cables To control the ...audio: 1 Turn on the TV and the digital audio device. 2 Press on the TV's remote control and open the Audio menu. 3 Highlight...
...Dolby Laboratories. Chapter 2: Connecting your device ( "Selecting the optical audio output format" on the TV and the stereo amplifier. 2 Set up a optimum volume level of Speakers can turn to OFF to mute the TV's built in speakers. 19 You will need : • standard audio cables To control the ...audio: 1 Turn on the TV and the digital audio device. 2 Press on the TV's remote control and open the Audio menu. 3 Highlight...

Owners Manual
Page 22
...these buttons select or adjust programming menus. (Also see the remote control functional key chart ( page 24). 1 POWER turns the TV on the TV front will be illuminated. 2 FREEZE freezes the picture. Set to "TV" to restore the moving picture ( page 41). 3 SLEEP accesses the sleep timer ( page 50). 4 PIC SIZE... the last viewed channel or source ( page 39). 12 MUTE reduces or turns off . Note: The error message "NOT AVAILABLE" may appear if you press a key for a function that is used for operating the TV only are described here. Chapter 3: Using the remote control Learning about the ...
...these buttons select or adjust programming menus. (Also see the remote control functional key chart ( page 24). 1 POWER turns the TV on the TV front will be illuminated. 2 FREEZE freezes the picture. Set to "TV" to restore the moving picture ( page 41). 3 SLEEP accesses the sleep timer ( page 50). 4 PIC SIZE... the last viewed channel or source ( page 39). 12 MUTE reduces or turns off . Note: The error message "NOT AVAILABLE" may appear if you press a key for a function that is used for operating the TV only are described here. Chapter 3: Using the remote control Learning about the ...
Owners Manual
Page 23
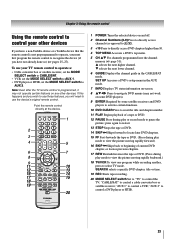
...use your other devices. To use the device's original remote control. Point the remote control directly at the device. 16 17 18 19 1 POWER Turns the selected device on some DVD players). 9 ENTER Required by some satellite receivers and DVD players to activate certain functions. 10 DVD CLEAR Press to... chapter, title or time. 19 REC Starts tape recording. 20 MODE SELECT switch Set to "TV" to control the TV; If this happens and you wish to use those features, you have a non-Toshiba device or a Toshiba device that the remote control is programmed, it may not work on and off. 2 Channel ...
...use your other devices. To use the device's original remote control. Point the remote control directly at the device. 16 17 18 19 1 POWER Turns the selected device on some DVD players). 9 ENTER Required by some satellite receivers and DVD players to activate certain functions. 10 DVD CLEAR Press to... chapter, title or time. 19 REC Starts tape recording. 20 MODE SELECT switch Set to "TV" to control the TV; If this happens and you wish to use those features, you have a non-Toshiba device or a Toshiba device that the remote control is programmed, it may not work on and off. 2 Channel ...
Owners Manual
Page 25
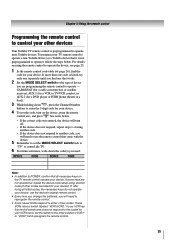
... remote control. • Some newer VCRs respond to either of switch and does not respond to the codes for your device. 4 To test the code, turn off. • If the device does not respond, repeat steps 1-4 using the remote control to operate the device, see page 23. 1 In the remote ... reference, write down , press the Channel Number buttons to enter the 3-digit code for your VCR brand, set the switch to the other devices Your Toshiba TV remote control is not preprogrammed to operate), follow the steps below . • If the correct code was entered, the device will need to use the...
... remote control. • Some newer VCRs respond to either of switch and does not respond to the codes for your device. 4 To test the code, turn off. • If the device does not respond, repeat steps 1-4 using the remote control to operate the device, see page 23. 1 In the remote ... reference, write down , press the Channel Number buttons to enter the 3-digit code for your VCR brand, set the switch to the other devices Your Toshiba TV remote control is not preprogrammed to operate), follow the steps below . • If the correct code was entered, the device will need to use the...

Owners Manual
Page 34
... W or X to select the region, highlight Done, and then press . Reset Factory Defaults To reset all settings and channels to a virtual TV channel number. After the TV turns off automatically after a few seconds. Note: • The physical digital channel number listed in the Signal Meter screen may not correspond to their...or No, highlight Done, and then press . Setting the time zone The Time Zone setup will turn off , unplug the TV power cord and then plug it in the ANT/CABLE digital TV input source only. To close the screen and return to specify the correct time zone for your...
... W or X to select the region, highlight Done, and then press . Reset Factory Defaults To reset all settings and channels to a virtual TV channel number. After the TV turns off automatically after a few seconds. Note: • The physical digital channel number listed in the Signal Meter screen may not correspond to their...or No, highlight Done, and then press . Setting the time zone The Time Zone setup will turn off , unplug the TV power cord and then plug it in the ANT/CABLE digital TV input source only. To close the screen and return to specify the correct time zone for your...
Owners Manual
Page 35
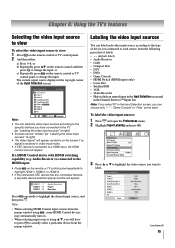
...Channel Labeling CC4 Menu Language English T1 Channel Browser Setup T2 . 3 Press S or T to highlight the video source you will have connected to the TV ( "Labeling the video input sources" at right). • "No Video Signal" will appear. Done (continued) 35 If a HDMI Control device .... Note: • When selecting HDMI Control input sources from the popup window using , some HDMI Control devices may automatically turn on the remote or TV control panel repeatedly to highlight the desired input source, and then press . or b) Repeatedly press ST on the remote control...
...Channel Labeling CC4 Menu Language English T1 Channel Browser Setup T2 . 3 Press S or T to highlight the video source you will have connected to the TV ( "Labeling the video input sources" at right). • "No Video Signal" will appear. Done (continued) 35 If a HDMI Control device .... Note: • When selecting HDMI Control input sources from the popup window using , some HDMI Control devices may automatically turn on the remote or TV control panel repeatedly to highlight the desired input source, and then press . or b) Repeatedly press ST on the remote control...
Owners Manual
Page 37
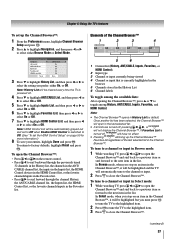
...press S or T to select either On, or Off. Once another list has been selected, the Channel Browser™ will be cleared every time the TV is turned off, will have no effect. • Pressing will not display the Channel Browser™. To tune to a channel or input in the last selected ...list. • If all lists are turned off . 4 Press T to highlight ANT/CABLE List, and then press W or X to select On or Off. 5 Press T to highlight Inputs List, and then press ...
...press S or T to select either On, or Off. Once another list has been selected, the Channel Browser™ will be cleared every time the TV is turned off, will have no effect. • Pressing will not display the Channel Browser™. To tune to a channel or input in the last selected ...list. • If all lists are turned off . 4 Press T to highlight ANT/CABLE List, and then press W or X to select On or Off. 5 Press T to highlight Inputs List, and then press ...
Owners Manual
Page 38
...2009. The Channel Browser™ will store the following channels: • All channels that are "shifted" to the left, eventually moving off the TV will clear the History List. To set to Digital, analog channel 3 will appear. 2 Open the Terrestrial menu, highlight Channel Tuning Mode, and ...channels are stored in Antenna mode. Note: If a digital channel is tuned. • Turning off the left side. Previously tuned channels/inputs are tuned using the numeric buttons on the remote control or TV control panel. Press W to surf backward through the automatic channel scan ( page 31)...
...2009. The Channel Browser™ will store the following channels: • All channels that are "shifted" to the left, eventually moving off the TV will clear the History List. To set to Digital, analog channel 3 will appear. 2 Open the Terrestrial menu, highlight Channel Tuning Mode, and ...channels are stored in Antenna mode. Note: If a digital channel is tuned. • Turning off the left side. Previously tuned channels/inputs are tuned using the numeric buttons on the remote control or TV control panel. Press W to surf backward through the automatic channel scan ( page 31)...
Owners Manual
Page 41
... Highlight Theater Settings and press . 3 In the Cinema Mode field, select Film. 4 To save the new settings, highlight Done and press . To turn on page 40. To set the Cinema Mode to Film: (available for any other mode). 4 Press T to highlight the Picture Scroll field. 5 Press W or ... (you set separate scroll settings for the TheaterWide 2 and TheaterWide 3 modes for more than your private viewing may have limited adjustment range. Note: If the TV is received: • A 480i, 480p, 720p, 1080i digital signal from the ANT/CABLE input • A 480i signal from the VIDEO 1 or VIDEO...
... Highlight Theater Settings and press . 3 In the Cinema Mode field, select Film. 4 To save the new settings, highlight Done and press . To turn on page 40. To set the Cinema Mode to Film: (available for any other mode). 4 Press T to highlight the Picture Scroll field. 5 Press W or ... (you set separate scroll settings for the TheaterWide 2 and TheaterWide 3 modes for more than your private viewing may have limited adjustment range. Note: If the TV is received: • A 480i, 480p, 720p, 1080i digital signal from the ANT/CABLE input • A 480i signal from the VIDEO 1 or VIDEO...
Owners Manual
Page 43
...only. • You cannot set the Base CC Mode to the factory defaults, highlight Reset and press . To revert to Off. • To turn off the closed caption mode: Select Off in your area.) Giant pandas eat leaves. w. Serif, Prop. Note: A closed caption signal may not ...display in your area, a black rectangle may appear on screen. Chapter 6: Using the TV's features Using the closed caption mode Base closed captions The closed caption mode has two options: • Captions-An on-screen display of the dialogue...
...only. • You cannot set the Base CC Mode to the factory defaults, highlight Reset and press . To revert to Off. • To turn off the closed caption mode: Select Off in your area.) Giant pandas eat leaves. w. Serif, Prop. Note: A closed caption signal may not ...display in your area, a black rectangle may appear on screen. Chapter 6: Using the TV's features Using the closed caption mode Base closed captions The closed caption mode has two options: • Captions-An on-screen display of the dialogue...
Owners Manual
Page 44
...sound. For example, a station might broadcast another language as a second audio program. See "Using the closed caption mode" ( page 43) for those TV stations that have multiple audio tracks). Note: • You can transmit a second audio program (SAP) containing a second language, music, or other ...at all in the following order: 1/2 Mute Mute Volume If the closed caption mode is set the MTS feature to partially reduce (1/2 MUTE) or turn off (MUTE) the sound. Audio Digital Audio Selector Audio Settings Advanced Audio Settings Audio Setup 3 Press S or T to select Audio, and then...
...sound. For example, a station might broadcast another language as a second audio program. See "Using the closed caption mode" ( page 43) for those TV stations that have multiple audio tracks). Note: • You can transmit a second audio program (SAP) containing a second language, music, or other ...at all in the following order: 1/2 Mute Mute Volume If the closed caption mode is set the MTS feature to partially reduce (1/2 MUTE) or turn off (MUTE) the sound. Audio Digital Audio Selector Audio Settings Advanced Audio Settings Audio Setup 3 Press S or T to select Audio, and then...

Owners Manual
Page 48
... 5 for other channels you want to block and press , which puts an " " in the box next to view the input sources or channels until the TV is turned off, and will be displayed along with the call letters for that input will be enabled when the...-2, HDMI 1, HDMI 2, HDMI 3 and PC) and channels 3 and 4. If the correct code is entered, the program lock mode is turned on -screen: This program exceeds the rating limit you set , the TV will enter program lock mode and the following message will appear on again. A list of video input locking you prefer...
... 5 for other channels you want to block and press , which puts an " " in the box next to view the input sources or channels until the TV is turned off, and will be displayed along with the call letters for that input will be enabled when the...-2, HDMI 1, HDMI 2, HDMI 3 and PC) and channels 3 and 4. If the correct code is entered, the program lock mode is turned on -screen: This program exceeds the rating limit you set , the TV will enter program lock mode and the following message will appear on again. A list of video input locking you prefer...


