

Owners Manual
Page 2
... of misuse. If the cabinet is probably non-standard and must be used only with Toshiba stand shown on a soft floor, make sure that important operating and maintenance instructions follow this...damp cloth to allow proper ventilation. Using your TV to force it is not protected by a picture-in picture distortion or color fading. Then remove the source of any heavy object on a sturdy platform....around. Avoid areas subject to check for extended periods of the TV. • Model 40H80 may occur if you that the floor is provided to call the CATV system installer's ...
... of misuse. If the cabinet is probably non-standard and must be used only with Toshiba stand shown on a soft floor, make sure that important operating and maintenance instructions follow this...damp cloth to allow proper ventilation. Using your TV to force it is not protected by a picture-in picture distortion or color fading. Then remove the source of any heavy object on a sturdy platform....around. Avoid areas subject to check for extended periods of the TV. • Model 40H80 may occur if you that the floor is provided to call the CATV system installer's ...
Owners Manual
Page 3
Introduction 4 Welcome to Toshiba 4 Exploring your new TV 4 Connecting your TV 5 Connecting a VCR 5 Connecting a cable converter box ... Locking channels 38 Locking video inputs 39 Changing the PIN code 39 Adjusting the picture 40 Selecting the picture mode 40 Adjusting the picture quality 40 Saving new preference 41 Using the flesh tone feature 41 Using the... Digital Noise Reduction (DNR) feature 41 Selecting the color temperature 42 Resetting your picture adjustments 42 Watching video input 43 Labeling the video input sources 43 Using the closed caption feature ...
Introduction 4 Welcome to Toshiba 4 Exploring your new TV 4 Connecting your TV 5 Connecting a VCR 5 Connecting a cable converter box ... Locking channels 38 Locking video inputs 39 Changing the PIN code 39 Adjusting the picture 40 Selecting the picture mode 40 Adjusting the picture quality 40 Saving new preference 41 Using the flesh tone feature 41 Using the... Digital Noise Reduction (DNR) feature 41 Selecting the color temperature 42 Resetting your picture adjustments 42 Watching video input 43 Labeling the video input sources 43 Using the closed caption feature ...
Owners Manual
Page 5
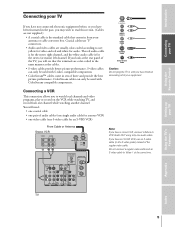
... an S-VHS VCR, use "F" connectors. • Audio and video cables are color-coded in the same manner as the cables. • S-video cables provide better picture performance. You will see that comes in until you to VCR Audio OUT using only one channel while watching another channel. TV Using the TV... cables can only be used with S-video compatible components. • ColorStream™ cables come in the S-video jacks) instead of three and provide the best picture performance. Coaxial cables use an S-video cable (in sets of the regular video cable.
... an S-VHS VCR, use "F" connectors. • Audio and video cables are color-coded in the same manner as the cables. • S-video cables provide better picture performance. You will see that comes in until you to VCR Audio OUT using only one channel while watching another channel. TV Using the TV... cables can only be used with S-video compatible components. • ColorStream™ cables come in the S-video jacks) instead of three and provide the best picture performance. Coaxial cables use an S-video cable (in sets of the regular video cable.
Owners Manual
Page 7
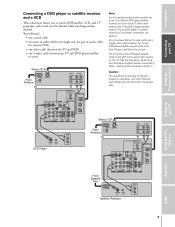
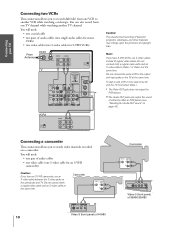
.../satellite receiver) Stereo VCR From Antenna IN from ANT OUT to TV CH 3 CH 4 TV VIDEO AUDIO LR IN OUT Note: For the highest possible picture quality from a non-ColorStream DVD player/satellite receiver, you to TV CH 3 CH 4 TV VIDEO AUDIO LR IN OUT From Satellite Dish S-VIDEO AUDIO ... 2 IN ANT-2 IN from ANT OUT to watch DVD/satellite, VCR, and TV programs, and record one pair of copyright laws. You will distort the picture. Doing so will need: • one coaxial cable • two pairs of audio cables (one single and one TV channel while watching another channel. S-...
.../satellite receiver) Stereo VCR From Antenna IN from ANT OUT to TV CH 3 CH 4 TV VIDEO AUDIO LR IN OUT Note: For the highest possible picture quality from a non-ColorStream DVD player/satellite receiver, you to TV CH 3 CH 4 TV VIDEO AUDIO LR IN OUT From Satellite Dish S-VIDEO AUDIO ... 2 IN ANT-2 IN from ANT OUT to watch DVD/satellite, VCR, and TV programs, and record one pair of copyright laws. You will distort the picture. Doing so will need: • one coaxial cable • two pairs of audio cables (one single and one TV channel while watching another channel. S-...

Owners Manual
Page 8
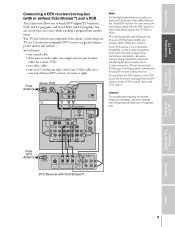
...use the S-video connections (both audio and video) instead of the ColorStream connections. (Be aware, however, that a ColorStream connection provides higher picture quality than an S-video connection.) Do not connect both S-Video and ColorStream cables between the TV and DVD player at right) From Antenna ...and one pair of copyright laws. You can connect the ColorStream cables from the DVD player to a ColorStream-compatible DVD player (such as a Toshiba ColorStream-equipped DVD player) can record from one S-video cable for a mono VCR) • two video cables • one set of ...
...use the S-video connections (both audio and video) instead of the ColorStream connections. (Be aware, however, that a ColorStream connection provides higher picture quality than an S-video connection.) Do not connect both S-Video and ColorStream cables between the TV and DVD player at right) From Antenna ...and one pair of copyright laws. You can connect the ColorStream cables from the DVD player to a ColorStream-compatible DVD player (such as a Toshiba ColorStream-equipped DVD player) can record from one S-video cable for a mono VCR) • two video cables • one set of ...
Owners Manual
Page 9
...can record from the DTV receiver, set the VCR to Line IN, and set the TV to Line IN. You can greatly enhance picture quality and realism. Introduction Connecting your TV Using the Remote Control Connecting a DTV receiver/set-top box (with ColorStream™ Setting up...three pairs of audio cables (two single and one pair of the ColorStream connections. (Be aware, however, that a ColorStream connection provides higher picture quality than an S-video connection.) Do not connect both S-Video and ColorStream cables between the TV and DTV receiver. Your TV has ColorStream component...
...can record from the DTV receiver, set the VCR to Line IN, and set the TV to Line IN. You can greatly enhance picture quality and realism. Introduction Connecting your TV Using the Remote Control Connecting a DTV receiver/set-top box (with ColorStream™ Setting up...three pairs of audio cables (two single and one pair of the ColorStream connections. (Be aware, however, that a ColorStream connection provides higher picture quality than an S-video connection.) Do not connect both S-Video and ColorStream cables between the TV and DTV receiver. Your TV has ColorStream component...
Owners Manual
Page 10
... To dub or edit, VCR 2 must select Line IN, and the TV must select Video-1. * The Video OUT jack does not output the POP picture. **The Audio OUT jacks can also record from ANT OUT to another TV channel. You will need : • one VCR to TV AUDIO LR ... materials may infringe upon the provisions of copyright laws. Camcorder VIDEO AUDIO OUT L R 10 VIDEO-3 IN S-VIDEO VIDEO AUDIO L/MONO R Video-3 (front panel) of 40H80 Camcorder VIDEO AUDIO OUT L R M Video-355(fHro7n0t/6p1aHn7e0l) of 56H80/65H80 Index You will need : • one pair of audio cables • one video...
... To dub or edit, VCR 2 must select Line IN, and the TV must select Video-1. * The Video OUT jack does not output the POP picture. **The Audio OUT jacks can also record from ANT OUT to another TV channel. You will need : • one VCR to TV AUDIO LR ... materials may infringe upon the provisions of copyright laws. Camcorder VIDEO AUDIO OUT L R 10 VIDEO-3 IN S-VIDEO VIDEO AUDIO L/MONO R Video-3 (front panel) of 40H80 Camcorder VIDEO AUDIO OUT L R M Video-355(fHro7n0t/6p1aHn7e0l) of 56H80/65H80 Index You will need : • one pair of audio cables • one video...
Owners Manual
Page 13
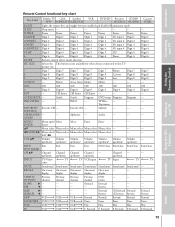
...* up/down* up/down* up/down* up/down* up/down* up your TV Remote Control functional key chart Key Label Toshiba TV Cable Satellite (TV) (CBL/SAT) (CBL/SAT) VCR DVD/LD Receiver CD/MD Cassette (AUDIO) (AUDIO) (VCR... --- --- --- --- Guide Guide Program DVD setup Program Program --- INFO --- ENTER Enter yz Menu select Menu select Menu select Menu select Menu select --- --- --- SKIP/ • --- --- --- --- picture size. 7 Digit 7 Digit 7 Digit 7 Digit 7 Digit 7 Phono Digit 7 Digit 7 8 Digit 8 Digit 8 Digit 8 Digit 8 Digit 8 Cassette Digit 8 Digit 8 9 Digit 9 Digit...
...* up/down* up/down* up/down* up/down* up/down* up your TV Remote Control functional key chart Key Label Toshiba TV Cable Satellite (TV) (CBL/SAT) (CBL/SAT) VCR DVD/LD Receiver CD/MD Cassette (AUDIO) (AUDIO) (VCR... --- --- --- --- Guide Guide Program DVD setup Program Program --- INFO --- ENTER Enter yz Menu select Menu select Menu select Menu select Menu select --- --- --- SKIP/ • --- --- --- --- picture size. 7 Digit 7 Digit 7 Digit 7 Digit 7 Digit 7 Phono Digit 7 Digit 7 8 Digit 8 Digit 8 Digit 8 Digit 8 Digit 8 Cassette Digit 8 Digit 8 9 Digit 9 Digit...

Owners Manual
Page 20
... Brand Aiwa Fisher Harman/Kardon JBL JVC Jerrold Nikko Paramount Pictures RCA SSI Schneider Scientific Atlanta Sony Soundesign Starcom Yorx Code ...Mathes Denon GE Harman/Kardon JVC Linn Magnavox Marantz Optimus Panasonic Philips Pioneer Realistic Sony Soundesign Technics Toshiba Victor Wards Yamaha Code 0425 0288 0319 0179 0097 0911 0350 0288 0288 0288 0319, 0414...Harman/Kardon JVC Kenwood Magnavox Marantz Mitsubishi Onkyo Optimus Panasonic Philips Pioneer Revox Sansui Sherwood Sony Teac Technics Toshiba Victor Wards Yamaha Code 0048, 0216, 0219 0302 0048 0095 0093 0327, 0458 0048, 0201 0263...
... Brand Aiwa Fisher Harman/Kardon JBL JVC Jerrold Nikko Paramount Pictures RCA SSI Schneider Scientific Atlanta Sony Soundesign Starcom Yorx Code ...Mathes Denon GE Harman/Kardon JVC Linn Magnavox Marantz Optimus Panasonic Philips Pioneer Realistic Sony Soundesign Technics Toshiba Victor Wards Yamaha Code 0425 0288 0319 0179 0097 0911 0350 0288 0288 0288 0319, 0414...Harman/Kardon JVC Kenwood Magnavox Marantz Mitsubishi Onkyo Optimus Panasonic Philips Pioneer Revox Sansui Sherwood Sony Teac Technics Toshiba Victor Wards Yamaha Code 0048, 0216, 0219 0302 0048 0095 0093 0327, 0458 0048, 0201 0263...
Owners Manual
Page 21
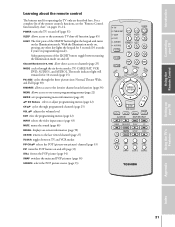
...remain lit for 10 seconds (page 15). Subsequent presses of the LIGHT button toggle between TV and VCR modes PIP CH yz selects the POP (picture-out-picture) channel (page 33) PIP turns the POP feature on and off function (page 45) LIGHT The first press of the remote control's functions,...Control Learning about the remote control The buttons used for 5 seconds (10 seconds if you're in programming mode). PIC SIZE cycles through the three picture sizes: Normal, Theater Wide, and Full (page 30) FAVORITE allows access to the favorite channel search function (page 34) MENU allows access to ...
...remain lit for 10 seconds (page 15). Subsequent presses of the LIGHT button toggle between TV and VCR modes PIP CH yz selects the POP (picture-out-picture) channel (page 33) PIP turns the POP feature on and off function (page 45) LIGHT The first press of the remote control's functions,...Control Learning about the remote control The buttons used for 5 seconds (10 seconds if you're in programming mode). PIC SIZE cycles through the three picture sizes: Normal, Theater Wide, and Full (page 30) FAVORITE allows access to the favorite channel search function (page 34) MENU allows access to ...

Owners Manual
Page 25
...channel (programmed or unprogrammed): Press the Channel Number buttons (0-9 and 100). Repeat steps 1-4 for other channels you want to add or erase. 40H80 x •zy CH MENU VOL CH EXIT VOL TV/VIDEO DEMO MENU Channel zy 56H80 / 65H80 DEMO MENU TV/VIDEO VOLUME CHANNEL POWER... MENU Channel zy zyx • Changing channels To change to form a full-color picture. Press y or z to select channel 125, press 100-2-5. For example, to highlight CONVERGENCE. 1 2 3 4 5 6 7 8 9 10 11 12 13 14 15...
...channel (programmed or unprogrammed): Press the Channel Number buttons (0-9 and 100). Repeat steps 1-4 for other channels you want to add or erase. 40H80 x •zy CH MENU VOL CH EXIT VOL TV/VIDEO DEMO MENU Channel zy 56H80 / 65H80 DEMO MENU TV/VIDEO VOLUME CHANNEL POWER... MENU Channel zy zyx • Changing channels To change to form a full-color picture. Press y or z to select channel 125, press 100-2-5. For example, to highlight CONVERGENCE. 1 2 3 4 5 6 7 8 9 10 11 12 13 14 15...
Owners Manual
Page 27
...; The (FAV) x • buttons operate as MENU x • buttons when a menu display is on the screen. • The favorite channel feature is not available in a 9-picture multiwindow: Press FAVORITE (see "Using the favorite channel search function" on page 34). Select the first channel you want to highlight FAVORITE CH1 or FAVORITE...
...; The (FAV) x • buttons operate as MENU x • buttons when a menu display is on the screen. • The favorite channel feature is not available in a 9-picture multiwindow: Press FAVORITE (see "Using the favorite channel search function" on page 34). Select the first channel you want to highlight FAVORITE CH1 or FAVORITE...
Owners Manual
Page 30
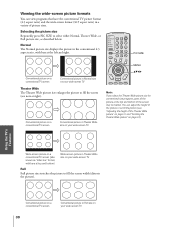
... 32). Introduction Connecting your TV Using the Remote Control Viewing the wide-screen picture formats You can adjust the height of the picture or scroll the picture (see note at right). You can view programs that have the conventional TV picture format (4:3 aspect ratio) and the wide-screen format (16:9 aspect ratio) in the...
... 32). Introduction Connecting your TV Using the Remote Control Viewing the wide-screen picture formats You can adjust the height of the picture or scroll the picture (see note at right). You can view programs that have the conventional TV picture format (4:3 aspect ratio) and the wide-screen format (16:9 aspect ratio) in the...
Owners Manual
Page 31
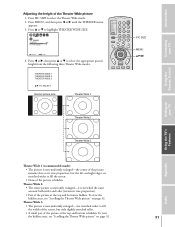
... wider and taller (retains its true proportion, but only slightly stretched taller. • A small part of the Theater Wide picture 1. Press y or z to select the appropriate picture height from the following three Theater Wide modes. Press MENU, and then press x or • until the THEATER menu appears.... 3. To view the hidden areas, see "Scrolling the Theater Wide picture" on page 32. PIC SIZE MENU yzx • 31 Index Appendix Using the TV's Features Setting up your TV Using the Remote Control Connecting...
... wider and taller (retains its true proportion, but only slightly stretched taller. • A small part of the Theater Wide picture 1. Press y or z to select the appropriate picture height from the following three Theater Wide modes. Press MENU, and then press x or • until the THEATER menu appears.... 3. To view the hidden areas, see "Scrolling the Theater Wide picture" on page 32. PIC SIZE MENU yzx • 31 Index Appendix Using the TV's Features Setting up your TV Using the Remote Control Connecting...
Owners Manual
Page 32
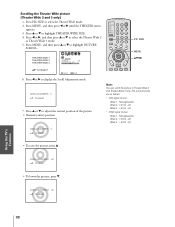
...SCROLL ADJUSTMENT +35 : TO ADJUST • To lower the picture, press z. SCROLL ADJUSTMENT 0 : TO ADJUST 7. Press x or • to adjust the vertical position of the picture. • Normal (center) position Note: You can scroll the picture in Theater Wide 2 and Theater Wide 3 only. The ... Connecting your TV Using the Remote Control Setting up your TV Scrolling the Theater Wide picture (Theater Wide 2 and 3 only) 1. Press PIC SIZE to -20 SCROLL ADJUSTMENT 0 : TO ADJUST • To raise the picture, press y . Press MENU, and then press x or • until the THEATER...
...SCROLL ADJUSTMENT +35 : TO ADJUST • To lower the picture, press z. SCROLL ADJUSTMENT 0 : TO ADJUST 7. Press x or • to adjust the vertical position of the picture. • Normal (center) position Note: You can scroll the picture in Theater Wide 2 and Theater Wide 3 only. The ... Connecting your TV Using the Remote Control Setting up your TV Scrolling the Theater Wide picture (Theater Wide 2 and 3 only) 1. Press PIC SIZE to -20 SCROLL ADJUSTMENT 0 : TO ADJUST • To raise the picture, press y . Press MENU, and then press x or • until the THEATER...

Owners Manual
Page 33
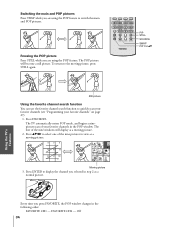
... V-CHIP menu" on page 49). PIP STILL SOURCE SWAP PIP CH yz POP 24 BLOCKED To display a picture from a TV broadcast or an external source, such as the POP picture, or select a channel for the POP window using the VCR's channel keys. Press PIP to select the input.... The current source will be horizontally compressed. Introduction Connecting your TV Using the Remote Control Using the POP double-window feature The POP (picture-outside-picture) feature splits the screen into a double window that exceeds your set rating limits, the program will display in purple. 5. Press PIP ...
... V-CHIP menu" on page 49). PIP STILL SOURCE SWAP PIP CH yz POP 24 BLOCKED To display a picture from a TV broadcast or an external source, such as the POP picture, or select a channel for the POP window using the VCR's channel keys. Press PIP to select the input.... The current source will be horizontally compressed. Introduction Connecting your TV Using the Remote Control Using the POP double-window feature The POP (picture-outside-picture) feature splits the screen into a double window that exceeds your set rating limits, the program will display in purple. 5. Press PIP ...
Owners Manual
Page 34
...FM DISC PIP STILL SOURCE SWAP PIP CH yz Using the Remote Control Setting up your favorite channels in the POP window. Freezing the POP picture Press STILL while you selected in the following order: FAVORITE CH1 - FAVORITE CH2 - The TV automatically enters POP mode, and begins a ...ninepicture scan of the nine windows will become a still picture. The first of your TV Using the TV's Features Still picture Using the favorite channel search function You can use the favorite channel search function to display the channel you are...
...FM DISC PIP STILL SOURCE SWAP PIP CH yz Using the Remote Control Setting up your favorite channels in the POP window. Freezing the POP picture Press STILL while you selected in the following order: FAVORITE CH1 - FAVORITE CH2 - The TV automatically enters POP mode, and begins a ...ninepicture scan of the nine windows will become a still picture. The first of your TV Using the TV's Features Still picture Using the favorite channel search function You can use the favorite channel search function to display the channel you are...
Owners Manual
Page 38
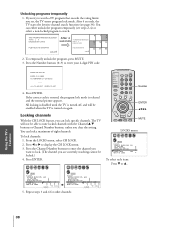
... 34 35 5. All locking is disabled until the TV is turned off, and will not be enabled when the TV is released and the normal picture appears. The TV will be able to watch a TV program that exceeds the rating limits you can lock specific channels. Press the Channel Number buttons...
... 34 35 5. All locking is disabled until the TV is turned off, and will not be enabled when the TV is released and the normal picture appears. The TV will be able to watch a TV program that exceeds the rating limits you can lock specific channels. Press the Channel Number buttons...

Owners Manual
Page 40
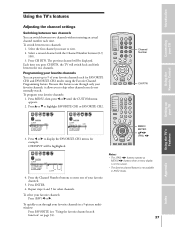
... automatically changes to PREFERENCE in the TV's memory with the SAVE NEW PREFERENCE feature (see page 41) before closing the Picture menu or the TV will return to your personal preferences, including the contrast, brightness, color, tint, sharpness, flesh tone, noise reduction, and color...item you must select SAVE NEW PREFERENCE (see page 41). To save your new picture quality settings, you want to select MODE. 3. To select the picture mode: 1. You can adjust the picture quality to the previous picture mode. 40H80 x •zy CH MENU VOL CH EXIT VOL TV/VIDEO DEMO MENU 56H80 ...
... automatically changes to PREFERENCE in the TV's memory with the SAVE NEW PREFERENCE feature (see page 41) before closing the Picture menu or the TV will return to your personal preferences, including the contrast, brightness, color, tint, sharpness, flesh tone, noise reduction, and color...item you must select SAVE NEW PREFERENCE (see page 41). To save your new picture quality settings, you want to select MODE. 3. To select the picture mode: 1. You can adjust the picture quality to the previous picture mode. 40H80 x •zy CH MENU VOL CH EXIT VOL TV/VIDEO DEMO MENU 56H80 ...

Owners Manual
Page 41
...up your TV Using the Remote Control Connecting your new preferences: 1. Press MENU, and then press x or • until the PICTURE menu appears. 2. Using the Digital Noise Reduction (DNR) feature This feature allows you to reduce visible interference in your saved preferences by... • to highlight SAVE NEW PREFERENCE. 3. Press y or z to highlight DNR. 3. Press y or z to highlight FLESH TONE. 3. To save the PICTURE qualities (contrast, brightness, color, tint, and sharpness) you adjusted in step 3 above . To turn on the flesh tone feature: 1. Press MENU, and then...
...up your TV Using the Remote Control Connecting your new preferences: 1. Press MENU, and then press x or • until the PICTURE menu appears. 2. Using the Digital Noise Reduction (DNR) feature This feature allows you to reduce visible interference in your saved preferences by... • to highlight SAVE NEW PREFERENCE. 3. Press y or z to highlight DNR. 3. Press y or z to highlight FLESH TONE. 3. To save the PICTURE qualities (contrast, brightness, color, tint, and sharpness) you adjusted in step 3 above . To turn on the flesh tone feature: 1. Press MENU, and then...


