

Owners Manual
Page 2
...; Avoid displaying stationary images on your TV screen for proper grounding, and, in particular, specifies that important operating and maintenance instructions follow this product may occur if you that the cable ground shall be replaced by a picture-in direct sunlight or near a heater. The exclamation mark in the triangle tells you leave the TV in -picture (PIP) display, Multi-Window display, computer displays, video games, stock...
...; Avoid displaying stationary images on your TV screen for proper grounding, and, in particular, specifies that important operating and maintenance instructions follow this product may occur if you that the cable ground shall be replaced by a picture-in direct sunlight or near a heater. The exclamation mark in the triangle tells you leave the TV in -picture (PIP) display, Multi-Window display, computer displays, video games, stock...
Owners Manual
Page 3
... 16 Operational feature Reset (980 16 Device code table 17-20 Learning about the remote control 21 Setting up your TV 22 Learning about the menu system 22 Changing the on-screen display language 23 Selecting the antenna input 23 Using the TV/ VIDEO button on the TV 23 Adding channels to the TV's memory 24 Programming channels automatically 24 Adding and erasing channels manually 25 Changing channels 25 Adjusting the color convergence 25 Using the TV's features 27 Adjusting the channel settings 27 Switching...
... 16 Operational feature Reset (980 16 Device code table 17-20 Learning about the remote control 21 Setting up your TV 22 Learning about the menu system 22 Changing the on-screen display language 23 Selecting the antenna input 23 Using the TV/ VIDEO button on the TV 23 Adding channels to the TV's memory 24 Programming channels automatically 24 Adding and erasing channels manually 25 Changing channels 25 Adjusting the color convergence 25 Using the TV's features 27 Adjusting the channel settings 27 Switching...
Owners Manual
Page 4
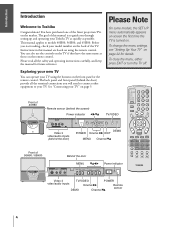
... TV's Features Appendix Index 4 See "Connecting your TV" on using the buttons on the back of 40H80 Remote sensor (behind the screen) Power indicator x •zy TV/VIDEO S-VIDEO AUDIO VIDEO L/MONO R IN-VIDEO 3 Video 3 video/audio inputs (behind the door) provide all the safety and operating instructions carefully, and keep the manual for details. Instructions in this manual is turned on page 22 for future reference. To change the menu settings, see "Setting Up Your TV" on . This manual applies to Toshiba...
... TV's Features Appendix Index 4 See "Connecting your TV" on using the buttons on the back of 40H80 Remote sensor (behind the screen) Power indicator x •zy TV/VIDEO S-VIDEO AUDIO VIDEO L/MONO R IN-VIDEO 3 Video 3 video/audio inputs (behind the door) provide all the safety and operating instructions carefully, and keep the manual for details. Instructions in this manual is turned on page 22 for future reference. To change the menu settings, see "Setting Up Your TV" on . This manual applies to Toshiba...
Owners Manual
Page 5
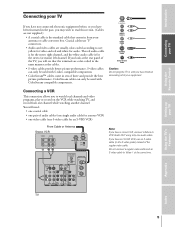
... see that comes in from your antenna or cable converter box. Coaxial cables use "F" connectors. • Audio and video cables are usually color-coded according to use an S-video cable (in the S-video jacks) instead of three and provide the best picture performance. S-video cables can only be used with S-video compatible components. • ColorStream™ cables come in sets of the regular video cable. Introduction Connecting your TV Using the Remote Control Setting up your TV Connecting your TV If you have not connected electronic equipment...
... see that comes in from your antenna or cable converter box. Coaxial cables use "F" connectors. • Audio and video cables are usually color-coded according to use an S-video cable (in the S-video jacks) instead of three and provide the best picture performance. S-video cables can only be used with S-video compatible components. • ColorStream™ cables come in sets of the regular video cable. Introduction Connecting your TV Using the Remote Control Setting up your TV Connecting your TV If you have not connected electronic equipment...

Owners Manual
Page 8
... Line IN, and set of copyright laws. Introduction Connecting your TV Using the Remote Control Connecting a DVD player (with or without ColorStream™) and a VCR This connection allows you must use the S-video connections (both audio and video) instead of the ColorStream connections. (Be aware, however, that a ColorStream connection provides higher picture quality than an S-video connection.) Do not connect both S-Video and ColorStream cables between the TV and DVD player. To monitor recording from the DVD player to Video-1. Your TV...
... Line IN, and set of copyright laws. Introduction Connecting your TV Using the Remote Control Connecting a DVD player (with or without ColorStream™) and a VCR This connection allows you must use the S-video connections (both audio and video) instead of the ColorStream connections. (Be aware, however, that a ColorStream connection provides higher picture quality than an S-video connection.) Do not connect both S-Video and ColorStream cables between the TV and DVD player. To monitor recording from the DVD player to Video-1. Your TV...
Owners Manual
Page 11
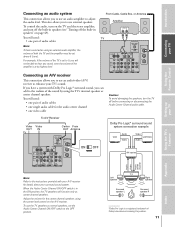
... Audio Center Channel ON/OFF switch is in speakers" on the A/V receiver. You will need : • one video cable Caution: To avoid damaging the speakers, turn off the built-in speakers (see" Turning off before connecting or disconnecting the Audio Center Channel audio cable. Adjust the volume for details about your TV's sound. Introduction Connecting your TV Using the Remote Control Connecting an audio system From Cable, Cable Box, or Antenna This connection allows you to use an audio amplifier to hear any sound, even the volume...
... Audio Center Channel ON/OFF switch is in speakers" on the A/V receiver. You will need : • one video cable Caution: To avoid damaging the speakers, turn off the built-in speakers (see" Turning off before connecting or disconnecting the Audio Center Channel audio cable. Adjust the volume for details about your TV's sound. Introduction Connecting your TV Using the Remote Control Connecting an audio system From Cable, Cable Box, or Antenna This connection allows you to use an audio amplifier to hear any sound, even the volume...
Owners Manual
Page 12
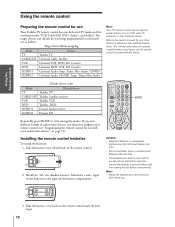
... audio/video devices, you will not use the remote control for a long time, remove the batteries to the signs on your VCR, cable TV converter, or other devices to cycle among the modes. Do not throw batteries into the battery compartment. Refer to the owner's manuals for your other electronic device. Installing the remote control batteries To install the batteries: 1. Default device codes Mode Default device TV Toshiba TV CABLE/SAT Toshiba Satellite receiver VCR Toshiba...
... audio/video devices, you will not use the remote control for a long time, remove the batteries to the signs on your VCR, cable TV converter, or other devices to cycle among the modes. Do not throw batteries into the battery compartment. Refer to the owner's manuals for your other electronic device. Installing the remote control batteries To install the batteries: 1. Default device codes Mode Default device TV Toshiba TV CABLE/SAT Toshiba Satellite receiver VCR Toshiba...
Owners Manual
Page 13
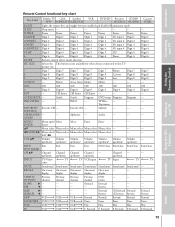
... Power Power Power 1/MOVIE Digit 1 Digit 1 Digit 1 Digit 1 Digit 1 AV input 1 Digit 1 Digit 1 2/SPORTS Digit 2 Digit 2 Digit 2 Digit 2 Digit 2 AV input 2 Digit 2 Digit 2 3/NEWS Digit 3 Digit 3 Digit 3 Digit 3 Digit 3 AV input 3 Digit 3 Digit 3 4/SERVICES Digit 4 Digit 4 Digit 4 Digit 4 Digit 4 AV input 4 Digit 4 Digit 4 5/LIST Digit 5 Digit 5 Digit 5 Digit 5 Digit 5 CD Digit 5 Digit 5 6 Digit 6 Digit 6 Digit 6 Digit 6 Digit 6 Tuner Digit 6 Digit 6 MODE Remote control device mode selection PIC SIZE Selects the This button is not available for other devices connected to this TV...
... Power Power Power 1/MOVIE Digit 1 Digit 1 Digit 1 Digit 1 Digit 1 AV input 1 Digit 1 Digit 1 2/SPORTS Digit 2 Digit 2 Digit 2 Digit 2 Digit 2 AV input 2 Digit 2 Digit 2 3/NEWS Digit 3 Digit 3 Digit 3 Digit 3 Digit 3 AV input 3 Digit 3 Digit 3 4/SERVICES Digit 4 Digit 4 Digit 4 Digit 4 Digit 4 AV input 4 Digit 4 Digit 4 5/LIST Digit 5 Digit 5 Digit 5 Digit 5 Digit 5 CD Digit 5 Digit 5 6 Digit 6 Digit 6 Digit 6 Digit 6 Digit 6 Tuner Digit 6 Digit 6 MODE Remote control device mode selection PIC SIZE Selects the This button is not available for other devices connected to this TV...
Owners Manual
Page 21
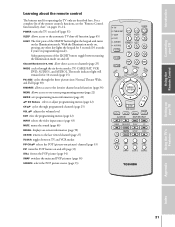
... if you're in programming mode). The mode indicator light will remain lit for operating the TV only are described here. Channel Numbers (0-9, 100) allow direct access to channels (page 25) MODE cycles through programmed channels (page 25) VOL yz adjusts the volume level EXIT exits the programming menus (page 22) INPUT selects the video input source (page 43) MUTE mutes the sound (page 46) RECALL displays on-screen information (page 50) CH...
... if you're in programming mode). The mode indicator light will remain lit for operating the TV only are described here. Channel Numbers (0-9, 100) allow direct access to channels (page 25) MODE cycles through programmed channels (page 25) VOL yz adjusts the volume level EXIT exits the programming menus (page 22) INPUT selects the video input source (page 43) MUTE mutes the sound (page 46) RECALL displays on-screen information (page 50) CH...
Owners Manual
Page 22
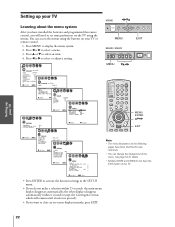
... : ENDSBS SBS LEVEL SPEAKERS AUDI O OUT STABLE SOUND ON / OFF 50 ON MA I N ON THEATER SURROUND THEATER WIDE SIZE P I CTURE SCROLL SRS : MOVE : SELECT 40H80 x •zy CH MENU VOL CH EXIT VOL TV/VIDEO DEMO MENU EXIT 56H80 / 65H80 DEMO MENU TV/VIDEO VOLUME CHANNEL MENU zyx • POWER MENU/ ENTER yzx • EXIT : SELECT SET UP EXIT : EN DLANGUAGE CLOCK SET ANT 1 / 2 TV / CABLE CH PROGRAM ADD / ERASE ENGL...
... : ENDSBS SBS LEVEL SPEAKERS AUDI O OUT STABLE SOUND ON / OFF 50 ON MA I N ON THEATER SURROUND THEATER WIDE SIZE P I CTURE SCROLL SRS : MOVE : SELECT 40H80 x •zy CH MENU VOL CH EXIT VOL TV/VIDEO DEMO MENU EXIT 56H80 / 65H80 DEMO MENU TV/VIDEO VOLUME CHANNEL MENU zyx • POWER MENU/ ENTER yzx • EXIT : SELECT SET UP EXIT : EN DLANGUAGE CLOCK SET ANT 1 / 2 TV / CABLE CH PROGRAM ADD / ERASE ENGL...

Owners Manual
Page 25
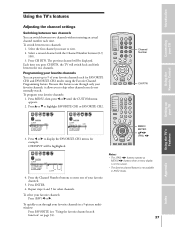
... 32 33 34 35 Channel yz Using the TV's Features Appendix Index 25 Channel Number MENU yzx • Adjusting the color convergence This projection TV uses three separate TV tubes: red, green, and blue. The red, green, and blue images are adding a channel, you can manually add or erase specific channels. This adjustment should be made only after the TV has been on the TV or remote control. To check and adjust the color convergence: 1. Select the channel you want to highlight CONVERGENCE. 1 2 3 4 5 6 7 8 9 10 11 12...
... 32 33 34 35 Channel yz Using the TV's Features Appendix Index 25 Channel Number MENU yzx • Adjusting the color convergence This projection TV uses three separate TV tubes: red, green, and blue. The red, green, and blue images are adding a channel, you can manually add or erase specific channels. This adjustment should be made only after the TV has been on the TV or remote control. To check and adjust the color convergence: 1. Select the channel you want to highlight CONVERGENCE. 1 2 3 4 5 6 7 8 9 10 11 12...
Owners Manual
Page 27
CH INPUT will be displayed. Channel Number CH RTN MENU/ ENTER yzx • (FAV) x • Notes: • The (FAV) x • buttons operate as MENU x • buttons when a menu display is not available in ANT2 mode. 27 Using the TV's Features Appendix Index Select a second channel with the Channel Number buttons (0-9, 100). 3. Programming your favorite channels You can switch between two channels without entering an actual channel number each for other channels you do not normally watch...
CH INPUT will be displayed. Channel Number CH RTN MENU/ ENTER yzx • (FAV) x • Notes: • The (FAV) x • buttons operate as MENU x • buttons when a menu display is not available in ANT2 mode. 27 Using the TV's Features Appendix Index Select a second channel with the Channel Number buttons (0-9, 100). 3. Programming your favorite channels You can switch between two channels without entering an actual channel number each for other channels you do not normally watch...

Owners Manual
Page 40
... picture modes: Sports, Standard, Movie, and Preference. Introduction Connecting your TV Using the Remote Control Setting up your TV Adjusting the picture Selecting the picture mode You can keep these settings or choose factory set picture modes (SPORTS, STANDARDS, or MOVIE) and then change a picture quality setting (for example, increase the contrast), the picture mode automatically changes to the previous picture mode. 40H80 x •zy CH MENU VOL CH EXIT VOL TV/VIDEO DEMO MENU 56H80 / 65H80 DEMO MENU TV/VIDEO VOLUME CHANNEL POWER MENU zyx • MENU yzx • Using...
... picture modes: Sports, Standard, Movie, and Preference. Introduction Connecting your TV Using the Remote Control Setting up your TV Adjusting the picture Selecting the picture mode You can keep these settings or choose factory set picture modes (SPORTS, STANDARDS, or MOVIE) and then change a picture quality setting (for example, increase the contrast), the picture mode automatically changes to the previous picture mode. 40H80 x •zy CH MENU VOL CH EXIT VOL TV/VIDEO DEMO MENU 56H80 / 65H80 DEMO MENU TV/VIDEO VOLUME CHANNEL POWER MENU zyx • MENU yzx • Using...

Owners Manual
Page 43
..., the POP window will close. 40H80 CH MENU VOL CH TV/VIDEO EXIT VOL TV/VIDEO DEMO 56H80 / 65H80 DEMO MENU TV/VIDEO VOLUME CHANNEL TV/VIDEO POWER MENU yzx • EXIT INPUT 43 Index Appendix Using the TV's Features Setting up your TV Using the Remote Control Connecting your TV, such as desired. Watching video input Press the INPUT button on the remote control or the TV/VIDEO button on the TV to view a signal coming from the following on-screen display appears if you can select VIDEO 1, VIDEO 2, VIDEO 3, ColorStream HD1, or...
..., the POP window will close. 40H80 CH MENU VOL CH TV/VIDEO EXIT VOL TV/VIDEO DEMO 56H80 / 65H80 DEMO MENU TV/VIDEO VOLUME CHANNEL TV/VIDEO POWER MENU yzx • EXIT INPUT 43 Index Appendix Using the TV's Features Setting up your TV Using the Remote Control Connecting your TV, such as desired. Watching video input Press the INPUT button on the remote control or the TV/VIDEO button on the TV to view a signal coming from the following on-screen display appears if you can select VIDEO 1, VIDEO 2, VIDEO 3, ColorStream HD1, or...
Owners Manual
Page 45
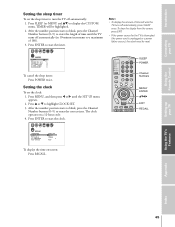
... 25 26 27 28 29 30 31 32 33 34 35 To cancel the sleep timer: Press POWER twice. After the number position starts to blink, press the Channel Number buttons (0-9) to enter the length of 180). 3. Press ENTER to a maximum of time until the SET UP menu appears. 2. Introduction Connecting your TV Using the TV's Features Appendix Index 45 The clock operates on -screen: Press RECALL.
... 25 26 27 28 29 30 31 32 33 34 35 To cancel the sleep timer: Press POWER twice. After the number position starts to blink, press the Channel Number buttons (0-9) to enter the length of 180). 3. Press ENTER to a maximum of time until the SET UP menu appears. 2. Introduction Connecting your TV Using the TV's Features Appendix Index 45 The clock operates on -screen: Press RECALL.

Owners Manual
Page 46
... or SAP appears on-screen every time the TV is automatically activated. Press y or z to stereo sound: 1. Press x or • to highlight MTS. 3. Index Appendix Using the TV's Features Setting up your TV Using the Remote Control Connecting your TV in the lower right corner. See "Using the closed caption feature" on , the channel is changed, or the RECALL button is in the menu when the TV receives the signal. The MTS feature is...
... or SAP appears on-screen every time the TV is automatically activated. Press y or z to stereo sound: 1. Press x or • to highlight MTS. 3. Index Appendix Using the TV's Features Setting up your TV Using the Remote Control Connecting your TV in the lower right corner. See "Using the closed caption feature" on , the channel is changed, or the RECALL button is in the menu when the TV receives the signal. The MTS feature is...
Owners Manual
Page 47
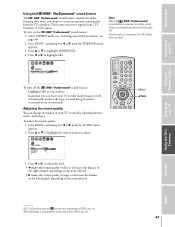
... turn off (see "Selecting stereo/SAP broadcasts" on page 46). 2. Press MENU, and then press x or • until the AUDIO menu appears. 2. Press x or • to highlight SURROUND. 4. Press y or z to create exceptional sound quality from the TV's speakers. To adjust the sound quality: 1. Press MENU, and then press x or • until the THEATER menu appears. 3. MENU yzx • Setting up your TV Using the Remote Control Using...
... turn off (see "Selecting stereo/SAP broadcasts" on page 46). 2. Press MENU, and then press x or • until the AUDIO menu appears. 2. Press x or • to highlight SURROUND. 4. Press y or z to create exceptional sound quality from the TV's speakers. To adjust the sound quality: 1. Press MENU, and then press x or • until the THEATER menu appears. 3. MENU yzx • Setting up your TV Using the Remote Control Using...
Owners Manual
Page 53
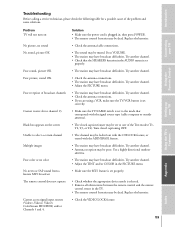
... color No stereo or SAP sound from a known MTS broadcast The remote control does not operate Cannot access signal input sources (Video1, Video2, Video3, ColorStream HD1/HD2) and/or Channels 3 and 4. Using the TV's Features Appendix Index 53 Turn closed caption feature may be muted. Replace the batteries. • Check the antenna/cable connections. • The sound may have broadcast difficulties. Replace the batteries. • Check the VIDEO LOCK feature. Try another channel. • Adjust the PICTURE menu...
... color No stereo or SAP sound from a known MTS broadcast The remote control does not operate Cannot access signal input sources (Video1, Video2, Video3, ColorStream HD1/HD2) and/or Channels 3 and 4. Using the TV's Features Appendix Index 53 Turn closed caption feature may be muted. Replace the batteries. • Check the antenna/cable connections. • The sound may have broadcast difficulties. Replace the batteries. • Check the VIDEO LOCK feature. Try another channel. • Adjust the PICTURE menu...
Owners Manual
Page 54
.... Rental Units The warranty for consequential or incidental damages. Your Responsibility The above . Introduction Connecting your TV Using the Remote Control Setting up , adjustment of customer controls and installation or repair of antenna systems are not covered by this product. are not covered by these warranties in any warranties implied by state law as lightning or fluctuations in lieu of all parts, labor and picture tube.
.... Rental Units The warranty for consequential or incidental damages. Your Responsibility The above . Introduction Connecting your TV Using the Remote Control Setting up , adjustment of customer controls and installation or repair of antenna systems are not covered by this product. are not covered by these warranties in any warranties implied by state law as lightning or fluctuations in lieu of all parts, labor and picture tube.
Owners Manual
Page 55
... C Cable converter box connection 6 Camcorder connection 10 CH yz button 25 CH LABEL 28 CH LOCK 38 CH RTN button 27 Channel Number buttons 25 Channel programming ADD/ERASE 25 Automatic programming 24 TV/CABLE selection 24 Channel yz button 25 Clock, setting 45 Closed caption 44 ColorStream cables 5 Convergence adjustment 25 Color temperature 42 D DEMO button 51 Device code table 17-20 Double-window ("POP") feature 33 DNR (Digital Noise Reduction 41 DTV receiver connection 9 DVD connection 7, 8 F I (FAV) x • buttons 27 FAVORITE button 34...
... C Cable converter box connection 6 Camcorder connection 10 CH yz button 25 CH LABEL 28 CH LOCK 38 CH RTN button 27 Channel Number buttons 25 Channel programming ADD/ERASE 25 Automatic programming 24 TV/CABLE selection 24 Channel yz button 25 Clock, setting 45 Closed caption 44 ColorStream cables 5 Convergence adjustment 25 Color temperature 42 D DEMO button 51 Device code table 17-20 Double-window ("POP") feature 33 DNR (Digital Noise Reduction 41 DTV receiver connection 9 DVD connection 7, 8 F I (FAV) x • buttons 27 FAVORITE button 34...


