Brochure
Page 2
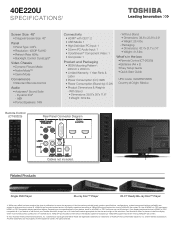
... 1 Product and Packaging • VESA Mounting Pattern4: 200mm x 200mm • Limited Warranty: 1 Year Parts & Labor • Power Consumption (On): 99W • Power Consumption (Stand-by): 0.2W • Product Dimensions & Weights - If you decide to place or install the display where it cannot...of HDMI® w/ CEC requires an HDMI® w/ CEC compatible display/peripheral device. ColorStream, DynaLight and Native Mode are the property of Toshiba America Information Systems, Inc. 40E220U S P E C I F I C AT I O N S1 Screen Size: 40" • Diagonal Screen Size: 40" Panel &#...
... 1 Product and Packaging • VESA Mounting Pattern4: 200mm x 200mm • Limited Warranty: 1 Year Parts & Labor • Power Consumption (On): 99W • Power Consumption (Stand-by): 0.2W • Product Dimensions & Weights - If you decide to place or install the display where it cannot...of HDMI® w/ CEC requires an HDMI® w/ CEC compatible display/peripheral device. ColorStream, DynaLight and Native Mode are the property of Toshiba America Information Systems, Inc. 40E220U S P E C I F I C AT I O N S1 Screen Size: 40" • Diagonal Screen Size: 40" Panel &#...
User Guide
Page 3
... convenience receptacles, and the point where it may reduce the product lifetime or result in case the product requires service. 21) NEVER route the product's power cord inside the TV contains glass and a toxic liquid. When a cart is located in such a manner that produce heat. 9) Do not defeat ... area thoroughly with water and contact your doctor immediately. • ALWAYS contact a service technician to inspect the TV any way, such as power-supply cord or plug is dropped and the cabinet or enclosure surface has been damaged or the TV does not operate normally, take the following...
... convenience receptacles, and the point where it may reduce the product lifetime or result in case the product requires service. 21) NEVER route the product's power cord inside the TV contains glass and a toxic liquid. When a cart is located in such a manner that produce heat. 9) Do not defeat ... area thoroughly with water and contact your doctor immediately. • ALWAYS contact a service technician to inspect the TV any way, such as power-supply cord or plug is dropped and the cabinet or enclosure surface has been damaged or the TV does not operate normally, take the following...

User Guide
Page 4
...). Never locate the antenna near the TV pedestal. Never spray volatile compounds such as air refreshers, cleaning agents, etc.) on or near overhead power lines or other electrical circuits. • Never attempt to install any of your body (or any home theater component connected to drapes, curtains,...children to climb on the TV. 25) To avoid damage to this equipment from a 120 VAC, 60Hz power source. 33) Always make sure you are never in a position where your TOSHIBA TV, follow these recommendations and precautions: 35) If you are provided to protect the TV from overheating and...
...). Never locate the antenna near the TV pedestal. Never spray volatile compounds such as air refreshers, cleaning agents, etc.) on or near overhead power lines or other electrical circuits. • Never attempt to install any of your body (or any home theater component connected to drapes, curtains,...children to climb on the TV. 25) To avoid damage to this equipment from a 120 VAC, 60Hz power source. 33) Always make sure you are never in a position where your TOSHIBA TV, follow these recommendations and precautions: 35) If you are provided to protect the TV from overheating and...
User Guide
Page 5
...assembly instructions included with your local authorities or the Electronics Industries Affiance (www. If these sounds become frequent or continuous, unplug the power cord and contact a Toshiba Authorized Service Provider. 42) i WARNING: RISK OF SERIOUS | .... Failure to properly dispose of the TV. These actions will ...the TV. 4) Always use , the TV may expose you to determine that is not completely disconnected from power and a minute amount of this manual to a Toshiba Authorized Service Provider. 45) If you decide to the wall and the back of the TV as described in...
...assembly instructions included with your local authorities or the Electronics Industries Affiance (www. If these sounds become frequent or continuous, unplug the power cord and contact a Toshiba Authorized Service Provider. 42) i WARNING: RISK OF SERIOUS | .... Failure to properly dispose of the TV. These actions will ...the TV. 4) Always use , the TV may expose you to determine that is not completely disconnected from power and a minute amount of this manual to a Toshiba Authorized Service Provider. 45) If you decide to the wall and the back of the TV as described in...
User Guide
Page 7
.... This equipment generates, uses, and can be an occasional pixel (dot of light) that may be determined by removing and applying power to the equipment, the user is encouraged to try to the use of Bitstream, Inc. All Rights Reserved. Bitstream Vera is connected...of LCD Display technology and are trademarks or registered trademarks of HDMI Licensing LLC in accordance with respect to correct the interference by Toshiba America Information Systems, Inc. U.S. and foreign patents pending. Dolby and the double-D symbol are trademarks of Dolby Laboratories. •...
.... This equipment generates, uses, and can be an occasional pixel (dot of light) that may be determined by removing and applying power to the equipment, the user is encouraged to try to the use of Bitstream, Inc. All Rights Reserved. Bitstream Vera is connected...of LCD Display technology and are trademarks or registered trademarks of HDMI Licensing LLC in accordance with respect to correct the interference by Toshiba America Information Systems, Inc. U.S. and foreign patents pending. Dolby and the double-D symbol are trademarks of Dolby Laboratories. •...
User Guide
Page 13
C°.te.ts 13 Automatic Power Down 100 No Signal Power Down 100 Using REGZA-LINK 101 REGZA-LINK® playback device (DVD player, etc.) control 101 Other REGZA-LINK® functions 103 Setting up REGZA-...
C°.te.ts 13 Automatic Power Down 100 No Signal Power Down 100 Using REGZA-LINK 101 REGZA-LINK® playback device (DVD player, etc.) control 101 Other REGZA-LINK® functions 103 Setting up REGZA-...

User Guide
Page 14
Index 1..2..7........ 4 Contents AppendixA: Specification..s 1..1..8...... Television system 118 Channel coverage 118 Power source 119 Power maximum current 119 Power consumption 119 Audio power 119 Speaker type 119 Video/audio terminals 119 Video/audio input 119 ColorStream ® (component video) HD input 120 HDMI® input 120 Digital audio ...
Index 1..2..7........ 4 Contents AppendixA: Specification..s 1..1..8...... Television system 118 Channel coverage 118 Power source 119 Power maximum current 119 Power consumption 119 Audio power 119 Speaker type 119 Video/audio terminals 119 Video/audio input 119 ColorStream ® (component video) HD input 120 HDMI® input 120 Digital audio ...
User Guide
Page 17
... cable types" on page 21. 5 Connect your TV and other devices. THIS TYPE OF DAMAGE IS NOT COVERED UNDER THE TOSHIBA WARRANTY. 3 Do not plug in any power cords until after you cannot turn on page 54. 12 For help, refer to allow proper ventilation. Inadequate ventilation may cause overheating... device to the HDMI® input" on page 26. 6 Install the batteries in the power cords for a few seconds and then plug them in a location where light does not reflect on , unplug the power cords for your other objects to "Troubleshooting" on page 112. 13 Specifications 14 End User ...
... cable types" on page 21. 5 Connect your TV and other devices. THIS TYPE OF DAMAGE IS NOT COVERED UNDER THE TOSHIBA WARRANTY. 3 Do not plug in any power cords until after you cannot turn on page 54. 12 For help, refer to allow proper ventilation. Inadequate ventilation may cause overheating... device to the HDMI® input" on page 26. 6 Install the batteries in the power cords for a few seconds and then plug them in a location where light does not reflect on , unplug the power cords for your other objects to "Troubleshooting" on page 112. 13 Specifications 14 End User ...
User Guide
Page 18
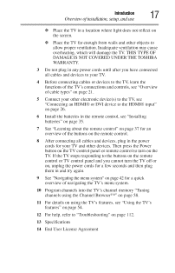
...ENTER button. 8 INPUT--Changes the source you cannot turn off the TV, press and hold the POWER button on the TV control panel for a few seconds to optimize the backlighting levels. 4 POWER--Turns the TV On and Off. 8 Introduction TVjivnt and side panel contlvls and connections TV frontandsidepanelcontrolsandconnections ... in memory (optional)" on page 46). 6 VOLUME buttons 4 ll_--When no menu is On). When a menu is displayed, this remote sensor. 2 Power On LED--Power power is on-screen, these buttons adjust the volume level. 7 MENU (ENTER)--Accesses the on -screen menu.
...ENTER button. 8 INPUT--Changes the source you cannot turn off the TV, press and hold the POWER button on the TV control panel for a few seconds to optimize the backlighting levels. 4 POWER--Turns the TV On and Off. 8 Introduction TVjivnt and side panel contlvls and connections TV frontandsidepanelcontrolsandconnections ... in memory (optional)" on page 46). 6 VOLUME buttons 4 ll_--When no menu is On). When a menu is displayed, this remote sensor. 2 Power On LED--Power power is on-screen, these buttons adjust the volume level. 7 MENU (ENTER)--Accesses the on -screen menu.
User Guide
Page 37
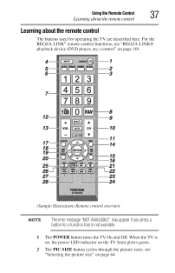
Usingthe Remote Control _'7 Learning about the ren_te control Learningaboutthe remotecontrol The buttons used for operating the TV are described here. ]:or the REGZA-LINK
Usingthe Remote Control _'7 Learning about the ren_te control Learningaboutthe remotecontrol The buttons used for operating the TV are described here. ]:or the REGZA-LINK
User Guide
Page 44
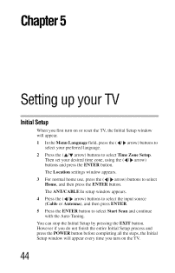
You can stop tile Initial Setup by pressing tile EXIT button. However if you do not finish tile entire Initial Setup process and press tile POWER button before completing all tile steps, tile Initial Setup window will appear every time you first turn on or reset tile TV, tile Initial Setup ...
You can stop tile Initial Setup by pressing tile EXIT button. However if you do not finish tile entire Initial Setup process and press tile POWER button before completing all tile steps, tile Initial Setup window will appear every time you first turn on or reset tile TV, tile Initial Setup ...
User Guide
Page 53
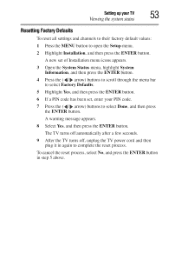
The TV turns off automatically after a few seconds. 9 After the TV turns off, unplug the TV power cord and then plug it in step 5 above. SettingupyourTV 53 Vi_>lving the s_'stem st_ttus ResettingFactoryDefaults To reset all settings and channels to their ...
The TV turns off automatically after a few seconds. 9 After the TV turns off, unplug the TV power cord and then plug it in step 5 above. SettingupyourTV 53 Vi_>lving the s_'stem st_ttus ResettingFactoryDefaults To reset all settings and channels to their ...
User Guide
Page 89
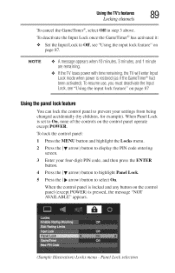
... MENU button and highlight the Locks menu. 2 Press the (V arrow) button to On, none of the controls on the control panel operate except POWER. When Panel Lock is restored (as if the GameTime®r had been activated)T. Panel Lock selection oresume use, you must deactivatethe Input Locks,ee ... arrow) button to highlight Panel Lock. 5 Press the ( _ arrow) button to Off, see "Using the input lock feature" on the control panel (except POWER) is pressed, the message "NOT AVAILABLE" appears. (Sample Illustration) Locks menu - When the control panel is locked and any button on page 87.
... MENU button and highlight the Locks menu. 2 Press the (V arrow) button to On, none of the controls on the control panel operate except POWER. When Panel Lock is restored (as if the GameTime®r had been activated)T. Panel Lock selection oresume use, you must deactivatethe Input Locks,ee ... arrow) button to highlight Panel Lock. 5 Press the ( _ arrow) button to Off, see "Using the input lock feature" on the control panel (except POWER) is pressed, the message "NOT AVAILABLE" appears. (Sample Illustration) Locks menu - When the control panel is locked and any button on page 87.
User Guide
Page 100
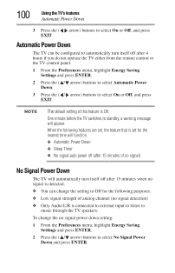
... this featureis Off. Whenthefollowingfeaturesareset,thefeaturethatis setfor the nearestimewill function. •:. AutomaticPower Down The TV can change the no signal power down setting: 1 From the Preferences menu, highlight Energy Saving Settings and press ENTER. 2 Press the (&/y arrow) buttons.... 1 From the Preferences menu, highlight Energy Saving Settings and press ENTER. 2 Press the (&/y arrow) buttons to select Automatic Power Down. 3 Press the (_1!/_,arrow) buttons to music through the TV speakers. SleepTimer •:. Nosignalautopoweroff (after15 minutesofno signal) ...
... this featureis Off. Whenthefollowingfeaturesareset,thefeaturethatis setfor the nearestimewill function. •:. AutomaticPower Down The TV can change the no signal power down setting: 1 From the Preferences menu, highlight Energy Saving Settings and press ENTER. 2 Press the (&/y arrow) buttons.... 1 From the Preferences menu, highlight Energy Saving Settings and press ENTER. 2 Press the (&/y arrow) buttons to select Automatic Power Down. 3 Press the (_1!/_,arrow) buttons to music through the TV speakers. SleepTimer •:. Nosignalautopoweroff (after15 minutesofno signal) ...
User Guide
Page 102
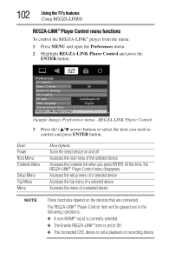
...) buttons to select the item you wish to control and press ENTER button. A non-HUM®I inputis currentlyselected. ¢ TheEnableREGZA-LIN_K'*itemis setto Off. •:. Power RootMenu ContentsMenu SetupMenu TopMenu Menu Description." TheREGZA-LIN®KPlayerControlitemwill begrayedoutin the followingconditions: ,,:. 1 02 UsingtheTV'sfeatures Using REGZA-LINK® REGZA-LIN®KPlayer Controlmenufunctions...
...) buttons to select the item you wish to control and press ENTER button. A non-HUM®I inputis currentlyselected. ¢ TheEnableREGZA-LIN_K'*itemis setto Off. •:. Power RootMenu ContentsMenu SetupMenu TopMenu Menu Description." TheREGZA-LIN®KPlayerControlitemwill begrayedoutin the followingconditions: ,,:. 1 02 UsingtheTV'sfeatures Using REGZA-LINK® REGZA-LIN®KPlayer Controlmenufunctions...
User Guide
Page 104
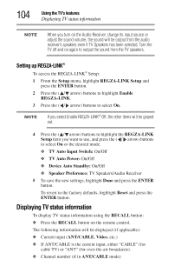
...-LINK Setup and press the ENTER button. 2 Press the (&/y arrow) buttons to highlight Enable REGZA-LINK. 3 Press the (4/_ arrow) buttons to select On. TV Auto Power: On/Off •:.
...-LINK Setup and press the ENTER button. 2 Press the (&/y arrow) buttons to highlight Enable REGZA-LINK. 3 Press the (4/_ arrow) buttons to select On. TV Auto Power: On/Off •:.
User Guide
Page 106
1 06 UsingtheTV'sfeatures Understanding the last mode men_O_eature Understandinthgelastmodememoryfeature If the AC power is cut oft"while you knowyouwill beawayfromtheTVfor anextendedperiodof timeyoushouldunplugthepowercord. NOTE If you are viewing the TV, the Last Mode Memory feature automatically turns on the TV when the AC power is resupplied.
1 06 UsingtheTV'sfeatures Understanding the last mode men_O_eature Understandinthgelastmodememoryfeature If the AC power is cut oft"while you knowyouwill beawayfromtheTVfor anextendedperiodof timeyoushouldunplugthepowercord. NOTE If you are viewing the TV, the Last Mode Memory feature automatically turns on the TV when the AC power is resupplied.
User Guide
Page 112
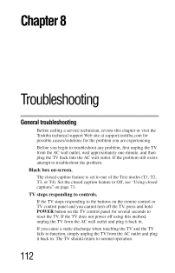
...are experiencing. Black box on the TV control panel for the problem you cannot turn off using this chapter or visit the Toshiba technical support Web site at support.toshiba.com for possible causes/solutions for several seconds to one minute, and then plug the TV back into the AC wall ...outlet. TV stops responding to troubleshoot the problem. If the TV does not power off the TV, press and hold POWER button on -screen. Chapter8 ...
...are experiencing. Black box on the TV control panel for the problem you cannot turn off using this chapter or visit the Toshiba technical support Web site at support.toshiba.com for possible causes/solutions for several seconds to one minute, and then plug the TV back into the AC wall ...outlet. TV stops responding to troubleshoot the problem. If the TV does not power off the TV, press and hold POWER button on -screen. Chapter8 ...
User Guide
Page 113
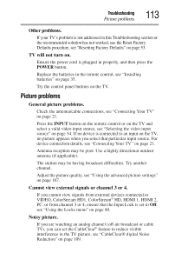
...on the TV and select a valid video input source, see "Using the Locks menu" on page 109. Antenna reception may be poor. Ensure the power cord is plugged in the remote control, see "Connecting Your TV" on page 35. Cannot view external signals or channel 3 or 4. Replace the... batteries in properly, and then press the POWER button. For device connection details, see "Installing batteries" on page 21. Use a highly directional outdoor antenna (if applicable). If you select that the ...
...on the TV and select a valid video input source, see "Using the Locks menu" on page 109. Antenna reception may be poor. Ensure the power cord is plugged in the remote control, see "Connecting Your TV" on page 35. Cannot view external signals or channel 3 or 4. Replace the... batteries in properly, and then press the POWER button. For device connection details, see "Installing batteries" on page 21. Use a highly directional outdoor antenna (if applicable). If you select that the ...
User Guide
Page 116
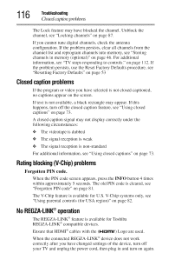
If you have blocked the channel. If the problem persists, clear all channels from the channel list and reprogram channels into memory, see "Using parental controls (for U.S. For additional information, see "Forgotten PIN code" on page 82. When the PIN code screen appears, press the INFO button 4 times within approximately 5 seconds. V-Chip systems only, see "Storing channels in memory (optional)" on page 73. If text is cleared, see "TV stops responding to controls." If this happens, turn off the closed caption feature, see "Locking channels" on page 73. Unblock the ...
If you have blocked the channel. If the problem persists, clear all channels from the channel list and reprogram channels into memory, see "Using parental controls (for U.S. For additional information, see "Forgotten PIN code" on page 82. When the PIN code screen appears, press the INFO button 4 times within approximately 5 seconds. V-Chip systems only, see "Storing channels in memory (optional)" on page 73. If text is cleared, see "TV stops responding to controls." If this happens, turn off the closed caption feature, see "Locking channels" on page 73. Unblock the ...


