
Resource Guide for Model Series L4300U TV's
Page 1
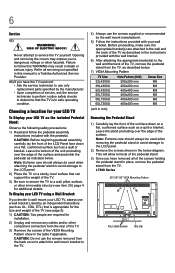
...assemble the pedestal as the weight of the supporting furniture, • NEVER place the TV on tall furniture (for proper grounding and, in the diagram below . 7) VESA Mounting Pattern TV Size 32L4300U 39L4300U 50L4300U 58L4300U Hole Pattern (HxV) Screw Size 200x200 mm M6 200x200 mm M6 400x400..., unplug the power cord and contact a Toshiba Authorized Service Provider. 43) WARNING: RISK OF SERIOUS PERSONAL INJURY OR EQUIPMENT DAMAGE! This is normal, especially when the unit is being walked on the TV. 25) To avoid damage to this manual to rest on the pedestal, or the ...
...assemble the pedestal as the weight of the supporting furniture, • NEVER place the TV on tall furniture (for proper grounding and, in the diagram below . 7) VESA Mounting Pattern TV Size 32L4300U 39L4300U 50L4300U 58L4300U Hole Pattern (HxV) Screw Size 200x200 mm M6 200x200 mm M6 400x400..., unplug the power cord and contact a Toshiba Authorized Service Provider. 43) WARNING: RISK OF SERIOUS PERSONAL INJURY OR EQUIPMENT DAMAGE! This is normal, especially when the unit is being walked on the TV. 25) To avoid damage to this manual to rest on the pedestal, or the ...
Resource Guide for Model Series L4300U TV's
Page 2
...does not light, remains constantly lit, etc.). FCC Declaration of Conformity Compliance Statement (Part 15): Toshiba television models 32L4300U, 39L4300U, 50L4300U and 58L4300U comply with Part 15 of the TV glows green. 2 INPUT button Selects the video input source. 3 SLEEP button Accesses the sleep timer...INCURRED DIRECTLY OR INDIRECTLY FROM ANY TECHNICAL OR TYPOGRAPHICAL ERRORS OR OMISSIONS CONTAINED HEREIN OR FOR DISCREPANCIES BETWEEN THE PRODUCT AND THE MANUAL. Using the Remote The buttons used in the online User's Guide at optimal energy efficiency, select [Home] mode during ...
...does not light, remains constantly lit, etc.). FCC Declaration of Conformity Compliance Statement (Part 15): Toshiba television models 32L4300U, 39L4300U, 50L4300U and 58L4300U comply with Part 15 of the TV glows green. 2 INPUT button Selects the video input source. 3 SLEEP button Accesses the sleep timer...INCURRED DIRECTLY OR INDIRECTLY FROM ANY TECHNICAL OR TYPOGRAPHICAL ERRORS OR OMISSIONS CONTAINED HEREIN OR FOR DISCREPANCIES BETWEEN THE PRODUCT AND THE MANUAL. Using the Remote The buttons used in the online User's Guide at optimal energy efficiency, select [Home] mode during ...
User's Guide for Model Series L4300U and L7300U TV
Page 3
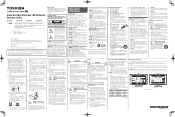
...3 Dear Customer, Thank you use the many exciting features of your new LED TV. This document will help you for long periods of time. 14) Refer all instructions. 5) Do not use this Toshiba LED TV. REFER SERVICING TO QUALIFIED SERVICE PERSONNEL. WARNING: If you decide to wall mount ...Wide blade purpose of the obsolete outlet. 10) Protect the power cord from being walked on page 4. WARNING To prevent injury, this manual completely. Install in the literature accompanying the appliance. The use attachments/accessories specified by the manufacturer. 12) Use only with dry cloth....
...3 Dear Customer, Thank you use the many exciting features of your new LED TV. This document will help you for long periods of time. 14) Refer all instructions. 5) Do not use this Toshiba LED TV. REFER SERVICING TO QUALIFIED SERVICE PERSONNEL. WARNING: If you decide to wall mount ...Wide blade purpose of the obsolete outlet. 10) Protect the power cord from being walked on page 4. WARNING To prevent injury, this manual completely. Install in the literature accompanying the appliance. The use attachments/accessories specified by the manufacturer. 12) Use only with dry cloth....
User's Guide for Model Series L4300U and L7300U TV
Page 6
... LCD Panel face down on the included Pedestal Stand: Observe the following safety precautions: 1) Read and follow this manual to a Toshiba Authorized Service Provider. 46) If you have the TV serviced: • Ask the service technician to use a wall bracket Listed by the manufacturer. • Upon ... One clip Opening and removing the covers may result in the below . 7) VESA Mounting Pattern TV Size Hole Pattern (HxV) Screw Size 32L4300U 200x200 mm M6 39L4300U 200x200 mm M6 50L4300U 400x400 mm M8 50L7300U 400x200 mm M6 58L7300U 400x400 mm M6 65L7300U 400x400 mm...
... LCD Panel face down on the included Pedestal Stand: Observe the following safety precautions: 1) Read and follow this manual to a Toshiba Authorized Service Provider. 46) If you have the TV serviced: • Ask the service technician to use a wall bracket Listed by the manufacturer. • Upon ... One clip Opening and removing the covers may result in the below . 7) VESA Mounting Pattern TV Size Hole Pattern (HxV) Screw Size 32L4300U 200x200 mm M6 39L4300U 200x200 mm M6 50L4300U 400x400 mm M8 50L7300U 400x200 mm M6 58L7300U 400x400 mm M6 65L7300U 400x400 mm...
User's Guide for Model Series L4300U and L7300U TV
Page 20
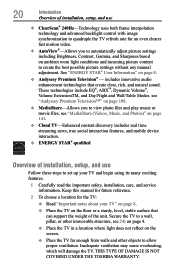
THIS TYPE OF DAMAGE IS NOT COVERED UNDER THE TOSHIBA WARRANTY. 20 Introduction Overview of installation, setup, and use Follow these steps to set up your TV" on page 8. ❖❖ Place the TV on page 8. ❖❖ Audyssey Premium Television® - see "Audyssey Premium Television&#..., Gamma, and Sharpness based on the screen. ❖❖ Place the TV far enough from walls and other objects to create the best possible picture settings without any manual adjustment. Keep this manual for future reference. 2 To choose a location for an even clearer fast motion...
THIS TYPE OF DAMAGE IS NOT COVERED UNDER THE TOSHIBA WARRANTY. 20 Introduction Overview of installation, setup, and use Follow these steps to set up your TV" on page 8. ❖❖ Place the TV on page 8. ❖❖ Audyssey Premium Television® - see "Audyssey Premium Television&#..., Gamma, and Sharpness based on the screen. ❖❖ Place the TV far enough from walls and other objects to create the best possible picture settings without any manual adjustment. Keep this manual for future reference. 2 To choose a location for an even clearer fast motion...
User's Guide for Model Series L4300U and L7300U TV
Page 29
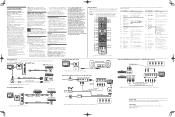
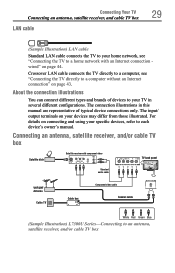
... VIDEO 2 IN R W R B G VHF/UHF Antenna Cable TV Cable box CH 3 CH 4 IN OUT Component video cable Coaxial cable ANT/CABLE R White Red Green Blue (Sample Illustration) L7300U Series-Connecting to your TV in this manual are representative of devices to an antenna, satellite receiver, and/or ...cable TV box For details on page 43. The input/ output terminals on page 44. Connecting Your...
... VIDEO 2 IN R W R B G VHF/UHF Antenna Cable TV Cable box CH 3 CH 4 IN OUT Component video cable Coaxial cable ANT/CABLE R White Red Green Blue (Sample Illustration) L7300U Series-Connecting to your TV in this manual are representative of devices to an antenna, satellite receiver, and/or ...cable TV box For details on page 43. The input/ output terminals on page 44. Connecting Your...
User's Guide for Model Series L4300U and L7300U TV
Page 38
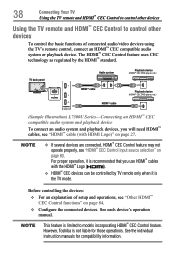
...with the HDMI™ Logo ( ). ❖❖ HDMI™ CEC devices can be controlled by the HDMI™ standard. However, Toshiba is limited to control other devices To control the basic functions of setup and operations, see "Other HDMI™ CEC Control functions" on page...devices: ❖❖ For an explanation of connected audio/video devices using the TV's remote control, connect an HDMI™ CEC compatible audio system or playback device. See the individual instruction manuals for those operations. NOTE v If several devices are connected, HDMI™ CEC ...
...with the HDMI™ Logo ( ). ❖❖ HDMI™ CEC devices can be controlled by the HDMI™ standard. However, Toshiba is limited to control other devices To control the basic functions of setup and operations, see "Other HDMI™ CEC Control functions" on page...devices: ❖❖ For an explanation of connected audio/video devices using the TV's remote control, connect an HDMI™ CEC compatible audio system or playback device. See the individual instruction manuals for those operations. NOTE v If several devices are connected, HDMI™ CEC ...
User's Guide for Model Series L4300U and L7300U TV
Page 55
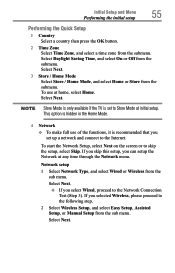
... Wired or Wireless from the submenu. NOTE Store Mode is only available if the TV is recommended that you selected Wireless, please proceed to the following step. 2 Select Wireless Setup, and select Easy Setup, Assisted Setup, or Manual Setup from the submenu. Initial Setup and Menu Performing the initial setup 55 Performing...
... Wired or Wireless from the submenu. NOTE Store Mode is only available if the TV is recommended that you selected Wireless, please proceed to the following step. 2 Select Wireless Setup, and select Easy Setup, Assisted Setup, or Manual Setup from the submenu. Initial Setup and Menu Performing the initial setup 55 Performing...
User's Guide for Model Series L4300U and L7300U TV
Page 56
... failed, the connection failure screen will appear. If you select Enabled, you can be used. You need to manually set the Security Key for this method can control the TV using the AP's notification information). When Software Upgrade is a standard designed to secure your wired or wireless network ... TV Power On Control, and select Enabled or Disabled from the sub menu. When the network can turn on page 113 . 4 Press the OK button. When On is being performed. If your Access Point (AP) supports WPS, this method. ❖❖ Manual Setup (to the next step. For more ...
... failed, the connection failure screen will appear. If you select Enabled, you can be used. You need to manually set the Security Key for this method can control the TV using the AP's notification information). When Software Upgrade is a standard designed to secure your wired or wireless network ... TV Power On Control, and select Enabled or Disabled from the sub menu. When the network can turn on page 113 . 4 Press the OK button. When On is being performed. If your Access Point (AP) supports WPS, this method. ❖❖ Manual Setup (to the next step. For more ...
User's Guide for Model Series L4300U and L7300U TV
Page 66
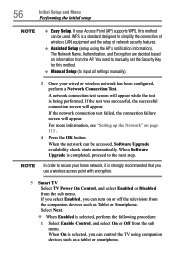
You can manually store or skip individual channels from memory. See "Skipping channels" on page 52. The TV cycles through the channels and stores all active channels in your area and store them in its memory. Storing channels in memory (optional) To make sure your cable TV service's lineup changes significantly. ...not stored in memory, use buttons 0-9 and the DASH button on the remote control or the control panel, store those channels in the TV's memory. To skip an antenna source channel and remove it from memory. See "Initial setup" on page 67. 66 Setting up your...
You can manually store or skip individual channels from memory. See "Skipping channels" on page 52. The TV cycles through the channels and stores all active channels in your area and store them in its memory. Storing channels in memory (optional) To make sure your cable TV service's lineup changes significantly. ...not stored in memory, use buttons 0-9 and the DASH button on the remote control or the control panel, store those channels in the TV's memory. To skip an antenna source channel and remove it from memory. See "Initial setup" on page 67. 66 Setting up your...

User's Guide for Model Series L4300U and L7300U TV
Page 67
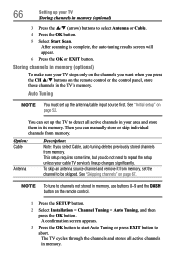
... 0-9 on the remote control to enter the channel number (for example, 56). 4 Press the OK button. 5 Press the OK button again to begin Manual Tuning. Setting up your TV Skipping channels 67 4 To view the programmed channels, press the CH p/q buttons. The list of the screen. Option: ATV DTV Description: Analog channel...
... 0-9 on the remote control to enter the channel number (for example, 56). 4 Press the OK button. 5 Press the OK button again to begin Manual Tuning. Setting up your TV Skipping channels 67 4 To view the programmed channels, press the CH p/q buttons. The list of the screen. Option: ATV DTV Description: Analog channel...
User's Guide for Model Series L4300U and L7300U TV
Page 107
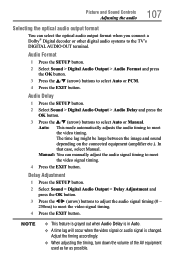
... connect a Dolby® Digital decoder or other digital audio systems to the TV's DIGITAL AUDIO OUT terminal. 107 Picture and Sound Controls Adjusting the audio Selecting the optical audio output format You can manually adjust the audio signal timing to meet the video timing. Delay Adjustment 1 ...Format and press the OK button. 3 Press the p/q (arrow) buttons to meet the video signal timing. 4 Press the EXIT button. In that case, select Manual. Audio Delay 1 Press the SETUP button. 2 Select Sound > Digital Audio Output > Audio Delay and press the OK button. 3 Press the p/q (arrow) ...
... connect a Dolby® Digital decoder or other digital audio systems to the TV's DIGITAL AUDIO OUT terminal. 107 Picture and Sound Controls Adjusting the audio Selecting the optical audio output format You can manually adjust the audio signal timing to meet the video timing. Delay Adjustment 1 ...Format and press the OK button. 3 Press the p/q (arrow) buttons to meet the video signal timing. 4 Press the EXIT button. In that case, select Manual. Audio Delay 1 Press the SETUP button. 2 Select Sound > Digital Audio Output > Audio Delay and press the OK button. 3 Press the p/q (arrow) ...
User's Guide for Model Series L4300U and L7300U TV
Page 113
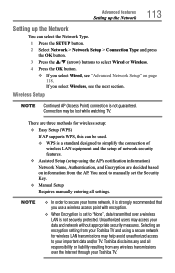
...Toshiba TV and using the AP's notification information) Network Name, Authentication, and Encryption are three methods for wireless LAN transmissions may access your home network, it is strongly recommended that you use a wireless access point with encryption. ❖❖ When Encryption is not guaranteed. You need to manually... the Network You can be lost while watching TV. Wireless Setup NOTE Continued AP (Access Point) connection is set the Security Key. ❖❖ Manual Setup Requires manually entering all responsibility or liability resulting from the AP...
...Toshiba TV and using the AP's notification information) Network Name, Authentication, and Encryption are three methods for wireless LAN transmissions may access your home network, it is strongly recommended that you use a wireless access point with encryption. ❖❖ When Encryption is not guaranteed. You need to manually... the Network You can be lost while watching TV. Wireless Setup NOTE Continued AP (Access Point) connection is set the Security Key. ❖❖ Manual Setup Requires manually entering all responsibility or liability resulting from the AP...

User's Guide for Model Series L4300U and L7300U TV
Page 117
...the Subnet Mask Default GATEWAY's address DNS's address NOTE Even if an AP for IEEE 802.11n is used when Encryption is successfully made. The TV's IP address Value of surrounding APs. The message, "Disabled" appears when you use DHCP. 117 Advanced features Setting up the Network NOTE Settings... are changed to AES (Under manual setup). We recommend that the Encryption setting are not saved if the BACK button is pressed before Done is connected to the AP The message...
...the Subnet Mask Default GATEWAY's address DNS's address NOTE Even if an AP for IEEE 802.11n is used when Encryption is successfully made. The TV's IP address Value of surrounding APs. The message, "Disabled" appears when you use DHCP. 117 Advanced features Setting up the Network NOTE Settings... are changed to AES (Under manual setup). We recommend that the Encryption setting are not saved if the BACK button is pressed before Done is connected to the AP The message...
User's Guide for Model Series L4300U and L7300U TV
Page 119
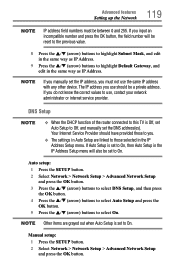
... settings in Auto Setup are grayed out when Auto Setup is set the IP address, you use the same IP address with any other device. Manual setup: 1 Press the SETUP button. 2 Select Network > Network Setup > Advanced Network Setup and press the OK button. Your Internet Service Provider should be reset ... internet service provider. DNS Setup NOTE v When the DHCP function of the router connected to this TV is set to On, then Auto Setup in the same way as IP Address. NOTE If you manually set to select On. NOTE Other items are linked to those selected in the IP Address Setup...
... settings in Auto Setup are grayed out when Auto Setup is set the IP address, you use the same IP address with any other device. Manual setup: 1 Press the SETUP button. 2 Select Network > Network Setup > Advanced Network Setup and press the OK button. Your Internet Service Provider should be reset ... internet service provider. DNS Setup NOTE v When the DHCP function of the router connected to this TV is set to On, then Auto Setup in the same way as IP Address. NOTE If you manually set to select On. NOTE Other items are linked to those selected in the IP Address Setup...
User's Guide for Model Series L4300U and L7300U TV
Page 132
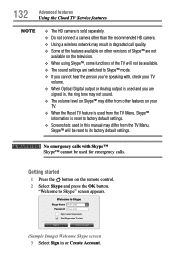
... Skype Name Press [OK] Password Press [OK] Sign in when Skype starts Start Skype when TV starts Sign in Create Account (Sample Image) Welcome Skype screen 3 Select Sign in this manual may differ from the TV Menu, Skype™ information is used and you are switched to Skype™ mode. ❖...;❖ If you cannot hear the person you're speaking with Skype™ Skype™ cannot be used from the TV Menu, Skype™ will ...
... Skype Name Press [OK] Password Press [OK] Sign in when Skype starts Start Skype when TV starts Sign in Create Account (Sample Image) Welcome Skype screen 3 Select Sign in this manual may differ from the TV Menu, Skype™ information is used and you are switched to Skype™ mode. ❖...;❖ If you cannot hear the person you're speaking with Skype™ Skype™ cannot be used from the TV Menu, Skype™ will ...
User's Guide for Model Series L4300U and L7300U TV
Page 141
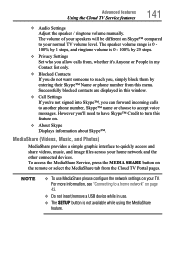
... to have Skype™ Credit to quickly access and share videos, music, and image files across your normal TV volume level. For more information, see "Connecting to accept voice messages. NOTE v To use . ❖❖...0 - 100% by 25 steps. ❖❖ Privacy Settings Set who you allow calls from the Cloud TV Portal pages. The speaker volume range is 0 100% by entering their Skype™ Name or phone number... to a home network" on your TV. Advanced features Using the Cloud TV Service features 141 ❖❖ Audio Settings Adjust the speaker / ringtone volume...
... to have Skype™ Credit to quickly access and share videos, music, and image files across your normal TV volume level. For more information, see "Connecting to accept voice messages. NOTE v To use . ❖❖...0 - 100% by 25 steps. ❖❖ Privacy Settings Set who you allow calls from the Cloud TV Portal pages. The speaker volume range is 0 100% by entering their Skype™ Name or phone number... to a home network" on your TV. Advanced features Using the Cloud TV Service features 141 ❖❖ Audio Settings Adjust the speaker / ringtone volume...
User's Guide for Model Series L4300U and L7300U TV
Page 142
Basic operation Using MediaShare with a USB HUB connection. Toshiba cannot and does not grant such permission. Auto Start 1 Insert a USB device...select the devices on the screen, and then press the OK button. 142 Advanced features Using the Cloud TV Service features MediaShare specifications Devices: ❖❖ USB device: USB Mass Storage Class devices (MSC) &#... FAT32 NOTE You must obtain any required permission from the Cloud TV Portal pages or press the MEDIA SHARE button on the network), you must manually start the MediaShare when a USB device is enabled, you will...
Basic operation Using MediaShare with a USB HUB connection. Toshiba cannot and does not grant such permission. Auto Start 1 Insert a USB device...select the devices on the screen, and then press the OK button. 142 Advanced features Using the Cloud TV Service features MediaShare specifications Devices: ❖❖ USB device: USB Mass Storage Class devices (MSC) &#... FAT32 NOTE You must obtain any required permission from the Cloud TV Portal pages or press the MEDIA SHARE button on the network), you must manually start the MediaShare when a USB device is enabled, you will...

User's Guide for Model Series L4300U and L7300U TV
Page 143
Manual Start 1 Insert a USB device into the USB terminal. 2 Press MEDIA SHARE. 3 To change the device, press the p/q/t/u (arrow) buttons to select the devices on... the Sort and press the OK button. 2 Press the p/q (arrow) buttons to select OK and then press the OK button. Advanced features Using the Cloud TV Service features 143 5 Press the p/q (arrow) buttons to select the device and then press the OK button. 6 Press the p/q (arrow) buttons to select ... press the BACK button to return to select a file or folder. NOTE If Auto Start is set to Off, you can start the MediaShare manually.
Manual Start 1 Insert a USB device into the USB terminal. 2 Press MEDIA SHARE. 3 To change the device, press the p/q/t/u (arrow) buttons to select the devices on... the Sort and press the OK button. 2 Press the p/q (arrow) buttons to select OK and then press the OK button. Advanced features Using the Cloud TV Service features 143 5 Press the p/q (arrow) buttons to select the device and then press the OK button. 6 Press the p/q (arrow) buttons to select ... press the BACK button to return to select a file or folder. NOTE If Auto Start is set to Off, you can start the MediaShare manually.
User's Guide for Model Series L4300U and L7300U TV
Page 159
... use Apps, it is necessary to connect a compatible tablet or smart phone and this TV to your home network, and carry out pairing (using a 4 or 8 digit password to submit. Refer to the Apps manual for the wireless LAN access point before carrying out Pairing. ❖❖ When the ...the p/q (arrow) buttons to select and set to ON in External Control Setup, Apps functions including Pairing cannot be carried out when the TV is connected to an unencrypted wireless LAN access point. Activate the encryption settings for more details about pairing. The Apps Control Profile window will appear...
... use Apps, it is necessary to connect a compatible tablet or smart phone and this TV to your home network, and carry out pairing (using a 4 or 8 digit password to submit. Refer to the Apps manual for the wireless LAN access point before carrying out Pairing. ❖❖ When the ...the p/q (arrow) buttons to select and set to ON in External Control Setup, Apps functions including Pairing cannot be carried out when the TV is connected to an unencrypted wireless LAN access point. Activate the encryption settings for more details about pairing. The Apps Control Profile window will appear...


