

Owners Manual
Page 2
..., audio speakers, chests, or carts. a Sometimes TVs are popular purchases; a Use appropriate angle braces, straps, and anchors to the presence of the International CES® a Avoid placing any wall bracket other enclosed instructions for purchasing this Toshiba LCD TV. a Share our safety message about television safety. WARNING RISK OF ELECTRIC SHOCK DO NOT OPEN. The lightning flash with the installation instructions. a The...
..., audio speakers, chests, or carts. a Sometimes TVs are popular purchases; a Use appropriate angle braces, straps, and anchors to the presence of the International CES® a Avoid placing any wall bracket other enclosed instructions for purchasing this Toshiba LCD TV. a Share our safety message about television safety. WARNING RISK OF ELECTRIC SHOCK DO NOT OPEN. The lightning flash with the installation instructions. a The...

Owners Manual
Page 3
... used, use the polarized plug with the manufacturer's instructions. 8) Do not install near water. 6) Clean only with one ) inch around the TV. 3 A polarized plug has two blades with dry cloth. 7) Do not block any broken glass or liquid from overheating and to help maintain reliable operation of time. 14) Refer all servicing to the floor. 1" Sturdy tie (as short as power-supply cord or plug...
... used, use the polarized plug with the manufacturer's instructions. 8) Do not install near water. 6) Clean only with one ) inch around the TV. 3 A polarized plug has two blades with dry cloth. 7) Do not block any broken glass or liquid from overheating and to help maintain reliable operation of time. 14) Refer all servicing to the floor. 1" Sturdy tie (as short as power-supply cord or plug...

Owners Manual
Page 4
... and removing the covers may vary until the LCD warms up static charges (see Section 810 of the National Electric Code). 22) Always place the back of the television at least one (1) inch away from any vertical surface (such as a wall) to allow proper ventilation. 23) Never allow anything on the LCD screen. When selecting a location for the television, avoid locations...
... and removing the covers may vary until the LCD warms up static charges (see Section 810 of the National Electric Code). 22) Always place the back of the television at least one (1) inch away from any vertical surface (such as a wall) to allow proper ventilation. 23) Never allow anything on the LCD screen. When selecting a location for the television, avoid locations...

Owners Manual
Page 6
... remember your PIN code 40 Changing your PIN code 41 Locking channels 41 Using the Video lock feature 41 Using the PC setting feature 42 PC Audio 42 Setting the sleep timer 43 Setting the On timer 43 Displaying TV setting information on-screen using RECALL 44 Understanding the auto power off feature 44 Understanding the last mode memory feature 44 Chapter 7: Troubleshooting 45 General troubleshooting 45 Chapter 8: Appendix 47 Specifications 47 Limited Canada Warranty for LCD Televisions 48 Index...
... remember your PIN code 40 Changing your PIN code 41 Locking channels 41 Using the Video lock feature 41 Using the PC setting feature 42 PC Audio 42 Setting the sleep timer 43 Setting the On timer 43 Displaying TV setting information on-screen using RECALL 44 Understanding the auto power off feature 44 Understanding the last mode memory feature 44 Chapter 7: Troubleshooting 45 General troubleshooting 45 Chapter 8: Appendix 47 Specifications 47 Limited Canada Warranty for LCD Televisions 48 Index...
Owners Manual
Page 7
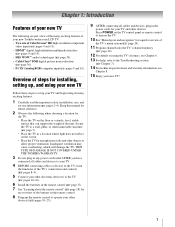
... TV control panel or remote control to turn on the TV. 10 See "Menu layout and navigation" for a quick overview of the buttons on using the TV's features, see Chapter 8. 15 Enjoy your new TV! Chapter 7). 14 For technical specifications and warranty information, see Chapter 6. 13 For help, refer to operate your other devices. page 3). • Place the TV in the power cords for installing, setting up...
... TV control panel or remote control to turn on the TV. 10 See "Menu layout and navigation" for a quick overview of the buttons on using the TV's features, see Chapter 8. 15 Enjoy your new TV! Chapter 7). 14 For technical specifications and warranty information, see Chapter 6. 13 For help, refer to operate your other devices. page 3). • Place the TV in the power cords for installing, setting up...

Owners Manual
Page 8
... video and an S-video cable to change the channel (programmed channels only; - Point the remote control toward the remote sensor. When a menu is on-screen, the INPUT button on . 3 POWER - Red light indicates power is on-screen, these buttons change the source you are required for connecting devices with either composite video or Svideo output. Press to access the menu system (- When no menu is on the TV's control panel functions as up /down menu navigation buttons. 5 VOLUME C c - Press to turn the TV on -screen, these buttons...
... video and an S-video cable to change the channel (programmed channels only; - Point the remote control toward the remote sensor. When a menu is on-screen, the INPUT button on . 3 POWER - Red light indicates power is on-screen, these buttons change the source you are required for connecting devices with either composite video or Svideo output. Press to access the menu system (- When no menu is on the TV's control panel functions as up /down menu navigation buttons. 5 VOLUME C c - Press to turn the TV on -screen, these buttons...

Owners Manual
Page 9
... (analog) audio inputs for connecting devices with component video output, such as a Toshiba DVD player with ColorStream®. Two sets of cable types and connections, see Chapter 2 (- Their use when connecting a personal computer (- Antenna input that supports analog (NTSC) antenna signals and analog cable TV signals. 6 PC IN - TV back 1 34 2 Power cord Cable Clamper 5 67 1 A/V OUT - One set of HDMI Licensing LLC. 9 item 3, at left; Note: VIDEO-1 input terminals are connected to the ColorStream HD-1 terminals and ColorStream HD-1 is the current input mode...
... (analog) audio inputs for connecting devices with component video output, such as a Toshiba DVD player with ColorStream®. Two sets of cable types and connections, see Chapter 2 (- Their use when connecting a personal computer (- Antenna input that supports analog (NTSC) antenna signals and analog cable TV signals. 6 PC IN - TV back 1 34 2 Power cord Cable Clamper 5 67 1 A/V OUT - One set of HDMI Licensing LLC. 9 item 3, at left; Note: VIDEO-1 input terminals are connected to the ColorStream HD-1 terminals and ColorStream HD-1 is the current input mode...

Owners Manual
Page 11
... revision of television programs, videotapes, DVDs, and other materials is prohibited under the Copyright Law and may differ from ANT CH 3 CH 4 OUT to TV VIDEO AUDIO L R IN OUT L R TV upper back panel TV lower back panel To view the antenna or Cable signal: Select the antenna/cable channel input source on the TV to your specific devices, refer to each device's owner's manual. To program the TV remote control to operate other...
... revision of television programs, videotapes, DVDs, and other materials is prohibited under the Copyright Law and may differ from ANT CH 3 CH 4 OUT to TV VIDEO AUDIO L R IN OUT L R TV upper back panel TV lower back panel To view the antenna or Cable signal: Select the antenna/cable channel input source on the TV to your specific devices, refer to each device's owner's manual. To program the TV remote control to operate other...

Owners Manual
Page 12
... the remote control (- To program the TV remote control to operate other devices, see "Using the remote control to operate your other materials is set to). Select the Video 1 video input source on the TV.* *To select the video input source, press + on the TV to TV VIDEO AUDIO L R IN OUT L R To view basic and premium Cable channels: Turn OFF the VCR. Do not connect both types of video cable to VIDEO-2 at the same time or the picture performance will need...
... the remote control (- To program the TV remote control to operate other devices, see "Using the remote control to operate your other materials is set to). Select the Video 1 video input source on the TV.* *To select the video input source, press + on the TV to TV VIDEO AUDIO L R IN OUT L R To view basic and premium Cable channels: Turn OFF the VCR. Do not connect both types of video cable to VIDEO-2 at the same time or the picture performance will need...

Owners Manual
Page 13
... record antenna channels: Turn ON the VCR. Select the ColorStream HD-2 video input source on the TV.* To view the DVD player: Turn ON the DVD player. Chapter 2: Connecting your DVD player has HDMI video, see "Using the remote control to operate your VCR has S-video, connect an S-video cable and standard (analog) audio cables to the VIDEO-2 inputs on the side panel (instead of the VIDEO-1 inputs). If your TV Connecting a DVD player with ColorStream® (component video), a VCR, and a satellite receiver Your TV has two sets of television programs, videotapes, DVDs...
... record antenna channels: Turn ON the VCR. Select the ColorStream HD-2 video input source on the TV.* To view the DVD player: Turn ON the DVD player. Chapter 2: Connecting your DVD player has HDMI video, see "Using the remote control to operate your VCR has S-video, connect an S-video cable and standard (analog) audio cables to the VIDEO-2 inputs on the side panel (instead of the VIDEO-1 inputs). If your TV Connecting a DVD player with ColorStream® (component video), a VCR, and a satellite receiver Your TV has two sets of television programs, videotapes, DVDs...

Owners Manual
Page 15
... 1080i signals but will need : • one HDMI-to-DVI adapter cable (HDMI type A connector) per HDMI device - The recommended length is possible that you use as short an HDMI cable as a set-top box or DVD player with high-bandwidth digital content protection, which is not designed to support input from a DVI (Digital Visual Interface) source device. Separate analog audio cables are suitable for best performance with the TV. See "Setting the HDMI™ audio mode" on...
... 1080i signals but will need : • one HDMI-to-DVI adapter cable (HDMI type A connector) per HDMI device - The recommended length is possible that you use as short an HDMI cable as a set-top box or DVD player with high-bandwidth digital content protection, which is not designed to support input from a DVI (Digital Visual Interface) source device. Separate analog audio cables are suitable for best performance with the TV. See "Setting the HDMI™ audio mode" on...
Owners Manual
Page 16
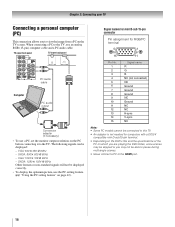
... DVD's title and the specifications of the PC on which you are playing the DVD-Video, some scenes may not be able to pause during multi-angle scenes. • Never connect a PC to the HDMI port. 16 TV upper back panel TV lower back panel Computer PC audio cable PC audio output Conversion adapter (if necessary) • To use an analog RGB (15-pin) computer cable and a PC audio cable...
... DVD's title and the specifications of the PC on which you are playing the DVD-Video, some scenes may not be able to pause during multi-angle scenes. • Never connect a PC to the HDMI port. 16 TV upper back panel TV lower back panel Computer PC audio cable PC audio output Conversion adapter (if necessary) • To use an analog RGB (15-pin) computer cable and a PC audio cable...

Owners Manual
Page 18
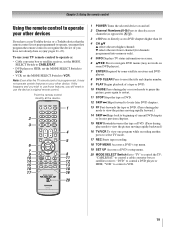
... remote control The buttons used to tune digital channels (- Press p to turn off the TV. 2 FREEZE freezes the picture. The red LED indicator on -screen menus. 19 MODE SELECT Switch switches between TV, CABLE/SAT, DVD, and VCR modes (- page 27). 6 INPUT selects the video input source (- page 38). 13 (This button is not available for this TV.) 14 Arrow buttons (BbC c) When a menu is on-screen. 8 VOL + - Set to "TV" to restore the moving picture. 3 SLEEP accesses the sleep timer...
... remote control The buttons used to tune digital channels (- Press p to turn off the TV. 2 FREEZE freezes the picture. The red LED indicator on -screen menus. 19 MODE SELECT Switch switches between TV, CABLE/SAT, DVD, and VCR modes (- page 27). 6 INPUT selects the video input source (- page 38). 13 (This button is not available for this TV.) 14 Arrow buttons (BbC c) When a menu is on-screen. 8 VOL + - Set to "TV" to restore the moving picture. 3 SLEEP accesses the sleep timer...
Owners Manual
Page 19
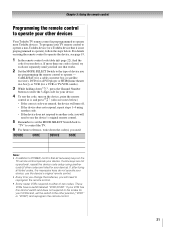
.... 1 POWER Turns the selected device on and off. 2 Channel Numbers (0-9) Press to directly access channels (as opposed to < ,). 3 +10 Press to control a VCR. 19 Note: Even after the TV remote control is not preprogrammed to operate, you must first program the remote control to recognize the device (if you will need to use your TV remote control to operate a: • Cable converter box or satellite receiver, set the MODE SELECT Switch to CABLE/SAT. • DVD player...
.... 1 POWER Turns the selected device on and off. 2 Channel Numbers (0-9) Press to directly access channels (as opposed to < ,). 3 +10 Press to control a VCR. 19 Note: Even after the TV remote control is not preprogrammed to operate, you must first program the remote control to recognize the device (if you will need to use your TV remote control to operate a: • Cable converter box or satellite receiver, set the MODE SELECT Switch to CABLE/SAT. • DVD player...
Owners Manual
Page 21
..., set the MODE SELECT Switch back to "TV" to control the TV. 6 For future reference, write down E, press the Channel Number buttons to enter the 3-digit code for your device). To program your TV remote control to operate a non-Toshiba device (or a Toshiba device that it , and press p. (Also see page 19. 1 In the remote control code table (- If more than one that all necessary keys on using another code, you...
..., set the MODE SELECT Switch back to "TV" to control the TV. 6 For future reference, write down E, press the Channel Number buttons to enter the 3-digit code for your device). To program your TV remote control to operate a non-Toshiba device (or a Toshiba device that it , and press p. (Also see page 19. 1 In the remote control code table (- If more than one that all necessary keys on using another code, you...

Owners Manual
Page 31
..., 480p, 720p, and 1080i format programs in any purpose other than your favorite channels To tune to a specific channel (programmed or unprogrammed) Press the Channel Number buttons (0-9, 100) on the remote control. Note: This feature will return to the last-viewed ANT input and channel. Tuning to a specific programmed channel (or video mode) using the Channel Number buttons (0-9, 100). 3 Press R on the next page. Select the picture size that displays the current program the way that were...
..., 480p, 720p, and 1080i format programs in any purpose other than your favorite channels To tune to a specific channel (programmed or unprogrammed) Press the Channel Number buttons (0-9, 100) on the remote control. Note: This feature will return to the last-viewed ANT input and channel. Tuning to a specific programmed channel (or video mode) using the Channel Number buttons (0-9, 100). 3 Press R on the next page. Select the picture size that displays the current program the way that were...

Owners Manual
Page 42
... outputs the sound from the PC HDMI: Mutes the sound from the HDMI device Note: • The PC/HDMI Audio switch setting influences the HDMI Audio setting. page 15). "Selecting the video input source to make the appropriate adjustments. AV Connection PC Settings Set Up 2/2 ENTER ENTER • Sampling Clock: Helps to select PC or HDMI. To set to HDMI, the HDMI Audio setting changes to select PC input mode (- The adjustment range is within ±5 from a PC on the screen...
... outputs the sound from the PC HDMI: Mutes the sound from the HDMI device Note: • The PC/HDMI Audio switch setting influences the HDMI Audio setting. page 15). "Selecting the video input source to make the appropriate adjustments. AV Connection PC Settings Set Up 2/2 ENTER ENTER • Sampling Clock: Helps to select PC or HDMI. To set to HDMI, the HDMI Audio setting changes to select PC input mode (- The adjustment range is within ±5 from a PC on the screen...
Owners Manual
Page 45
...;, or HDMI, or from a known SAP source, make sure the Video Lock is set to reduce the effect of the Text modes (T1, T2, T3, or T4). Cannot view external signals or channel 3 or 4 • If you press + on the remote control or INPUT on screen • The Closed Caption feature is active, the VIDEO OUT terminal outputs blank video. Try another channel. • Adjust the Tint and/or Color (- television broadcasts, video games, DVDs), you...
...;, or HDMI, or from a known SAP source, make sure the Video Lock is set to reduce the effect of the Text modes (T1, T2, T3, or T4). Cannot view external signals or channel 3 or 4 • If you press + on the remote control or INPUT on screen • The Closed Caption feature is active, the VIDEO OUT terminal outputs blank video. Try another channel. • Adjust the Tint and/or Color (- television broadcasts, video games, DVDs), you...
Owners Manual
Page 48
... the LCD Television will be commenced to enforce any obligation of TCL arising under this period, TCL Authorized Service Depot personnel will enable TCL to bring you new products specifically designed to meet your needs and help us to original consumers in Canada. (4) Labor charges for installation, setup, adjustment of customer controls, and installation or repair of antenna systems are your home when warranty service...
... the LCD Television will be commenced to enforce any obligation of TCL arising under this period, TCL Authorized Service Depot personnel will enable TCL to bring you new products specifically designed to meet your needs and help us to original consumers in Canada. (4) Labor charges for installation, setup, adjustment of customer controls, and installation or repair of antenna systems are your home when warranty service...
Owners Manual
Page 49
... mode 35 Picture quality 35 Picture size selection 31 POWER button 8 R RECALL button 44 Remote control Battery installation 17 Device code table 22 Effective range 17 Functional key chart 20 Learning about the buttons....... 18 Programming 21 S Safety 2 SAP sound 38 Selecting Menu Language 26 Service 4 Side panel control 8 Sleep timer 43 Specifications 47 StableSound 40 Stereo sound 38 S-video cable 10 T TheaterWide® picture size 32 Troubleshooting 45 V VCR connection........... 11, 12, 13, 14 Video cables 10 Video input label 30 Video input lock 41 W Warranty...
... mode 35 Picture quality 35 Picture size selection 31 POWER button 8 R RECALL button 44 Remote control Battery installation 17 Device code table 22 Effective range 17 Functional key chart 20 Learning about the buttons....... 18 Programming 21 S Safety 2 SAP sound 38 Selecting Menu Language 26 Service 4 Side panel control 8 Sleep timer 43 Specifications 47 StableSound 40 Stereo sound 38 S-video cable 10 T TheaterWide® picture size 32 Troubleshooting 45 V VCR connection........... 11, 12, 13, 14 Video cables 10 Video input label 30 Video input lock 41 W Warranty...


