
User Manual
Page 5
Important Safety Information 2-4 Introduction 6 Welcome to Toshiba 6 Exploring your new TV 6 Note regarding Quick Connect Guide 6 Connecting your TV 7 Connecting a VCR 7 Connecting a cable converter box 8 Connecting a cable converter box and VCR 8 Connecting a... the remote control 19 Setting up your TV 20 Learning about the menu system 20 Changing the on-screen display language 21 Selecting the antenna input 21 Programming channels into the channel memory .......... 22 Programming channels automatically 22 Adding and erasing channels manually 22 Using the Quick Connect Guide 23 ...
Important Safety Information 2-4 Introduction 6 Welcome to Toshiba 6 Exploring your new TV 6 Note regarding Quick Connect Guide 6 Connecting your TV 7 Connecting a VCR 7 Connecting a cable converter box 8 Connecting a cable converter box and VCR 8 Connecting a... the remote control 19 Setting up your TV 20 Learning about the menu system 20 Changing the on-screen display language 21 Selecting the antenna input 21 Programming channels into the channel memory .......... 22 Programming channels automatically 22 Adding and erasing channels manually 22 Using the Quick Connect Guide 23 ...

User Manual
Page 6
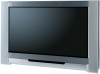
...L/MONO R S-VIDEO VIDEO AUDIO VIDEO-3 IN MENU TV/VIDEO VOLUME CHANNEL POWER Video-3 Video/audio inputs (behind the door) provide all the safety and operating instructions carefully, and keep the manual for details... one of this manual are based on using the buttons on -screen instructions to Toshiba Congratulations! Note regarding Quick Connect Guide The Quick Connect Guide automatically appears on-screen ...time the TV is to guide you will need to connect other equipment to model 34HF83. This manual applies to your TV. Introduction Connecting your TV Using the Remote ...
...L/MONO R S-VIDEO VIDEO AUDIO VIDEO-3 IN MENU TV/VIDEO VOLUME CHANNEL POWER Video-3 Video/audio inputs (behind the door) provide all the safety and operating instructions carefully, and keep the manual for details... one of this manual are based on using the buttons on -screen instructions to Toshiba Congratulations! Note regarding Quick Connect Guide The Quick Connect Guide automatically appears on-screen ...time the TV is to guide you will need to connect other equipment to model 34HF83. This manual applies to your TV. Introduction Connecting your TV Using the Remote ...

User Manual
Page 7
... will be unacceptable.) ● For BEST picture quality: If your equipment has component video (or DVI) inputs, use with video equipment with your TV. ● Coaxial cable is Toshiba's brand of a standard yellow video cable. (You still must connect the standard red and white audio cables... channel. Introduction Connecting your TV Connecting your TV Note: Cables are not supplied with component video outputs. On your equipment has an S-video input, use an S-video cable instead of component video. ● DVI-D digital single-link cable is for stereo left (or mono) audio....
... will be unacceptable.) ● For BEST picture quality: If your equipment has component video (or DVI) inputs, use with video equipment with your TV. ● Coaxial cable is Toshiba's brand of a standard yellow video cable. (You still must connect the standard red and white audio cables... channel. Introduction Connecting your TV Connecting your TV Note: Cables are not supplied with component video outputs. On your equipment has an S-video input, use an S-video cable instead of component video. ● DVI-D digital single-link cable is for stereo left (or mono) audio....

User Manual
Page 9
... 2) at the same time or the picture performance will need: • two coaxial cables (three if satellite receiver is prohibited under the Copyright Laws of A/V inputs on the TV. (See the illustrations, which show the DVD player/satellite receiver connected to VIDEO 1 on the TV, and the VCR connected to VIDEO...
... 2) at the same time or the picture performance will need: • two coaxial cables (three if satellite receiver is prohibited under the Copyright Laws of A/V inputs on the TV. (See the illustrations, which show the DVD player/satellite receiver connected to VIDEO 1 on the TV, and the VCR connected to VIDEO...

User Manual
Page 10
...(plus the standard audio connections) instead of the United States and other countries, and may subject you to a DVD player with component video inputs (such as a Toshiba DVD player with Progressive (480p, 720p) and Interlace (480i,1080i) scan systems. If your DVD player does not have component video... inputs, use component video cables (or a DVI-D singlelink cable) between the TV and DVD player at the same time. Connecting your TV to watch ....
...(plus the standard audio connections) instead of the United States and other countries, and may subject you to a DVD player with component video inputs (such as a Toshiba DVD player with Progressive (480p, 720p) and Interlace (480i,1080i) scan systems. If your DVD player does not have component video... inputs, use component video cables (or a DVI-D singlelink cable) between the TV and DVD player at the same time. Connecting your TV to watch ....

User Manual
Page 11
... HD-2 (or VIDEO 1 for a nonColorStream connection) on the TV (HD-1 or HD-2). For DVI/HDCP connection, see "Selecting the antenna input" on page 21). - To record one set of the ColorStream connections. The unauthorized recording, use the S-video and standard audio connections instead of...TV and DTV receiver. You can greatly enhance picture quality and realism. - Connecting your TV to a DTV receiver with component video inputs can connect component video cables to either set of standard audio cables • one TV program while watching another TV program, tune the...
... HD-2 (or VIDEO 1 for a nonColorStream connection) on the TV (HD-1 or HD-2). For DVI/HDCP connection, see "Selecting the antenna input" on page 21). - To record one set of the ColorStream connections. The unauthorized recording, use the S-video and standard audio connections instead of...TV and DTV receiver. You can greatly enhance picture quality and realism. - Connecting your TV to a DTV receiver with component video inputs can connect component video cables to either set of standard audio cables • one TV program while watching another TV program, tune the...

User Manual
Page 12
... TV's Features Appendix Index 12 L/MONO R ME S-VIDEO VIDEO AUDIO VIDEO-3 IN Video-3 (front panel) Do not connect the same VCR to the output and input jacks on page 52). You can use an S-video cable instead of either the Main or POP picture (see "Selecting the antenna... input" on a camcorder. You will be unacceptable. Do not connect both a standard video cable and an S-video cable to VIDEO 1 (or VIDEO 2) at the same time, ...
... TV's Features Appendix Index 12 L/MONO R ME S-VIDEO VIDEO AUDIO VIDEO-3 IN Video-3 (front panel) Do not connect the same VCR to the output and input jacks on page 52). You can use an S-video cable instead of either the Main or POP picture (see "Selecting the antenna... input" on a camcorder. You will be unacceptable. Do not connect both a standard video cable and an S-video cable to VIDEO 1 (or VIDEO 2) at the same time, ...

User Manual
Page 13
...is not intended for best performance with 1080i high-definition video signals. The recommended length is designed for connection to the DVI/HDCP1 input The DVI/HDCP input on the TV first, and then the DVI/HDCP device. • When turning off your TV Using the TV's Features ...Appendix Index 13 You will accept and display 480p, 480i and 720p picture signals. The DVI/HDCP input also will need: • one coaxial cable • one pair of high-definition video signals. 3 Consult your consumer electronics dealer for reception...
...is not intended for best performance with 1080i high-definition video signals. The recommended length is designed for connection to the DVI/HDCP1 input The DVI/HDCP input on the TV first, and then the DVI/HDCP device. • When turning off your TV Using the TV's Features ...Appendix Index 13 You will accept and display 480p, 480i and 720p picture signals. The DVI/HDCP input also will need: • one coaxial cable • one pair of high-definition video signals. 3 Consult your consumer electronics dealer for reception...

User Manual
Page 19
POWER turns the TV on and off at a specific time (page 47) TV/VIDEO selects video input source (page 45) MUTE mutes the sound (page 49) Device Switch switches between TV, CLB/SAT/VCR, and DVD (Pages 16-18) Set to "TV" ...
POWER turns the TV on and off at a specific time (page 47) TV/VIDEO selects video input source (page 45) MUTE mutes the sound (page 49) Device Switch switches between TV, CLB/SAT/VCR, and DVD (Pages 16-18) Set to "TV" ...
User Manual
Page 21
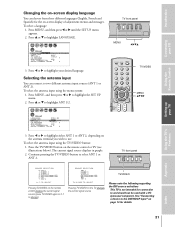
...The current signal source displays in purple. 2. Continue pressing the TV/VIDEO button to highlight the SET UP menu. 2. Selecting the antenna input You can choose from three different languages (English, French and Spanish) for the on the remote control displays the current signal source (press...r e am HD2 DVI ANT 2 TV / V I DEO : TO SELECT Pressing TV/VIDEO on the remote control or TV (see illustrations below). To select the antenna input using the TV/VIDEO button: 1. Press the TV/VIDEO button on the TV changes the current signal source TV/VIDEO Please note the following regarding...
...The current signal source displays in purple. 2. Continue pressing the TV/VIDEO button to highlight the SET UP menu. 2. Selecting the antenna input You can choose from three different languages (English, French and Spanish) for the on the remote control displays the current signal source (press...r e am HD2 DVI ANT 2 TV / V I DEO : TO SELECT Pressing TV/VIDEO on the remote control or TV (see illustrations below). To select the antenna input using the TV/VIDEO button: 1. Press the TV/VIDEO button on the TV changes the current signal source TV/VIDEO Please note the following regarding...
User Manual
Page 26
... 28 29 30 31 32 33 34 35 5. Press x or • to display the FAVORITE CH1 menu, for other channels. Repeat step 4 for example. CH INPUT will be highlighted. 1 2 3 4 5 6 7 8 9 10 11 12 13 14 15 16 17 18 19 20 21 22 23 24 25 26 27 28 29 30 31...
... 28 29 30 31 32 33 34 35 5. Press x or • to display the FAVORITE CH1 menu, for other channels. Repeat step 4 for example. CH INPUT will be highlighted. 1 2 3 4 5 6 7 8 9 10 11 12 13 14 15 16 17 18 19 20 21 22 23 24 25 26 27 28 29 30 31...
User Manual
Page 27
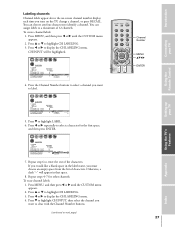
... 15 LABEL - - - - 16 CLEAR 17 18 18 1 2 3 4 5 6 7 8 9 10 11 12 13 14 15 16 17 18 19 20 4. Press y or z to highlight LABEL. 6. CH INPUT will appear in the label name, you must choose an empty space from the list of 32 channels. To erase channel labels: 1. Press x or •... 17 18 19 20 7. Press y or z to display the CH LABELING menu. Press x or • to highlight CH LABELING. 3. Press z to highlight CH INPUT, then select the channel you want to display the CH LABELING menu. 4. Labeling channels Channel labels appear above the on-screen channel number display each...
... 15 LABEL - - - - 16 CLEAR 17 18 18 1 2 3 4 5 6 7 8 9 10 11 12 13 14 15 16 17 18 19 20 4. Press y or z to highlight LABEL. 6. CH INPUT will appear in the label name, you must choose an empty space from the list of 32 channels. To erase channel labels: 1. Press x or •... 17 18 19 20 7. Press y or z to display the CH LABELING menu. Press x or • to highlight CH LABELING. 3. Press z to highlight CH INPUT, then select the channel you want to display the CH LABELING menu. 4. Labeling channels Channel labels appear above the on-screen channel number display each...

User Manual
Page 31
...TV PICTURE TUBE REC LIGHT Avoid displaying stationary images on page 4. See item 33 on your TV screen for the antenna (cable) and DVI input sources. Setting up your TV Using the TV's Features Appendix Selecting the cinema mode When you set the CINEMA MODE to VIDEO (off ): ...Not Defined Picture size to be obtained by reading aspect information (ID-1 data) from a DVD player connected to the ColorStream (component video) or DVI/ HDCP inputs on the auto aspect: 1. Press MENU, and then press x or • until the THEATER menu appears. 2. Fixed (non-moving) images (such as...
...TV PICTURE TUBE REC LIGHT Avoid displaying stationary images on page 4. See item 33 on your TV screen for the antenna (cable) and DVI input sources. Setting up your TV Using the TV's Features Appendix Selecting the cinema mode When you set the CINEMA MODE to VIDEO (off ): ...Not Defined Picture size to be obtained by reading aspect information (ID-1 data) from a DVD player connected to the ColorStream (component video) or DVI/ HDCP inputs on the auto aspect: 1. Press MENU, and then press x or • until the THEATER menu appears. 2. Fixed (non-moving) images (such as...

User Manual
Page 32
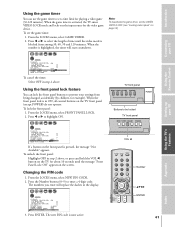
...play a tape as still PIP/POP windows or black/gray bars in wide-screen picture or PIP/POP formats) can select the desired signal input source by pressing the corresponding number button (0-5). Introduction Connecting your TV Using the POP double-window feature The POP (picture-out-picture) feature...100). • To change to display the POP window. Repeatedly press SOURCE to watch a TV program that allows you want to select the input source for extended periods of time. The POP program can choose to watch two programs at the same time. Connect the external source equipment (...
...play a tape as still PIP/POP windows or black/gray bars in wide-screen picture or PIP/POP formats) can select the desired signal input source by pressing the corresponding number button (0-5). Introduction Connecting your TV Using the POP double-window feature The POP (picture-out-picture) feature...100). • To change to display the POP window. Repeatedly press SOURCE to watch a TV program that allows you want to select the input source for extended periods of time. The POP program can choose to watch two programs at the same time. Connect the external source equipment (...

User Manual
Page 33
... POSSIBLE ADVERSE EFFECTS ON TV PICTURE TUBE Avoid displaying stationary images on the screen. Still picture Adjusting the size of the double-window When the input signals of the main and POP pictures are using the POP feature to switch the main and POP pictures. See item 33 on the screen...
... POSSIBLE ADVERSE EFFECTS ON TV PICTURE TUBE Avoid displaying stationary images on the screen. Still picture Adjusting the size of the double-window When the input signals of the main and POP pictures are using the POP feature to switch the main and POP pictures. See item 33 on the screen...
User Manual
Page 34
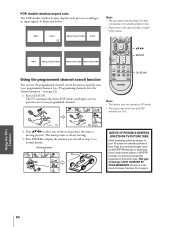
.../1080i Using the programmed channel search function You can become permanently engrained in step 2 as a normal picture. Press CH SCAN. Press yzx • to its input signal. See item 33 on page 22). 1. The main picture is always moving picture). Fixed (non-moving) images (such as still PIP/POP windows or...
.../1080i Using the programmed channel search function You can become permanently engrained in step 2 as a normal picture. Press CH SCAN. Press yzx • to its input signal. See item 33 on page 22). 1. The main picture is always moving picture). Fixed (non-moving) images (such as still PIP/POP windows or...

User Manual
Page 39
...BLOCK I NG ACTI VE ENTER P I N CODE ON OFF OFF OFF To select each item: Press z or y . CH INPUT will not be able to display the CH LOCK menu. You will be enabled when the TV is released and the normal picture ... 4 4 4 5 5 5 5 6 6 6 6 7 LOCKS 7 7 LOCKS 7 8 9 V-CH I P 0 ENABLEBLOCK I NG OFF 8 8 9 9 0 10 1 TV RATI NG 11 2 MPAA RATI NG 12 3 BLOCK I NG OPTI ON 3 13 4 CH LOCK CH INPUT 12 4 14 5 VI DEO LOCK 0 0 05 15 6 GAME TIMER 0 0 06 16 7 FRONT PANEL LOCK 0 0 07 17 8 NEW P I N CODE TV CABLE 8 C L E A R A L L 1 2 3 4 5 6 7 8 9 10 11 12 13 ...
...BLOCK I NG ACTI VE ENTER P I N CODE ON OFF OFF OFF To select each item: Press z or y . CH INPUT will not be able to display the CH LOCK menu. You will be enabled when the TV is released and the normal picture ... 4 4 4 5 5 5 5 6 6 6 6 7 LOCKS 7 7 LOCKS 7 8 9 V-CH I P 0 ENABLEBLOCK I NG OFF 8 8 9 9 0 10 1 TV RATI NG 11 2 MPAA RATI NG 12 3 BLOCK I NG OPTI ON 3 13 4 CH LOCK CH INPUT 12 4 14 5 VI DEO LOCK 0 0 05 15 6 GAME TIMER 0 0 06 16 7 FRONT PANEL LOCK 0 0 07 17 8 NEW P I N CODE TV CABLE 8 C L E A R A L L 1 2 3 4 5 6 7 8 9 10 11 12 13 ...
User Manual
Page 40
... LOCK. 2. Press yzx • to highlight the channel you use the antenna terminal to highlight the level of video locking you can lock out the input sources (VIDEO 1, VIDEO 2, VIDEO 3, ColorStream HD1, ColorStream HD2, DVI/HDCP) and channels 3 and 4. This option should be able to highlight CLEAR ... OFF Note: Make sure the POP is not on channel 3 or 4. : Unlocks all locked channels at once: Press y or z to select the input sources with the TV/VIDEO button or Channel buttons unless you clear the setting. Introduction Connecting your TV Using the Remote Control Setting up the...
... LOCK. 2. Press yzx • to highlight the channel you use the antenna terminal to highlight the level of video locking you can lock out the input sources (VIDEO 1, VIDEO 2, VIDEO 3, ColorStream HD1, ColorStream HD2, DVI/HDCP) and channels 3 and 4. This option should be able to highlight CLEAR ... OFF Note: Make sure the POP is not on channel 3 or 4. : Unlocks all locked channels at once: Press y or z to select the input sources with the TV/VIDEO button or Channel buttons unless you clear the setting. Introduction Connecting your TV Using the Remote Control Setting up the...
User Manual
Page 41
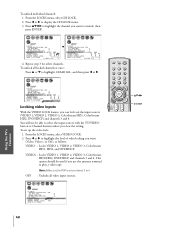
... FRONT PANEL LOCK. 2. Changing the PIN code 1. Press ENTER. When the game timer is activated, the TV enters VIDEO LOCK mode and locks out the input source for playing a video game (30-120 minutes). When the front panel lock is in step 2 above . To unlock the front panel: Highlight OFF in... children, for about 10 seconds until the message "Front Panel Lock: Off " appears on the screen. Press the Number buttons (0-9) to OFF (see "Locking video inputs" on page 39). The numbers you enter will start countdown. 1 2 3 4 5 6 7 8 9 10 11 12 13 14 15 16 17 18 19 20 21 22 23 24...
... FRONT PANEL LOCK. 2. Changing the PIN code 1. Press ENTER. When the game timer is activated, the TV enters VIDEO LOCK mode and locks out the input source for playing a video game (30-120 minutes). When the front panel lock is in step 2 above . To unlock the front panel: Highlight OFF in... children, for about 10 seconds until the message "Front Panel Lock: Off " appears on the screen. Press the Number buttons (0-9) to OFF (see "Locking video inputs" on page 39). The numbers you enter will start countdown. 1 2 3 4 5 6 7 8 9 10 11 12 13 14 15 16 17 18 19 20 21 22 23 24...
User Manual
Page 44
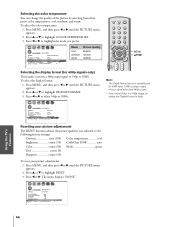
... SPLIT REW FF SKIP / SEARCH • The Disply CH SCAN SWAP REC ForPOmPCaH t feature LIGHT is available only for 480P input. 1080i is always output when a signal other than 480p is input. • if you prefer. 1 2 3 4 5 6 7 8 9 10 11 12 13 14 15 16 17 18 19 20 21 22 ...29 30 31 32 33 34 35 18 Picture Quality blueish neutral reddish Selecting the display format (for 480p signals only) This feature converts a 480p input signal to the following factory settings: Contrast max (100) Color temperature cool Brightness center (50) CableClear DNR auto Color center (50) Mode sports...
... SPLIT REW FF SKIP / SEARCH • The Disply CH SCAN SWAP REC ForPOmPCaH t feature LIGHT is available only for 480P input. 1080i is always output when a signal other than 480p is input. • if you prefer. 1 2 3 4 5 6 7 8 9 10 11 12 13 14 15 16 17 18 19 20 21 22 ...29 30 31 32 33 34 35 18 Picture Quality blueish neutral reddish Selecting the display format (for 480p signals only) This feature converts a 480p input signal to the following factory settings: Contrast max (100) Color temperature cool Brightness center (50) CableClear DNR auto Color center (50) Mode sports...


