
Owners Manual
Page 2
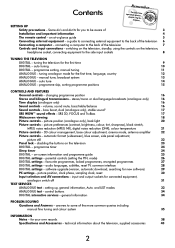
... antenna amplifier 22 Picture controls - on the television 23 DIGITAL - audio languages, subtitles, reset TV, common interface 28 DIGITAL settings - auto tuning 10 DIGITAL - picture position, clock phase, sampling clock, reset 30 Input selection and AV connections - for the... of the television 7 Controls and input connections - disabling the buttons on -screen information and programme guide 25 DIGITAL settings - SRS 3D, FOCUS and TruBass 17 Widescreen viewing 18 Picture controls - software upgrade (version, automatic download, searching...
... antenna amplifier 22 Picture controls - on the television 23 DIGITAL - audio languages, subtitles, reset TV, common interface 28 DIGITAL settings - auto tuning 10 DIGITAL - picture position, clock phase, sampling clock, reset 30 Input selection and AV connections - for the... of the television 7 Controls and input connections - disabling the buttons on -screen information and programme guide 25 DIGITAL settings - SRS 3D, FOCUS and TruBass 17 Widescreen viewing 18 Picture controls - software upgrade (version, automatic download, searching...
Owners Manual
Page 4
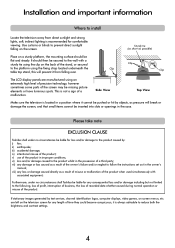
... of business, the loss of recorded data whether caused during normal operation or misuse of the product. Please take note EXCLUSION CLAUSE Toshiba shall under no circumstances be missing picture elements or have luminous spots. iv) intentional misuse of the product in improper conditions; are...comfortable viewing. vii) any loss or damage caused directly as possible) Place on the screen. Use curtains or blinds to follow the instructions set out in the owner's manual; If stationary images generated by objects, as a result of the owner's failure and/or neglect to ...
... of business, the loss of recorded data whether caused during normal operation or misuse of the product. Please take note EXCLUSION CLAUSE Toshiba shall under no circumstances be missing picture elements or have luminous spots. iv) intentional misuse of the product in improper conditions; are...comfortable viewing. vii) any loss or damage caused directly as possible) Place on the screen. Use curtains or blinds to follow the instructions set out in the owner's manual; If stationary images generated by objects, as a result of the owner's failure and/or neglect to ...
Owners Manual
Page 6
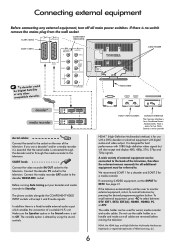
... monitor external equipment, return to normal television by using the sound controls. 6 HDMI™ INPUT SOCKETS COMMON INTERFACE The Common Interface is set the INPUT for a media recorder. Make sure the Speaker option in the Sound menu is for best performance with digital audio and video output.... If connecting S-VIDEO equipment, set to the television. Do not use the cable holder as a handle and make sure all main power switches. HDMI, the HDMI logo, ...
... monitor external equipment, return to normal television by using the sound controls. 6 HDMI™ INPUT SOCKETS COMMON INTERFACE The Common Interface is set the INPUT for a media recorder. Make sure the Speaker option in the Sound menu is for best performance with digital audio and video output.... If connecting S-VIDEO equipment, set to the television. Do not use the cable holder as a handle and make sure all main power switches. HDMI, the HDMI logo, ...
Owners Manual
Page 7
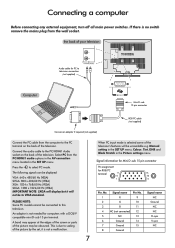
... cannot be connected to scaling of the television's features will display but it is not a malfunction. This is selected some of the picture by the set, it will not be displayed: VGA: 640 x 480/60 Hz (VESA) SVGA: 800 x 600/60 Hz (VESA) XGA: 1024 x 768/60 Hz (VESA) SXGA: ... switches. An adaptor is no switch remove the mains plug from the PC/HDMI1 audio options in the AV connection menu located in the Picture settings menu. Signal name Pin No. 1 R 9 2 G 10 3 B 11 4 NC (not connected) 12 5 NC 13 6 Ground 14 7 Ground 15 8 Ground Signal name NC Ground NC NC H-sync...
... cannot be connected to scaling of the television's features will display but it is not a malfunction. This is selected some of the picture by the set, it will not be displayed: VGA: 640 x 480/60 Hz (VESA) SVGA: 800 x 600/60 Hz (VESA) XGA: 1024 x 768/60 Hz (VESA) SXGA: ... switches. An adaptor is no switch remove the mains plug from the PC/HDMI1 audio options in the AV connection menu located in the Picture settings menu. Signal name Pin No. 1 R 9 2 G 10 3 B 11 4 NC (not connected) 12 5 NC 13 6 Ground 14 7 Ground 15 8 Ground Signal name NC Ground NC NC H-sync...

Owners Manual
Page 9
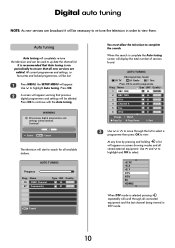
... 5 five 6 ITV2 31 GOOD 31 POOR 48 GOOD 31 POOR Change Watch Page Up Page Down Sort 4 Use Q or P to move along the line. To set up the television use the buttons on the remote control as detailed on page 5. 1 Press the power-on button, the Welcome screen will automatically select... appear and the television will display the total number of services found 55 TV 24 Radio 7 Text Press OK to search for choosing this Toshiba television. First you for available stations. Press to continue 2 Press OK to start to watch programme Prog. AUTO TUNING Progress Prog.
... 5 five 6 ITV2 31 GOOD 31 POOR 48 GOOD 31 POOR Change Watch Page Up Page Down Sort 4 Use Q or P to move along the line. To set up the television use the buttons on the remote control as detailed on page 5. 1 Press the power-on button, the Welcome screen will automatically select... appear and the television will display the total number of services found 55 TV 24 Radio 7 Text Press OK to search for choosing this Toshiba television. First you for available stations. Press to continue 2 Press OK to start to watch programme Prog. AUTO TUNING Progress Prog.
Owners Manual
Page 10
... P to move through all new services are broadcast it will be necessary to re-tune the television in DTV mode. 10 All current programmes and settings, i.e. Press OK. 2 A screen will appear warning that all connected equipment and the last channel being viewed in order to view them. WARNING ! AUTO ...TUNING 86 programmes found . B 3C B2 B1 DTV ATV PC HDMI2 B When DTV mode is run periodically to ensure that previous digital programmes and settings will be lost. 1 Press MENU, the SETUP MENU will start to view. Name 70 CBBC Channel 87 Community Type UHF Quality 34 GOOD 21 POOR...
... P to move through all new services are broadcast it will be necessary to re-tune the television in DTV mode. 10 All current programmes and settings, i.e. Press OK. 2 A screen will appear warning that all connected equipment and the last channel being viewed in order to view them. WARNING ! AUTO ...TUNING 86 programmes found . B 3C B2 B1 DTV ATV PC HDMI2 B When DTV mode is run periodically to ensure that previous digital programmes and settings will be lost. 1 Press MENU, the SETUP MENU will start to view. Name 70 CBBC Channel 87 Community Type UHF Quality 34 GOOD 21 POOR...
Owners Manual
Page 13
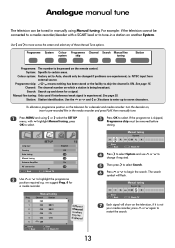
... ITV 4 C32 CH4 5 C69 OK Select MENU Back Sort EXIT Watch TV Different Channel numbers may be tuned-in manually using S or R select the SET UP menu, with a SCART lead or to tune-in the media recorder and press PLAY, then manually tune. 1 Press MENU and using Manual tuning. ...: means nothing has been stored or the facility to skip the channel is being broadcast. Language Country Auto tuning Manual tuning Antenna Amplifier AV connection SET UP MENU Back EXIT Watch TV 1/2 English UK OK OK On OK 2 Use P or Q to enter up and down for a media recorder. Search: Search...
... ITV 4 C32 CH4 5 C69 OK Select MENU Back Sort EXIT Watch TV Different Channel numbers may be tuned-in manually using S or R select the SET UP menu, with a SCART lead or to tune-in the media recorder and press PLAY, then manually tune. 1 Press MENU and using Manual tuning. ...: means nothing has been stored or the facility to skip the channel is being broadcast. Language Country Auto tuning Manual tuning Antenna Amplifier AV connection SET UP MENU Back EXIT Watch TV 1/2 English UK OK OK On OK 2 Use P or Q to enter up and down for a media recorder. Search: Search...
Owners Manual
Page 14
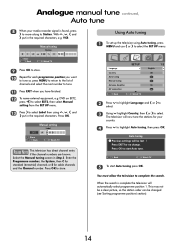
... TV P N LEASE OTE This television has direct channel entry if the channel numbers are known. Language Country Auto tuning Manual tuning Antenna Amplifier AV connection SET UP MENU Back EXIT Watch TV 1/2 English UK OK OK On OK 2 Press Q to highlight Language and S or R to select. 3 Using Q... highlight Country, then Sor R to store. Previous settings will be changed (see 'Sorting programme positions' section). 14 Press EXIT for cable channels and the Channel number. When the search is found, press R to...
... TV P N LEASE OTE This television has direct channel entry if the channel numbers are known. Language Country Auto tuning Manual tuning Antenna Amplifier AV connection SET UP MENU Back EXIT Watch TV 1/2 English UK OK OK On OK 2 Press Q to highlight Language and S or R to select. 3 Using Q... highlight Country, then Sor R to store. Previous settings will be changed (see 'Sorting programme positions' section). 14 Press EXIT for cable channels and the Channel number. When the search is found, press R to...

Owners Manual
Page 15
...select Programme skip. 4 Use P or Q to your move. To turn Programme skip on the programme position of your choice. 1 Select Manual tuning from the SET UP menu. 2 With the list of the screen. Prog. 1 2 3 4 Manual tuning Channel Station C22 BBC1 C28 BBC2 C25 ITV C32 CH4 5 ...highlight the programme position to store your preferred position. The selected station will not show the skipped programme position. 1 Select Manual tuning from the SET UP menu. Skipped programme positions cannot be selected f e by P and P or by the controls on the remote control. Each programme ...
...select Programme skip. 4 Use P or Q to your move. To turn Programme skip on the programme position of your choice. 1 Select Manual tuning from the SET UP menu. 2 With the list of the screen. Prog. 1 2 3 4 Manual tuning Channel Station C22 BBC1 C28 BBC2 C25 ITV C32 CH4 5 ...highlight the programme position to store your preferred position. The selected station will not show the skipped programme position. 1 Select Manual tuning from the SET UP menu. Skipped programme positions cannot be selected f e by P and P or by the controls on the remote control. Each programme ...
Owners Manual
Page 16
Press again to change the setting. The sound controls are accessible in digital and analogue modes, as are changed, disappearing after a few seconds. Choose the required programme number and if the ... TV 16 If the broadcast is not in the AV connection menu. (See 'Input selection and AV connections' section). When connecting to a Hi-fi unit, set the Speaker option to adjust the volume. programme position, channels or stereo/mono signal, press i+ . Stereo and Bilingual transmissions - analogue only If stereo or dual...
Press again to change the setting. The sound controls are accessible in digital and analogue modes, as are changed, disappearing after a few seconds. Choose the required programme number and if the ... TV 16 If the broadcast is not in the AV connection menu. (See 'Input selection and AV connections' section). When connecting to a Hi-fi unit, set the Speaker option to adjust the volume. programme position, channels or stereo/mono signal, press i+ . Stereo and Bilingual transmissions - analogue only If stereo or dual...

Owners Manual
Page 18
...horizontally and vertically, holding the correct proportions at the centre of the image. When watching 'letterbox format' films/video tapes, this setting will eliminate or reduce the black bars at the top and bottom of the screen by zooming in and selecting the image without ...distortion. Some distortion may occur. Widescreen viewing Depending on a letterbox format broadcast, this setting will raise the picture to fit the screen by stretching the image horizontally and vertically, holding the correct proportions at the centre of...
...horizontally and vertically, holding the correct proportions at the centre of the image. When watching 'letterbox format' films/video tapes, this setting will eliminate or reduce the black bars at the top and bottom of the screen by zooming in and selecting the image without ...distortion. Some distortion may occur. Widescreen viewing Depending on a letterbox format broadcast, this setting will raise the picture to fit the screen by stretching the image horizontally and vertically, holding the correct proportions at the centre of...

Owners Manual
Page 19
... Subtitle 14:9 Using the special functions to view a true 4:3 broadcast. 42 MODEL ONLY ☛aav1aT0ihl8ai0sbiloespowtuiohrcneeni.swoantlcyhing EXACT SCAN Use this setting to change the size of all the widescreen formats will display the image as transmitted without scaling or cropping the picture. { Press ...of widescreen formats (16:9, 14:9, 20:9 etc.) black bars may infringe on screen. Widescreen viewing continued 14:9 WIDE 4:3 Use this setting when watching a widescreen DVD, widescreen video tape or a 16:9 broadcast (when available). Use P and Q to highlight the required...
... Subtitle 14:9 Using the special functions to view a true 4:3 broadcast. 42 MODEL ONLY ☛aav1aT0ihl8ai0sbiloespowtuiohrcneeni.swoantlcyhing EXACT SCAN Use this setting to change the size of all the widescreen formats will display the image as transmitted without scaling or cropping the picture. { Press ...of widescreen formats (16:9, 14:9, 20:9 etc.) black bars may infringe on screen. Widescreen viewing continued 14:9 WIDE 4:3 Use this setting when watching a widescreen DVD, widescreen video tape or a 16:9 broadcast (when available). Use P and Q to highlight the required...
Owners Manual
Page 20
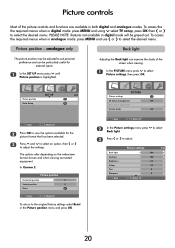
...be greyed out. In Cinema 2: Picture position Horizontal position 0 Vertical position 0 Reset OK MENU Back EXIT Watch TV To return to the original factory settings select Reset in digital mode: press MENU and using Q select TV setup, press OK then S or R to select the desired menu. Back light... Contrast Brightness Colour Tint Sharpness MENU Back Picture settings 1/2 100 100 50 50 0 0 EXIT Watch TV 20 Picture position Quick Setup SET UP 2/2 OK OK MENU Back EXIT Watch TV 2 Press OK to adjust. To access the the required ...
...be greyed out. In Cinema 2: Picture position Horizontal position 0 Vertical position 0 Reset OK MENU Back EXIT Watch TV To return to the original factory settings select Reset in digital mode: press MENU and using Q select TV setup, press OK then S or R to select the desired menu. Back light... Contrast Brightness Colour Tint Sharpness MENU Back Picture settings 1/2 100 100 50 50 0 0 EXIT Watch TV 20 Picture position Quick Setup SET UP 2/2 OK OK MENU Back EXIT Watch TV 2 Press OK to adjust. To access the the required ...
Owners Manual
Page 21
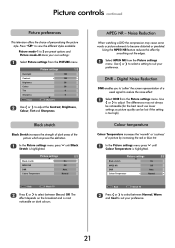
...Reduction DNR enables you to 'soften' the screen representation of a picture by smoothing out the edges. 1 Select MPEG NR from the Picture settings menu. Colour temperature Colour Temperature increases the 'warmth' or 'coolness' of a weak signal to select between Normal, Warm and Cool to...S or R to reduce the noise effect. 1 Select DNR from the PICTURE menu. Use S or R to select a setting to suit your preference. Picture settings 2/2 Black stretch On MPEG NR DNR Colour Temperature Off Auto. Black stretch Black Stretch increases the strength of dark areas of ...
...Reduction DNR enables you to 'soften' the screen representation of a picture by smoothing out the edges. 1 Select MPEG NR from the Picture settings menu. Colour temperature Colour Temperature increases the 'warmth' or 'coolness' of a weak signal to select between Normal, Warm and Cool to...S or R to reduce the noise effect. 1 Select DNR from the PICTURE menu. Use S or R to select a setting to suit your preference. Picture settings 2/2 Black stretch On MPEG NR DNR Colour Temperature Off Auto. Black stretch Black Stretch increases the strength of dark areas of ...
Owners Manual
Page 22
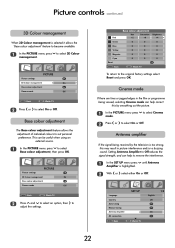
...Amplifier is selected it allows the 'Base colour adjustment' feature to become available. 1 In the PICTURE menu press Q to the original factory settings select Reset and press OK. Antenna amplifier If the signal being viewed, selecting Cinema mode can be useful when using an external source. 1... preference. Picture controls continued 3D Colour management When 3D Colour management is highlighted. 2 With S or R select either On or Off. Setting Antenna Amplifier to Off reduces the signal strength, and can help correct this may result in the film or programme being received by the ...
...Amplifier is selected it allows the 'Base colour adjustment' feature to become available. 1 In the PICTURE menu press Q to the original factory settings select Reset and press OK. Antenna amplifier If the signal being viewed, selecting Cinema mode can be useful when using an external source. 1... preference. Picture controls continued 3D Colour management When 3D Colour management is highlighted. 2 With S or R select either On or Off. Setting Antenna Amplifier to Off reduces the signal strength, and can help correct this may result in the film or programme being received by the ...
Owners Manual
Page 23
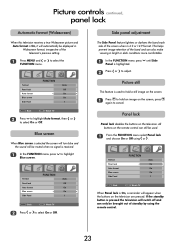
... muted when no signal is received. 1 In the FUNCTION menu press Q to select On or Off. This helps prevent image retention of the television's previous setting. 1 Press MENU and S or R to select the FUNCTION menu. Teletext Panel lock Auto format Blue screen Side Panel FUNCTION Auto. All buttons on the screen...
... muted when no signal is received. 1 In the FUNCTION menu press Q to select On or Off. This helps prevent image retention of the television's previous setting. 1 Press MENU and S or R to select the FUNCTION menu. Teletext Panel lock Auto format Blue screen Side Panel FUNCTION Auto. All buttons on the screen...

Owners Manual
Page 24
... and other channels will not be used to select the TIMER MENU. Sleep timer The television can be set to turn itself off in one and a half hours enter 01:30, or press S or R...10 minutes. 3 Press EXIT to make selections. 12:18 Fri, 13 Jan. The SET TIMER menu will set the required time. SET TIMER Programme BBC ONE 1 Date Fri, 13 Jan. 2006 13/01 Start Time 13....00 End Time 13.15 Repeat ONCE Auto-start VCR: If your Toshiba media recorder is cancelled. For example,...
... and other channels will not be used to select the TIMER MENU. Sleep timer The television can be set to turn itself off in one and a half hours enter 01:30, or press S or R...10 minutes. 3 Press EXIT to make selections. 12:18 Fri, 13 Jan. The SET TIMER menu will set the required time. SET TIMER Programme BBC ONE 1 Date Fri, 13 Jan. 2006 13/01 Start Time 13....00 End Time 13.15 Repeat ONCE Auto-start VCR: If your Toshiba media recorder is cancelled. For example,...

Owners Manual
Page 25
... screen will activate Showing also, giving details of the programme currently being viewed. To set from both the information screen and guide. Press OK to programme details for information of other channels. 4 To record the following programme, with the information ..., press P and Q to appear. In order for the recording operation to work the media recorder must be set the timer for the channel selected. 3 For details of the channel and programme currently being viewed. SET TIMER Start Time End Time Repeat Auto-start VCR Subtitles Audio Language 01:25 02:55 ONCE...
... screen will activate Showing also, giving details of the programme currently being viewed. To set from both the information screen and guide. Press OK to programme details for information of other channels. 4 To record the following programme, with the information ..., press P and Q to appear. In order for the recording operation to work the media recorder must be set the timer for the channel selected. 3 For details of the channel and programme currently being viewed. SET TIMER Start Time End Time Repeat Auto-start VCR Subtitles Audio Language 01:25 02:55 ONCE...

Owners Manual
Page 26
...a four digit number, when these have been locked are now selected they will ask you to select the FEATURE MENU. Digital settings - FEATURE MENU Parental Control OK Favourite and Locked Programmes OK Favourites ALL PROGS Common Interface Slots NO MODULE Software Upgrade OK MENU.... PARENTAL CONTROL Mode OFF Change Pin OK MENU Back EXIT Watch TV This feature locks various menus to prevent the television being retuned or the settings being overridden. 1 In the PARENTAL CONTROL menu press Q to the Parental Control screen. New PIN Confirm PIN CHANGE PIN * * * * ---- 0...
...a four digit number, when these have been locked are now selected they will ask you to select the FEATURE MENU. Digital settings - FEATURE MENU Parental Control OK Favourite and Locked Programmes OK Favourites ALL PROGS Common Interface Slots NO MODULE Software Upgrade OK MENU.... PARENTAL CONTROL Mode OFF Change Pin OK MENU Back EXIT Watch TV This feature locks various menus to prevent the television being retuned or the settings being overridden. 1 In the PARENTAL CONTROL menu press Q to the Parental Control screen. New PIN Confirm PIN CHANGE PIN * * * * ---- 0...

Owners Manual
Page 27
... OK Favourite and Locked Programmes OK Favourites FAV-1 Common Interface Slots NO MODULE Software Upgrade OK MENU Back EXIT Watch TV 25 Press EXIT. Digital settings - The number of the channels in the box. 3 Press R to go through the list of the digital channels that are available from service providers (see...
... OK Favourite and Locked Programmes OK Favourites FAV-1 Common Interface Slots NO MODULE Software Upgrade OK MENU Back EXIT Watch TV 25 Press EXIT. Digital settings - The number of the channels in the box. 3 Press R to go through the list of the digital channels that are available from service providers (see...


