
User Manual
Page 10
...-LINK® connection 18 Connecting a digital audio system 19 Connecting a personal computer (PC 20 Chapter 3: Using the remote control 21 Preparing the remote control for use 21 Installing the remote control batteries 21 Learning about the remote control 22 Chapter 4: Menu layout and navigation 24 Main menu layout 24 Setup / Installation menu layout 25... Specifications 74 Acceptable signal formats for PC IN and HDMI terminals...........75 Limited United States Warranty LCD TV/DVD Combination ......76 Limited Canadian Warranty for Toshiba Brand Flat Panel Televisions 77
...-LINK® connection 18 Connecting a digital audio system 19 Connecting a personal computer (PC 20 Chapter 3: Using the remote control 21 Preparing the remote control for use 21 Installing the remote control batteries 21 Learning about the remote control 22 Chapter 4: Menu layout and navigation 24 Main menu layout 24 Setup / Installation menu layout 25... Specifications 74 Acceptable signal formats for PC IN and HDMI terminals...........75 Limited United States Warranty LCD TV/DVD Combination ......76 Limited Canadian Warranty for Toshiba Brand Flat Panel Televisions 77
User Manual
Page 11
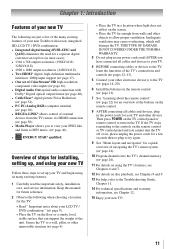
...10 Program channels into the TV's channel memory ( page 26). 11 For details on using its many exciting features of your new Toshiba widescreen, integrated HD, LCD TV / DVD combination: • Integrated digital tuning (8VSB ATSC and QAM) eliminates the need for a separate... for the TV: • Read " Important notes about the remote control page 22) for an overview of the buttons on the remote control. 8 AFTER connecting all cables and devices, plug in most cases). • 1366 x 768 output resolution. (19SLV411U, 32SLV411U) • 1920 x 1080 output resolution. (24SLV411U) •...
...10 Program channels into the TV's channel memory ( page 26). 11 For details on using its many exciting features of your new Toshiba widescreen, integrated HD, LCD TV / DVD combination: • Integrated digital tuning (8VSB ATSC and QAM) eliminates the need for a separate... for the TV: • Read " Important notes about the remote control page 22) for an overview of the buttons on the remote control. 8 AFTER connecting all cables and devices, plug in most cases). • 1366 x 768 output resolution. (19SLV411U, 32SLV411U) • 1920 x 1080 output resolution. (24SLV411U) •...
User Manual
Page 12
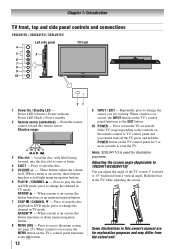
...purposes and may differ from a vertical angle. Press to change the channel in DVD mode; Note: 32SLV411U is onscreen, the INPUT button on the remote control or TV control panel and you are for illustration purposes. press to stop the disc playback in ... Chapter 1: Introduction TV front, top and side panel controls and connections 19SLV411U / 24SLV411U / 32SLV411U Left side panel 4 TV front 5 3 6 7 8 9 10 21 1無 Power On / Standby LED - Point the remote control toward this owner's manual are viewing. Adjusting the screen angle (Applicable to 19SLV411U/24SLV411U...
...purposes and may differ from a vertical angle. Press to change the channel in DVD mode; Note: 32SLV411U is onscreen, the INPUT button on the remote control or TV control panel and you are for illustration purposes. press to stop the disc playback in ... Chapter 1: Introduction TV front, top and side panel controls and connections 19SLV411U / 24SLV411U / 32SLV411U Left side panel 4 TV front 5 3 6 7 8 9 10 21 1無 Power On / Standby LED - Point the remote control toward this owner's manual are viewing. Adjusting the screen angle (Applicable to 19SLV411U/24SLV411U...
User Manual
Page 15
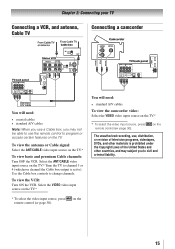
... prohibited under the Copyright Laws of television programs, videotapes, DVDs, and other countries, and may not be able to use the remote control to program or access certain features on the remote control ( page 30). Use the Cable box controls to change channels. Chapter 2: Connecting your TV Connecting a VCR, and antenna... may subject you to civil and criminal liability. 15 To view the antenna or Cable signal: Select the ANT/CABLE video input source on the remote control ( page 30).
... prohibited under the Copyright Laws of television programs, videotapes, DVDs, and other countries, and may not be able to use the remote control to program or access certain features on the remote control ( page 30). Use the Cable box controls to change channels. Chapter 2: Connecting your TV Connecting a VCR, and antenna... may subject you to civil and criminal liability. 15 To view the antenna or Cable signal: Select the ANT/CABLE video input source on the remote control ( page 30).
User Manual
Page 16
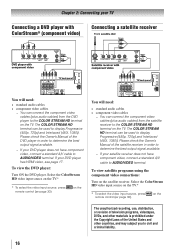
Select the ColorStream HD video input source on the TV.* * To select the video input source, press INPUT on the remote control ( page 30). The unauthorized recording, use, distribution, or revision of television programs, videotapes, DVDs, and other countries, and may subject...and criminal liability. 16 Select the ColorStream HD video input source on the TV.* * To select the video input source, press INPUT on the remote control ( page 30). Please check the Owner's Manual of the DVD player in order to determine the best output signal available. −&#...
Select the ColorStream HD video input source on the TV.* * To select the video input source, press INPUT on the remote control ( page 30). The unauthorized recording, use, distribution, or revision of television programs, videotapes, DVDs, and other countries, and may subject...and criminal liability. 16 Select the ColorStream HD video input source on the TV.* * To select the video input source, press INPUT on the remote control ( page 30). Please check the Owner's Manual of the DVD player in order to determine the best output signal available. −&#...
User Manual
Page 17
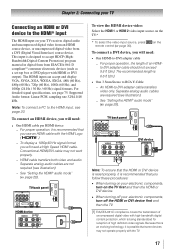
To connect an HDMI device, you follow these procedures: •• When turning on the remote control ( page 30). Separate analog audio cables are not required (see page 20. The HDMI input can accept and display VGA, SVGA, XGA, WXGA, ...
To connect an HDMI device, you follow these procedures: •• When turning on the remote control ( page 30). Separate analog audio cables are not required (see page 20. The HDMI input can accept and display VGA, SVGA, XGA, WXGA, ...
User Manual
Page 18
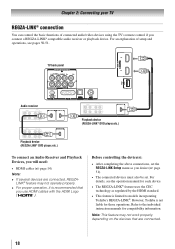
... device. • The REGZA-LINK® feature uses the CEC technology as you connect a REGZA-LINK® compatible audio receiver or playback device. However, Toshiba is recommended that are connected, REGZALINK® feature may not work properly depending on the devices that you will need: • HDMI cables ( page... 14) Note: •• If several devices are connected. 18 For an explanation of connected audio/video devices using the TV's remote control if you desire ( page 51). • The connected devices must also be set.
... device. • The REGZA-LINK® feature uses the CEC technology as you connect a REGZA-LINK® compatible audio receiver or playback device. However, Toshiba is recommended that are connected, REGZALINK® feature may not work properly depending on the devices that you will need: • HDMI cables ( page... 14) Note: •• If several devices are connected. 18 For an explanation of connected audio/video devices using the TV's remote control if you desire ( page 51). • The connected devices must also be set.
User Manual
Page 19
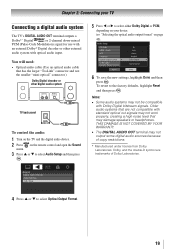
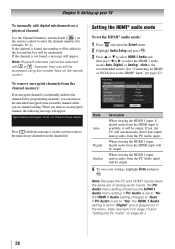
Chapter 2: Connecting your device. ( "Selecting the optical audio output format" on the remote control and open the Sound menu. 3無 Press p or q to select Audio Setup and then press . 5無 Press t or u to the factory defaults, highlight Reset ...
Chapter 2: Connecting your device. ( "Selecting the optical audio output format" on the remote control and open the Sound menu. 3無 Press p or q to select Audio Setup and then press . 5無 Press t or u to the factory defaults, highlight Reset ...

User Manual
Page 21
Caution: Batteries must not be exposed to be used batteries in mind. This will prevent battery acid from the remote control if they are dead or if the remote control is not to excessive heat such as sunshine, fire or the like. Never mix battery types or use new and...; When necessary to the (+) and (-) markings on the battery compartment. 3無 Reattach the battery cover. Note: •• Be sure to use The remote control can operate your LCD TV / DVD combination and control the basic functions of connected audio/video devices if you connect a REGZA-LINK® compatible...
Caution: Batteries must not be exposed to be used batteries in mind. This will prevent battery acid from the remote control if they are dead or if the remote control is not to excessive heat such as sunshine, fire or the like. Never mix battery types or use new and...; When necessary to the (+) and (-) markings on the battery compartment. 3無 Reattach the battery cover. Note: •• Be sure to use The remote control can operate your LCD TV / DVD combination and control the basic functions of connected audio/video devices if you connect a REGZA-LINK® compatible...
User Manual
Page 22
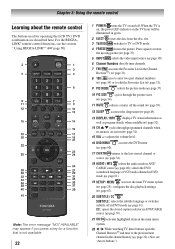
... ( page 67). 20無 SUBTITLE / CC SUBTITLE : selects the subtitle language or switches subtitle off . Chapter 3: Using the remote control Learning about the remote control The buttons used for a function that is on and off in DVD mode ( page 61). adjusts the volume level. 16&#... ( page 25); selects the DVD soundtrack language or VCD audio channel in ANT/ CABLE source ( page 40); For the REGZALINK® remote control functions, see "Arrow buttons.") Note: The error message "NOT AVAILABLE" may appear if you press a key for operating the LCD TV / ...
... ( page 67). 20無 SUBTITLE / CC SUBTITLE : selects the subtitle language or switches subtitle off . Chapter 3: Using the remote control Learning about the remote control The buttons used for a function that is on and off in DVD mode ( page 61). adjusts the volume level. 16&#... ( page 25); selects the DVD soundtrack language or VCD audio channel in ANT/ CABLE source ( page 40); For the REGZALINK® remote control functions, see "Arrow buttons.") Note: The error message "NOT AVAILABLE" may appear if you press a key for operating the LCD TV / ...
User Manual
Page 23
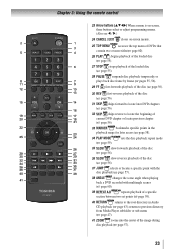
Chapter 3: Using the remote control 23無 Arrow buttons (pqtu) When a menu is on-screen, these buttons select or adjust programming menus. (Also see t / u.) 24無 CANCEL / EXIT closes ...
Chapter 3: Using the remote control 23無 Arrow buttons (pqtu) When a menu is on-screen, these buttons select or adjust programming menus. (Also see t / u.) 24無 CANCEL / EXIT closes ...

User Manual
Page 24
Chapter 4: Menu layout and navigation Main menu layout The tables below ), press on the remote control or MENU on the next page provide a quick overview of 12 hours ] [Opens the PC Settings menu] [Opens the Media Player menu] ...
Chapter 4: Menu layout and navigation Main menu layout The tables below ), press on the remote control or MENU on the next page provide a quick overview of 12 hours ] [Opens the PC Settings menu] [Opens the Media Player menu] ...

User Manual
Page 25
... a sign of malfunction. • When a menu is receiving. To open the Installation menu (illustrated below), press on the remote control or MENU on the remote control or pq + - Icon Terrestrial System Status Item Input Configuration Channel Program Channel Options Channel Tuning Mode Time Zone Signal Meter System... about 5 minutes. • To close a menu instantly, press . 25 on the signal the TV is opened, use the buttons on the remote control or TV control panel to access and navigate your TV's onscreen menu system. • Press to save your menu settings or select a highlighted...
... a sign of malfunction. • When a menu is receiving. To open the Installation menu (illustrated below), press on the remote control or MENU on the remote control or pq + - Icon Terrestrial System Status Item Input Configuration Channel Program Channel Options Channel Tuning Mode Time Zone Signal Meter System... about 5 minutes. • To close a menu instantly, press . 25 on the signal the TV is opened, use the buttons on the remote control or TV control panel to access and navigate your TV's onscreen menu system. • Press to save your menu settings or select a highlighted...
User Manual
Page 26
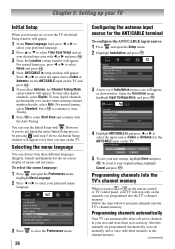
... step 5 above, the Initial Setup window will appear, as shown below to program channels into the TV's channel memory When you press or on the remote control or TV control panel, your TV will appear. After the channels are programmed automatically, you can choose from three different languages (English, French and...
... step 5 above, the Initial Setup window will appear, as shown below to program channels into the TV's channel memory When you press or on the remote control or TV control panel, your TV will appear. After the channels are programmed automatically, you can choose from three different languages (English, French and...
User Manual
Page 27
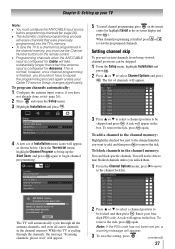
... 26). 2無 Press and open the Setup menu. 3無 Highlight Installation and press . 5無 To cancel channel programming, press on the remote control (or highlight Cancel in the on the remote control. •• Programming channels when the ANT/CABLE input is configured for Cable will take substantially longer than when the...
... 26). 2無 Press and open the Setup menu. 3無 Highlight Installation and press . 5無 To cancel channel programming, press on the remote control (or highlight Cancel in the on the remote control. •• Programming channels when the ANT/CABLE input is configured for Cable will take substantially longer than when the...
User Manual
Page 28
.... 4無 To save your TV To manually add digital subchannels on a physical channel: Use the Channel Numbers and the Dash ( ) on the remote control. Press 1 on remote to remove the unnecessary channel from the HDMI input will be output. Digital When viewing the HDMI 1 input, digital audio from the channel list...to "No" the HDMI 1 Audio setting changes to the channel list by programming channels, you can still be accessed using the number keys on the remote control to the list and the box will be selected with or ; If PC Audio is set to "Yes" the HDMI 1 Audio setting is ...
.... 4無 To save your TV To manually add digital subchannels on a physical channel: Use the Channel Numbers and the Dash ( ) on the remote control. Press 1 on remote to remove the unnecessary channel from the HDMI input will be output. Digital When viewing the HDMI 1 input, digital audio from the channel list...to "No" the HDMI 1 Audio setting changes to the channel list by programming channels, you can still be accessed using the number keys on the remote control to the list and the box will be selected with or ; If PC Audio is set to "Yes" the HDMI 1 Audio setting is ...

User Manual
Page 30
... screen, you can label each video input source according to the type of device you will appear. or c) Repeatedly press INPUT on the remote control or TV control panel to actually select a particular device from the popup window. If a REGZA-LINK® device with HDMI switching ... the video input source to highlight HDMI 1 or HDMI 2. Press INPUT repeatedly to change the input. or b) Repeatedly press on the remote control or TV control panel. 2無 And then either: a) Press 0-6 ; If the connected CEC device has any connected devices, a separate device...
... screen, you can label each video input source according to the type of device you will appear. or c) Repeatedly press INPUT on the remote control or TV control panel to actually select a particular device from the popup window. If a REGZA-LINK® device with HDMI switching ... the video input source to highlight HDMI 1 or HDMI 2. Press INPUT repeatedly to change the input. or b) Repeatedly press on the remote control or TV control panel. 2無 And then either: a) Press 0-6 ; If the connected CEC device has any connected devices, a separate device...
User Manual
Page 31
... channel/input: 1無 Tune to select the desired label for 3 seconds. Input labeling example: The screen below left side of the Favorites list on the remote control. 5無 To save the new input labels, highlight Done and press . The screen below ). • Quickly surf and tune your channels and inputs. To...
... channel/input: 1無 Tune to select the desired label for 3 seconds. Input labeling example: The screen below left side of the Favorites list on the remote control. 5無 To save the new input labels, highlight Done and press . The screen below ). • Quickly surf and tune your channels and inputs. To...
User Manual
Page 32
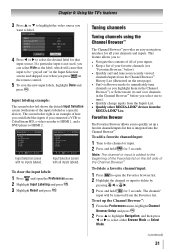
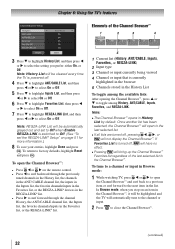
To open the Channel Browser™: • Press or on the remote control. • Press to surf backward through the previously tuned channels in the History list, the channels in the ANT/ CABLE channel list, the ...
To open the Channel Browser™: • Press or on the remote control. • Press to surf backward through the previously tuned channels in the History list, the channels in the ANT/ CABLE channel list, the ...
User Manual
Page 33
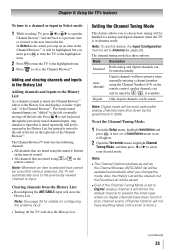
... channels can be tuned normally Auto (default) Digital channels will have priority when manually entering a channel number using the Channel Number (0-9) on the remote control, analog channels can still be tuned by / , if available Digital Only digital channels can be tuned Note: Digital mode will be most ...(Channel Options will be saved. ••Even if the Channel Tuning Mode is tuned, the Channel Browser™ adds it on the remote control. To set of the Channel Browser™. Also, the History List will be cleared, but the Favorites List will be highlighted but instead...
... channels can be tuned normally Auto (default) Digital channels will have priority when manually entering a channel number using the Channel Number (0-9) on the remote control, analog channels can still be tuned by / , if available Digital Only digital channels can be tuned Note: Digital mode will be most ...(Channel Options will be saved. ••Even if the Channel Tuning Mode is tuned, the Channel Browser™ adds it on the remote control. To set of the Channel Browser™. Also, the History List will be cleared, but the Favorites List will be highlighted but instead...

