
User Manual
Page 10
... language 26 Configuring the antenna input source for theANT/CABLE terminal..........26 Programming channels into the TV's channel memory 26 Programming channels automatically 26 Setting channel skip 27 Setting the HDMI® audio mode 28 Viewing the digital signal... TV programs by Canada rating 43 Unlocking programs temporarily 44 Using the input lock feature 44 Locking channels 44 10 Using the GameTimer 44 Using the panel lock feature 45 Using the PC settings feature ... Warranty LCD TV/DVD Combination ......76 Limited Canadian Warranty for Toshiba Brand Flat Panel Televisions 77
... language 26 Configuring the antenna input source for theANT/CABLE terminal..........26 Programming channels into the TV's channel memory 26 Programming channels automatically 26 Setting channel skip 27 Setting the HDMI® audio mode 28 Viewing the digital signal... TV programs by Canada rating 43 Unlocking programs temporarily 44 Using the input lock feature 44 Locking channels 44 10 Using the GameTimer 44 Using the panel lock feature 45 Using the PC settings feature ... Warranty LCD TV/DVD Combination ......76 Limited Canadian Warranty for Toshiba Brand Flat Panel Televisions 77
User Manual
Page 11
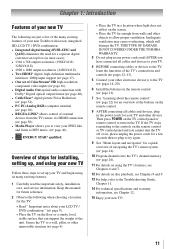
... other electronic device(s) to the TV ( pages 14-20). 6 Install the batteries in most cases). • 1366 x 768 output resolution. (19SLV411U, 32SLV411U) • 1920 x 1080 output resolution. (24SLV411U) • Two HDMI® digital, high-definition multimedia interfaces 1080p input support ( page 17). &#... channel memory ( page 26). 11 For details on the screen. • Place the TV far enough from the TV remote via HDMI connection ( page 50). • Media Player allows you cannot turn on the TV. THIS TYPE OF DAMAGE IS NOT COVERED UNDER THE TOSHIBA ...
... other electronic device(s) to the TV ( pages 14-20). 6 Install the batteries in most cases). • 1366 x 768 output resolution. (19SLV411U, 32SLV411U) • 1920 x 1080 output resolution. (24SLV411U) • Two HDMI® digital, high-definition multimedia interfaces 1080p input support ( page 17). &#... channel memory ( page 26). 11 For details on the screen. • Place the TV far enough from the TV remote via HDMI connection ( page 50). • Media Player allows you cannot turn on the TV. THIS TYPE OF DAMAGE IS NOT COVERED UNDER THE TOSHIBA ...
User Manual
Page 12
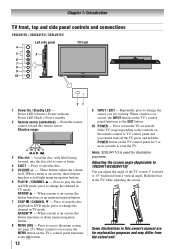
...q - Repeatedly press to stop the disc playback in this remote sensor. Note: 32SLV411U is on-screen, the MENU button on -screen, the button functions as up menu navigation button. 7無 STOP / CHANNEL q - When a menu is on the TV's control panel functions as the button... the POWER button on the TV control panel for illustration purposes. Chapter 1: Introduction TV front, top and side panel controls and connections 19SLV411U / 24SLV411U / 32SLV411U Left side panel 4 TV front 5 3 6 7 8 9 10 21 1無 Power On / Standby LED - When a menu is onscreen, the...
...q - Repeatedly press to stop the disc playback in this remote sensor. Note: 32SLV411U is on-screen, the MENU button on -screen, the button functions as up menu navigation button. 7無 STOP / CHANNEL q - When a menu is on the TV's control panel functions as the button... the POWER button on the TV control panel for illustration purposes. Chapter 1: Introduction TV front, top and side panel controls and connections 19SLV411U / 24SLV411U / 32SLV411U Left side panel 4 TV front 5 3 6 7 8 9 10 21 1無 Power On / Standby LED - When a menu is onscreen, the...
User Manual
Page 15
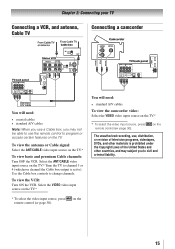
... you to program or access certain features on the TV. Select the ANT/CABLE video input source on the TV.* Tune the TV to channel 3 or 4 (whichever channel the Cable box output is prohibited under the Copyright Laws of the United States and other countries, and may not be able to use... , distribution, or revision of television programs, videotapes, DVDs, and other materials is set to change channels. Select the VIDEO video input source on the TV.* * To select the video input source, press INPUT on the TV.* To view basic and premium...
... you to program or access certain features on the TV. Select the ANT/CABLE video input source on the TV.* Tune the TV to channel 3 or 4 (whichever channel the Cable box output is prohibited under the Copyright Laws of the United States and other countries, and may not be able to use... , distribution, or revision of television programs, videotapes, DVDs, and other materials is set to change channels. Select the VIDEO video input source on the TV.* * To select the video input source, press INPUT on the TV.* To view basic and premium...
User Manual
Page 19
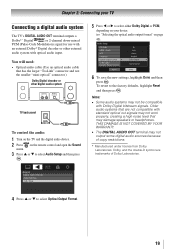
... system with Dolby Digital bitstream signals. Chapter 2: Connecting your TV Connecting a digital audio system The TV's DIGITAL AUDIO OUT terminal outputs a Dolby® * Digital or 2-channel down-mixed PCM (Pulse-Code Modulation) signal for use with an external Dolby® Digital decoder or other digital audio system TV back panel To...
... system with Dolby Digital bitstream signals. Chapter 2: Connecting your TV Connecting a digital audio system The TV's DIGITAL AUDIO OUT terminal outputs a Dolby® * Digital or 2-channel down-mixed PCM (Pulse-Code Modulation) signal for use with an external Dolby® Digital decoder or other digital audio system TV back panel To...
User Manual
Page 22
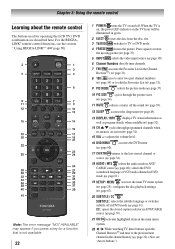
... 49). 13無 DISPLAY / INFO displays TV status information as well as program details, when available ( page 52). 14無 CH cycles through programmed channels when no menu is on-screen ( page 34). 15無 VOL + - accesses the DVD menu 17無 CH RTN returns to the last viewed... channel or source ( page 34). 18無 AUDIO / MTS selects the audio mode in green. 2無 EJECT ejects the disc from the disc slot. 3無 ...
... 49). 13無 DISPLAY / INFO displays TV status information as well as program details, when available ( page 52). 14無 CH cycles through programmed channels when no menu is on-screen ( page 34). 15無 VOL + - accesses the DVD menu 17無 CH RTN returns to the last viewed... channel or source ( page 34). 18無 AUDIO / MTS selects the audio mode in green. 2無 EJECT ejects the disc from the disc slot. 3無 ...

User Manual
Page 24
...Mode Theater Settings Digital Audio Selector Audio Settings Audio Setup CC Selector Base CC Mode Digital CC Settings Input Labeling Menu Language Channel Browser Setup REGZA-LINK Player Control Energy Saving Settings Enable Rating Blocking Edit Rating Limits Input Lock Panel Lock GameTimer New ...[Opens the Digital CC Settings menu] [Opens the Input Labeling menu] English / Français / Español [Opens the Channel Browser Setup menu] [Opens the REGZA-LINK Player Control menu] [Opens the Energy Saving Settings menu] Off / On [...
...Mode Theater Settings Digital Audio Selector Audio Settings Audio Setup CC Selector Base CC Mode Digital CC Settings Input Labeling Menu Language Channel Browser Setup REGZA-LINK Player Control Energy Saving Settings Enable Rating Blocking Edit Rating Limits Input Lock Panel Lock GameTimer New ...[Opens the Digital CC Settings menu] [Opens the Input Labeling menu] English / Français / Español [Opens the Channel Browser Setup menu] [Opens the REGZA-LINK Player Control menu] [Opens the Energy Saving Settings menu] Off / On [...

User Manual
Page 25
... Mode Time Zone Signal Meter System Information Option [Opens the Input Configuration menu] [Start Scan] [Scans for new channels on ANT/CABLE] [Opens the Skip / Lock Channel menu] Standard / Auto / Digital Eastern / Newfoundland / Atlantic / Hawaii / Alaska / Pacific / Mountain / Central [Opens the Signal Meter menu] ...
... Mode Time Zone Signal Meter System Information Option [Opens the Input Configuration menu] [Start Scan] [Scans for new channels on ANT/CABLE] [Opens the Skip / Lock Channel menu] Standard / Auto / Digital Eastern / Newfoundland / Atlantic / Hawaii / Alaska / Pacific / Mountain / Central [Opens the Signal Meter menu] ...
User Manual
Page 26
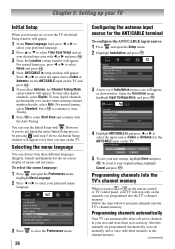
... 26 Configuring the antenna input source for the ANT/CABLE input on the TV and press . 5無 If you select Antenna, the Channel Tuning Mode setup window will stop the Initial Setup with the Auto Tuning. Open the Terrestrial menu, highlight Input Configuration, and press . ...and press . 3無 A new set your original settings, highlight Cancel and press . However if you turn on the channels you can automatically detect all active channels in the channel memory. (continued) You can stop only on or reset the TV, the Initial Setup window will appear. 1無 In...
... 26 Configuring the antenna input source for the ANT/CABLE input on the TV and press . 5無 If you select Antenna, the Channel Tuning Mode setup window will stop the Initial Setup with the Auto Tuning. Open the Terrestrial menu, highlight Input Configuration, and press . ...and press . 3無 A new set your original settings, highlight Cancel and press . However if you turn on the channels you can automatically detect all active channels in the channel memory. (continued) You can stop only on or reset the TV, the Initial Setup window will appear. 1無 In...
User Manual
Page 27
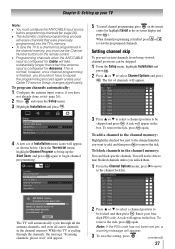
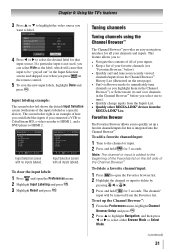
...Setting channel skip To prevent certain channels from being viewed, channel positions can block specific channels. To add a channel to the channel memory: Highlight the checked box next to the channel number you unlock them. 1無 From the Channel Options menu, press uto move to the channel lock ...of Installation menu icons will appear, as shown below. To block channels in the channel memory. however, once channel programming is cycling through all the antenna channels, and store all active channels in the channel memory: You can be skipped and press . A tick will ...
...Setting channel skip To prevent certain channels from being viewed, channel positions can block specific channels. To add a channel to the channel memory: Highlight the checked box next to the channel number you unlock them. 1無 From the Channel Options menu, press uto move to the channel lock ...of Installation menu icons will appear, as shown below. To block channels in the channel memory. however, once channel programming is cycling through all the antenna channels, and store all active channels in the channel memory: You can be skipped and press . A tick will ...
User Manual
Page 28
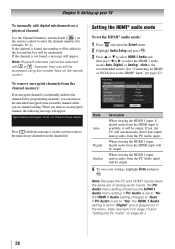
... and press . 3無 Press p or q to select HDMI 1 Audio and then press t or u to the HDMI® input" ( page 17). If the channel is the recommended mode.) See "Connecting an HDMI or DVI device to select the HDMI 1 audio mode (Auto, Digital, or Analog). (Auto is found , a message... Audio input. Chapter 5: Setting up your settings, highlight Done and press . Analog When viewing the HDMI 1 input, analog audio from the channel memory: If an encrypted channel is grayed out in the menu. (Also see item 3 on page 13 and "Setting the PC Audio" on the remote control to the...
... and press . 3無 Press p or q to select HDMI 1 Audio and then press t or u to the HDMI® input" ( page 17). If the channel is the recommended mode.) See "Connecting an HDMI or DVI device to select the HDMI 1 audio mode (Auto, Digital, or Analog). (Auto is found , a message... Audio input. Chapter 5: Setting up your settings, highlight Done and press . Analog When viewing the HDMI 1 input, analog audio from the channel memory: If an encrypted channel is grayed out in the menu. (Also see item 3 on page 13 and "Setting the PC Audio" on the remote control to the...

User Manual
Page 29
..., and then press . After the time zone has been set the current Daylight Saving Time status. Reset Factory Defaults To reset all settings and channels to their factory default values: 1無 Press and open the Setup menu. 2無 Highlight Installation and press . 3無 A new set...28961; Press t or u to select Factory Defaults. 5無 Highlight Yes and press . 6無 (If PIN code has been set of the presentation channel, Highlight Advanced and press . Open the System Status menu, highlight System Information, and press . 4無 Press tu to scroll through the menu bar to...
..., and then press . After the time zone has been set the current Daylight Saving Time status. Reset Factory Defaults To reset all settings and channels to their factory default values: 1無 Press and open the Setup menu. 2無 Highlight Installation and press . 3無 A new set...28961; Press t or u to select Factory Defaults. 5無 Highlight Yes and press . 6無 (If PIN code has been set of the presentation channel, Highlight Advanced and press . Open the System Status menu, highlight System Information, and press . 4無 Press tu to scroll through the menu bar to...

User Manual
Page 30
...; Laser Disc • Satellite/DSS • VCR • Video Recorder • Hide (to hide an unused input in the Input Selection screen and in the Channel Browser™ Inputs list) Note: If you select PC in video input mode. ••If CEC device is connected to view: 1無 Press INPUT...
...; Laser Disc • Satellite/DSS • VCR • Video Recorder • Hide (to hide an unused input in the Input Selection screen and in the Channel Browser™ Inputs list) Note: If you select PC in video input mode. ••If CEC device is connected to view: 1無 Press INPUT...
User Manual
Page 31
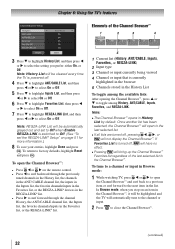
...the next page). • Surf via Browse mode (to immediately tune channels as a specific device). Note: The channel or input is an example of the Channel Browser™. Tuning channels Tuning channels using the Channel Browser™ The Channel Browser™ provides an easy navigation interface for 3 seconds. The screen ... you can select Hide as the label, which will be "grayed out" in the Input Selection screen and skipped over channels in the Channel Browser™) or Select mode (to surf over when you press INPUT on the left shows the default Input Selection screen ...
...the next page). • Surf via Browse mode (to immediately tune channels as a specific device). Note: The channel or input is an example of the Channel Browser™. Tuning channels Tuning channels using the Channel Browser™ The Channel Browser™ provides an easy navigation interface for 3 seconds. The screen ... you can select Hide as the label, which will be "grayed out" in the Input Selection screen and skipped over channels in the Channel Browser™) or Select mode (to surf over when you press INPUT on the left shows the default Input Selection screen ...
User Manual
Page 32
... REGZA-LINK® devices in the REGZA-LINK® list. • Press to surf forward through the channel History, the ANT/CABLE channel list, the Inputs list, the favorite channels/inputs in the Favorites list, or the REGZA-LINK® list. 1無 Current list (History, ANT/CABLE, Inputs...Chapter 6: Using the TV's features Elements of the last selected list in the list. Once another list has been selected, the Channel Browser™ will open the Channel Browser™ and surf back to a previous item or surf forward to toggle among History, ANT/CABLE, Inputs, Favorites, ...
... REGZA-LINK® devices in the REGZA-LINK® list. • Press to surf forward through the channel History, the ANT/CABLE channel list, the Inputs list, the favorite channels/inputs in the Favorites list, or the REGZA-LINK® list. 1無 Current list (History, ANT/CABLE, Inputs...Chapter 6: Using the TV's features Elements of the last selected list in the list. Once another list has been selected, the Channel Browser™ will open the Channel Browser™ and surf back to a previous item or surf forward to toggle among History, ANT/CABLE, Inputs, Favorites, ...
User Manual
Page 33
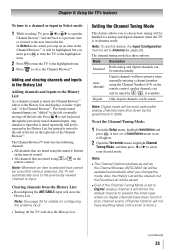
...will be highlighted but instead is moved to the History List and displays it will be saved. ••Even if the Channel Tuning Mode is tuned, the Channel Browser™ adds it to the end of the list on the "right side" of Installation menu icons will automatically tune ... TV to the highlighted item. 2無 Press to tune the TV to the highlighted item. 3無 Press to select your desired mode. The Channel Browser™ will be updated automatically when you must be handled for various reasons), the TV will appear. 2無 Open the Terrestrial menu, highlight...
...will be highlighted but instead is moved to the History List and displays it will be saved. ••Even if the Channel Tuning Mode is tuned, the Channel Browser™ adds it to the end of the list on the "right side" of Installation menu icons will automatically tune ... TV to the highlighted item. 2無 Press to tune the TV to the highlighted item. 3無 Press to select your desired mode. The Channel Browser™ will be updated automatically when you must be handled for various reasons), the TV will appear. 2無 Open the Terrestrial menu, highlight...

User Manual
Page 34
... and the button will be tuned. Full, TheaterWide 1, TheaterWide 2, TheaterWide 3, Native, 4:3, Normal, and Dot by the dash ( ) button and then the sub-channel number. Select the picture size that displays the current program the way that are tuned.This feature also works for external inputs. Tuning to the ...TV. The format of the image (in a variety of the signal you press from any of the picture sizes) will have to tune the RF channel using the remote control: 1無 Press on the remote control. 2無 While the Picture Size menu is opened, you want to program into the...
... and the button will be tuned. Full, TheaterWide 1, TheaterWide 2, TheaterWide 3, Native, 4:3, Normal, and Dot by the dash ( ) button and then the sub-channel number. Select the picture size that displays the current program the way that are tuned.This feature also works for external inputs. Tuning to the ...TV. The format of the image (in a variety of the signal you press from any of the picture sizes) will have to tune the RF channel using the remote control: 1無 Press on the remote control. 2無 While the Picture Size menu is opened, you want to program into the...

User Manual
Page 39
... step 3. Caption Size Auto, Small, Standard, Large Caption Text Type Auto, Default, Mono w. However, once you change to another analog channel, the closed caption setting will change back to select the desired service. 4無 Press . To select closed caption feature is automatically activated ... (1/2 MUTE) or turn off (MUTE) the sound. Adjusting the audio Muting the sound (For TV speakers) Press on a digital channel (for digital channels only. ••You cannot set the volume to Off when you press , the mute mode will automatically change in the SOUND ...
... step 3. Caption Size Auto, Small, Standard, Large Caption Text Type Auto, Default, Mono w. However, once you change to another analog channel, the closed caption setting will change back to select the desired service. 4無 Press . To select closed caption feature is automatically activated ... (1/2 MUTE) or turn off (MUTE) the sound. Adjusting the audio Muting the sound (For TV speakers) Press on a digital channel (for digital channels only. ••You cannot set the volume to Off when you press , the mute mode will automatically change in the SOUND ...
User Manual
Page 40
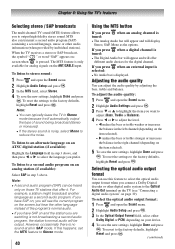
...28961; Press or to adjust the level. • makes the bass or treble weaker or increases the balance in the left channel (depending on those TV stations that offer it will display Stereo, SAP, Mono as a second audio program. When the TV receives a stereo or SAP ... . To reset the settings to output high-fidelity stereo sound. If this feature to select the language you prefer. If you press when a digital channel is pressed. screen when is tuned: • The Digital Audio bar will appear and will be heard only on the item selected). • &#...
...28961; Press or to adjust the level. • makes the bass or treble weaker or increases the balance in the left channel (depending on those TV stations that offer it will display Stereo, SAP, Mono as a second audio program. When the TV receives a stereo or SAP ... . To reset the settings to output high-fidelity stereo sound. If this feature to select the language you prefer. If you press when a digital channel is pressed. screen when is tuned: • The Digital Audio bar will appear and will be heard only on the item selected). • &#...
User Manual
Page 41
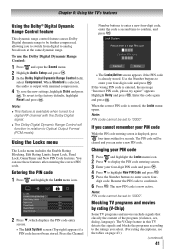
... the programs according to the ratings you cannot remember your PIN code While the PIN code entering screen is available when tuned to a digital RF channel with minimal compression. 4無 To save the new settings, highlight Done and press . The new PIN code is already stored. Press the... Channel Number buttons to enter a new four-digit code, enter the code a second time to display the PIN code entering screen. 3無 Enter your four-digit ...
... the programs according to the ratings you cannot remember your PIN code While the PIN code entering screen is available when tuned to a digital RF channel with minimal compression. 4無 To save the new settings, highlight Done and press . The new PIN code is already stored. Press the... Channel Number buttons to enter a new four-digit code, enter the code a second time to display the PIN code entering screen. 3無 Enter your four-digit ...

