
User Manual
Page 2
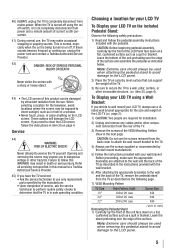
... OF ELECTRIC SHOCK, DO NOT REMOVE COVER (OR BACK). NOTE TO CATV INSTALLERS This is intended to alert the user to the presence of this television. CHILD SAFETY: It Makes A Difference How and Where You Use Your Flat Panel Display Congratulations on a "larger than a UL Listed wall bracket appropriate for the size and weight of important operating and maintenance (servicing) instructions in serious bodily injury and...
... OF ELECTRIC SHOCK, DO NOT REMOVE COVER (OR BACK). NOTE TO CATV INSTALLERS This is intended to alert the user to the presence of this television. CHILD SAFETY: It Makes A Difference How and Where You Use Your Flat Panel Display Congratulations on a "larger than a UL Listed wall bracket appropriate for the size and weight of important operating and maintenance (servicing) instructions in serious bodily injury and...
User Manual
Page 5
... this manual to a Toshiba Authorized Service Provider. 45) If you need to a wall, pillar, surface, or other immovable structure. ( item 25, page 4). Note: Extreme care should always be exposed to the TV. 4) Always use a UL listed wall bracket appropriate for installation. 2) Unplug and remove any cables and/or other hazards. CAUTION: Do not use the screws removed from the back cover to attach the wall mount bracket to...
... this manual to a Toshiba Authorized Service Provider. 45) If you need to a wall, pillar, surface, or other immovable structure. ( item 25, page 4). Note: Extreme care should always be exposed to the TV. 4) Always use a UL listed wall bracket appropriate for installation. 2) Unplug and remove any cables and/or other hazards. CAUTION: Do not use the screws removed from the back cover to attach the wall mount bracket to...
User Manual
Page 6
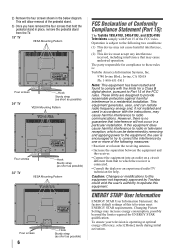
..., if not installed and used in place, remove the pedestal stand from the TV. 19" TV VESA Mounting Pattern Four screws Hook Sturdy strap (as short as possible) 24" TV VESA Mounting Pattern Four screws Hook Sturdy strap (as short as possible) 32" TV VESA Mounting Pattern Four screws 6 Hook Sturdy strap (as short as possible) FCC Declaration of Conformity Compliance Statement (Part 15): The Toshiba 19SL410U, 24SL410U, and 32SL410U Televisions comply with...
..., if not installed and used in place, remove the pedestal stand from the TV. 19" TV VESA Mounting Pattern Four screws Hook Sturdy strap (as short as possible) 24" TV VESA Mounting Pattern Four screws Hook Sturdy strap (as short as possible) 32" TV VESA Mounting Pattern Four screws 6 Hook Sturdy strap (as short as possible) FCC Declaration of Conformity Compliance Statement (Part 15): The Toshiba 19SL410U, 24SL410U, and 32SL410U Televisions comply with...
User Manual
Page 8
... (V-Chip 40 Downloading an additional rating system for blocking TV programs and movies 41 Locking channels 42 Unlocking programs temporarily 42 Using the input lock feature 42 Using the Game Timer 43 Using the control panel lock feature 43 Using the PC settings feature 43 Setting the PC Audio 44 Using the Media Player 44 Using the Media Player with USB 44 To select the Auto Start function 45 To open the Media Player 45 Viewing photo files 45 Playing music files...
... (V-Chip 40 Downloading an additional rating system for blocking TV programs and movies 41 Locking channels 42 Unlocking programs temporarily 42 Using the input lock feature 42 Using the Game Timer 43 Using the control panel lock feature 43 Using the PC settings feature 43 Setting the PC Audio 44 Using the Media Player 44 Using the Media Player with USB 44 To select the Auto Start function 45 To open the Media Player 45 Viewing photo files 45 Playing music files...
User Manual
Page 12
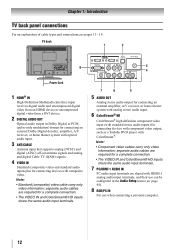
... with HDMI-1 analog audio input terminals, and their use can be configured in Dolby Digital or PCM (pulse-code modulation) format for connecting an external Dolby Digital decoder, amplifier, A/V receiver, or home theater system with optical audio input. 3 ANT/CABLE Antenna input that supports analog (NTSC) and digital (ATSC) off-air antenna signals and analog and digital Cable TV (QAM) signals. 4 VIDEO IN Standard (composite) video and standard audio inputs plus for connecting devices with component video output, such as a Toshiba DVD player with composite video. separate audio cables are...
... with HDMI-1 analog audio input terminals, and their use can be configured in Dolby Digital or PCM (pulse-code modulation) format for connecting an external Dolby Digital decoder, amplifier, A/V receiver, or home theater system with optical audio input. 3 ANT/CABLE Antenna input that supports analog (NTSC) and digital (ATSC) off-air antenna signals and analog and digital Cable TV (QAM) signals. 4 VIDEO IN Standard (composite) video and standard audio inputs plus for connecting devices with component video output, such as a Toshiba DVD player with composite video. separate audio cables are...
User Manual
Page 13
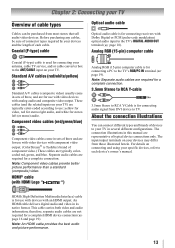
... antenna, cable TV service, and/or cable converter box to the ANT/CABLE input on your TV) are typically color-coded according to use with devices with Dolby Digital or PCM (pulse-code modulation) optical audio input to the TV's DIGITAL AUDIO OUT terminal ( page 18). HDMI (High-Definition Multimedia Interface) cable is for connecting receivers with an HDMI output. This cable carries both video and audio information; Analog RGB (15-pin) computer cable Coaxial (F-type) cable is Toshiba's brand of component video...
... antenna, cable TV service, and/or cable converter box to the ANT/CABLE input on your TV) are typically color-coded according to use with devices with Dolby Digital or PCM (pulse-code modulation) optical audio input to the TV's DIGITAL AUDIO OUT terminal ( page 18). HDMI (High-Definition Multimedia Interface) cable is for connecting receivers with an HDMI output. This cable carries both video and audio information; Analog RGB (15-pin) computer cable Coaxial (F-type) cable is Toshiba's brand of component video...
User Manual
Page 19
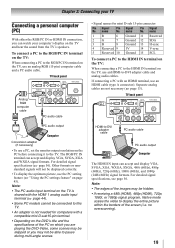
... use a PC, set the monitor output resolution on the TV, use an HDMI-to-DVI adapter cable and analog audio cables. For detailed signal specifications, see page 56. name Pin Signal No. For detailed signal specifications ( page 56). If connecting a PC with a compatible mini D-sub15-pin terminal. • Depending on the DVD's title and the specifications of the screen (i.e. Separate analog cables are playing the DVD-Video, some scenes may be skipped or you can accept and display...
... use a PC, set the monitor output resolution on the TV, use an HDMI-to-DVI adapter cable and analog audio cables. For detailed signal specifications, see page 56. name Pin Signal No. For detailed signal specifications ( page 56). If connecting a PC with a compatible mini D-sub15-pin terminal. • Depending on the DVD's title and the specifications of the screen (i.e. Separate analog cables are playing the DVD-Video, some scenes may be skipped or you can accept and display...
User Manual
Page 22
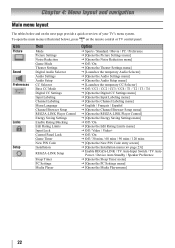
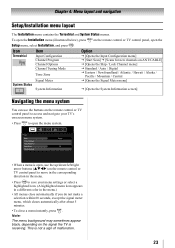
... (illustrated below and on the remote control or TV control panel. Icon Picture Sound Preferences Locks Setup Item Mode Picture Settings Noise Reduction Game Mode Theater Settings Digital Audio Selector Audio Settings Audio Setup CC Selector Base CC Mode Digital CC Settings Input Labeling Channel Labeling Menu Language Channel Browser Setup REGZA-LINK Player Control Energy Saving Settings Enable Rating Blocking Edit Rating Limits Input Lock Control Panel Lock Game Timer New PIN Code Installation REGZA-LINK Setup Sleep Timer PC Settings Media Player Option J Sports / Standard / Movie / PC...
... (illustrated below and on the remote control or TV control panel. Icon Picture Sound Preferences Locks Setup Item Mode Picture Settings Noise Reduction Game Mode Theater Settings Digital Audio Selector Audio Settings Audio Setup CC Selector Base CC Mode Digital CC Settings Input Labeling Channel Labeling Menu Language Channel Browser Setup REGZA-LINK Player Control Energy Saving Settings Enable Rating Blocking Edit Rating Limits Input Lock Control Panel Lock Game Timer New PIN Code Installation REGZA-LINK Setup Sleep Timer PC Settings Media Player Option J Sports / Standard / Movie / PC...
User Manual
Page 23
... Game Mode Theater Settings Sports Off • When a menu is open the menu system. Note: The menu background may sometimes appear black, depending on the remote control or TV control panel, open the Setup menu, select Installation, and press . Icon Terrestrial Item Input Configuration Channel Program Channel Options Channel Tuning Mode Time Zone Signal Meter System Status System Information Option J [Opens the Input Configuration menu] J [Start Scan] J [Scans for new channels on ANT/CABLE] J [Opens the Skip / Lock Channel menu] J Standard / Auto / Digital...
... Game Mode Theater Settings Sports Off • When a menu is open the menu system. Note: The menu background may sometimes appear black, depending on the remote control or TV control panel, open the Setup menu, select Installation, and press . Icon Terrestrial Item Input Configuration Channel Program Channel Options Channel Tuning Mode Time Zone Signal Meter System Status System Information Option J [Opens the Input Configuration menu] J [Start Scan] J [Scans for new channels on ANT/CABLE] J [Opens the Skip / Lock Channel menu] J Standard / Auto / Digital...
User Manual
Page 24
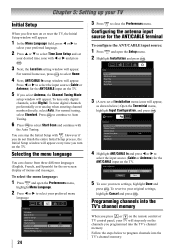
... . 3 Next, the Location setting window will appear. To select the menu language: 1 Press and open the Setup menu. 2 Highlight Installation and press . Configuring the antenna input source for the on-screen display of Installation menu icons will appear. Installation Terrestrial Input Configuration Channel Program Channel Options Channel Tuning Mode Auto Time Zone Signal Meter 4 Highlight ANT/CABLE In and press W or X to select Start Scan and continue with the Auto Tuning. Programming channels into the TV's channel memory. Selecting...
... . 3 Next, the Location setting window will appear. To select the menu language: 1 Press and open the Setup menu. 2 Highlight Installation and press . Configuring the antenna input source for the on-screen display of Installation menu icons will appear. Installation Terrestrial Input Configuration Channel Program Channel Options Channel Tuning Mode Auto Time Zone Signal Meter 4 Highlight ANT/CABLE In and press W or X to select Start Scan and continue with the Auto Tuning. Programming channels into the TV's channel memory. Selecting...

User Manual
Page 25
... Input Configuration Channel Program Channel Options Channel Tuning Mode Time Zone Signal Meter again to begin Auto ANT/CABLE Antenna Scanning channels, please wait... 52% Number of Installation menu icons will take substantially longer than when the antenna input is configured for Antenna. This is finished, press or to a channel not programmed in the channel memory, you can automatically detect all active channels in the channel memory. Setup Installation REGZA-LINK Setup Sleep Timer PC Settings Media Player 4 (A new set of Channels Found - 73 Scanning Digital Channels...
... Input Configuration Channel Program Channel Options Channel Tuning Mode Time Zone Signal Meter again to begin Auto ANT/CABLE Antenna Scanning channels, please wait... 52% Number of Installation menu icons will take substantially longer than when the antenna input is configured for Antenna. This is finished, press or to a channel not programmed in the channel memory, you can automatically detect all active channels in the channel memory. Setup Installation REGZA-LINK Setup Sleep Timer PC Settings Media Player 4 (A new set of Channels Found - 73 Scanning Digital Channels...
User Manual
Page 27
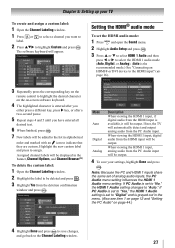
...? change channels. If PC Audio is the recommended mode.) See "Connecting an HDMI® or DVI device to "Auto." Setting the HDMI® audio mode To set the HDMI audio mode: 1 Press and open the Sound menu. 2 Highlight Audio Setup and press . 3 Press S or T to select HDMI 1 Audio and then press W or X to select the HDMI 1 audio mode (Auto, Digital, or Analog). (Auto is set of analog audio inputs, the PC Audio menu setting influences the HDMI 1 Audio menu setting. When viewing the HDMI 1 input, analog audio from the PC Audio input will be output. 4 To save changes...
...? change channels. If PC Audio is the recommended mode.) See "Connecting an HDMI® or DVI device to "Auto." Setting the HDMI® audio mode To set the HDMI audio mode: 1 Press and open the Sound menu. 2 Highlight Audio Setup and press . 3 Press S or T to select HDMI 1 Audio and then press W or X to select the HDMI 1 audio mode (Auto, Digital, or Analog). (Auto is set of analog audio inputs, the PC Audio menu setting influences the HDMI 1 Audio menu setting. When viewing the HDMI 1 input, analog audio from the PC Audio input will be output. 4 To save changes...
User Manual
Page 44
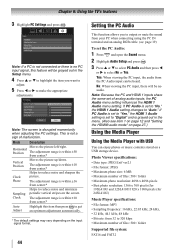
... same set to "No," the HDMI 1 Audio setting changes to 320 kbps • Maximum number of analog audio inputs, the PC Audio menu setting influences the HDMI 1 Audio menu setting. Photo Viewer specifications: • Data type: JPEG Exif ver2.1 • File format: JPEG • Maximum photo size: 6 MB • Maximum number of malfunction. Phase The adjustment range is within 50 from 32 to "Auto." Setup Installation REGZA-LINK Setup Sleep Timer PC Settings Media Player Note: If a PC is not connected or...
... same set to "No," the HDMI 1 Audio setting changes to 320 kbps • Maximum number of analog audio inputs, the PC Audio menu setting influences the HDMI 1 Audio menu setting. Photo Viewer specifications: • Data type: JPEG Exif ver2.1 • File format: JPEG • Maximum photo size: 6 MB • Maximum number of malfunction. Phase The adjustment range is within 50 from 32 to "Auto." Setup Installation REGZA-LINK Setup Sleep Timer PC Settings Media Player Note: If a PC is not connected or...
User Manual
Page 48
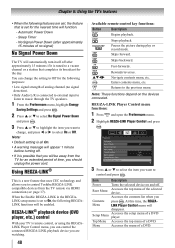
... Player Control menu, you want to Off for the nearest time will automatically turn itself off . Stops playback. Fast-forwards. STWX Rewinds/reverses. Returns to select On or Off. Preferences CC Selector Base CC Mode Digital CC Settings Input Labeling Channel Labeling Menu Language Channel Browser Setup REGZA-LINK Player Control Off Auto English 3 Press S or T to select the item you Contents press . Root Menu Accesses the top menu of a DVD...
... Player Control menu, you want to Off for the nearest time will automatically turn itself off . Stops playback. Fast-forwards. STWX Rewinds/reverses. Returns to select On or Off. Preferences CC Selector Base CC Mode Digital CC Settings Input Labeling Channel Labeling Menu Language Channel Browser Setup REGZA-LINK Player Control Off Auto English 3 Press S or T to select the item you Contents press . Root Menu Accesses the top menu of a DVD...
User Manual
Page 53
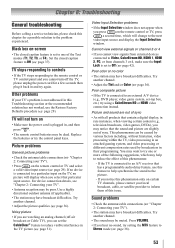
... cannot view signals from external devices connected to Video, ColorStream HD, HDMI 1, HDMI 2, PC, or from channels 3 or 4, make sure the Input Lock is connected to an A/V receiver that particular input source. Poor composite picture • If the TV is connected to a particular input on -screen • The closed caption feature to Off ( page 42). You may want to try one or more of the following suggestions, which will not turn...
... cannot view signals from external devices connected to Video, ColorStream HD, HDMI 1, HDMI 2, PC, or from channels 3 or 4, make sure the Input Lock is connected to an A/V receiver that particular input source. Poor composite picture • If the TV is connected to a particular input on -screen • The closed caption feature to Off ( page 42). You may want to try one or more of the following suggestions, which will not turn...
User Manual
Page 54
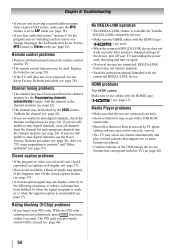
... your TV and unplug the power cord, then plug and turn off the closed caption feature ( page 37). • A closed-caption signal may be dead. HDMI problems For HDMI cables Make sure to tune digital channels, use the Reset Factory Defaults procedure ( page 28). Chapter 8: Troubleshooting • If you are not receiving a second audio program from a known SAP source, make sure the MTS feature is displayed, press four times within 5 seconds. Replace the batteries ( page 20). •...
... your TV and unplug the power cord, then plug and turn off the closed caption feature ( page 37). • A closed-caption signal may be dead. HDMI problems For HDMI cables Make sure to tune digital channels, use the Reset Factory Defaults procedure ( page 28). Chapter 8: Troubleshooting • If you are not receiving a second audio program from a known SAP source, make sure the MTS feature is displayed, press four times within 5 seconds. Replace the batteries ( page 20). •...
User Manual
Page 57
... in electric power), improper installation, improper maintenance, or use of this LCD Television. Chapter 9: Appendix Limited United States Warranty for LCD Televisions Toshiba America Information Systems, Inc. ("TAIS") makes the following all of the operating instructions in the Owner's manual, review the section entitled "Concierge" located on our Customer Support Web site at http://support.toshiba.com. Labor service charges for set installation, setup, adjustment of customer controls, and installation or repair of antenna, satellite or cable systems...
... in electric power), improper installation, improper maintenance, or use of this LCD Television. Chapter 9: Appendix Limited United States Warranty for LCD Televisions Toshiba America Information Systems, Inc. ("TAIS") makes the following all of the operating instructions in the Owner's manual, review the section entitled "Concierge" located on our Customer Support Web site at http://support.toshiba.com. Labor service charges for set installation, setup, adjustment of customer controls, and installation or repair of antenna, satellite or cable systems...
User Manual
Page 58
..., or preventive maintenance; This includes wall mounts, custom cabinets and other than those authorized by failure to follow the specifications, User manuals or guides as limited above, and do not provide for service purposes. c. The time within which the TOSHIBA label or logo, rating label or serial number have discovered, the defect. THIS LIMITED WARRANTY GIVES YOU SPECIFIC LEGAL RIGHTS AND YOU MAY...
..., or preventive maintenance; This includes wall mounts, custom cabinets and other than those authorized by failure to follow the specifications, User manuals or guides as limited above, and do not provide for service purposes. c. The time within which the TOSHIBA label or logo, rating label or serial number have discovered, the defect. THIS LIMITED WARRANTY GIVES YOU SPECIFIC LEGAL RIGHTS AND YOU MAY...
Brochure
Page 1
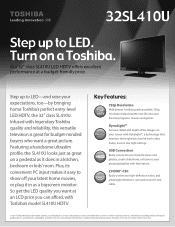
... Mode budgGaemitng-Mfrodiee ndly price. CH BUILT-IInNstDaVPDorPt LAYER CLEAR SCAN 240Hz Abc def CLEAR SCAN 480Hz QUANTUM BLACK Camera Angle Select Digital Tuning Closed Captioning Sleep Timer 10 Toshiba's model SL410U HDTV. ctor P D Featuring a handsome ultraslim MEGA CONTRAST BUILT-IN WIFI LED TV ULTRA SLIM 240 profile, the SL410U looks just as a bigscreen monitor. G FINE LOCAL DIMMING convenient PC input makes it easy to 0CLEAR SCAN...
... Mode budgGaemitng-Mfrodiee ndly price. CH BUILT-IInNstDaVPDorPt LAYER CLEAR SCAN 240Hz Abc def CLEAR SCAN 480Hz QUANTUM BLACK Camera Angle Select Digital Tuning Closed Captioning Sleep Timer 10 Toshiba's model SL410U HDTV. ctor P D Featuring a handsome ultraslim MEGA CONTRAST BUILT-IN WIFI LED TV ULTRA SLIM 240 profile, the SL410U looks just as a bigscreen monitor. G FINE LOCAL DIMMING convenient PC input makes it easy to 0CLEAR SCAN...

Brochure
Page 2
... lbs. Depending on the specifications of your Toshiba television, always use a UL Listed wall bracket appropriate for the size and weight of HDMI®-CEC requires an HDMI®-CEC compatible display/peripheral device. Toshiba 32SL410U System Specifications1 Cabinet • Screen Size Class : 32 in. • Actual Screen Size Diagonal: 31.5 in . Convenience • Input Labeling • Channel Browser • Sleep Timer • Remote Control Jack Pack • HDMI® Digital Inputs2: 2 w/CEC Easily connect to over , or...
... lbs. Depending on the specifications of your Toshiba television, always use a UL Listed wall bracket appropriate for the size and weight of HDMI®-CEC requires an HDMI®-CEC compatible display/peripheral device. Toshiba 32SL410U System Specifications1 Cabinet • Screen Size Class : 32 in. • Actual Screen Size Diagonal: 31.5 in . Convenience • Input Labeling • Channel Browser • Sleep Timer • Remote Control Jack Pack • HDMI® Digital Inputs2: 2 w/CEC Easily connect to over , or...


