Owners Manual
Page 2
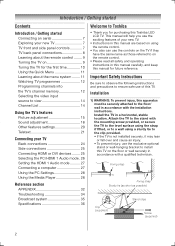
... panel connections 8 Learning about the remote control ........ 9 Turning the TV on 9 Tuning the TV for the first time 10 Using the Quick Menu 11 Learning about the menu system ........ 11 Watching TV programmes 12 Programming channels into the TV's channel memory 12 Selecting the video input source to view 14 Channel List 14 Using the TV's features Picture adjustment 15 Sound adjustment 18 Other features settings 20 Teletext 21 Connecting your new TV. • Instructions in this manual...
... panel connections 8 Learning about the remote control ........ 9 Turning the TV on 9 Tuning the TV for the first time 10 Using the Quick Menu 11 Learning about the menu system ........ 11 Watching TV programmes 12 Programming channels into the TV's channel memory 12 Selecting the video input source to view 14 Channel List 14 Using the TV's features Picture adjustment 15 Sound adjustment 18 Other features settings 20 Teletext 21 Connecting your new TV. • Instructions in this manual...
Owners Manual
Page 8
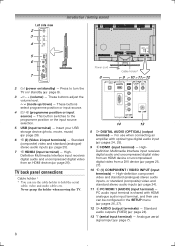
...). 12 O AUDIO (output terminals) - page 7). 8 Standard (composite) video and standard (analogue) stereo audio inputs (- Standard audio outputs (FIXED) (- PC audio input terminal is shared with optical type digital audio input (- U u (mode up/down) - This button switches to hold the aerial cable, video and audio cables etc. Never grasp the holder when moving the TV. 14 13 8 O DIGITAL AUDIO (OPTICAL) (output terminal) - page 24). 11 o PC/HDMI 1 (AUDIO) (input terminal) - Press to turn the TV on /standby) - pages 26, 27). 10 o (1) COMPONENT / VIDEO INPUT (input terminals) -
...). 12 O AUDIO (output terminals) - page 7). 8 Standard (composite) video and standard (analogue) stereo audio inputs (- Standard audio outputs (FIXED) (- PC audio input terminal is shared with optical type digital audio input (- U u (mode up/down) - This button switches to hold the aerial cable, video and audio cables etc. Never grasp the holder when moving the TV. 14 13 8 O DIGITAL AUDIO (OPTICAL) (output terminal) - page 24). 11 o PC/HDMI 1 (AUDIO) (input terminal) - Press to turn the TV on /standby) - pages 26, 27). 10 o (1) COMPONENT / VIDEO INPUT (input terminals) -
Owners Manual
Page 9
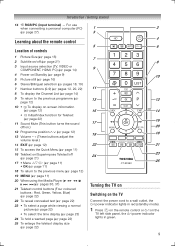
...) 25 To enlarge the teletext display size (- power indicator lights in red (standby mode). 1 Press on /Standby (- page 14) 9 To return to the previous menu (- page 12) 13 Volume - + (These buttons adjust the volume level.) 14 EXIT (- page 12) 15 To access the Quick Menu (- page 21) 3 Input source selection (TV, VIDEO or COMPONENT, HDMI, PC) (- on /Superimpose Teletext/off (- page 14) 4 Power on the remote control or ! power indicator lights in green. 9 page 22) 22 To...
...) 25 To enlarge the teletext display size (- power indicator lights in red (standby mode). 1 Press on /Standby (- page 14) 9 To return to the previous menu (- page 12) 13 Volume - + (These buttons adjust the volume level.) 14 EXIT (- page 12) 15 To access the Quick Menu (- page 21) 3 Input source selection (TV, VIDEO or COMPONENT, HDMI, PC) (- on /Superimpose Teletext/off (- page 14) 4 Power on the remote control or ! power indicator lights in green. 9 page 22) 22 To...
Owners Manual
Page 10
... after turned on by on the remote control or ! AutoView AutoView mode automatically adjusts picture settings to display the Location menu (- Auto Signal Booster Signal Booster boosts weak analogue broadcast signals. Do you are connected, and ensure that completes its broadcast for a long time and you wish to prevent the TV from your TV, unplug the power cord to enable automatic control? The Quick Setup screen will automatically appear the Manual Tuning menu (- If...
... after turned on by on the remote control or ! AutoView AutoView mode automatically adjusts picture settings to display the Location menu (- Auto Signal Booster Signal Booster boosts weak analogue broadcast signals. Do you are connected, and ensure that completes its broadcast for a long time and you wish to prevent the TV from your TV, unplug the power cord to enable automatic control? The Quick Setup screen will automatically appear the Manual Tuning menu (- If...
Owners Manual
Page 11
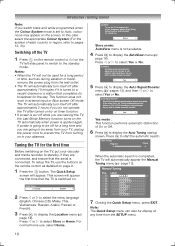
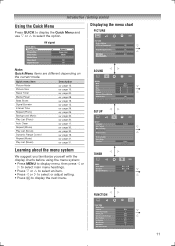
... Advanced Sound Settings Stable Sound Dynamic Range Control Auto Dual 1 0 0 0 Off On SETUP SETUP Language Auto Tuning Manual Tuning Manual Settings AV Connection PC Settings Picture Position Quick Setup Location TIMER TIMER Sleep Timer On Timer On Timer Position English Home Ver.XXXXXX 0 0 : 0 0 0 0 : 0 0 01 FUNCTION FUNCTION Media Player Teletext Teletext Language Panel Lock Automatic Power Down Auto Format 4:3 Stretch Blue Screen Side Panel Auto Clean Demo Auto 1 Off Off On Off On 1 11 Introduction / Getting started Using the Quick Menu Press QUICK to display the Quick Menu and use...
... Advanced Sound Settings Stable Sound Dynamic Range Control Auto Dual 1 0 0 0 Off On SETUP SETUP Language Auto Tuning Manual Tuning Manual Settings AV Connection PC Settings Picture Position Quick Setup Location TIMER TIMER Sleep Timer On Timer On Timer Position English Home Ver.XXXXXX 0 0 : 0 0 0 0 : 0 0 01 FUNCTION FUNCTION Media Player Teletext Teletext Language Panel Lock Automatic Power Down Auto Format 4:3 Stretch Blue Screen Side Panel Auto Clean Demo Auto 1 Off Off On Off On 1 11 Introduction / Getting started Using the Quick Menu Press QUICK to display the Quick Menu and use...
Owners Manual
Page 12
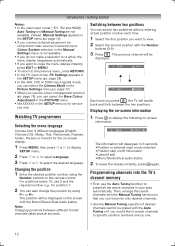
... Manual Tuning operation if desired channels cannot be displayed on the screen with the Auto Tuning or if you connect external equipment via component video source to select the desired language. Introduction / Getting started Notes: • In the video input mode ( o1, o2 and HDMI), Auto Tuning and Manual Tuning are not available. page 28). • In the 480i, 576i or 1080i input signals mode, you want to the previous menu...
... Manual Tuning operation if desired channels cannot be displayed on the screen with the Auto Tuning or if you connect external equipment via component video source to select the desired language. Introduction / Getting started Notes: • In the video input mode ( o1, o2 and HDMI), Auto Tuning and Manual Tuning are not available. page 28). • In the 480i, 576i or 1080i input signals mode, you want to the previous menu...
Owners Manual
Page 13
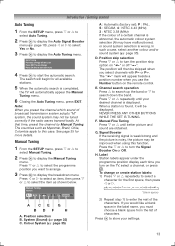
... a position number when you preset the channel which sound of the characters. To change . If you would like a blank space in the label name, you turn the Signal Booster On or Off. The "8" mark will then be Lost! Manual Fine Tuning Press or until your settings. 13 G. Press the or to display the Auto Tuning menu. Press...
... a position number when you preset the channel which sound of the characters. To change . If you would like a blank space in the label name, you turn the Signal Booster On or Off. The "8" mark will then be Lost! Manual Fine Tuning Press or until your settings. 13 G. Press the or to display the Auto Tuning menu. Press...
Owners Manual
Page 14
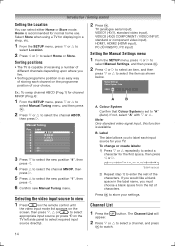
... started Setting the Location You can select either Home or Store mode. Home is an easy way of the characters. Sorting positions • The TV is capable of receiving a number of different channels depending upon where you must choose a blank space from the list of your settings. Selecting the video input source to view 1 Press on the remote control until the video input mode list appears on the screen...
... started Setting the Location You can select either Home or Store mode. Home is an easy way of the characters. Sorting positions • The TV is capable of receiving a number of different channels depending upon where you must choose a blank space from the list of your settings. Selecting the video input source to view 1 Press on the remote control until the video input mode list appears on the screen...
Owners Manual
Page 16
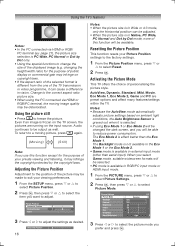
... transmission or video programme, it is in external input mode (other than the Eco Mode 1. Adjusting the Picture Position Adjustment to freeze the picture. Activating the Picture Mode This TV offers the choice of the picture may infringe on ambient light conditions, the Auto Brightness Sensor is greyed out when it can be adjusted. • When the picture size is selected. • If using the PC connected via HDMI or RGB...
... transmission or video programme, it is in external input mode (other than the Eco Mode 1. Adjusting the Picture Position Adjustment to freeze the picture. Activating the Picture Mode This TV offers the choice of the picture may infringe on ambient light conditions, the Auto Brightness Sensor is greyed out when it can be adjusted. • When the picture size is selected. • If using the PC connected via HDMI or RGB...

Owners Manual
Page 17
... playing back, this mode may be improved when using this signal to adjust the setting as DVD, etc., that you change the following items, such as Picture Settings items, your preference. Effective signal and setup conditions: • When the Video input mode is selected. • When the input signal format is available for 480i and 576i signals. 17 Picture Settings Cinema Mode Colour Temperature Reset 2/2 Off Noise Reduction Auto NR On MPEG NR Auto DNR Auto...
... playing back, this mode may be improved when using this signal to adjust the setting as DVD, etc., that you change the following items, such as Picture Settings items, your preference. Effective signal and setup conditions: • When the Video input mode is selected. • When the input signal format is available for 480i and 576i signals. 17 Picture Settings Cinema Mode Colour Temperature Reset 2/2 Off Noise Reduction Auto NR On MPEG NR Auto DNR Auto...

Owners Manual
Page 18
... select Reset. 2 Press Q. Note: If you experience noise with a particular programme on the broadcast signal. 1 Press MENU, and then press or to display the SOUND menu. 2 Press or to select MTS, and then press or to adjust. Selecting the Dual 1 or Dual 2 mode You can adjust the picture colour quality by selecting from 6 base colour adjustments : Red, Green...
... select Reset. 2 Press Q. Note: If you experience noise with a particular programme on the broadcast signal. 1 Press MENU, and then press or to display the SOUND menu. 2 Press or to select MTS, and then press or to adjust. Selecting the Dual 1 or Dual 2 mode You can adjust the picture colour quality by selecting from 6 base colour adjustments : Red, Green...
Owners Manual
Page 20
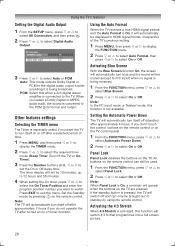
... Panel Lock. 2 Press or to set by on the remote control can only be displayed in HDMI signal format, irrespective of standby by pressing on the TV. Panel Lock Panel Lock disables the buttons on the remote control. AV Connection PC/HDMI 1 Audio HDMI 1 Audio Digital Audio Output PC Digital Auto 3 Press or to select Auto or PCM Auto: This mode outputs Dolby Digital or PCM to the digital audio output socket providing it will switch off the TV) or On Timer). 3 Press the Number buttons...
... Panel Lock. 2 Press or to set by on the remote control can only be displayed in HDMI signal format, irrespective of standby by pressing on the TV. Panel Lock Panel Lock disables the buttons on the remote control. AV Connection PC/HDMI 1 Audio HDMI 1 Audio Digital Audio Output PC Digital Auto 3 Press or to select Auto or PCM Auto: This mode outputs Dolby Digital or PCM to the digital audio output socket providing it will switch off the TV) or On Timer). 3 Press the Number buttons...
Owners Manual
Page 21
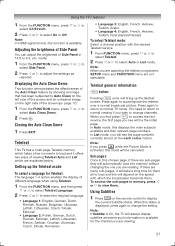
...; to adjust the settings as required. You need to return to change channels. Note: If Subtitle is On, the TV will always display subtitles whenever such information is activated, this function is displayed, press again to normal viewing if you are watching the teletext programme, SETUP menu and FUNCTION menu are explained below. Note: In HDMI signal format, this mode will bring up the teletext screen...
...; to adjust the settings as required. You need to return to change channels. Note: If Subtitle is On, the TV will always display subtitles whenever such information is activated, this function is displayed, press again to normal viewing if you are watching the teletext programme, SETUP menu and FUNCTION menu are explained below. Note: In HDMI signal format, this mode will bring up the teletext screen...
Owners Manual
Page 24
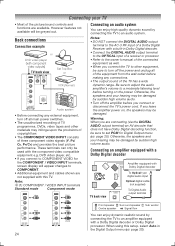
...Optical type digital audio input Optical digital cable (not supplied) To Digital Audio output terminal Front speaker Surround speaker Sub woofer Centre speaker Signal flow You can enjoy high quality dynamic sound by connecting the TV to an amplifier equipped with a built-in the Digital Output menu (- Note: o (1) COMPONENT / VIDEO INPUT terminals Standard mode Component mode Yellow White Red Green Blue Red White Red (Audio) 24 Connecting an audio system You can enjoy dynamic realistic sound by connecting the TV to an audio system. Notes: • DO NOT connect the DIGITAL AUDIO...
...Optical type digital audio input Optical digital cable (not supplied) To Digital Audio output terminal Front speaker Surround speaker Sub woofer Centre speaker Signal flow You can enjoy high quality dynamic sound by connecting the TV to an amplifier equipped with a built-in the Digital Output menu (- Note: o (1) COMPONENT / VIDEO INPUT terminals Standard mode Component mode Yellow White Red Green Blue Red White Red (Audio) 24 Connecting an audio system You can enjoy dynamic realistic sound by connecting the TV to an audio system. Notes: • DO NOT connect the DIGITAL AUDIO...
Owners Manual
Page 25
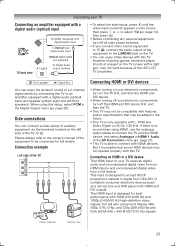
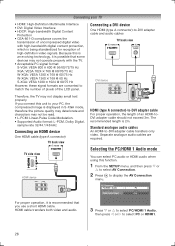
... amplifier equipped with digital audio input To Optical type digital audio input Optical digital cable (not supplied) To Digital Audio output terminal • To select the side inputs, press o until the video input mode list appears on 32/44.1/48 kHz. Connecting your TV receives digital audio and uncompressed digital video from an HDMI device and uncompressed digital video from CEA-861-D compliant consumer electronic devices (such as a set top box and DVD player with L-PCM and Dolby Digital on the screen, then press ...
... amplifier equipped with digital audio input To Optical type digital audio input Optical digital cable (not supplied) To Digital Audio output terminal • To select the side inputs, press o until the video input mode list appears on 32/44.1/48 kHz. Connecting your TV receives digital audio and uncompressed digital video from an HDMI device and uncompressed digital video from CEA-861-D compliant consumer electronic devices (such as a set top box and DVD player with L-PCM and Dolby Digital on the screen, then press ...
Owners Manual
Page 26
... HDMI-toDVI adapter cable should not exceed 3m. AV Connection PC/HDMI 1 Audio HDMI 1 Audio Digital Audio Output PC Digital Auto For proper operation, it is possible that you connect this unit to your TV • HDMI: High-Definition Multimedia Interface • DVI: Digital Video Interface • HDCP: High-bandwidth Digital Content Protection • CEA-861-D compliance covers the transmission of uncompressed digital video with the TV. • Acceptable PC signal format: S-VGA: VESA...
... HDMI-toDVI adapter cable should not exceed 3m. AV Connection PC/HDMI 1 Audio HDMI 1 Audio Digital Audio Output PC Digital Auto For proper operation, it is possible that you connect this unit to your TV • HDMI: High-Definition Multimedia Interface • DVI: Digital Video Interface • HDCP: High-bandwidth Digital Content Protection • CEA-861-D compliance covers the transmission of uncompressed digital video with the TV. • Acceptable PC signal format: S-VGA: VESA...

Owners Manual
Page 27
... may be hidden. • If connecting a certain PC model that signal is particular, the PC signal may not be detected correctly. • There is no need to the HDMI input terminals from the computer to DVI adapter cable and analogue audio cables. Separate analogue audio cables are playing the DVD-Video on the back of the TV. The following signals can be displayed: VGA: VESA 640 × 480 @ 60...
... may be hidden. • If connecting a certain PC model that signal is particular, the PC signal may not be detected correctly. • There is no need to the HDMI input terminals from the computer to DVI adapter cable and analogue audio cables. Separate analogue audio cables are playing the DVD-Video on the back of the TV. The following signals can be displayed: VGA: VESA 640 × 480 @ 60...
Owners Manual
Page 30
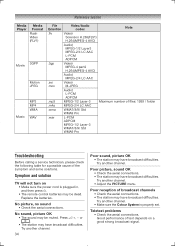
... 1. Settings Interval Time and Repeat : 1 Press QUICK to open the Quick Menu. 2 Press or to play in the same folder. File Compatibility USB device use, see page 32. Slide Show This view allows you to the list of available file. In this mode, only files located in the Quick Menu, and then press or to select a list as desired. • During Signal View...
... 1. Settings Interval Time and Repeat : 1 Press QUICK to open the Quick Menu. 2 Press or to play in the same folder. File Compatibility USB device use, see page 32. Slide Show This view allows you to the list of available file. In this mode, only files located in the Quick Menu, and then press or to select a list as desired. • During Signal View...
Owners Manual
Page 34
...-1/2 Layer-3 WMA7/8/9/ Std WMA9 Pro Troubleshooting Before calling a service technician, please check the following table for a possible cause of text depends on • Make sure the power cord is properly set. Replace the batteries. Try another channel. Symptom and solution TV will not turn on a good strong broadcast signal. No picture, no sound • Check the aerial connections. Press 2 +, − or . • The...
...-1/2 Layer-3 WMA7/8/9/ Std WMA9 Pro Troubleshooting Before calling a service technician, please check the following table for a possible cause of text depends on • Make sure the power cord is properly set. Replace the batteries. Try another channel. Symptom and solution TV will not turn on a good strong broadcast signal. No picture, no sound • Check the aerial connections. Press 2 +, − or . • The...
Owners Manual
Page 36
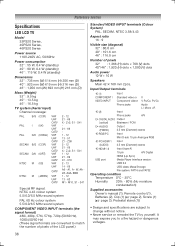
... jacks Audio L / Mono +R o (2) Input Phono jacks A/V O DIGITAL AUDIO Output (optical) Bitstream / PCM O AUDIO Output (FIXED) 3.5 mm (Diameter) stereo o RGB/PC Input Mini D-sub 15 pin Analogue RGB o PC/HDMI 1 Input (AUDIO) 3.5 mm (Diameter) stereo o HDMI1-2 Input (type A) 19 pin A/V Digital HDMI (Lip Sync) USB port Media Player Interface version: USB 2.0 USB class: Mass Storage File system: FAT16 and FAT32 Operating condition Temperature 0°C - 35°C Humidity 20% - 80% (No moisture condensation) Supplied accessories Owner's manual (1), Remote control...
... jacks Audio L / Mono +R o (2) Input Phono jacks A/V O DIGITAL AUDIO Output (optical) Bitstream / PCM O AUDIO Output (FIXED) 3.5 mm (Diameter) stereo o RGB/PC Input Mini D-sub 15 pin Analogue RGB o PC/HDMI 1 Input (AUDIO) 3.5 mm (Diameter) stereo o HDMI1-2 Input (type A) 19 pin A/V Digital HDMI (Lip Sync) USB port Media Player Interface version: USB 2.0 USB class: Mass Storage File system: FAT16 and FAT32 Operating condition Temperature 0°C - 35°C Humidity 20% - 80% (No moisture condensation) Supplied accessories Owner's manual (1), Remote control...


