
Owners Manual
Page 3
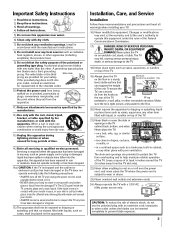
... enclosure surface has been damaged or the TV does not operate normally, take the following precautions: • ALWAYS turn off the TV and unplug the power cord to avoid possible electric shock or fire. • NEVER allow anything to rest on or roll over . 13) Unplug this equipment. Never place... is damaged, liquid has been spilled or objects have fallen into your outlet, consult an electrician for replacement of the obsolete outlet. 10) Protect the power cord from being walked on the floor or a sturdy, Sturdy tie (as short as a bookcase, built-in contact with your mouth or eyes, ...
... enclosure surface has been damaged or the TV does not operate normally, take the following precautions: • ALWAYS turn off the TV and unplug the power cord to avoid possible electric shock or fire. • NEVER allow anything to rest on or roll over . 13) Unplug this equipment. Never place... is damaged, liquid has been spilled or objects have fallen into your outlet, consult an electrician for replacement of the obsolete outlet. 10) Protect the power cord from being walked on the floor or a sturdy, Sturdy tie (as short as a bookcase, built-in contact with your mouth or eyes, ...
Owners Manual
Page 4
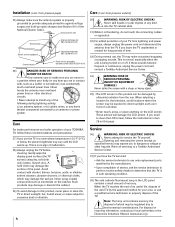
...area, or ask a qualified service technician to clean the LCD screen, follow these sounds become frequent or continuous, unplug the power cord and contact a Toshiba Authorized Service Center. 34) WARNING: RISK OF SERIOUS PERSONAL INJURY OR EQUIPMENT DAMAGE ! A hard cloth may damage the surface....in item 28 on the LCD screen. Refer all servicing to a Toshiba Authorized Service Center. 37) If you need to properly dispose of mercury. Installation (cont. Never locate the antenna near overhead power lines or other hazards. Never strike the screen with alcohol, thinner...
...area, or ask a qualified service technician to clean the LCD screen, follow these sounds become frequent or continuous, unplug the power cord and contact a Toshiba Authorized Service Center. 34) WARNING: RISK OF SERIOUS PERSONAL INJURY OR EQUIPMENT DAMAGE ! A hard cloth may damage the surface....in item 28 on the LCD screen. Refer all servicing to a Toshiba Authorized Service Center. 37) If you need to properly dispose of mercury. Installation (cont. Never locate the antenna near overhead power lines or other hazards. Never strike the screen with alcohol, thinner...
Owners Manual
Page 5
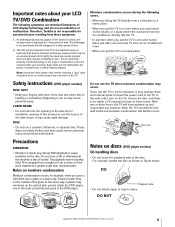
... use a cracked, deformed, or repaired disc. Keep the TV connected to the wall outlet and moisture condensation will have warmed up lens Copyright © 2005 TOSHIBA CORPORATION. DO Playback side • Do not attach paper or tape to see the source of time. 2) The LCD panel contained in a humid place. ... outlet, turn on the screen if a fixed, nonmoving image is not permanent and will disappear in a short period of the laser beam. Connect the power cord of the TV to do so may cause sight damage. Notes on the heater, or a place where the cold wind from the air conditioner...
... use a cracked, deformed, or repaired disc. Keep the TV connected to the wall outlet and moisture condensation will have warmed up lens Copyright © 2005 TOSHIBA CORPORATION. DO Playback side • Do not attach paper or tape to see the source of time. 2) The LCD panel contained in a humid place. ... outlet, turn on the screen if a fixed, nonmoving image is not permanent and will disappear in a short period of the laser beam. Connect the power cord of the TV to do so may cause sight damage. Notes on the heater, or a place where the cold wind from the air conditioner...
Owners Manual
Page 8
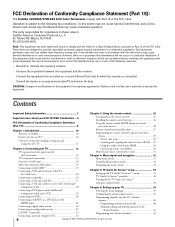
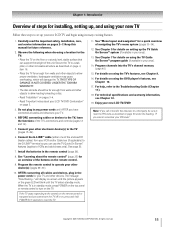
...Changes or modifications to this equipment does cause harmful interference to these rules is: Toshiba America Consumer Products, L.L.C. 82 Totowa Rd. FCC Declaration of Conformity Compliance Statement (Part 15): The Toshiba 32HLX95/37HLX95 LCD Color Televisions comply with the instructions, may cause undesired operation. Wayne...Programming the remote control to radio communications. However, there is encouraged to try to correct the interference by removing and applying power to the equipment, the user is no Cable box 16 Connecting a camcorder 16 Connecting a VCR and Cable box 17 ...
...Changes or modifications to this equipment does cause harmful interference to these rules is: Toshiba America Consumer Products, L.L.C. 82 Totowa Rd. FCC Declaration of Conformity Compliance Statement (Part 15): The Toshiba 32HLX95/37HLX95 LCD Color Televisions comply with the instructions, may cause undesired operation. Wayne...Programming the remote control to radio communications. However, there is encouraged to try to correct the interference by removing and applying power to the equipment, the user is no Cable box 16 Connecting a camcorder 16 Connecting a VCR and Cable box 17 ...
Owners Manual
Page 9
... timer 77 Setting the sleep timer 77 Using the PC setting feature 78 Displaying TV setting information on-screen using RECALL 79 Understanding the auto power off feature 79 Understanding the last mode memory feature 79 Using the Gray Level feature 79 Chapter 9: Using the Locks menu 80 Entering the PIN... On Screen™ FAQs 93 Chapter 12: Appendix 96 Specifications 96 Limited United States Warranty 97 Limited Canada Warranty 98 Index 100 Copyright © 2005 TOSHIBA CORPORATION.
... timer 77 Setting the sleep timer 77 Using the PC setting feature 78 Displaying TV setting information on-screen using RECALL 79 Understanding the auto power off feature 79 Understanding the last mode memory feature 79 Using the Gray Level feature 79 Chapter 9: Using the Locks menu 80 Entering the PIN... On Screen™ FAQs 93 Chapter 12: Appendix 96 Specifications 96 Limited United States Warranty 97 Limited Canada Warranty 98 Index 100 Copyright © 2005 TOSHIBA CORPORATION.
Owners Manual
Page 11
...buttons on the remote control. 9. THIS TYPE OF DAMAGE IS NOT COVERED UNDER THE TOSHIBA WARRANTY. • The disc slot side should be sure to reset the PIN code as described on , press and hold POWER for 5 seconds to reset the TV. 11. Do not plug in your area)....the Troubleshooting Guide (Chapter 11). 18. Program the remote control to operate your other electronic device(s) to the TV (pages 15-24). 6. Copyright © 2005 TOSHIBA CORPORATION. Secure the TV to a wall, pillar, or other objects to allow loading/unloading a disc. • Read "Installation" on pages 3-4. • Read...
...buttons on the remote control. 9. THIS TYPE OF DAMAGE IS NOT COVERED UNDER THE TOSHIBA WARRANTY. • The disc slot side should be sure to reset the PIN code as described on , press and hold POWER for 5 seconds to reset the TV. 11. Do not plug in your area)....the Troubleshooting Guide (Chapter 11). 18. Program the remote control to operate your other electronic device(s) to the TV (pages 15-24). 6. Copyright © 2005 TOSHIBA CORPORATION. Secure the TV to a wall, pillar, or other objects to allow loading/unloading a disc. • Read "Installation" on pages 3-4. • Read...
Owners Manual
Page 12
.../VIDEO - When a menu is on -screen, these buttons change the source you cannot turn the TV on and off the TV, press and hold the POWER button on -screen, these buttons function as left /right/up /down menu navigation buttons. 6 MENU - When a menu is on -screen, these buttons function as ... no menu is being used, the sound from all speakers will be muted, and normal sound will be output to play . 12 Copyright © 2005 TOSHIBA CORPORATION. Press to the headphones only. !¶ DVD disc slot - Repeatedly press to reset the TV. 8 CHANNEL zy - When no menu is on using ...
.../VIDEO - When a menu is on -screen, these buttons change the source you cannot turn the TV on and off the TV, press and hold the POWER button on -screen, these buttons function as left /right/up /down menu navigation buttons. 6 MENU - When a menu is on -screen, these buttons function as ... no menu is being used, the sound from all speakers will be muted, and normal sound will be output to play . 12 Copyright © 2005 TOSHIBA CORPORATION. Press to the headphones only. !¶ DVD disc slot - Repeatedly press to reset the TV. 8 CHANNEL zy - When no menu is on using ...
Owners Manual
Page 13
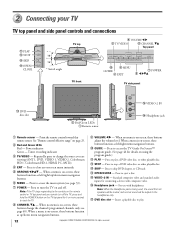
...DVI device with composite video or S-video output. See page 24. 8 HDMI™ IN - See page 22. !¡ CableCARD™ slot - Copyright © 2005 TOSHIBA CORPORATION. separate audio cables are required for editing and dubbing. See pages 18 and 19. See page 22. 6 ANT-1 (CABLE) IN and ANT-2 IN - High... player with optical audio input. All rights reserved. 13 Two sets of the arrow ( ) and pulling the cover. 1 TV back 2 Power cord Cable clamper 3 7 90 !¡ 4 56 TV lower back panel 8 1 VIDEO-1 IN and VIDEO-2 IN - separate audio cables are trademarks or registered ...
...DVI device with composite video or S-video output. See page 24. 8 HDMI™ IN - See page 22. !¡ CableCARD™ slot - Copyright © 2005 TOSHIBA CORPORATION. separate audio cables are required for editing and dubbing. See pages 18 and 19. See page 22. 6 ANT-1 (CABLE) IN and ANT-2 IN - High... player with optical audio input. All rights reserved. 13 Two sets of the arrow ( ) and pulling the cover. 1 TV back 2 Power cord Cable clamper 3 7 90 !¡ 4 56 TV lower back panel 8 1 VIDEO-1 IN and VIDEO-2 IN - separate audio cables are trademarks or registered ...
Owners Manual
Page 23
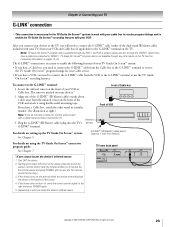
... G-LINK™ cable from device) For details on , move the remote control slightly to connect the G-LINK™ cable (either of the device and press POWER. (Do not use the TV Guide On Screen™ recording features. G-LINK™ (IR blaster) cable wand (approx. 1 inch from the VCR to the G-LINK... VCR. Locate the infrared sensor on the TV. Plug the G-LINK™ (IR blaster) cable's plug into the TV's G-LINK™ terminal. Copyright © 2005 TOSHIBA CORPORATION. If you connect your VCR and Cable box (if applicable) to the G-LINK™ terminal: 1.
... G-LINK™ cable from device) For details on , move the remote control slightly to connect the G-LINK™ cable (either of the device and press POWER. (Do not use the TV Guide On Screen™ recording features. G-LINK™ (IR blaster) cable wand (approx. 1 inch from the VCR to the G-LINK... VCR. Locate the infrared sensor on the TV. Plug the G-LINK™ (IR blaster) cable's plug into the TV's G-LINK™ terminal. Copyright © 2005 TOSHIBA CORPORATION. If you connect your VCR and Cable box (if applicable) to the G-LINK™ terminal: 1.

Owners Manual
Page 25
... PBC, SLOW, SKIP, REW, FF, PAUSE, PLAY, OPEN/CLOSE, STOP, A-B REPEAT, and SEARCH (see chapter 10). 16.4 ft (5m) Copyright © 2005 TOSHIBA CORPORATION. INFO provides detailed information on the TV. RECALL displays TV setting information on front of the buttons that is on , the TV starts from... the TV mode. Press POWER again to the previous/next channel in programming mode). The "-" button is in the TV Guide On Screen™ system (Chapter 7). Arrow ...
... PBC, SLOW, SKIP, REW, FF, PAUSE, PLAY, OPEN/CLOSE, STOP, A-B REPEAT, and SEARCH (see chapter 10). 16.4 ft (5m) Copyright © 2005 TOSHIBA CORPORATION. INFO provides detailed information on the TV. RECALL displays TV setting information on front of the buttons that is on , the TV starts from... the TV mode. Press POWER again to the previous/next channel in programming mode). The "-" button is in the TV Guide On Screen™ system (Chapter 7). Arrow ...
Owners Manual
Page 27
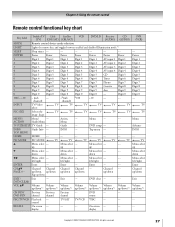
...down, up/down up/down up/down Page up/down Channel --up/down Channel up z Menu select --- Menu --- --- Enter CH yz PAGE +/- Menu select --- --- POWER Power Power Power Power Power Power Power Power 1 Digit 1 Digit 1 Digit 1 Digit 1 Digit 1 AV input 1 Digit 1 Digit 1 2 Digit 2 Digit 2 Digit 2 Digit 2 Digit 2 AV input ...reserved. 27 TV/SAT TV/VCR XPBC --- --- --- Chapter 3: Using the remote control Remote control functional key chart Key Label Toshiba TV Cable Satellite (TV) (CBL/SAT) (CBL/SAT) VCR DVD/LD Receiver CD (AUDIO) (AUDIO) PVR (VCR) MODE...
...down, up/down up/down up/down Page up/down Channel --up/down Channel up z Menu select --- Menu --- --- Enter CH yz PAGE +/- Menu select --- --- POWER Power Power Power Power Power Power Power Power 1 Digit 1 Digit 1 Digit 1 Digit 1 Digit 1 AV input 1 Digit 1 Digit 1 2 Digit 2 Digit 2 Digit 2 Digit 2 Digit 2 AV input ...reserved. 27 TV/SAT TV/VCR XPBC --- --- --- Chapter 3: Using the remote control Remote control functional key chart Key Label Toshiba TV Cable Satellite (TV) (CBL/SAT) (CBL/SAT) VCR DVD/LD Receiver CD (AUDIO) (AUDIO) PVR (VCR) MODE...
Owners Manual
Page 29
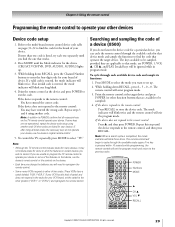
... remote control includes codes for a particular device, you do not operate your device. The remote control will blink one that works. 2. POWER Numbers MODE y CH y VOL z RECALL Copyright © 2005 TOSHIBA CORPORATION. If, after trying all necessary keys on the TV remote control operate your device, use the device's remote control or...
... remote control includes codes for a particular device, you do not operate your device. The remote control will blink one that works. 2. POWER Numbers MODE y CH y VOL z RECALL Copyright © 2005 TOSHIBA CORPORATION. If, after trying all necessary keys on the TV remote control operate your device, use the device's remote control or...
Owners Manual
Page 38
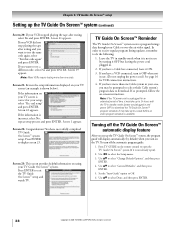
...example is available. In order to receive regular program listing updates, remember to select Done, and then press ENTER. 38 Copyright © 2005 TOSHIBA CORPORATION. It may be prompted to select which Cable system's program data to download the TV Guide On Screen™ program schedule. Use yz.... Screen 23: This screen provides helpful information on -screen instructions. Leave the TV in standby mode when it OFF but leaving the power cord plugged in and power OFF) to download. You have a Cable box connected, leave it OFF when not in your setup, select "Yes, end setup"...
...example is available. In order to receive regular program listing updates, remember to select Done, and then press ENTER. 38 Copyright © 2005 TOSHIBA CORPORATION. It may be prompted to select which Cable system's program data to download the TV Guide On Screen™ program schedule. Use yz.... Screen 23: This screen provides helpful information on -screen instructions. Leave the TV in standby mode when it OFF but leaving the power cord plugged in and power OFF) to download. You have a Cable box connected, leave it OFF when not in your setup, select "Yes, end setup"...
Owners Manual
Page 43
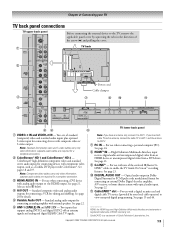
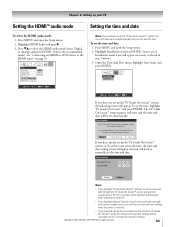
... the time and date. The TV Guide On Screen™ setup sequence will start, and the time and date will be updated automatically when the power is restored. • If you highlight Manual (above) to the HDMI input" on -screen, as shown in step 3 below.) 3. Manual TV ... And Date Date (MM/DD/YY) Time (HH:MM) 0 6/3 0/0 5 1 1 : 1 1 AM Cancel Done Note: • If you have not set automatically. Copyright © 2005 TOSHIBA CORPORATION. Press MENU and open the Setup menu. 2. Time And Date Start Setup Navigate Select CH RTN Back EXIT Exit If you highlight TV Guide...
... the time and date. The TV Guide On Screen™ setup sequence will start, and the time and date will be updated automatically when the power is restored. • If you highlight Manual (above) to the HDMI input" on -screen, as shown in step 3 below.) 3. Manual TV ... And Date Date (MM/DD/YY) Time (HH:MM) 0 6/3 0/0 5 1 1 : 1 1 AM Cancel Done Note: • If you have not set automatically. Copyright © 2005 TOSHIBA CORPORATION. Press MENU and open the Setup menu. 2. Time And Date Start Setup Navigate Select CH RTN Back EXIT Exit If you highlight TV Guide...

Owners Manual
Page 45
...Select CH RTN Back EXIT Exit Navigate Select CH RTN Back EXIT Exit 3. System Information System Information Product Information Brand: Toshiba Model: 32HLX95 Software Version 0.8.2 Jun 13 2005 - 13:54:14 FW:1.41 Sub:41 Done Done To close the screen and ...TOSHIBA CORPORATION. Press MENU and open the Setup menu. 2. Use x • to scroll through the menu bar to check the Product Information and Software Version. Highlight Yes and press ENTER. All rights reserved. 45 Highlight Installation and press ENTER. (A new set of Installation menu icons will turn off , unplug the TV power...
...Select CH RTN Back EXIT Exit Navigate Select CH RTN Back EXIT Exit 3. System Information System Information Product Information Brand: Toshiba Model: 32HLX95 Software Version 0.8.2 Jun 13 2005 - 13:54:14 FW:1.41 Sub:41 Done Done To close the screen and ...TOSHIBA CORPORATION. Press MENU and open the Setup menu. 2. Use x • to scroll through the menu bar to check the Product Information and Software Version. Highlight Yes and press ENTER. All rights reserved. 45 Highlight Installation and press ENTER. (A new set of Installation menu icons will turn off , unplug the TV power...
Owners Manual
Page 50
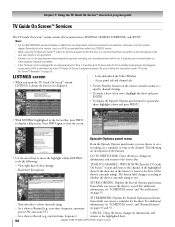
Be sure to the highlighted show. 50 Copyright © 2005 TOSHIBA CORPORATION. Lock and unlock the Video Window - The following are possible from within... your system is set a reminder for the first time, it may take up properly. • If power is cut or the plug becomes disconnected during timer recording, any recorded contents will be connected to the Service...the show (if the show airs in the Service Bar, press INFO to Record (e.g, start time, frequency, automatic power ON, auto-tune TV) - SET RECORDING: Displays the Record Options panel menu, from which you can choose ...
Be sure to the highlighted show. 50 Copyright © 2005 TOSHIBA CORPORATION. Lock and unlock the Video Window - The following are possible from within... your system is set a reminder for the first time, it may take up properly. • If power is cut or the plug becomes disconnected during timer recording, any recorded contents will be connected to the Service...the show (if the show airs in the Service Bar, press INFO to Record (e.g, start time, frequency, automatic power ON, auto-tune TV) - SET RECORDING: Displays the Record Options panel menu, from which you can choose ...
Owners Manual
Page 55
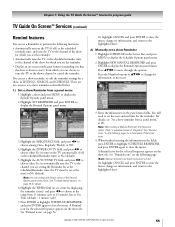
... set the reminder. • Display an on the following page. See "Remind icons" on the show reminder as necessary. 3. Copyright © 2005 TOSHIBA CORPORATION. There are two ways to the channel of Reminder icons. 4. the TV must be on the TV automatically, if off ) at the scheduled ...which you are listed by channel number. Highlight SET REMINDER and press ENTER to choose among Once, Regularly, Weekly, or Off. 4. Highlight the POWER ON TV field, and press x • to choose either Yes (to automatically tune the TV to the show Reminder from 15 minutes early to...
... set the reminder. • Display an on the following page. See "Remind icons" on the show reminder as necessary. 3. Copyright © 2005 TOSHIBA CORPORATION. There are two ways to the channel of Reminder icons. 4. the TV must be on the TV automatically, if off ) at the scheduled ...which you are listed by channel number. Highlight SET REMINDER and press ENTER to choose among Once, Regularly, Weekly, or Off. 4. Highlight the POWER ON TV field, and press x • to choose either Yes (to automatically tune the TV to the show Reminder from 15 minutes early to...

Owners Manual
Page 58
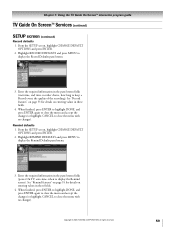
..., Small & Large, and All (default). • AUTO GUIDE: Automatic entry into the TV Guide On Screen™ system when the TV is powered on the remote control when the TV Guide On Screen™ system is always displayed in LISTINGS) - From the SETUP screen, highlight CHANGE DEFAULT OPTIONS... reserved. Auto-Hide (channel is available) 1. Highlight GENERAL DEFAULTS and press MENU to close the menu with no changes). 58 Copyright © 2005 TOSHIBA CORPORATION. Choices are No, Small, Large, and Last Used (default). • BOX CYCLE: The Info Box size rotation when you to display the...
..., Small & Large, and All (default). • AUTO GUIDE: Automatic entry into the TV Guide On Screen™ system when the TV is powered on the remote control when the TV Guide On Screen™ system is always displayed in LISTINGS) - From the SETUP screen, highlight CHANGE DEFAULT OPTIONS... reserved. Auto-Hide (channel is available) 1. Highlight GENERAL DEFAULTS and press MENU to close the menu with no changes). 58 Copyright © 2005 TOSHIBA CORPORATION. Choices are No, Small, Large, and Last Used (default). • BOX CYCLE: The Info Box size rotation when you to display the...
Owners Manual
Page 59
Copyright © 2005 TOSHIBA CORPORATION. Highlight RECORD DEFAULTS and press MENU to display the Remind Defaults panel menu. 3. Remind defaults 1. When finished, press ENTER to highlight DONE, and press ... fields (start time, end time, recorder choice, how long to close the menu with no changes). Enter the required information in the panel menu fields (power On TV, auto-tune, when to close the menu with no changes). See "Remind features" on page 55 for details on entering values in these...
Copyright © 2005 TOSHIBA CORPORATION. Highlight RECORD DEFAULTS and press MENU to display the Remind Defaults panel menu. 3. Remind defaults 1. When finished, press ENTER to highlight DONE, and press ... fields (start time, end time, recorder choice, how long to close the menu with no changes). Enter the required information in the panel menu fields (power On TV, auto-tune, when to close the menu with no changes). See "Remind features" on page 55 for details on entering values in these...
Owners Manual
Page 77
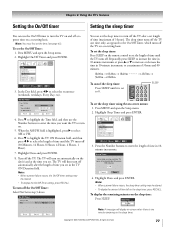
...time only, as opposed to the On/Off Timer, which turns off the TV one minute remaining on the sleep timer. Note: • When a power failure occurs, the sleep timer setting may be cleared. • To display the amount of time until the TV turns off (30 Minutes, 12 ...Hours, 8 Hours, 4 Hours, 2 Hours, 1 Hour). 7. When the AM/PM field is set . Copyright © 2005 TOSHIBA CORPORATION. Press MENU and open the Setup menu. 2. Sleep Timer Enter total minutes until the TV turns off automatically (Maximum 180 minutes) 120 Cancel Done...
...time only, as opposed to the On/Off Timer, which turns off the TV one minute remaining on the sleep timer. Note: • When a power failure occurs, the sleep timer setting may be cleared. • To display the amount of time until the TV turns off (30 Minutes, 12 ...Hours, 8 Hours, 4 Hours, 2 Hours, 1 Hour). 7. When the AM/PM field is set . Copyright © 2005 TOSHIBA CORPORATION. Press MENU and open the Setup menu. 2. Sleep Timer Enter total minutes until the TV turns off automatically (Maximum 180 minutes) 120 Cancel Done...
