
Printable Spec Sheet
Page 1
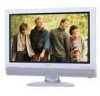
...Screen and 12 MultiWindows • Tri-Lingual Color Icon On-Screen Display • Off/Sleep Timer ADVANTAGE TOSHIBA >> HD Dynamic Contrast feature continually analyzes picture information and enhances those parts of the picture with the most detailed ...Ratio • HD Dynamic Contrast • Toshiba PixelPure™ Proprietary Digital Video Processing • CableClear™ DNR+ (by input. >> Digital Visual Interface (DVI) with rich colors and a more accurate picture. 32" DIAGONAL THEATERWIDE® LCD HD MONTIOR 32HL84 KEY FEATURES • 720p (1366 x 768) True HD Display with ...
...Screen and 12 MultiWindows • Tri-Lingual Color Icon On-Screen Display • Off/Sleep Timer ADVANTAGE TOSHIBA >> HD Dynamic Contrast feature continually analyzes picture information and enhances those parts of the picture with the most detailed ...Ratio • HD Dynamic Contrast • Toshiba PixelPure™ Proprietary Digital Video Processing • CableClear™ DNR+ (by input. >> Digital Visual Interface (DVI) with rich colors and a more accurate picture. 32" DIAGONAL THEATERWIDE® LCD HD MONTIOR 32HL84 KEY FEATURES • 720p (1366 x 768) True HD Display with ...

Printable Spec Sheet
Page 2
... a registered trademark of Toshiba America Consumer Products. CableClear, SurfLock, HD Window, TheaterLink, and GameTimer are registered trademarks of SRS Labs, Inc. All Rights Reserved (07/04.01) dbx is a trademark of Carillon Electronics Corporation. HDMI is a registered trademark of HDMI Licensing LLC. 32HL84 S P E C I F I C AT I O N S VIDEO AUDIO CONVENIENCE Series TheaterWide® HD LCD TV Screen Size 32" Diagonal Wide...
... a registered trademark of Toshiba America Consumer Products. CableClear, SurfLock, HD Window, TheaterLink, and GameTimer are registered trademarks of SRS Labs, Inc. All Rights Reserved (07/04.01) dbx is a trademark of Carillon Electronics Corporation. HDMI is a registered trademark of HDMI Licensing LLC. 32HL84 S P E C I F I C AT I O N S VIDEO AUDIO CONVENIENCE Series TheaterWide® HD LCD TV Screen Size 32" Diagonal Wide...

Installation Guide - English
Page 1
.... [34F-A] 1-1,SHIBAURA 1-CHOME, MINATO-KU TOKYO 105-8001,JAPAN PHONE:(03)3457-3536 FACSIMILE:(03)5444-9408 SERVICE INSTRUCTION Product: LCD TV Model: 26/32HL84, 26/32WL46B/G/C/A/E/R/T Corrective Action: Backlight Lamp unit as a service part File No.01C2005002R Date: Mar.11,2005 Rank: C Part ... shall be liable for the model(s) covered in Toshiba service manuals 020-200403 and 020-200405 for any resulting damages and may be complied with before returning the equipment to possible injury. ©2005 TOSHIBA AMERICA CONSUMER PRODUCTS, LLC Hideto Kitamura Manager International Customer...
.... [34F-A] 1-1,SHIBAURA 1-CHOME, MINATO-KU TOKYO 105-8001,JAPAN PHONE:(03)3457-3536 FACSIMILE:(03)5444-9408 SERVICE INSTRUCTION Product: LCD TV Model: 26/32HL84, 26/32WL46B/G/C/A/E/R/T Corrective Action: Backlight Lamp unit as a service part File No.01C2005002R Date: Mar.11,2005 Rank: C Part ... shall be liable for the model(s) covered in Toshiba service manuals 020-200403 and 020-200405 for any resulting damages and may be complied with before returning the equipment to possible injury. ©2005 TOSHIBA AMERICA CONSUMER PRODUCTS, LLC Hideto Kitamura Manager International Customer...

Installation Guide - English
Page 2
...these ferrite cores, as excessive force may cause damage. Cautions for Backlight Lamp Unit Replacement The backlight lamps used when servicing this area. TFT-LCD Module Bottom view INV board (HOT) side Return FFC INV board (GND) side C board INV cover C board cover Flat cables Ferrite cores... Service Instruction 2004 LCD Television Page 1 of 12 The high voltage applied to the backlight lamp units with double-sided adhesive tape. Ferrite cores are fragile and caution...
...these ferrite cores, as excessive force may cause damage. Cautions for Backlight Lamp Unit Replacement The backlight lamps used when servicing this area. TFT-LCD Module Bottom view INV board (HOT) side Return FFC INV board (GND) side C board INV cover C board cover Flat cables Ferrite cores... Service Instruction 2004 LCD Television Page 1 of 12 The high voltage applied to the backlight lamp units with double-sided adhesive tape. Ferrite cores are fragile and caution...

Installation Guide - English
Page 3
Remove the two screws securing the C board. Remove the two screws securing the C board cover. 2-2. Use caution when removing the ferrite cores, as excessive force may cause damage. Remove the C board and connectors, using caution to remove the ferrite cores. Service Instruction 2004 LCD Television Page 2 of 12 2. Removing C Board Cover and C Board 2.1.
Remove the two screws securing the C board. Remove the two screws securing the C board cover. 2-2. Use caution when removing the ferrite cores, as excessive force may cause damage. Remove the C board and connectors, using caution to remove the ferrite cores. Service Instruction 2004 LCD Television Page 2 of 12 2. Removing C Board Cover and C Board 2.1.

Installation Guide - English
Page 4
Remove the three screws securing the INV cover. 3-3. Service Instruction 2004 LCD Television Page 3 of 12 Disconnect the seven lamp unit connectors and remove the three screws securing the INV board (HOT side). 3-4. Remove the return FFC connected to the INV board. 3-2. Removing INV Cover and INV Board (HOT Side / GND Side) 3-1. Disconnect the seven lamp unit connectors and remove the seven screws securing the INV board (GND side). 3.
Remove the three screws securing the INV cover. 3-3. Service Instruction 2004 LCD Television Page 3 of 12 Disconnect the seven lamp unit connectors and remove the three screws securing the INV board (HOT side). 3-4. Remove the return FFC connected to the INV board. 3-2. Removing INV Cover and INV Board (HOT Side / GND Side) 3-1. Disconnect the seven lamp unit connectors and remove the seven screws securing the INV board (GND side). 3.

Installation Guide - English
Page 5
Service Instruction 2004 LCD Television Page 4 of 12 4. Remove the 20 screws securing the panel unit. 4-2. Remove the six screws securing the lamp holder. Removing Panel Unit and Lamp Holder 4-1.
Service Instruction 2004 LCD Television Page 4 of 12 4. Remove the 20 screws securing the panel unit. 4-2. Remove the six screws securing the lamp holder. Removing Panel Unit and Lamp Holder 4-1.

Installation Guide - English
Page 6
Replacing Lamp Units 5-1. Be very careful not to provide backlighting for the LCD display. Small connector Connected to INV board (GND side) Large connector Connected to INV board (HOT side) Service Instruction 2004 LCD Television Page 5 of two lamps. Note: The seven lamp direct illumination system uses 14 CCFTs (Cold Cathode Fluorescent Tubes) to break the lamp units when detaching/reattaching them with new ones. Remove the old lamp units from the lamp clip, and replace them . Keep dust off the units. One lamp unit consists of 12 5.
Replacing Lamp Units 5-1. Be very careful not to provide backlighting for the LCD display. Small connector Connected to INV board (GND side) Large connector Connected to INV board (HOT side) Service Instruction 2004 LCD Television Page 5 of two lamps. Note: The seven lamp direct illumination system uses 14 CCFTs (Cold Cathode Fluorescent Tubes) to break the lamp units when detaching/reattaching them with new ones. Remove the old lamp units from the lamp clip, and replace them . Keep dust off the units. One lamp unit consists of 12 5.

Installation Guide - English
Page 7
... when installing the panel unit. Attach ferrite cores very carefully. INV board (HOT side) Panel unit INV board (GND side) Flat cables Service Instruction 2004 LCD Television Page 6 of 12 Follow the lamp unit removal instructions in a dust-free environment. Assembly 6-1. Connect the connectors securely to re-assemble the backlight lamp...
... when installing the panel unit. Attach ferrite cores very carefully. INV board (HOT side) Panel unit INV board (GND side) Flat cables Service Instruction 2004 LCD Television Page 6 of 12 Follow the lamp unit removal instructions in a dust-free environment. Assembly 6-1. Connect the connectors securely to re-assemble the backlight lamp...

Installation Guide - English
Page 8
...32HL84, 32WL46B/G/C/A/E/R/T 1. The high voltage applied to the backlight lamp units with double-sided adhesive tape. Use caution when removing these components. Where possible, replace backlight lamp units in the listed Liquid Crystal Display (LCD) modules are consumables. Ferrite cores are fragile and caution should be used when handling. TFT-LCD...HOT) side INV board (GND) side C board C board cover Flat cables Ferrite cores Service Instruction 2004 LCD Television Page 7 of 12 Backlight lamp units are attached to the backlight lamps produces an electrical shock hazard ...
...32HL84, 32WL46B/G/C/A/E/R/T 1. The high voltage applied to the backlight lamp units with double-sided adhesive tape. Use caution when removing these components. Where possible, replace backlight lamp units in the listed Liquid Crystal Display (LCD) modules are consumables. Ferrite cores are fragile and caution should be used when handling. TFT-LCD...HOT) side INV board (GND) side C board C board cover Flat cables Ferrite cores Service Instruction 2004 LCD Television Page 7 of 12 Backlight lamp units are attached to the backlight lamps produces an electrical shock hazard ...

Installation Guide - English
Page 9
Removing C Board Cover and C Board 2.1. Remove the two screws securing the C board cover. 2-2. Use caution when removing the ferrite cores, as excessive force may cause damage. Remove the C board and connectors, using caution to remove the ferrite cores. Remove the two screws securing the C board. Service Instruction 2004 LCD Television Page 8 of 12 2.
Removing C Board Cover and C Board 2.1. Remove the two screws securing the C board cover. 2-2. Use caution when removing the ferrite cores, as excessive force may cause damage. Remove the C board and connectors, using caution to remove the ferrite cores. Remove the two screws securing the C board. Service Instruction 2004 LCD Television Page 8 of 12 2.

Installation Guide - English
Page 10
3. Removing INV Cover and INV Board (HOT Side / GND Side) 3-1. Disconnect the eight lamp unit connectors from and remove the four screws securing the INV board (HOT side). 3-4. Disconnect the eight lamp unit connectors from and remove the six screws securing the INV board (GND side). Remove the four screws securing the INV cover. 3-3. Remove the return FFC connected to the INV board. 3-2. Service Instruction 2004 LCD Television Page 9 of 12
3. Removing INV Cover and INV Board (HOT Side / GND Side) 3-1. Disconnect the eight lamp unit connectors from and remove the four screws securing the INV board (HOT side). 3-4. Disconnect the eight lamp unit connectors from and remove the six screws securing the INV board (GND side). Remove the four screws securing the INV cover. 3-3. Remove the return FFC connected to the INV board. 3-2. Service Instruction 2004 LCD Television Page 9 of 12

Installation Guide - English
Page 11
4. Service Instruction 2004 LCD Television Page 10 of 12 Remove the 22 screws securing the panel unit. 4-2. Removing Panel Unit and Lamp Holder 4-1. Remove the six screws securing the lamp holder.
4. Service Instruction 2004 LCD Television Page 10 of 12 Remove the 22 screws securing the panel unit. 4-2. Removing Panel Unit and Lamp Holder 4-1. Remove the six screws securing the lamp holder.

Installation Guide - English
Page 12
Remove the old lamp units from the lamp clip, and replace them . Note: The eight lamp direct illumination system uses 16 CCFTs (Cold Cathode Fluorescent Tubes) to INV board (HOT side) Service Instruction 2004 LCD Television Page 11 of 12 5. Keep dust off the units. Be very careful not to break the lamp units when detaching/reattaching them with new ones. Lamp unit consists of two lamps Small connector Connected to INV board (GND side) Large connector Connected to provide backlighting for the LCD display. Replacing Lamp Units 5-1.
Remove the old lamp units from the lamp clip, and replace them . Note: The eight lamp direct illumination system uses 16 CCFTs (Cold Cathode Fluorescent Tubes) to INV board (HOT side) Service Instruction 2004 LCD Television Page 11 of 12 5. Keep dust off the units. Be very careful not to break the lamp units when detaching/reattaching them with new ones. Lamp unit consists of two lamps Small connector Connected to INV board (GND side) Large connector Connected to provide backlighting for the LCD display. Replacing Lamp Units 5-1.

Installation Guide - English
Page 13
... bend or pinch flat cables when installing the panel unit. INV board (HOT side) Panel unit INV board (GND side) Flat cables Service Instruction 2004 LCD Television Page 12 of 12 Replace lamp units in reverse order to the INV board (GND side). Attach ferrite cores very carefully. Follow the lamp...
... bend or pinch flat cables when installing the panel unit. INV board (HOT side) Panel unit INV board (GND side) Flat cables Service Instruction 2004 LCD Television Page 12 of 12 Replace lamp units in reverse order to the INV board (GND side). Attach ferrite cores very carefully. Follow the lamp...
Owner's Manual - English
Page 1
Model number: Serial number: Index Record these numbers whenever you communicate with your TV. Introduction OWNER'S MANUAL LCD Color Television E: ENGLISH E F: FRANÇAIS F S: ESPAÑOL S Connecting your TV Using the Remote Control Setting up your TV Using the TV's Features Appendix 26HL84 32HL84 Owner's Record The model number and serial number are on the back of your Toshiba dealer about this TV. Refer to these numbers in the spaces below.
Model number: Serial number: Index Record these numbers whenever you communicate with your TV. Introduction OWNER'S MANUAL LCD Color Television E: ENGLISH E F: FRANÇAIS F S: ESPAÑOL S Connecting your TV Using the Remote Control Setting up your TV Using the TV's Features Appendix 26HL84 32HL84 Owner's Record The model number and serial number are on the back of your Toshiba dealer about this TV. Refer to these numbers in the spaces below.

Owner's Manual - English
Page 4
...power surges, always unplug the power cord and disconnect the antenna from the TV if you to properly dispose of precision technology; of any of the room. 32) LCD (Liquid Crystal Display) may cause interference in LCD panel contains a small amount of 0°C or less, the picture brightness...continuous, unplug the power cord and contact a Toshiba Authorized Service Center. 35) The screen on this TV is easy to install any kind into the TV cabinet slots. 30) While it may affect electronic equipment beyond the residential unit where a LCD TV is not a sign of joystick at on-...
...power surges, always unplug the power cord and disconnect the antenna from the TV if you to properly dispose of precision technology; of any of the room. 32) LCD (Liquid Crystal Display) may cause interference in LCD panel contains a small amount of 0°C or less, the picture brightness...continuous, unplug the power cord and contact a Toshiba Authorized Service Center. 35) The screen on this TV is easy to install any kind into the TV cabinet slots. 30) While it may affect electronic equipment beyond the residential unit where a LCD TV is not a sign of joystick at on-...

Owner's Manual - English
Page 5
Introduction 6 Welcome to Toshiba 6 Supplied accessories 6 Note Regarding Quick Connect Guide 6 Exploring your new TV 7 Connecting your TV 8 Connecting a VCR 9 Connecting a cable converter box 9 Connecting a cable converter box and VCR ...42 If you cannot remember your PIN code 42 Using the V-CHIP menu 43 ENABLE BLOCKING 43 TV RATING (Independent rating system for broadcasters 43 MPAA RATING (Independent rating system for movies 44 BLOCKING OPTION... Specifications 61 Troubleshooting 62 Limited United States Warranty for LCD TV 63 Limited Canada Warranty for LCD TV 64 Index 65 5
Introduction 6 Welcome to Toshiba 6 Supplied accessories 6 Note Regarding Quick Connect Guide 6 Exploring your new TV 7 Connecting your TV 8 Connecting a VCR 9 Connecting a cable converter box 9 Connecting a cable converter box and VCR ...42 If you cannot remember your PIN code 42 Using the V-CHIP menu 43 ENABLE BLOCKING 43 TV RATING (Independent rating system for broadcasters 43 MPAA RATING (Independent rating system for movies 44 BLOCKING OPTION... Specifications 61 Troubleshooting 62 Limited United States Warranty for LCD TV 63 Limited Canada Warranty for LCD TV 64 Index 65 5

Owner's Manual - English
Page 6
...! Introduction Introduction Welcome to guide you through setting up and operating your Toshiba TV as quickly as those referred to guide you through the initial setup of your TV. The goal of the finer LCD TVs on using the remote control. This owner's manual Remote control CT-90164 Batteries for your records. You have the...
...! Introduction Introduction Welcome to guide you through setting up and operating your Toshiba TV as quickly as those referred to guide you through the initial setup of your TV. The goal of the finer LCD TVs on using the remote control. This owner's manual Remote control CT-90164 Batteries for your records. You have the...

Owner's Manual - English
Page 63
...except Hawaii, visit TACP 's web site at no cost to you or to damage to LCD TV or parts caused by misuse, accident, Acts of the operating instructions in Hawaii,contact Toshiba Hawaii,Inc., 327 Kamakee Street, Honolulu, HI 96814,(808)591-9281. (2) Present your bill... VARY FROM STATE TO STATE IN THE U.S.A. E Limited United States Warranty F S for LCD TV Introduction Connecting your TV Using the Remote Control Setting up your TV Toshiba America Consumer Products,Inc. ("TACP ") and Toshiba Hawaii,Inc.("THI ")make the following all parts, labor. THESE LIMITED WARRANTIES EXTEND TO THE...
...except Hawaii, visit TACP 's web site at no cost to you or to damage to LCD TV or parts caused by misuse, accident, Acts of the operating instructions in Hawaii,contact Toshiba Hawaii,Inc., 327 Kamakee Street, Honolulu, HI 96814,(808)591-9281. (2) Present your bill... VARY FROM STATE TO STATE IN THE U.S.A. E Limited United States Warranty F S for LCD TV Introduction Connecting your TV Using the Remote Control Setting up your TV Toshiba America Consumer Products,Inc. ("TACP ") and Toshiba Hawaii,Inc.("THI ")make the following all parts, labor. THESE LIMITED WARRANTIES EXTEND TO THE...


