User Manual
Page 1
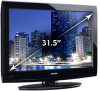
... LCD Television HIGH-DEFINITION TELEVISION 32DT1U 40FT1U For an overview of your TV. Record these numbers whenever you communicate with your new TV, see page10. Refer to these numbers in the spaces below. Note: To display a High Definition picture, the TV must be receiving... details, please contact your TV antenna installer, cable provider, or satellite provider. © 2010 TOSHIBA CORPORATION All Rights Reserved Owner's Record The model number and serial number are on the back of steps for setting up your Toshiba dealer about this TV. Model number: Serial number: HDA51F4010I
... LCD Television HIGH-DEFINITION TELEVISION 32DT1U 40FT1U For an overview of your TV. Record these numbers whenever you communicate with your new TV, see page10. Refer to these numbers in the spaces below. Note: To display a High Definition picture, the TV must be receiving... details, please contact your TV antenna installer, cable provider, or satellite provider. © 2010 TOSHIBA CORPORATION All Rights Reserved Owner's Record The model number and serial number are on the back of steps for setting up your Toshiba dealer about this TV. Model number: Serial number: HDA51F4010I
User Manual
Page 8
... 46 Understanding the auto power off feature 46 Understanding the last mode memory feature 46 Chapter 7: Using the TV's advanced features............47 Using the advanced picture settings features 47 Using Dynamic Contrast 47 Using the static gamma feature 47 Selecting the color temperature 47 Using CableClear® digital noise reduction 47 Using... 51 Specifications 51 Acceptable signal formats for PC IN and HDMI terminals 52 Limited United States Warranty for LCD Televisions....... 53 Limited Canadian Warranty for Toshiba Brand Flat Panel Televisions 54
... 46 Understanding the auto power off feature 46 Understanding the last mode memory feature 46 Chapter 7: Using the TV's advanced features............47 Using the advanced picture settings features 47 Using Dynamic Contrast 47 Using the static gamma feature 47 Selecting the color temperature 47 Using CableClear® digital noise reduction 47 Using... 51 Specifications 51 Acceptable signal formats for PC IN and HDMI terminals 52 Limited United States Warranty for LCD Televisions....... 53 Limited Canadian Warranty for Toshiba Brand Flat Panel Televisions 54
User Manual
Page 9
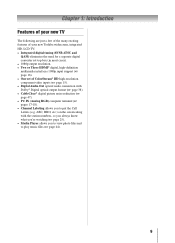
...TV The following are just a few of the many exciting features of your new Toshiba widescreen, integrated HD, LCD TV: • Integrated digital tuning (8VSB ATSC and QAM) eliminates the need for a separate digital converter set-top box (in most cases). • 1080p output resolution. • Two...44). 9 ABC, HBO, etc.) on the screen along with Dolby® Digital optical output format ( page 38). • CableClear® digital picture noise reduction ( page 47). • PC IN (Analog RGB) computer terminal ( pages 17-18). • Channel Labeling allows you to view...
...TV The following are just a few of the many exciting features of your new Toshiba widescreen, integrated HD, LCD TV: • Integrated digital tuning (8VSB ATSC and QAM) eliminates the need for a separate digital converter set-top box (in most cases). • 1080p output resolution. • Two...44). 9 ABC, HBO, etc.) on the screen along with Dolby® Digital optical output format ( page 38). • CableClear® digital picture noise reduction ( page 47). • PC IN (Analog RGB) computer terminal ( pages 17-18). • Channel Labeling allows you to view...
User Manual
Page 13
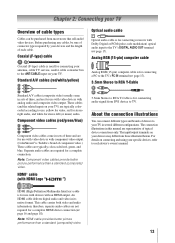
...) optical audio input to RCA Y-Cable Standard A/V cables (composite video) usually come in sets of three and are for use with video devices with component video output. (ColorStream®... your TV) are typically colorcoded according to TV. Note: Component video cables provide better picture performance than a standard (composite) video. 13 About the connection illustrations You can be ... herein. Analog RGB (15-pin) computer cable Analog RGB (15-pin) computer cable is Toshiba's brand of component video.) These cables are representative of typical device connections only. The input...
...) optical audio input to RCA Y-Cable Standard A/V cables (composite video) usually come in sets of three and are for use with video devices with component video output. (ColorStream®... your TV) are typically colorcoded according to TV. Note: Component video cables provide better picture performance than a standard (composite) video. 13 About the connection illustrations You can be ... herein. Analog RGB (15-pin) computer cable Analog RGB (15-pin) computer cable is Toshiba's brand of component video.) These cables are representative of typical device connections only. The input...

User Manual
Page 17
... modulation) signal for 40") signal formats. Note: •• Some audio systems may not be displayed correctly. • To display the optimum picture, use with an external Dolby® Digital decoder or other digital audio system TV back panel Optical audio cable To control the audio: 1無 ... select either the PC IN or HDMI connection, you can accept and display VGA, SVGA, XGA, WXGA and SXGA(Only for use the PC setting (continued) 17 THIS DAMAGE IS NOT COVERED BY YOUR WARRANTY. •• The DIGITAL AUDIO OUT terminal may damage speakers or headphones. Dolby,...
... modulation) signal for 40") signal formats. Note: •• Some audio systems may not be displayed correctly. • To display the optimum picture, use with an external Dolby® Digital decoder or other digital audio system TV back panel Optical audio cable To control the audio: 1無 ... select either the PC IN or HDMI connection, you can accept and display VGA, SVGA, XGA, WXGA and SXGA(Only for use the PC setting (continued) 17 THIS DAMAGE IS NOT COVERED BY YOUR WARRANTY. •• The DIGITAL AUDIO OUT terminal may damage speakers or headphones. Dolby,...
User Manual
Page 18
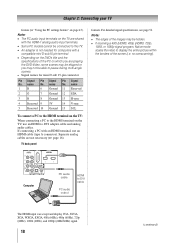
...If receiving a 480i (HDMI), 480p (HDMI), 720p, 1080i, or 1080p signal program, Native mode scales the video to display the entire picture within the borders of the images may not be connected to pause during multi-angle scenes. • Signal names for computers with an HDMI... (60Hz), 720p (60Hz), 1080i (60Hz), and 1080p (24Hz/60Hz) signal 18 (continued) Chapter 2: Connecting your TV feature ( "Using the PC settings feature" on the TV, use an HDMI cable (type A connector). Separate analog cables are shared with the HDMI-1 analog audio input terminals. ••...
...If receiving a 480i (HDMI), 480p (HDMI), 720p, 1080i, or 1080p signal program, Native mode scales the video to display the entire picture within the borders of the images may not be connected to pause during multi-angle scenes. • Signal names for computers with an HDMI... (60Hz), 720p (60Hz), 1080i (60Hz), and 1080p (24Hz/60Hz) signal 18 (continued) Chapter 2: Connecting your TV feature ( "Using the PC settings feature" on the TV, use an HDMI cable (type A connector). Separate analog cables are shared with the HDMI-1 analog audio input terminals. ••...
User Manual
Page 21
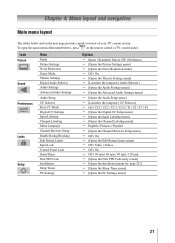
...control or TV control panel. Icon Picture Sound Preferences Locks Setup Item Mode Picture Settings Noise Reduction Game Mode Theater Settings Digital Audio Selector Audio Settings Advanced Audio Settings Audio Setup CC Selector Base CC Mode Digital CC Settings Input Labeling Channel Labeling Menu Language ...Edit Rating Limits Input Lock Control Panel Lock GameTimer New PIN Code Installation Sleep Timer PC Settings Option Sports / Standard / Movie / PC / Preference [Opens the Picture Settings menu] [Opens the Noise Reduction menu] Off / On ...
...control or TV control panel. Icon Picture Sound Preferences Locks Setup Item Mode Picture Settings Noise Reduction Game Mode Theater Settings Digital Audio Selector Audio Settings Advanced Audio Settings Audio Setup CC Selector Base CC Mode Digital CC Settings Input Labeling Channel Labeling Menu Language ...Edit Rating Limits Input Lock Control Panel Lock GameTimer New PIN Code Installation Sleep Timer PC Settings Option Sports / Standard / Movie / PC / Preference [Opens the Picture Settings menu] [Opens the Noise Reduction menu] Off / On ...
User Manual
Page 32
... the program in any of the picture sizes) will return to the button. 3無 You can view many program formats in PC Mode Only). Note: If you press from any purpose other countries, and may not be "grayed out" in the Theater Settings menu. 2無 Press ...3, Full, 4:3 HD, Native, and Dot by switching back and forth between the last two channels that are stretched wider to select the desired picture size setting. 3無 Highlight Done and press . Using these functions to change channels repeatedly, and when you to program into the button. 2無 Press...
... the program in any of the picture sizes) will return to the button. 3無 You can view many program formats in PC Mode Only). Note: If you press from any purpose other countries, and may not be "grayed out" in the Theater Settings menu. 2無 Press ...3, Full, 4:3 HD, Native, and Dot by switching back and forth between the last two channels that are stretched wider to select the desired picture size setting. 3無 Highlight Done and press . Using these functions to change channels repeatedly, and when you to program into the button. 2無 Press...
User Manual
Page 34
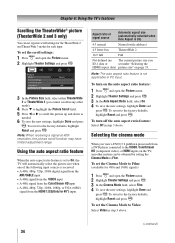
... and press . To set the scroll settings: 1無 Press and open the Picture menu. 2無 Highlight Theater Settings and press . 3無 In the Picture Size field, select either TheaterWide 2 or TheaterWide 3 (you ID-1 data or set to On, the TV will automatically select the picture size when one of signal... Mode to Film. Using the auto aspect ratio feature When the auto aspect ratio feature is set under "Selecting the HDMI aspect data) picture size" on the TV, smoother motion can set the Cinema Mode to the factory defaults, highlight Reset and press . Note: The auto aspect...
... and press . To set the scroll settings: 1無 Press and open the Picture menu. 2無 Highlight Theater Settings and press . 3無 In the Picture Size field, select either TheaterWide 2 or TheaterWide 3 (you ID-1 data or set to On, the TV will automatically select the picture size when one of signal... Mode to Film. Using the auto aspect ratio feature When the auto aspect ratio feature is set under "Selecting the HDMI aspect data) picture size" on the TV, smoother motion can set the Cinema Mode to the factory defaults, highlight Reset and press . Note: The auto aspect...
User Manual
Page 35
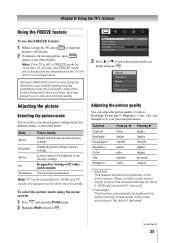
... PC inputs only (grayed out for more than your desired picture settings from four different modes, as described below. To select the picture mode using the menu system: 1無 Press and open the Picture menu. 2無 Highlight Mode and press . 3無 ... the TV, press to make the picture a still picture. 2無 To return to the moving picture. Mode Sports Standard Movie PC Preference Picture Quality Bright and dynamic picture (factory setting) Standard picture settings (factory setting) Lower contrast for darkened room (factory setting) Designed for viewing of darkness. (...
... PC inputs only (grayed out for more than your desired picture settings from four different modes, as described below. To select the picture mode using the menu system: 1無 Press and open the Picture menu. 2無 Highlight Mode and press . 3無 ... the TV, press to make the picture a still picture. 2無 To return to the moving picture. Mode Sports Standard Movie PC Preference Picture Quality Bright and dynamic picture (factory setting) Standard picture settings (factory setting) Lower contrast for darkened room (factory setting) Designed for viewing of darkness. (...
User Manual
Page 36
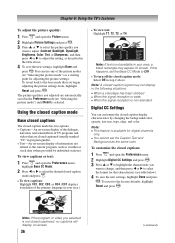
.... Chapter 6: Using the TV's features To adjust the picture quality: 1無 Press and open the Picture menu. 2無 Highlight Picture Settings and press . 3無 Press or to select the picture quality you want to adjust (Contrast, Backlight, DynaLight, Brightness...to the factory defaults, highlight Reset and press . The picture qualities you began adjusting the picture settings from, highlight Reset and press . Note: ••This feature is available for adjusting the picture settings. You can customize the closed captioned (usually marked "CC"...
.... Chapter 6: Using the TV's features To adjust the picture quality: 1無 Press and open the Picture menu. 2無 Highlight Picture Settings and press . 3無 Press or to select the picture quality you want to adjust (Contrast, Backlight, DynaLight, Brightness...to the factory defaults, highlight Reset and press . The picture qualities you began adjusting the picture settings from, highlight Reset and press . Note: ••This feature is available for adjusting the picture settings. You can customize the closed captioned (usually marked "CC"...

User Manual
Page 42
...that exceeds the rating limits you set, the TV will enter program ...30-120 minutes). All locking is disabled until you set. When the GameTimer expires, the TV enters Input ... to highlight GameTimer and press to set the GameTimer®: 1無 From the Locks menu,...press . 4無 Press to enter PIN. To set a time limit for 40"), PC, USB Media and channels ...program: 1無 Press . 2無 Enter your settings from being changed accidentally (by children, for the ...Set the Input Lock to watch. When the control panel lock is released and ...
...that exceeds the rating limits you set, the TV will enter program ...30-120 minutes). All locking is disabled until you set. When the GameTimer expires, the TV enters Input ... to highlight GameTimer and press to set the GameTimer®: 1無 From the Locks menu,...press . 4無 Press to enter PIN. To set a time limit for 40"), PC, USB Media and channels ...program: 1無 Press . 2無 Enter your settings from being changed accidentally (by children, for the ...Set the Input Lock to watch. When the control panel lock is released and ...

User Manual
Page 43
... and then press or to the image. button on the TV screen. If the picture is disrupted momentarily when adjusting the PC settings. Note: Because the PC and HDMI-1 inputs share the same set the PC Audio: 1無 Press and open the Setup menu. 3無 Highlight PC... vary depending on the control panel (except POWER) is not a sign of the picture are cut off, readjust the Horizontal Position and Vertical Position. Using the PC settings feature You can use the PC Settings feature to make the appropriate adjustments. When a PC is within ±10 from center...
... and then press or to the image. button on the TV screen. If the picture is disrupted momentarily when adjusting the PC settings. Note: Because the PC and HDMI-1 inputs share the same set the PC Audio: 1無 Press and open the Setup menu. 3無 Highlight PC... vary depending on the control panel (except POWER) is not a sign of the picture are cut off, readjust the Horizontal Position and Vertical Position. Using the PC settings feature You can use the PC Settings feature to make the appropriate adjustments. When a PC is within ±10 from center...
User Manual
Page 44
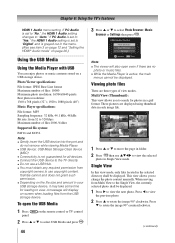
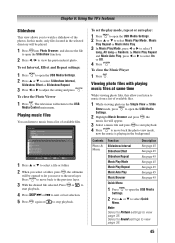
... mode, only files located in your USB storage device, it may take some time for loading to select Photo Browser, Music Browser or Settings then press . Toshiba cannot and does not grant such permission. ••Depending on the remote control or TV control 2無 Press or ... to view. Viewing photo files There are no photo or music files. ••While the Media Player is set to rotate the image 90° clockwise. These pictures are displayed using thumbnail data in each image file. 1無 Press or to move the page in ...
... mode, only files located in your USB storage device, it may take some time for loading to select Photo Browser, Music Browser or Settings then press . Toshiba cannot and does not grant such permission. ••Depending on the remote control or TV control 2無 Press or ... to view. Viewing photo files There are no photo or music files. ••While the Media Player is set to rotate the image 90° clockwise. These pictures are displayed using thumbnail data in each image file. 1無 Press or to move the page in ...
User Manual
Page 45
... listen to music from a list of available files. 1無 While viewing photo in the background. Ready (2009) Trey Songz - Note: Select to Picture settings to select On or Off. 4無 Press . To close the Music Player 1無 Press . Da Da Da.mp3 Lil Wayne 02:43 /... Description Slideshow Interval See page 45. The television will be played. 1無 Press into Photo Browser, and choose the file to open the USB Media Settings. 2無 Press or to select Quick Menu. B.o.B. - B.o.B Presents The... In Music Play Repeat and Music Auto Play, press ...
... listen to music from a list of available files. 1無 While viewing photo in the background. Ready (2009) Trey Songz - Note: Select to Picture settings to select On or Off. 4無 Press . To close the Music Player 1無 Press . Da Da Da.mp3 Lil Wayne 02:43 /... Description Slideshow Interval See page 45. The television will be played. 1無 Press into Photo Browser, and choose the file to open the USB Media Settings. 2無 Press or to select Quick Menu. B.o.B. - B.o.B Presents The... In Music Play Repeat and Music Auto Play, press ...
User Manual
Page 47
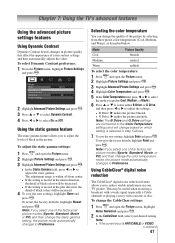
... press . 5無 In the Color Temperature field, press or to reduce visible interference in your desired setting. To select Dynamic Contrast preference: 1無 From the Picture menu, highlight Picture Settings and press . 2無 Highlight Advanced Picture Settings and press . 3無 Press or to select Dynamic Contrast. 4無 Press or to...
... press . 5無 In the Color Temperature field, press or to reduce visible interference in your desired setting. To select Dynamic Contrast preference: 1無 From the Picture menu, highlight Picture Settings and press . 2無 Highlight Advanced Picture Settings and press . 3無 Press or to select Dynamic Contrast. 4無 Press or to...

User Manual
Page 48
... HDMI 3(only for 40"). To revert to highest, respectively. 3無 To save the new settings, highlight Done and press . To select the MPEG noise reduction level: 1無 Press and open the Picture menu. 2無 Highlight Noise Reduction and press . 3無 Press or ... 3無 Turn On the 7 Band Equalizer, then press into Equalizer Setting. 4無 Press or to highlight the Equalizer Setting feature, and then press to change the Surround settings: 1無 Press and open the Picture menu, highlight the Game Mode. 2無 Press or ...
... HDMI 3(only for 40"). To revert to highest, respectively. 3無 To save the new settings, highlight Done and press . To select the MPEG noise reduction level: 1無 Press and open the Picture menu. 2無 Highlight Noise Reduction and press . 3無 Press or ... 3無 Turn On the 7 Band Equalizer, then press into Equalizer Setting. 4無 Press or to highlight the Equalizer Setting feature, and then press to change the Surround settings: 1無 Press and open the Picture menu, highlight the Game Mode. 2無 Press or ...
User Manual
Page 49
... have broadcast difficulties. Cannot view external signals or channel 3 or 4 •• If you can try. Poor composite picture •• If the TV is set to one or more of the following suggestions, which will change to try again. Black box on-screen •• The... system, and video processing or different compression rates used by broadcasters in their programming. Noisy picture •• If you can be poor. Picture and sound are out of this issue. 49 Set the closed caption feature is connected to an external A/V device (e.g., DVD player, video game...
... have broadcast difficulties. Cannot view external signals or channel 3 or 4 •• If you can try. Poor composite picture •• If the TV is set to one or more of the following suggestions, which will change to try again. Black box on-screen •• The... system, and video processing or different compression rates used by broadcasters in their programming. Noisy picture •• If you can be poor. Picture and sound are out of this issue. 49 Set the closed caption feature is connected to an external A/V device (e.g., DVD player, video game...


