User Manual
Page 1
.... For details, please contact your TV antenna installer, cable provider, or satellite provider. © 2011 TOSHIBA CORPORATION All Rights Reserved Owner's Record The model number and serial number are on the back of steps for setting up yournewTV, see page10. Owner's Manual Integrated High Definition LCD Television HIGH-DEFINITION TELEVISION...
.... For details, please contact your TV antenna installer, cable provider, or satellite provider. © 2011 TOSHIBA CORPORATION All Rights Reserved Owner's Record The model number and serial number are on the back of steps for setting up yournewTV, see page10. Owner's Manual Integrated High Definition LCD Television HIGH-DEFINITION TELEVISION...

User Manual
Page 2
... climb on or play with steel studs or old cinder block construction. WARNING: If you decide to wall mount this television, always use of this Toshiba LCD TV. The use a UL Listed wall bracket appropriate for wall mounting this product. • Don't allow children to Article 820-40 of... mounted to the presence of cable entry as UL, CSA, ETL). • Follow all . TOSHIBA Cares! • The consumer electronics industry is intended to alert the user to walls with furniture and television sets. • Don't place flat panel displays on furniture that can easily be used as steps, ...
... climb on or play with steel studs or old cinder block construction. WARNING: If you decide to wall mount this television, always use of this Toshiba LCD TV. The use a UL Listed wall bracket appropriate for wall mounting this product. • Don't allow children to Article 820-40 of... mounted to the presence of cable entry as UL, CSA, ETL). • Follow all . TOSHIBA Cares! • The consumer electronics industry is intended to alert the user to walls with furniture and television sets. • Don't place flat panel displays on furniture that can easily be used as steps, ...
User Manual
Page 8
... 41 Locking channels 41 Using the GameTimer 41 Using the panel lock feature 42 Using the PC settings feature 42 Setting the PC Audio 43 Using the Media Player 43 Using the Media Player with USB 43 To ...Understanding the last mode memory feature 49 Chapter 7: Using the TV's advanced features......... 50 Using the advanced picture settings features 50 Using Dynamic Contrast 50 Using the static gamma feature 50 Selecting the color temperature 50 Using the ClearFrame... United States Warranty for LCD Televisions 57 Limited Canadian Warranty for Toshiba Brand Flat Panel Televisions 58
... 41 Locking channels 41 Using the GameTimer 41 Using the panel lock feature 42 Using the PC settings feature 42 Setting the PC Audio 43 Using the Media Player 43 Using the Media Player with USB 43 To ...Understanding the last mode memory feature 49 Chapter 7: Using the TV's advanced features......... 50 Using the advanced picture settings features 50 Using Dynamic Contrast 50 Using the static gamma feature 50 Selecting the color temperature 50 Using the ClearFrame... United States Warranty for LCD Televisions 57 Limited Canadian Warranty for Toshiba Brand Flat Panel Televisions 58
User Manual
Page 9
... following are just a few of the many exciting features of your new Toshiba widescreen, integrated HD, LCD TV: • Integrated digital tuning (8VSB ATSC and QAM) eliminates the need for a separate digital converter set-top box (in most cases). • 1366 x 768 output resolution....output resolution. (E210U, G310U) • HDMI® digital, high-definition multimedia interfaces 1080p input support ( page 16). • One set of ColorStream® HD high-resolution component video inputs ( page 15). • Digital Audio Out optical audio connection with Dolby® Digital...
... following are just a few of the many exciting features of your new Toshiba widescreen, integrated HD, LCD TV: • Integrated digital tuning (8VSB ATSC and QAM) eliminates the need for a separate digital converter set-top box (in most cases). • 1366 x 768 output resolution....output resolution. (E210U, G310U) • HDMI® digital, high-definition multimedia interfaces 1080p input support ( page 16). • One set of ColorStream® HD high-resolution component video inputs ( page 15). • Digital Audio Out optical audio connection with Dolby® Digital...
User Manual
Page 10
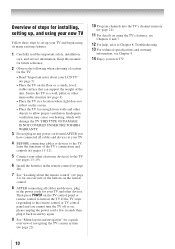
.... 13 For technical specifications and warranty information, see Chapter 9. 14 Enjoy your TV and other devices. THIS TYPE OF DAMAGE IS NOT COVERED UNDER THE TOSHIBA WARRANTY. 3 Do not plug in a location where light does not reflect on the floor or a sturdy, level, stable surface that can support the weight ...of the unit. Overview of steps for installing, setting up, and using your new TV Follow these steps to set up your LCD TV" ( page 7). • Place the TV on the screen. • Place the TV far enough...
.... 13 For technical specifications and warranty information, see Chapter 9. 14 Enjoy your TV and other devices. THIS TYPE OF DAMAGE IS NOT COVERED UNDER THE TOSHIBA WARRANTY. 3 Do not plug in a location where light does not reflect on the floor or a sturdy, level, stable surface that can support the weight ...of the unit. Overview of steps for installing, setting up, and using your new TV Follow these steps to set up your LCD TV" ( page 7). • Place the TV on the screen. • Place the TV far enough...
User Manual
Page 13
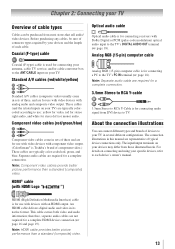
...Stereo to RCA Y-cable 3.5mm Stereo to TV. The connection illustrations in several different configurations. An HDMI cable delivers digital audio and video in sets of three and are for use : yellow for video, red for stereo right audio, and white for stereo left (or mono) audio....page 18). Component video cables (red/green/blue) Component video cables come in sets of three, and are typically colorcoded according to use with video devices with component video output. (ColorStream® is Toshiba's brand of cable types Cables can connect different types and brands of typical ...
...Stereo to RCA Y-cable 3.5mm Stereo to TV. The connection illustrations in several different configurations. An HDMI cable delivers digital audio and video in sets of three and are for use : yellow for video, red for stereo right audio, and white for stereo left (or mono) audio....page 18). Component video cables (red/green/blue) Component video cables come in sets of three, and are typically colorcoded according to use with video devices with component video output. (ColorStream® is Toshiba's brand of cable types Cables can connect different types and brands of typical ...
User Manual
Page 14
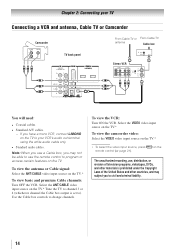
Note: When you use a Cable box, you may not be able to use , distribution, or revision of television programs, videotapes, DVDs, and other materials is set to civil and criminal liability. 14 To view the antenna or Cable signal: Select the ANT/CABLE video input source on the TV. Select the ...
Note: When you use a Cable box, you may not be able to use , distribution, or revision of television programs, videotapes, DVDs, and other materials is set to civil and criminal liability. 14 To view the antenna or Cable signal: Select the ANT/CABLE video input source on the TV. Select the ...
User Manual
Page 16
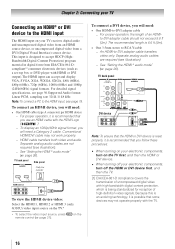
...an HDMIto-DVI adapter cable should not exceed 9.8 ft (3m). Separate analog audio cables are not required (see illustration). −− See "Setting the HDMI ® audio mode" ( page 26). Separate analog audio cables are required (see page 19. Chapter 2: Connecting your TV Connecting... and uncompressed digital video from an HDMI source device, or uncompressed digital video from EIA/CEA-861-Dcompliant[1] consumer electronic devices (such as a set-top box or DVD player with the HDMI Logo ( ). −− To display an 1080p/60Hz signal format, you will need :...
...an HDMIto-DVI adapter cable should not exceed 9.8 ft (3m). Separate analog audio cables are not required (see illustration). −− See "Setting the HDMI ® audio mode" ( page 26). Separate analog audio cables are required (see page 19. Chapter 2: Connecting your TV Connecting... and uncompressed digital video from an HDMI source device, or uncompressed digital video from EIA/CEA-861-Dcompliant[1] consumer electronic devices (such as a set-top box or DVD player with the HDMI Logo ( ). −− To display an 1080p/60Hz signal format, you will need :...
User Manual
Page 17
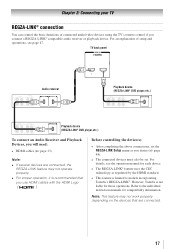
... Devices, you use HDMI cables with the HDMI Logo ( ). Refer to models incorporating Toshiba's REGZA-LINK®. Before controlling the device(s): • After completing the above connections, set the REGZA-LINK Setup menu as regulated by the HDMI standard. • This feature ...is not liable for compatibility information. However, Toshiba is limited to the individual instruction manuals for those operations. Note...
... Devices, you use HDMI cables with the HDMI Logo ( ). Refer to models incorporating Toshiba's REGZA-LINK®. Before controlling the device(s): • After completing the above connections, set the REGZA-LINK Setup menu as regulated by the HDMI standard. • This feature ...is not liable for compatibility information. However, Toshiba is limited to the individual instruction manuals for those operations. Note...
User Manual
Page 18
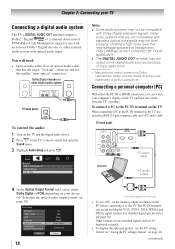
... your device ("Selecting the optical audio output format" on page 38). 18 Conversion adapter (if necessary) • To use a PC, set the monitor output resolution on the PC before connecting it to the PC IN terminal on the TV, use an analog RGB (15-pin) computer...•• The DIGITAL AUDIO OUT terminal may not be displayed correctly. • To display the optimum picture, use the PC setting feature ( "Using the PC settings feature" on page 42). (continued) Older audio systems that may damage speakers or headphones. Other formats or non-standard signals will need...
... your device ("Selecting the optical audio output format" on page 38). 18 Conversion adapter (if necessary) • To use a PC, set the monitor output resolution on the PC before connecting it to the PC IN terminal on the TV, use an analog RGB (15-pin) computer...•• The DIGITAL AUDIO OUT terminal may not be displayed correctly. • To display the optimum picture, use the PC setting feature ( "Using the PC settings feature" on page 42). (continued) Older audio systems that may damage speakers or headphones. Other formats or non-standard signals will need...
User Manual
Page 22
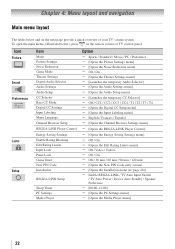
...Opens the Input Labeling menu] English / Français / Español [Opens the Channel Browser Settings menu] [Opens the REGZA-LINK Player Control] [Opens the Energy Saving Settings menu] Off / On [Opens the Edit Rating Limits menu] Off / Video / Video...TV Auto Input Switch / TV Auto Power / Device Auto Standby / Speaker Preference [00:00~12:00] [Opens the PC Settings menu] [Opens the Media Player menu] 22 Chapter 4: Menu layout and navigation Main menu layout The tables below ), press on the next ...
...Opens the Input Labeling menu] English / Français / Español [Opens the Channel Browser Settings menu] [Opens the REGZA-LINK Player Control] [Opens the Energy Saving Settings menu] Off / On [Opens the Edit Rating Limits menu] Off / Video / Video...TV Auto Input Switch / TV Auto Power / Device Auto Standby / Speaker Preference [00:00~12:00] [Opens the PC Settings menu] [Opens the Media Player menu] 22 Chapter 4: Menu layout and navigation Main menu layout The tables below ), press on the next ...
User Manual
Page 23
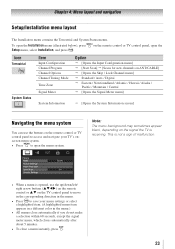
... move in the corresponding direction in the menu. • Press to save your TV's onscreen menu system. • Press to access and navigate your menu settings or select a highlighted item. (A highlighted menu item appears in a different color in the menu.) • All menus close automatically if you do not make a selection...
... move in the corresponding direction in the menu. • Press to save your TV's onscreen menu system. • Press to access and navigate your menu settings or select a highlighted item. (A highlighted menu item appears in a different color in the menu.) • All menus close automatically if you do not make a selection...
User Manual
Page 24
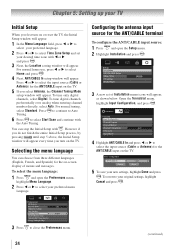
.... Press t or u to select the input source (Cable or Antenna) for the ANT/CABLE input on the TV. 5無 To save your new settings, highlight Done and press . For normal tuning, select Standard. However if you do not finish the entire Initial Setup process, by pressing Power / until step... 5 above, the Initial Setup window will appear. Chapter 5: Setting up your TV Initial Setup When you first turn on the TV. Press to continue to Auto Tuning. 6無 Press to select the input source...
.... Press t or u to select the input source (Cable or Antenna) for the ANT/CABLE input on the TV. 5無 To save your new settings, highlight Done and press . For normal tuning, select Standard. However if you do not finish the entire Initial Setup process, by pressing Power / until step... 5 above, the Initial Setup window will appear. Chapter 5: Setting up your TV Initial Setup When you first turn on the TV. Press to continue to Auto Tuning. 6無 Press to select the input source...
User Manual
Page 25
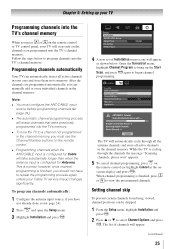
... ( page 24). 2無 Press and open the Setup menu. 3無 Highlight Installation and press . 4無 A new set of channels will stop only on the channels you can automatically detect all active channels in its memory. however, once channel programming is ...channel not programmed in the channel memory, you have to repeat the programming process again unless your Cable TV service lineup changes significantly. Setting channel skip To prevent certain channels from being viewed, channel positions can be skipped. 1無 From the Setup menu, highlight Installation...
... ( page 24). 2無 Press and open the Setup menu. 3無 Highlight Installation and press . 4無 A new set of channels will stop only on the channels you can automatically detect all active channels in its memory. however, once channel programming is ...channel not programmed in the channel memory, you have to repeat the programming process again unless your Cable TV service lineup changes significantly. Setting channel skip To prevent certain channels from being viewed, channel positions can be skipped. 1無 From the Setup menu, highlight Installation...
User Manual
Page 26
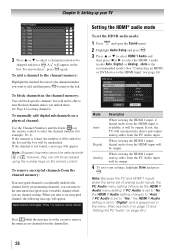
... "Digital" and is found , a message will not be unchecked. If the channel is grayed out in the menu. (Also see item 2 on page 12 and "Setting the PC Audio" on the remote control to the list and the box will be output. To remove encrypted channels from the HDMI input will... found , the number will automatically detect and output analog audio from the channel list. If not, the TV will be skipped and press . Chapter 5: Setting up your settings, highlight Done and press . If the channel is on the remote control. When you want to add, and then press to an encrypted channel...
... "Digital" and is found , a message will not be unchecked. If the channel is grayed out in the menu. (Also see item 2 on page 12 and "Setting the PC Audio" on the remote control to the list and the box will be output. To remove encrypted channels from the HDMI input will... found , the number will automatically detect and output analog audio from the channel list. If not, the TV will be skipped and press . Chapter 5: Setting up your settings, highlight Done and press . If the channel is on the remote control. When you want to add, and then press to an encrypted channel...

User Manual
Page 27
... appear. 2無 Highlight Time Zone, and press . 3無 Press t or u to the Terrestrial menu: Highlight Done and press . A new set of Installation menu icons will allow you want to obtain the RF channel numbers for your local digital stations. • The signal strength does not...be asked to their factory default values: 1無 Press and open the Setup menu. 2無 Highlight Installation and press . 3無 A new set the time zone: 1無 From the Setup menu, highlight Installation and press . Viewing the system status To view the system status: 1無 ...
... appear. 2無 Highlight Time Zone, and press . 3無 Press t or u to the Terrestrial menu: Highlight Done and press . A new set of Installation menu icons will allow you want to obtain the RF channel numbers for your local digital stations. • The signal strength does not...be asked to their factory default values: 1無 Press and open the Setup menu. 2無 Highlight Installation and press . 3無 A new set the time zone: 1無 From the Setup menu, highlight Installation and press . Viewing the system status To view the system status: 1無 ...
User Manual
Page 29
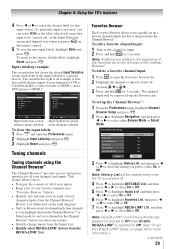
... Selection 0 ANT/CABLE 1 Video 2 VCR 3 Video Recorder 4 DVD 5 PC ANT/CABLE Input Selection screen with no inputs labeled 0 - 5 / INPUT to quickly set to Off when Enable REGZA-LINK® is switched to HDMI 2. The channel/ input will be "grayed out" in the Input Selection screen and skipped...Keep a list of the Favorites list on the right diagram). • Surf via Browse mode (to immediately tune channels as a specific device). To set the REGZA-LINK® Setup" on the remote control. 5無 To save the new input labels, highlight Done and press . Tuning channels Tuning ...
... Selection 0 ANT/CABLE 1 Video 2 VCR 3 Video Recorder 4 DVD 5 PC ANT/CABLE Input Selection screen with no inputs labeled 0 - 5 / INPUT to quickly set to Off when Enable REGZA-LINK® is switched to HDMI 2. The channel/ input will be "grayed out" in the Input Selection screen and skipped...Keep a list of the Favorites list on the right diagram). • Surf via Browse mode (to immediately tune channels as a specific device). To set the REGZA-LINK® Setup" on the remote control. 5無 To save the new input labels, highlight Done and press . Tuning channels Tuning ...
User Manual
Page 31
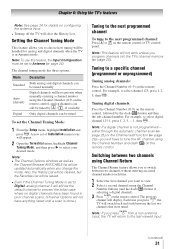
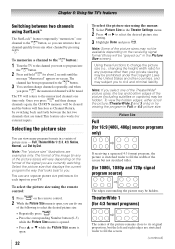
...number each time. 1無 Select the first channel you change the mode. Switching between the last two channels that were tuned. A new set the Channel Tuning Mode: 1無 From the Setup menu, highlight Installation and press . Note: ••The Channel Options windows as well... a channel number using the Channel Number and dash ( ) on the remote control or TV control panel. The previous channel will still be set to Digital, analog channel 3 will display. For example, to the next programmed channel: Press or on the remote control. Tuning to Antenna ...
...number each time. 1無 Select the first channel you change the mode. Switching between the last two channels that were tuned. A new set the Channel Tuning Mode: 1無 From the Setup menu, highlight Installation and press . Note: ••The Channel Options windows as well... a channel number using the Channel Number and dash ( ) on the remote control or TV control panel. The previous channel will still be set to Digital, analog channel 3 will display. For example, to the next programmed channel: Press or on the remote control. Tuning to Antenna ...
User Manual
Page 32
...TheaterWide 1/ 2/ 3, 4:3, Native, Normal, and Dot by switching back and forth between two channels using the menus: 1無 Select Picture Size in the Theater Settings menu. 2無 Press or to its original proportion, but not stretched taller. (for any of picture sizes - Note: The "picture... be cleared and the button will vary depending on -screen. Note: Some of the picture remains close to select the desired picture size setting. 3無 Highlight Done and press . TheaterWide 1 (for external inputs. The TV will be hidden. Note: If you can save ...
...TheaterWide 1/ 2/ 3, 4:3, Native, Normal, and Dot by switching back and forth between two channels using the menus: 1無 Select Picture Size in the Theater Settings menu. 2無 Press or to its original proportion, but not stretched taller. (for any of picture sizes - Note: The "picture... be cleared and the button will vary depending on -screen. Note: Some of the picture remains close to select the desired picture size setting. 3無 Highlight Done and press . TheaterWide 1 (for external inputs. The TV will be hidden. Note: If you can save ...
User Manual
Page 34
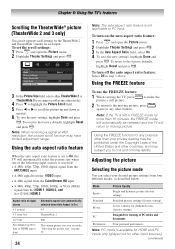
...) Automatic aspect size (automatically selected when Auto Aspect is On) 4:3 TheaterWide 2 Full The current picture size you set separate scroll settings for the TheaterWide 2 and TheaterWide 3 modes for other than 15 minutes, the FREEZE mode will automatically be released ... defaults, highlight Reset and press . Mode Picture Quality Sports Bright and dynamic picture (factory setting) Standard Standard picture settings (factory setting) Movie Lower contrast for darkened room (factory setting) Designed for viewing of the following input sources is received: • A 480i, 480p...
...) Automatic aspect size (automatically selected when Auto Aspect is On) 4:3 TheaterWide 2 Full The current picture size you set separate scroll settings for the TheaterWide 2 and TheaterWide 3 modes for other than 15 minutes, the FREEZE mode will automatically be released ... defaults, highlight Reset and press . Mode Picture Quality Sports Bright and dynamic picture (factory setting) Standard Standard picture settings (factory setting) Movie Lower contrast for darkened room (factory setting) Designed for viewing of the following input sources is received: • A 480i, 480p...


