User Manual
Page 7
... of malfunction; FCC Declaration of Conformity Compliance Statement (Part 15): The Toshiba 19C100U, 19C10U, 22C100U, 22C10U, 26C100U, 26C10U, 32C100U, and 32C10U Televisions comply with the instructions, may cause harmful interference to... provide reasonable protection against harmful interference in a particular installation. However, there is manufactured using an extremely high level of time. 2) The LCD panel contained in the United States and other countries. • MPEG Layer-3 audio...
... of malfunction; FCC Declaration of Conformity Compliance Statement (Part 15): The Toshiba 19C100U, 19C10U, 22C100U, 22C10U, 26C100U, 26C10U, 32C100U, and 32C10U Televisions comply with the instructions, may cause harmful interference to... provide reasonable protection against harmful interference in a particular installation. However, there is manufactured using an extremely high level of time. 2) The LCD panel contained in the United States and other countries. • MPEG Layer-3 audio...
User Manual
Page 8
...Connecting an HDMI® or DVI device to the HDMI input........16 REGZA-LINK® connection 17 Connecting a digital audio system 18 Connecting a personal computer (PC 18 Chapter 3: Using the remote control 20 Installing the remote control batteries... memory............24 Programming channels automatically 24 Setting channel skip 25 Labeling channels 26 Setting the HDMI® audio mode 27 Viewing the digital signal meter 27 Setting the time zone 27 Viewing the system status 28...Warranty for LCD Televisions 57 Limited Canadian Warranty for Toshiba Brand Flat Panel Televisions 58
...Connecting an HDMI® or DVI device to the HDMI input........16 REGZA-LINK® connection 17 Connecting a digital audio system 18 Connecting a personal computer (PC 18 Chapter 3: Using the remote control 20 Installing the remote control batteries... memory............24 Programming channels automatically 24 Setting channel skip 25 Labeling channels 26 Setting the HDMI® audio mode 27 Viewing the digital signal meter 27 Setting the time zone 27 Viewing the system status 28...Warranty for LCD Televisions 57 Limited Canadian Warranty for Toshiba Brand Flat Panel Televisions 58
User Manual
Page 9
... the Call Letters (e.g. Chapter 1: Introduction Features of your new TV The following are just a few of the many exciting features of your new Toshiba widescreen, integrated HD, LCD TV: • Integrated digital tuning (8VSB ATSC and QAM) eliminates the need for a separate digital converter set-top...( page 16). • One set of ColorStream® HD high-resolution component video inputs ( page 15). • Digital Audio Out optical audio connection with the station numbers, so you always know what you're watching ( page 26). • REGZA-LINK allows control of ...
... the Call Letters (e.g. Chapter 1: Introduction Features of your new TV The following are just a few of the many exciting features of your new Toshiba widescreen, integrated HD, LCD TV: • Integrated digital tuning (8VSB ATSC and QAM) eliminates the need for a separate digital converter set-top...( page 16). • One set of ColorStream® HD high-resolution component video inputs ( page 15). • Digital Audio Out optical audio connection with the station numbers, so you always know what you're watching ( page 26). • REGZA-LINK allows control of ...
User Manual
Page 12
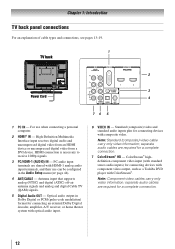
...code modulation) format for connecting an external Dolby Digital decoder, amplifier, A/V receiver, or home theater system with optical audio input. 6無 VIDEO IN - Note: Standard (composite) video cable carry only video information; Note: Component video cables carry only video... signals and analog and digital Cable TV (QAM) signals. 5無 Digital Audio OUT - Standard (composite) video and standard audio inputs plus for connecting devices with component video output, such as a Toshiba DVD player with composite video. Chapter 1: Introduction TV back panel connections For ...
...code modulation) format for connecting an external Dolby Digital decoder, amplifier, A/V receiver, or home theater system with optical audio input. 6無 VIDEO IN - Note: Standard (composite) video cable carry only video information; Note: Component video cables carry only video... signals and analog and digital Cable TV (QAM) signals. 5無 Digital Audio OUT - Standard (composite) video and standard audio inputs plus for connecting devices with component video output, such as a Toshiba DVD player with composite video. Chapter 1: Introduction TV back panel connections For ...
User Manual
Page 13
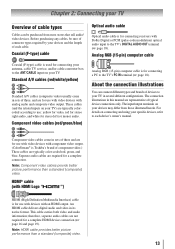
...sets of three and are for use with video devices with component video output. (ColorStream® is for connecting receivers with analog audio and composite video output. Note: HDMI cable provides better picture performance than a standard (composite) video. Analog RGB (15-pin)... computer cable Analog RGB (15-pin) computer cable is Toshiba's brand of typical device connections only. HDMI® cable (with an HDMI output. Chapter 2: Connecting your TV. Coaxial (F-type) cable Coaxial...
...sets of three and are for use with video devices with component video output. (ColorStream® is for connecting receivers with analog audio and composite video output. Note: HDMI cable provides better picture performance than a standard (composite) video. Analog RGB (15-pin)... computer cable Analog RGB (15-pin) computer cable is Toshiba's brand of typical device connections only. HDMI® cable (with an HDMI output. Chapter 2: Connecting your TV. Coaxial (F-type) cable Coaxial...
User Manual
Page 14
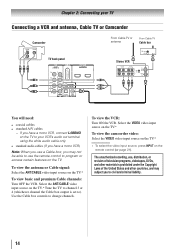
... TV.* To view basic and premium Cable channels: Turn OFF the VCR. Chapter 2: Connecting your TV Connecting a VCR and antenna, Cable TV or Camcorder Camcorder AUDIO OUT L R VIDEO TV back panel From Cable TV or antenna From Cable TV Cable box IN CH 3 CH 4 OUT Stereo VCR VIDEO...; coaxial cables • standard A/V cables −− If you have a mono VCR, connect L/MONO on the TV to your VCR's audio out terminal using the white audio cable only. • standard audio cables (If you have a mono VCR) Note: When you use a Cable box, you may not be able to use , distribution, or...
... TV.* To view basic and premium Cable channels: Turn OFF the VCR. Chapter 2: Connecting your TV Connecting a VCR and antenna, Cable TV or Camcorder Camcorder AUDIO OUT L R VIDEO TV back panel From Cable TV or antenna From Cable TV Cable box IN CH 3 CH 4 OUT Stereo VCR VIDEO...; coaxial cables • standard A/V cables −− If you have a mono VCR, connect L/MONO on the TV to your VCR's audio out terminal using the white audio cable only. • standard audio cables (If you have a mono VCR) Note: When you use a Cable box, you may not be able to use , distribution, or...
User Manual
Page 15
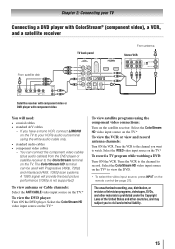
... TV program while watching a DVD: Turn ON the VCR. Tune the VCR to the channel to watch. Chapter 2: Connecting your VCR's audio out terminal using the component video connections: Turn on the satellite receiver. The unauthorized recording, use, distribution, or revision of the United States... a DVD player with ColorStream® (component video), a VCR, and a satellite receiver From satellite dish TV back panel From antenna Stereo VCR VIDEO AUDIO L R IN CH 3 CH 4 OUT L R IN from the DVD player or satellite receiver to civil and criminal liability. 15 To view antenna...
... TV program while watching a DVD: Turn ON the VCR. Tune the VCR to the channel to watch. Chapter 2: Connecting your VCR's audio out terminal using the component video connections: Turn on the satellite receiver. The unauthorized recording, use, distribution, or revision of the United States... a DVD player with ColorStream® (component video), a VCR, and a satellite receiver From satellite dish TV back panel From antenna Stereo VCR VIDEO AUDIO L R IN CH 3 CH 4 OUT L R IN from the DVD player or satellite receiver to civil and criminal liability. 15 To view antenna...

User Manual
Page 16
... • one HDMI-to-DVI adapter cable (HDMI type A connector) per DVI device −− For proper operation, the length of standard analog audio cables per HDMI device −− For proper operation, it is recommended that you will need a Category 2 cable. To connect a DVI device, ...you will need : • one pair of an HDMIto-DVI adapter cable should not exceed 9.8 ft (3m). Supported Audio format: Linear PCM, sampling rate 32/44.1/ 48 kHz Note: To connect a PC to -DVI adapter cable transfers video only. Conventional HDMI/DVI cable ...
... • one HDMI-to-DVI adapter cable (HDMI type A connector) per DVI device −− For proper operation, the length of standard analog audio cables per HDMI device −− For proper operation, it is recommended that you will need a Category 2 cable. To connect a DVI device, ...you will need : • one pair of an HDMIto-DVI adapter cable should not exceed 9.8 ft (3m). Supported Audio format: Linear PCM, sampling rate 32/44.1/ 48 kHz Note: To connect a PC to -DVI adapter cable transfers video only. Conventional HDMI/DVI cable ...
User Manual
Page 17
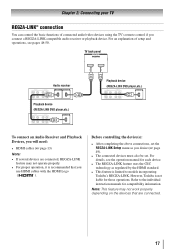
... cables with the HDMI Logo ( ). For details, see pages 48-50. For an explanation of connected audio/video devices using the TV's remote control if you connect a REGZA-LINK compatible audio receiver or playback device. However, Toshiba is limited to the individual instruction manuals for those operations. Chapter 2: Connecting your TV REGZA-LINK...
... cables with the HDMI Logo ( ). For details, see pages 48-50. For an explanation of connected audio/video devices using the TV's remote control if you connect a REGZA-LINK compatible audio receiver or playback device. However, Toshiba is limited to the individual instruction manuals for those operations. Chapter 2: Connecting your TV REGZA-LINK...

User Manual
Page 18
... because of Dolby Laboratories. Connecting a personal computer (PC) With either Dolby Digital or PCM, depending on your TV Connecting a digital audio system The TV's DIGITAL AUDIO OUT terminal outputs a *Dolby® Digital or 2-channel down-mixed PCM (pulse-code modulation) signal for use with an external Dolby® ...IN terminal on the TV: When connecting a PC to the TV. THIS DAMAGE IS NOT COVERED BY YOUR WARRANTY. •• The DIGITAL AUDIO OUT terminal may not be displayed correctly. • To display the optimum picture, use an analog RGB (15-pin) computer cable and a PC...
... because of Dolby Laboratories. Connecting a personal computer (PC) With either Dolby Digital or PCM, depending on your TV Connecting a digital audio system The TV's DIGITAL AUDIO OUT terminal outputs a *Dolby® Digital or 2-channel down-mixed PCM (pulse-code modulation) signal for use with an external Dolby® ...IN terminal on the TV: When connecting a PC to the TV. THIS DAMAGE IS NOT COVERED BY YOUR WARRANTY. •• The DIGITAL AUDIO OUT terminal may not be displayed correctly. • To display the optimum picture, use an analog RGB (15-pin) computer cable and a PC...

User Manual
Page 19
... panel Note: •• The edges of the images may be skipped or you are not necessary ( page 13). no overscanning). Computer PC audio cable PC audio output The HDMI input can accept and display VGA, SVGA, XGA, WXGA, SXGA, 480i (60Hz), 480p (60Hz), 720p (60Hz), 1080i (60Hz), ...names for mini D-sub 15-pin connector Pin Signal No. Chapter 2: Connecting your TV Note: •• The PC audio input terminals on the TV are shared with the HDMI-1 analog audio input terminals ( page 44). •• Some PC models cannot be connected to this TV. ••...
... panel Note: •• The edges of the images may be skipped or you are not necessary ( page 13). no overscanning). Computer PC audio cable PC audio output The HDMI input can accept and display VGA, SVGA, XGA, WXGA, SXGA, 480i (60Hz), 480p (60Hz), 720p (60Hz), 1080i (60Hz), ...names for mini D-sub 15-pin connector Pin Signal No. Chapter 2: Connecting your TV Note: •• The PC audio input terminals on the TV are shared with the HDMI-1 analog audio input terminals ( page 44). •• Some PC models cannot be connected to this TV. ••...
User Manual
Page 22
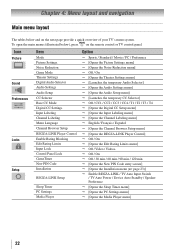
...panel. Icon Picture Sound Preferences Locks Setup Item Mode Picture Settings Noise Reduction Game Mode Theater Settings Digital Audio Selector Audio Settings Audio Setup CC Selector Base CC Mode Digital CC Settings Input Labeling Channel Labeling Menu Language Channel Browser Setup ... [Opens the Noise Reduction menu] Off / On [Opens the Theater Settings menu] [Launches the temporary Audio Selector] [Opens the Audio Settings menu] [Opens the Audio Setup menu] [Launches the temporary CC Selector] Off / CC1 / CC2 / CC3 / CC4 / T1 / ...
...panel. Icon Picture Sound Preferences Locks Setup Item Mode Picture Settings Noise Reduction Game Mode Theater Settings Digital Audio Selector Audio Settings Audio Setup CC Selector Base CC Mode Digital CC Settings Input Labeling Channel Labeling Menu Language Channel Browser Setup ... [Opens the Noise Reduction menu] Off / On [Opens the Theater Settings menu] [Launches the temporary Audio Selector] [Opens the Audio Settings menu] [Opens the Audio Setup menu] [Launches the temporary CC Selector] Off / CC1 / CC2 / CC3 / CC4 / T1 / ...
User Manual
Page 27
...local broadcasters to obtain the RF channel numbers for your region. This feature will appear. A new set of analog audio inputs, the PC Audio menu setting influences the HDMI 1 Audio menu setting. Note: • The physical digital channel number listed in the ANT/ CABLE digital TV input source only... Zone, and press . 3無 Press t or u to select the region, highlight Done, and then press . To set to "No," the HDMI 1 Audio setting changes to "Auto." Note: Because the PC and HDMI-1 inputs share the same set the Daylight Saving Time status: 1無 Press t or u to ...
...local broadcasters to obtain the RF channel numbers for your region. This feature will appear. A new set of analog audio inputs, the PC Audio menu setting influences the HDMI 1 Audio menu setting. Note: • The physical digital channel number listed in the ANT/ CABLE digital TV input source only... Zone, and press . 3無 Press t or u to select the region, highlight Done, and then press . To set to "No," the HDMI 1 Audio setting changes to "Auto." Note: Because the PC and HDMI-1 inputs share the same set the Daylight Saving Time status: 1無 Press t or u to ...
User Manual
Page 29
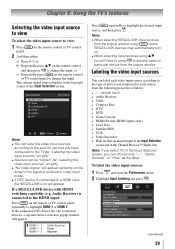
... window. or b) Repeatedly press on the screen if no signal is received in the top right corner of labels: • - - (default label) • Audio Receiver • Cable • Compact Disc • DTV • DVD • Game Console • HDMI Switch (HDMI inputs only) • Laser Disc • Satellite/DSS... to view To select the video input source to view: 1無 Press on the remote or TV control panel repeatedly to highlight HDMI 1 or HDMI 2. Audio Receiver) is connected to highlight the desired input source, and then press .
... window. or b) Repeatedly press on the screen if no signal is received in the top right corner of labels: • - - (default label) • Audio Receiver • Cable • Compact Disc • DTV • DVD • Game Console • HDMI Switch (HDMI inputs only) • Laser Disc • Satellite/DSS... to view To select the video input source to view: 1無 Press on the remote or TV control panel repeatedly to highlight HDMI 1 or HDMI 2. Audio Receiver) is connected to highlight the desired input source, and then press .
User Manual
Page 38
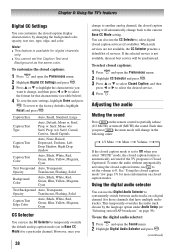
... the closed caption mode" ( page 37) for digital channels only. ••You cannot set the volume to conveniently switch between audio tracks on a digital channel (for those channels that characteristic (see table below). 4無 To save the new settings, highlight Done and ... modes. Chapter 6: Using the TV's features Digital CC Settings You can customize the closed caption display characteristics by the language option under Audio Setup ( "Selecting stereo/SAP broadcasts" on page 39). To customize the closed captions: 1無 Press and open the Preferences ...
... the closed caption mode" ( page 37) for digital channels only. ••You cannot set the volume to conveniently switch between audio tracks on a digital channel (for those channels that characteristic (see table below). 4無 To save the new settings, highlight Done and ... modes. Chapter 6: Using the TV's features Digital CC Settings You can customize the closed caption display characteristics by the language option under Audio Setup ( "Selecting stereo/SAP broadcasts" on page 39). To customize the closed captions: 1無 Press and open the Preferences ...
User Manual
Page 39
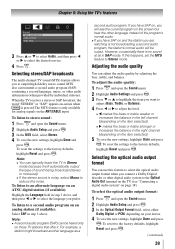
... in step 3 above , and then press or to stereo sound: 1無 Press and open the Sound menu. 2無 Highlight Audio Setup and press . 3無 In the Optical Output Format field, select either Dolby Digital or PCM, depending on the item selected). 5無 To save... the new settings, highlight Done and press . To adjust the audio quality: 1無 Press and open the Sound menu. 2無 Highlight Audio Settings and press . 3無 Press or to highlight the item you have SAP on page 18...
... in step 3 above , and then press or to stereo sound: 1無 Press and open the Sound menu. 2無 Highlight Audio Setup and press . 3無 In the Optical Output Format field, select either Dolby Digital or PCM, depending on the item selected). 5無 To save... the new settings, highlight Done and press . To adjust the audio quality: 1無 Press and open the Sound menu. 2無 Highlight Audio Settings and press . 3無 Press or to highlight the item you have SAP on page 18...
User Manual
Page 40
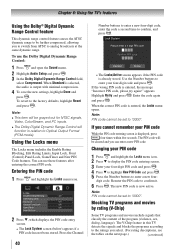
...PIN code is now active. If you can use the Dolby Digital Dynamic Range Control: 1無 Press and open the Sound menu. 2無 Highlight Audio Setup and press . 3無 In the Dolby Digital Dynamic Range Control field, select Compressed. digit code. Note: PIN code cannot be set to ...range. Reenter the PIN code to enter a new four- The new PIN code is entered, the Locks menu opens. When Standard is selected, the audio is entered, the message "Incorrect PIN code, please try again!" Highlight Retry and press . If the wrong PIN code is output with minimal compression...
...PIN code is now active. If you can use the Dolby Digital Dynamic Range Control: 1無 Press and open the Sound menu. 2無 Highlight Audio Setup and press . 3無 In the Dolby Digital Dynamic Range Control field, select Compressed. digit code. Note: PIN code cannot be set to ...range. Reenter the PIN code to enter a new four- The new PIN code is entered, the Locks menu opens. When Standard is selected, the audio is entered, the message "Incorrect PIN code, please try again!" Highlight Retry and press . If the wrong PIN code is output with minimal compression...
User Manual
Page 44
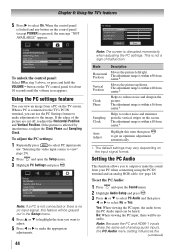
... to the TV's PC IN terminal, you can use the PC Settings feature to make the appropriate adjustments. 44 Note: The screen is no audio. When a PC is pressed, the message "NOT AVAILABLE" appears. If the edges of malfunction. The adjustment range is within ±50 from...cut off, readjust the Horizontal Position and Vertical Position. This is affected by interference, readjust the Clock Phase and Sampling Clock. Setting the PC Audio This function allows you want to adjust. 5無 Press or to reduce noise and minimize periodic vertical stripes on the...
... to the TV's PC IN terminal, you can use the PC Settings feature to make the appropriate adjustments. 44 Note: The screen is no audio. When a PC is pressed, the message "NOT AVAILABLE" appears. If the edges of malfunction. The adjustment range is within ±50 from...cut off, readjust the Horizontal Position and Vertical Position. This is affected by interference, readjust the Clock Phase and Sampling Clock. Setting the PC Audio This function allows you want to adjust. 5無 Press or to reduce noise and minimize periodic vertical stripes on the...
User Manual
Page 45
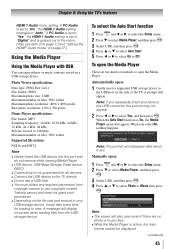
Toshiba cannot and does not grant such permission. ••Depending on the file size and amount in the menu. (Also see item 3 on page 12 and "Setting the HDMI® Audio mode" on page 27.) Using the Media Player Using the Media Player with USB You can enjoy photos or music contents... kinds of methods to 320 kbps Maximum number of the TV. When the Auto Start function is set to select On or Off. If PC Audio is On, the Media Player menu will display on the side of files: 500 / folder Supported file system: FAT16 and FAT32 Note: ••Gently...
Toshiba cannot and does not grant such permission. ••Depending on the file size and amount in the menu. (Also see item 3 on page 12 and "Setting the HDMI® Audio mode" on page 27.) Using the Media Player Using the Media Player with USB You can enjoy photos or music contents... kinds of methods to 320 kbps Maximum number of the TV. When the Auto Start function is set to select On or Off. If PC Audio is On, the Media Player menu will display on the side of files: 500 / folder Supported file system: FAT16 and FAT32 Note: ••Gently...
User Manual
Page 49
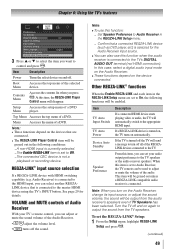
...8722;The connected CEC device is not a playback or recording device. Note: • These functions depend on again to the appropriate HDMI input. Audio Receiver) is connected to the HDMI input, you can select another REGZALINK device that is connected to the master HDMI device using the TV's ... menu will send a message to turn on automatically. This item will be used to the TV. Top Menu Accesses the top menu of the Audio Receiver. • adjust the volume level. • turns off . Item TV Auto Input Switch TV Auto Power Device Auto Standby Speaker Preference ...
...8722;The connected CEC device is not a playback or recording device. Note: • These functions depend on again to the appropriate HDMI input. Audio Receiver) is connected to the HDMI input, you can select another REGZALINK device that is connected to the master HDMI device using the TV's ... menu will send a message to turn on automatically. This item will be used to the TV. Top Menu Accesses the top menu of the Audio Receiver. • adjust the volume level. • turns off . Item TV Auto Input Switch TV Auto Power Device Auto Standby Speaker Preference ...


