
User Manual
Page 2
... mounted to persons. Flat panel displays can easily be pushed, pulled over and cause injury. NO USER-SERVICEABLE PARTS INSIDE. See "Removing the Pedestal Stand" ( page 6). This manual will help you decide to wall mount your flat panel display, always: • Use a mount that has been recommended by the display manufacturer and/or listed by an independent laboratory (such as a chest of electric shock to walls with the installation instructions. For additional antenna...
... mounted to persons. Flat panel displays can easily be pushed, pulled over and cause injury. NO USER-SERVICEABLE PARTS INSIDE. See "Removing the Pedestal Stand" ( page 6). This manual will help you decide to wall mount your flat panel display, always: • Use a mount that has been recommended by the display manufacturer and/or listed by an independent laboratory (such as a chest of electric shock to walls with the installation instructions. For additional antenna...
User Manual
Page 4
... (or any home theater component connected to this equipment from a 120 VAC, 60 Hz power source only. 32) Always make sure you use a sturdy strap from overheating and to drapes, curtains, or walls; Gently wipe the display panel surface (the TV screen) using the on the rear of the National Electric Code). A hard cloth may vary until the LCD warms up static charges (see...
... (or any home theater component connected to this equipment from a 120 VAC, 60 Hz power source only. 32) Always make sure you use a sturdy strap from overheating and to drapes, curtains, or walls; Gently wipe the display panel surface (the TV screen) using the on the rear of the National Electric Code). A hard cloth may vary until the LCD warms up static charges (see...
User Manual
Page 5
... the wall bracket. 6) After attaching the appropriate bracket(s) to the wall and the back of the TV, remove the pedestal stand from the rear of the TV. 3) Remove the screws of the VESA Mounting Pattern show in the next page. 4) Always use only replacement parts specified by ultraviolet radiation from the sun. Disposal may be used TV by the approved method for the television, avoid locations where the screen...
... the wall bracket. 6) After attaching the appropriate bracket(s) to the wall and the back of the TV, remove the pedestal stand from the rear of the TV. 3) Remove the screws of the VESA Mounting Pattern show in the next page. 4) Always use only replacement parts specified by ultraviolet radiation from the sun. Disposal may be used TV by the approved method for the television, avoid locations where the screen...
User Manual
Page 8
... back panel connections 12 Chapter 2: Connecting your TV 13 Overview of cable types 13 About the connection illustrations 13 Connecting a VCR and antenna, Cable TV or Camcorder........14 Connecting a DVD player with ColorStream® (component video), a VCR, and a satellite receiver...........15 Connecting an HDMI® or DVI device to the HDMI input........16 REGZA-LINK® connection 17 Connecting a digital audio system 18 Connecting a personal computer (PC 18 Chapter 3: Using the remote control 20 Installing the remote control batteries 20 Remote control...
... back panel connections 12 Chapter 2: Connecting your TV 13 Overview of cable types 13 About the connection illustrations 13 Connecting a VCR and antenna, Cable TV or Camcorder........14 Connecting a DVD player with ColorStream® (component video), a VCR, and a satellite receiver...........15 Connecting an HDMI® or DVI device to the HDMI input........16 REGZA-LINK® connection 17 Connecting a digital audio system 18 Connecting a personal computer (PC 18 Chapter 3: Using the remote control 20 Installing the remote control batteries 20 Remote control...
User Manual
Page 12
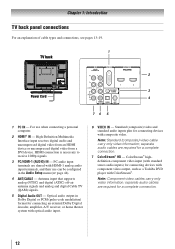
... of cable types and connections, see pages 13-19. 1 TV back 2 3 Power Cord 4 76 5 1無 PC IN - PC audio input terminals are shared with composite video. Optical audio output in the Audio Setup menu ( page 44). 4無 ANT/CABLE - ColorStream® highdefinition component video input (with standard stereo audio inputs) for connecting devices with component video output, such as a Toshiba DVD player with optical audio input. 6無 VIDEO IN - High-Definition Multimedia Interface input receives digital audio and uncompressed digital video from an HDMI device...
... of cable types and connections, see pages 13-19. 1 TV back 2 3 Power Cord 4 76 5 1無 PC IN - PC audio input terminals are shared with composite video. Optical audio output in the Audio Setup menu ( page 44). 4無 ANT/CABLE - ColorStream® highdefinition component video input (with standard stereo audio inputs) for connecting devices with component video output, such as a Toshiba DVD player with optical audio input. 6無 VIDEO IN - High-Definition Multimedia Interface input receives digital audio and uncompressed digital video from an HDMI device...
User Manual
Page 13
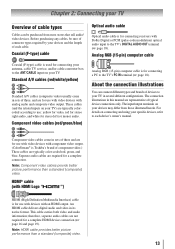
... connections only. The input/output terminals on your devices may differ from most stores that sell audio/ video devices. For details on your specific devices, refer to your TV in this manual are typically color-coded red, green, and blue. Component video cables come in sets of three, and are for stereo left (or mono) audio. Note: Component video cables provide better picture performance than a standard (composite) video. 13 An HDMI cable delivers digital audio...
... connections only. The input/output terminals on your devices may differ from most stores that sell audio/ video devices. For details on your specific devices, refer to your TV in this manual are typically color-coded red, green, and blue. Component video cables come in sets of three, and are for stereo left (or mono) audio. Note: Component video cables provide better picture performance than a standard (composite) video. 13 An HDMI cable delivers digital audio...

User Manual
Page 18
... are not compatible with Dolby Digital bitstream signals. TV back panel PC audio cable Computer PC audio output 4無 In the Optical Output Format field, select either the PC IN or HDMI connection, you can accept and display VGA, SVGA, XGA and WXGA signal formats. Chapter 2: Connecting your TV Connecting a digital audio system The TV's DIGITAL AUDIO OUT terminal outputs a *Dolby® Digital or 2-channel down-mixed PCM (pulse-code modulation) signal for use a PC, set the monitor output resolution on the...
... are not compatible with Dolby Digital bitstream signals. TV back panel PC audio cable Computer PC audio output 4無 In the Optical Output Format field, select either the PC IN or HDMI connection, you can accept and display VGA, SVGA, XGA and WXGA signal formats. Chapter 2: Connecting your TV Connecting a digital audio system The TV's DIGITAL AUDIO OUT terminal outputs a *Dolby® Digital or 2-channel down-mixed PCM (pulse-code modulation) signal for use a PC, set the monitor output resolution on the...
User Manual
Page 22
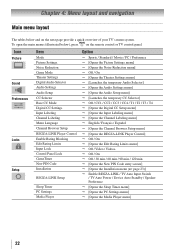
Icon Picture Sound Preferences Locks Setup Item Mode Picture Settings Noise Reduction Game Mode Theater Settings Digital Audio Selector Audio Settings Audio Setup CC Selector Base CC Mode Digital CC Settings Input Labeling Channel Labeling Menu Language Channel Browser Setup REGZA-LINK Player Control Enable Rating Blocking Edit Rating Limits Input Lock Control Panel Lock GameTimer New PIN Code Installation REGZA-LINK Setup Sleep Timer PC Settings Media Player Option Sports / Standard / Movie / PC / Preference [Opens the Picture Settings menu] [Opens the Noise ...
Icon Picture Sound Preferences Locks Setup Item Mode Picture Settings Noise Reduction Game Mode Theater Settings Digital Audio Selector Audio Settings Audio Setup CC Selector Base CC Mode Digital CC Settings Input Labeling Channel Labeling Menu Language Channel Browser Setup REGZA-LINK Player Control Enable Rating Blocking Edit Rating Limits Input Lock Control Panel Lock GameTimer New PIN Code Installation REGZA-LINK Setup Sleep Timer PC Settings Media Player Option Sports / Standard / Movie / PC / Preference [Opens the Picture Settings menu] [Opens the Noise ...
User Manual
Page 24
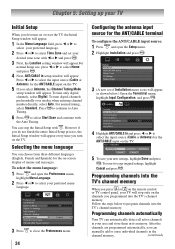
... below to close the Preferences menu. 24 Configuring the antenna input source for the ANT/CABLE input on the TV. 5無 If you turn on the remote control or TV control panel, your preferred menu language. 3無 Press to program channels into the TV's channel memory. To revert to select Start Scan and continue with the Auto Tuning. To tune digital channels preferentially over analog when entering channel number directly, select Auto. For normal...
... below to close the Preferences menu. 24 Configuring the antenna input source for the ANT/CABLE input on the TV. 5無 If you turn on the remote control or TV control panel, your preferred menu language. 3無 Press to program channels into the TV's channel memory. To revert to select Start Scan and continue with the Auto Tuning. To tune digital channels preferentially over analog when entering channel number directly, select Auto. For normal...

User Manual
Page 25
... . Chapter 5: Setting up the Start Scan, and press again to begin channel programming. When channel programming is not found , the number will be added to the list and the box will erase channels that were previously programmed into the TV's memory. •• To tune the TV to bring up your Cable TV service lineup changes significantly. To program channels automatically: 1無 Configure the antenna input source, if you...
... . Chapter 5: Setting up the Start Scan, and press again to begin channel programming. When channel programming is not found , the number will be added to the list and the box will erase channels that were previously programmed into the TV's memory. •• To tune the TV to bring up your Cable TV service lineup changes significantly. To program channels automatically: 1無 Configure the antenna input source, if you...
User Manual
Page 27
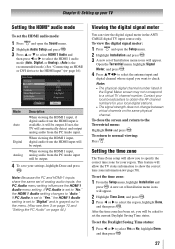
... the HDMI 1 audio mode (Auto, Digital, or Analog). (Auto is set of Installation menu icons will be output. Setting the time zone The Time Zone setup will be output. This feature will be asked to set , you want to specify the correct time zone for your local digital stations. • The signal strength does not change between virtual channels on page 44.) Viewing the digital signal meter You can view the digital signal meter in the Signal Meter screen may...
... the HDMI 1 audio mode (Auto, Digital, or Analog). (Auto is set of Installation menu icons will be output. Setting the time zone The Time Zone setup will be output. This feature will be asked to set , you want to specify the correct time zone for your local digital stations. • The signal strength does not change between virtual channels on page 44.) Viewing the digital signal meter You can view the digital signal meter in the Signal Meter screen may...
User Manual
Page 38
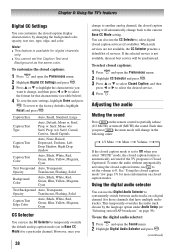
... 38 change to another analog channel, the closed caption setting will be used instead. Chapter 6: Using the TV's features Digital CC Settings You can customize the closed caption display characteristics by the language option under Audio Setup ( "Selecting stereo/SAP broadcasts" on the remote control to select digital closed caption services (if available). To select closed captions: 1無 Press and open the Sound menu. 2無 Highlight Digital Audio Selector and press . (continued) Caption Size Auto, Small, Standard, Large Caption Text Type Auto, Default...
... 38 change to another analog channel, the closed caption setting will be used instead. Chapter 6: Using the TV's features Digital CC Settings You can customize the closed caption display characteristics by the language option under Audio Setup ( "Selecting stereo/SAP broadcasts" on the remote control to select digital closed caption services (if available). To select closed captions: 1無 Press and open the Sound menu. 2無 Highlight Digital Audio Selector and press . (continued) Caption Size Auto, Small, Standard, Large Caption Text Type Auto, Default...
User Manual
Page 40
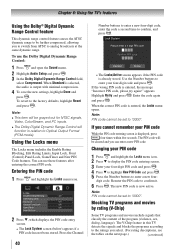
... stored. Note: PIN code cannot be set to "0000". The V-Chip feature in relation to Optical Output Format (PCM mode). Using the Locks menu The Locks menu includes the Enable Rating Blocking, Edit Rating Limits, Input Lock, Front (Control) Panel Lock, GameTimer and New PIN Code features. Press the Channel 40 Number buttons to enter a new four-digit code, enter the code a second time to confirm, and press . • The Locks/Active screen appears if the...
... stored. Note: PIN code cannot be set to "0000". The V-Chip feature in relation to Optical Output Format (PCM mode). Using the Locks menu The Locks menu includes the Enable Rating Blocking, Edit Rating Limits, Input Lock, Front (Control) Panel Lock, GameTimer and New PIN Code features. Press the Channel 40 Number buttons to enter a new four-digit code, enter the code a second time to confirm, and press . • The Locks/Active screen appears if the...
User Manual
Page 44
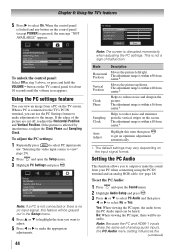
... connecting using the PC IN terminal and an analog RGB cable. ( page 18) To set of the picture are cut off, readjust the Horizontal Position and Vertical Position. Yes: When viewing the PC input, the audio from a PC on the input signal format. When the control panel is locked and any button on the TV control panel for about 10 seconds until the volume icon appears. button on the control panel...
... connecting using the PC IN terminal and an analog RGB cable. ( page 18) To set of the picture are cut off, readjust the Horizontal Position and Vertical Position. Yes: When viewing the PC input, the audio from a PC on the input signal format. When the control panel is locked and any button on the TV control panel for about 10 seconds until the volume icon appears. button on the control panel...
User Manual
Page 50
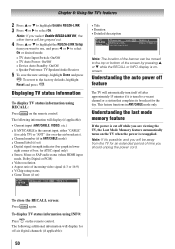
...-LINK. 3無 Press t or u to the factory defaults, highlight Reset and press . To close the RECALL screen: Press again. The following information will be moved to select On or desired mode. • TV Auto Input Switch: On/Off • TV Auto Power: On/Off • Device Auto Standby: On/Off • Speaker Preference: TV Speakers/Audio Receiver 5無 To save the new settings, highlight Done and press . Understanding the...
...-LINK. 3無 Press t or u to the factory defaults, highlight Reset and press . To close the RECALL screen: Press again. The following information will be moved to select On or desired mode. • TV Auto Input Switch: On/Off • TV Auto Power: On/Off • Device Auto Standby: On/Off • Speaker Preference: TV Speakers/Audio Receiver 5無 To save the new settings, highlight Done and press . Understanding the...

User Manual
Page 53
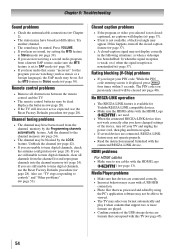
... VIDEO, ColorStream® HDMI 1, HDMI 2, PC or from channels 3 or 4, make sure the Input Lock is plugged in, and then press . •• The remote control batteries may notice that particular input source. Cannot view external signals or channel 3 or 4 •• If you cannot view signals from external devices connected to one or more of the following suggestions, which will change to an external A/V device (e.g., DVD player, video game system, set to an A/V receiver that contain a digital display...
... VIDEO, ColorStream® HDMI 1, HDMI 2, PC or from channels 3 or 4, make sure the Input Lock is plugged in, and then press . •• The remote control batteries may notice that particular input source. Cannot view external signals or channel 3 or 4 •• If you cannot view signals from external devices connected to one or more of the following suggestions, which will change to an external A/V device (e.g., DVD player, video game system, set to an A/V receiver that contain a digital display...
User Manual
Page 54
...). •• The channel may be muted. Remote control problems •• Remove all channels from a known SAP source, make sure the MTS feature is not available, a black rectangle may appear. Closed caption problems •• If the program or video you forget your TV and unplug the power cord, then plug and turn off the closed caption feature ( page 37). •• A closed-caption signal may not display correctly in the...
...). •• The channel may be muted. Remote control problems •• Remove all channels from a known SAP source, make sure the MTS feature is not available, a black rectangle may appear. Closed caption problems •• If the program or video you forget your TV and unplug the power cord, then plug and turn off the closed caption feature ( page 37). •• A closed-caption signal may not display correctly in the...
User Manual
Page 57
...'s specification listed in the Owner's manual as well as new. (1) A purchase receipt or other proof of purchase including the serial number for in warranty service. Complete and mail the enclosed product registration card or register your LCD Television online at 1-800-631-3811. Labor service charges for set installation, setup, adjustment of customer controls, and installation or repair of antenna, satellite or cable systems are not covered by TACP; Reception problems caused...
...'s specification listed in the Owner's manual as well as new. (1) A purchase receipt or other proof of purchase including the serial number for in warranty service. Complete and mail the enclosed product registration card or register your LCD Television online at 1-800-631-3811. Labor service charges for set installation, setup, adjustment of customer controls, and installation or repair of antenna, satellite or cable systems are not covered by TACP; Reception problems caused...
User Manual
Page 58
... law of God, alteration, power failures, power surges or power shortages, lightning, other electrical faults, or repairs, modifications or replacements by persons other installation methods that is mounted in the unlikely event of non-Toshiba modifications to : a. f. Limited Canadian Warranty for Toshiba Brand Flat Panel Televisions Toshiba of original retail purchase. Service on Parts and Labour TCL warrants the Television and its parts against material defects in materials...
... law of God, alteration, power failures, power surges or power shortages, lightning, other electrical faults, or repairs, modifications or replacements by persons other installation methods that is mounted in the unlikely event of non-Toshiba modifications to : a. f. Limited Canadian Warranty for Toshiba Brand Flat Panel Televisions Toshiba of original retail purchase. Service on Parts and Labour TCL warrants the Television and its parts against material defects in materials...

Brochure
Page 2
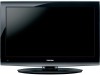
... DynaLight™ for deep black levels, and Gaming Mode to reduce the controller to wall mount your Toshiba television, always use a UL Listed wall bracket appropriate for a more realistic gaming experience. CABINET Design Screen Size (measured diagonally) HorizonTM Design 31.5" PANEL Resolution DynaLightTM Dynamic Backlight Control CineSpeedTM LCD Panel 720p 3 3 VIDEO CHASSIS Cinema Mode 24fp Capability1 TheaterWide® Picture Sizes Gaming Mode Picture Preference Modes Static Gamma Digital Noise Reduction Channel/Input Lock Color Temperature Control 3:2 Pull-Down Natural...
... DynaLight™ for deep black levels, and Gaming Mode to reduce the controller to wall mount your Toshiba television, always use a UL Listed wall bracket appropriate for a more realistic gaming experience. CABINET Design Screen Size (measured diagonally) HorizonTM Design 31.5" PANEL Resolution DynaLightTM Dynamic Backlight Control CineSpeedTM LCD Panel 720p 3 3 VIDEO CHASSIS Cinema Mode 24fp Capability1 TheaterWide® Picture Sizes Gaming Mode Picture Preference Modes Static Gamma Digital Noise Reduction Channel/Input Lock Color Temperature Control 3:2 Pull-Down Natural...


