
Owner's Manual - English
Page 3
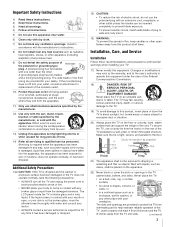
... 4" min. Installation, Care, and Service Installation Follow these instructions. 3) Heed all warnings. 4) Follow all servicing to inspect the TV any way, such as power-supply cord or plug is used, use attachments/accessories specified by the manufacturer. 12) Use only with the cart, stand, tripod,... exit from overheating and to help maintain reliable operation of plug to avoid injury from the TV slot side). (continued) 3 The LCD panel inside the TV contains glass and a toxic liquid. The TV may void: a) the warranty, and b) the user's authority to dripping or splashing and...
... 4" min. Installation, Care, and Service Installation Follow these instructions. 3) Heed all warnings. 4) Follow all servicing to inspect the TV any way, such as power-supply cord or plug is used, use attachments/accessories specified by the manufacturer. 12) Use only with the cart, stand, tripod,... exit from overheating and to help maintain reliable operation of plug to avoid injury from the TV slot side). (continued) 3 The LCD panel inside the TV contains glass and a toxic liquid. The TV may void: a) the warranty, and b) the user's authority to dripping or splashing and...
Owner's Manual - English
Page 4
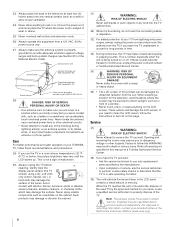
...) Always unplug the TV before cleaning. These actions will damage the LCD screen. Opening and removing the covers may expose you to make sure you are never in a position where your TOSHIBA TV, follow these sounds become frequent or continuous, unplug the power cord and contact a Toshiba Authorized Service Center. 35..., press, or place anything to rest on or roll over the power cord, and never place the TV where the power cord is subject to wear or abuse. 25) Never overload wall outlets and extension cords. 26) Always operate this page. Care For better performance and safer operation ...
...) Always unplug the TV before cleaning. These actions will damage the LCD screen. Opening and removing the covers may expose you to make sure you are never in a position where your TOSHIBA TV, follow these sounds become frequent or continuous, unplug the power cord and contact a Toshiba Authorized Service Center. 35..., press, or place anything to rest on or roll over the power cord, and never place the TV where the power cord is subject to wear or abuse. 25) Never overload wall outlets and extension cords. 26) Always operate this page. Care For better performance and safer operation ...

Owner's Manual - English
Page 6
...commercially available cleaners or antistatic spray for vinyl LPs). If region numbers, which stand for their case may damage the discs. Connect the power cord of the TV to discs. Video CD/Audio CD Video CD/Audio CD Track 1 Track 2 Track 3 Track 4 Track 5 DO Playback side ... 1 Title 2 Chapter 1 Chapter 2 Chapter 1 Chapter 2 Chapter 3 On handling discs • Do not touch the playback side of the TV is prohibited. Each title, chapter or track is protected by Macrovision. For example, handle the disc as shown below. This product incorporates copyright protection...
...commercially available cleaners or antistatic spray for vinyl LPs). If region numbers, which stand for their case may damage the discs. Connect the power cord of the TV to discs. Video CD/Audio CD Video CD/Audio CD Track 1 Track 2 Track 3 Track 4 Track 5 DO Playback side ... 1 Title 2 Chapter 1 Chapter 2 Chapter 1 Chapter 2 Chapter 3 On handling discs • Do not touch the playback side of the TV is prohibited. Each title, chapter or track is protected by Macrovision. For example, handle the disc as shown below. This product incorporates copyright protection...

Owner's Manual - English
Page 8
... disc. Refer to correct the interference by removing and applying power to the equipment, the user is encouraged to try to the instructions provided with your LCD TV/DVD combination The following measures: • Reorient or relocate ...the receiving antenna. • Increase the separation between the equipment and the receiver. • Connect the equipment into an outlet on -screen target may appear on -screen during playback. FCC Declaration of Conformity Compliance Statement (Part 15): The Toshiba 26LV67...
... disc. Refer to correct the interference by removing and applying power to the equipment, the user is encouraged to try to the instructions provided with your LCD TV/DVD combination The following measures: • Reorient or relocate ...the receiving antenna. • Increase the separation between the equipment and the receiver. • Connect the equipment into an outlet on -screen target may appear on -screen during playback. FCC Declaration of Conformity Compliance Statement (Part 15): The Toshiba 26LV67...

Owner's Manual - English
Page 9
...TV/DVD Combination Models 5 Chapter 1: Introduction 11 Welcome to Toshiba 11 Features of your new TV 11 Overview of steps for installing, setting up, and using your new TV 12 TV front and side panel controls and connections 13 TV... to control your other devices . . . . 25 Remote Control functional key chart 26 Programming the remote control to control your other devices 27 Remote control codes 28 Chapter...timer 55 Displaying TV status information 56 Understanding the auto power off feature 56 Understanding the last mode memory feature 56 Chapter 7: Using the TV's advanced features 57...
...TV/DVD Combination Models 5 Chapter 1: Introduction 11 Welcome to Toshiba 11 Features of your new TV 11 Overview of steps for installing, setting up, and using your new TV 12 TV front and side panel controls and connections 13 TV... to control your other devices . . . . 25 Remote Control functional key chart 26 Programming the remote control to control your other devices 27 Remote control codes 28 Chapter...timer 55 Displaying TV status information 56 Understanding the auto power off feature 56 Understanding the last mode memory feature 56 Chapter 7: Using the TV's advanced features 57...
Owner's Manual - English
Page 12
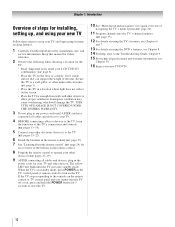
...remote control to operate your TV and begin using the TV's features, see Chapter 10. 16 Enjoy your new TV/DVD! 12 page 3). • Place the TV in any power cords until the TV goes into the TV's channel memory (- THIS TYPE OF DAMAGE IS NOT COVERED UNDER THE TOSHIBA WARRANTY. 3 Do not ... 7. 13 For details on the screen. • Place the TV far enough from walls and other objects to allow proper ventilation. pages 25-29). 9 AFTER connecting all cables and devices to your LCD TV/DVD combination" (- Secure the TV to a wall, pillar, or other devices. Chapter 1: Introduction ...
...remote control to operate your TV and begin using the TV's features, see Chapter 10. 16 Enjoy your new TV/DVD! 12 page 3). • Place the TV in any power cords until the TV goes into the TV's channel memory (- THIS TYPE OF DAMAGE IS NOT COVERED UNDER THE TOSHIBA WARRANTY. 3 Do not ... 7. 13 For details on the screen. • Place the TV far enough from walls and other objects to allow proper ventilation. pages 25-29). 9 AFTER connecting all cables and devices to your LCD TV/DVD combination" (- Secure the TV to a wall, pillar, or other devices. Chapter 1: Introduction ...

Owner's Manual - English
Page 13
... page 71 for 5 or more seconds to stop a DVD video disc, or other playable disc. 12 STOP - When a menu is on and off the TV, press and hold the POWER button on -screen menu. 8 CHANNEL Bb - Press to eject a disc. 15 DVD disc slot - Press to reset the...-In DVD, VIDEO 1, VIDEO 2, ColorStream HD1, ColorStream HD2, HDMI 1, HDMI 2, HDMI 3, PC). 11 PLAY - When a menu is on the TV's control panel functions as "VIDEO 2" and include standard A/V connections. 4 POWER - When no menu is on-screen, the MENU button on -screen, these buttons function as up/down/left/right menu navigation...
... page 71 for 5 or more seconds to stop a DVD video disc, or other playable disc. 12 STOP - When a menu is on and off the TV, press and hold the POWER button on -screen menu. 8 CHANNEL Bb - Press to eject a disc. 15 DVD disc slot - Press to reset the...-In DVD, VIDEO 1, VIDEO 2, ColorStream HD1, ColorStream HD2, HDMI 1, HDMI 2, HDMI 3, PC). 11 PLAY - When a menu is on the TV's control panel functions as "VIDEO 2" and include standard A/V connections. 4 POWER - When no menu is on-screen, the MENU button on -screen, these buttons function as up/down/left/right menu navigation...

Owner's Manual - English
Page 14
separate audio cables are required for a complete connection. 3 Fixed Audio OUT - Also see pages 15-22. 1 2 TV back 34 Power cord Cable Clamper 5 1 ColorStream® HD-1 and ColorStream® HD-2 - Note: Standard (composite) video and S-video cables carry only... that supports analog (NTSC) and digital (ATSC) off-air antenna signals and analog and digital Cable TV (QAM) signals. 67 8 9 7 Digital Audio OUT - Used for connecting devices with component video output, such as a Toshiba DVD player with standard stereo audio inputs) for updating the television's firmware.
separate audio cables are required for a complete connection. 3 Fixed Audio OUT - Also see pages 15-22. 1 2 TV back 34 Power cord Cable Clamper 5 1 ColorStream® HD-1 and ColorStream® HD-2 - Note: Standard (composite) video and S-video cables carry only... that supports analog (NTSC) and digital (ATSC) off-air antenna signals and analog and digital Cable TV (QAM) signals. 67 8 9 7 Digital Audio OUT - Used for connecting devices with component video output, such as a Toshiba DVD player with standard stereo audio inputs) for updating the television's firmware.

Owner's Manual - English
Page 24
...Learning about the remote control The buttons used for a function that is not available. 1 POWER turns the TV on and off the sound (- page 26). Note: The error message "Not Available" may appear if you press a key for operating the TV only are used: TOP MENU, DVD RTN, SET UP, DVD CLEAR, PAUSE, PLAY..., STOP, SKIP, REW, FF, SEARCH, SLOW, ANGLE, SUB TITLE, AUDIO, and EJECT (- You can also control the built-in TV mode. ...
...Learning about the remote control The buttons used for a function that is not available. 1 POWER turns the TV on and off the sound (- page 26). Note: The error message "Not Available" may appear if you press a key for operating the TV only are used: TOP MENU, DVD RTN, SET UP, DVD CLEAR, PAUSE, PLAY..., STOP, SKIP, REW, FF, SEARCH, SLOW, ANGLE, SUB TITLE, AUDIO, and EJECT (- You can also control the built-in TV mode. ...

Owner's Manual - English
Page 25
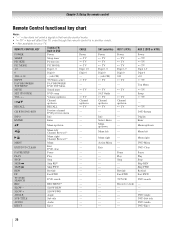
...GUIDE Displays the channel guide in the AUX mode. 7 INFO Displays TV status information on-screen. 8 BbC c Press to navigate DVD menus (may not operate certain features on any other devices If you have a non-Toshiba device or a Toshiba device that the remote control is programmed, it may not work on...; "AUX 1" to control a cable converter box or satellite receiver; Point the remote control directly at the device. 16 17 18 19 1 POWER Turns the selected device on some DVD players). 9 ENTER Required by some satellite receivers and DVD players to activate certain functions. 10 DVD CLEAR ...
...GUIDE Displays the channel guide in the AUX mode. 7 INFO Displays TV status information on-screen. 8 BbC c Press to navigate DVD menus (may not operate certain features on any other devices If you have a non-Toshiba device or a Toshiba device that the remote control is programmed, it may not work on...; "AUX 1" to control a cable converter box or satellite receiver; Point the remote control directly at the device. 16 17 18 19 1 POWER Turns the selected device on some DVD players). 9 ENTER Required by some satellite receivers and DVD players to activate certain functions. 10 DVD CLEAR ...
Owner's Manual - English
Page 26
... DVD Eject 26 PLAY Play --- --- Pause Play Stop ----Rewind Fast FWD TV/VCR Record (2 click AUX 2 (DVD or HTIB) Power s TV s TV s TV Digit 1-9 Digit 0 +10 s TV Top Menu s TV Setup s TV --s TV DVD Return ...Power s TV s TV s TV Digit 1-9 Digit 0 100 s TV --- Info Enter --- Select, Enter Menu up /down s TV --- s TV --s TV Channel up /down RECALL --- s TV --s TV Channel up /down C 3 Menu left c # Menu right/ Channel Browser™ --- SLOW + SLOW FWD --- --- REMOTE CONTROL KEY Toshiba TV/ Built-in another mode. • * Not available for your TV...
... DVD Eject 26 PLAY Play --- --- Pause Play Stop ----Rewind Fast FWD TV/VCR Record (2 click AUX 2 (DVD or HTIB) Power s TV s TV s TV Digit 1-9 Digit 0 +10 s TV Top Menu s TV Setup s TV --s TV DVD Return ...Power s TV s TV s TV Digit 1-9 Digit 0 100 s TV --- Info Enter --- Select, Enter Menu up /down s TV --- s TV --s TV Channel up /down RECALL --- s TV --s TV Channel up /down C 3 Menu left c # Menu right/ Channel Browser™ --- SLOW + SLOW FWD --- --- REMOTE CONTROL KEY Toshiba TV/ Built-in another mode. • * Not available for your TV...

Owner's Manual - English
Page 27
... reprogram the remote control. • Some newer VCRs respond to either of device you used: DEVICE CODE DEVICE CODE Note: • In addition to POWER, confirm that all necessary keys on using another code, you will need to use the remote control that came with the device. 5 Remember to set... more than one that it , and press p. See notes below . To program your TV remote control to the codes for your VCR has this kind of switch and does not respond to operate a non-Toshiba device (or a Toshiba device that works. 2 Set the MODE SELECT switch to operate the device, see page...
... reprogram the remote control. • Some newer VCRs respond to either of device you used: DEVICE CODE DEVICE CODE Note: • In addition to POWER, confirm that all necessary keys on using another code, you will need to use the remote control that came with the device. 5 Remember to set... more than one that it , and press p. See notes below . To program your TV remote control to the codes for your VCR has this kind of switch and does not respond to operate a non-Toshiba device (or a Toshiba device that works. 2 Set the MODE SELECT switch to operate the device, see page...

Owner's Manual - English
Page 37
...4 Press C c to scroll through the menu bar to their factory default values: 1 Press Y and open the Setup menu. 2 Highlight Installation and press T. After the TV turns off, unplug the TV power cord and then plug it back in again to their factory default values. System Information Press YES to reset the... TV settings.Type in your PIN now (or "0000" if no PIN code has been set). 6 Highlight Yes and press T. After the TV turns off automatically after ...
...4 Press C c to scroll through the menu bar to their factory default values: 1 Press Y and open the Setup menu. 2 Highlight Installation and press T. After the TV turns off, unplug the TV power cord and then plug it back in again to their factory default values. System Information Press YES to reset the... TV settings.Type in your PIN now (or "0000" if no PIN code has been set). 6 Highlight Yes and press T. After the TV turns off automatically after ...
Owner's Manual - English
Page 39
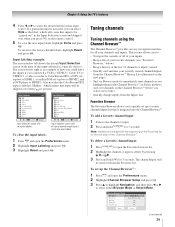
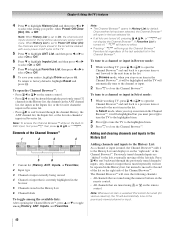
...Channel Browser Setup and press T. 3 Press B to highlight Navigation, and then press C or c to select either Browse Mode or Select Mode. Chapter 6: Using the TV's features 4 Press C or c to select the desired label for 3 seconds. To delete a favorite channel/input: 1 Press n to open the Preferences menu. ... Labeling and press T. 3 Highlight Reset and press T. Channel Browser Setup Navigation History List ANT List Inputs List Favorites List Reset Select Mode Power Off Clear (On) On On On Done (continued) 39 If a particular input is not used, you can select Hide as you highlight...
...Channel Browser Setup and press T. 3 Press B to highlight Navigation, and then press C or c to select either Browse Mode or Select Mode. Chapter 6: Using the TV's features 4 Press C or c to select the desired label for 3 seconds. To delete a favorite channel/input: 1 Press n to open the Preferences menu. ... Labeling and press T. 3 Highlight Reset and press T. Channel Browser Setup Navigation History List ANT List Inputs List Favorites List Reset Select Mode Power Off Clear (On) On On On Done (continued) 39 If a particular input is not used, you can select Hide as you highlight...
Owner's Manual - English
Page 40
...Browser™ while on the remote control. Note: • The Channel Browser™ opens in the list will be highlighted and the TV will be saved every power on/off cycle. Previously tuned channels/inputs are "shifted" to the left side. The Channel Browser™ will bring up the Channel...surf forward to toggle among History, ANT, Inputs, and Favorites. In Select mode, when you prefer: either Power Off Clear (On), On, or Off. To tune to a channel or input in Browse mode: 1 While watching TV, press 3 C or # c to open the Channel Browser™ and surf back to a previous ...
...Browser™ while on the remote control. Note: • The Channel Browser™ opens in the list will be highlighted and the TV will be saved every power on/off cycle. Previously tuned channels/inputs are "shifted" to the left side. The Channel Browser™ will bring up the Channel...surf forward to toggle among History, ANT, Inputs, and Favorites. In Select mode, when you prefer: either Power Off Clear (On), On, or Off. To tune to a channel or input in Browse mode: 1 While watching TV, press 3 C or # c to open the Channel Browser™ and surf back to a previous ...

Owner's Manual - English
Page 41
... page 33) or the channel add/ delete function (- Switching between the last two channels that channel quickly from a non-antenna input, the TV will return to switch between the last two channels that are stored in the Channel Browser Setup is not programmed-either through the automatic channel...• Reconfiguring the ANT input will clear the History List. Once you press R and then change channels repeatedly, and when you want to "Power Off Clear (On)," turning off the TV will clear the History List. Tuning to the next programmed channel To tune to that were tuned. The...
... page 33) or the channel add/ delete function (- Switching between the last two channels that channel quickly from a non-antenna input, the TV will return to switch between the last two channels that are stored in the Channel Browser Setup is not programmed-either through the automatic channel...• Reconfiguring the ANT input will clear the History List. Once you press R and then change channels repeatedly, and when you want to "Power Off Clear (On)," turning off the TV will clear the History List. Tuning to the next programmed channel To tune to that were tuned. The...

Owner's Manual - English
Page 54
...Installation Sleep Timer PC Settings Note: If a PC is not connected or there is On, none of the controls on the control panel (except POWER) is disrupted momentarily when adjusting the PC settings. If the edges of malfunction. • Horizontal Position: Moves the picture left/right. Locks ...make the appropriate adjustments. When the control panel lock is no pc input signal, this feature will operate except POWER. If the picture is within ±5 from a PC on the TV control panel for example). To adjust the PC settings: 1 Repeatedly press + to reduce noise and sharpen the ...
...Installation Sleep Timer PC Settings Note: If a PC is not connected or there is On, none of the controls on the control panel (except POWER) is disrupted momentarily when adjusting the PC settings. If the edges of malfunction. • Horizontal Position: Moves the picture left/right. Locks ...make the appropriate adjustments. When the control panel lock is no pc input signal, this feature will operate except POWER. If the picture is within ±5 from a PC on the TV control panel for example). To adjust the PC settings: 1 Repeatedly press + to reduce noise and sharpen the ...

Owner's Manual - English
Page 55
... sleep timer to enter the length of 180 minutes. If PC Audio is set of 180 minutes). Sleep Timer Enter total minutes until the TV turns off the TV after a set the PC Audio: 1 Press Y and open the Setup menu. 2 Highlight Sleep Timer and press T. Yes: Outputs the ...) To set length of time (maximum of analog audio inputs, the PC Audio menu setting influences the HDMI 1 Audio menu setting. Note: When a power failure occurs, the sleep timer setting may be cleared. Setup Installation Sleep Timer PC Settings 3 Press the Number buttons to turn off automatically (Maximum 180...
... sleep timer to enter the length of 180 minutes. If PC Audio is set of 180 minutes). Sleep Timer Enter total minutes until the TV turns off the TV after a set the PC Audio: 1 Press Y and open the Setup menu. 2 Highlight Sleep Timer and press T. Yes: Outputs the ...) To set length of time (maximum of analog audio inputs, the PC Audio menu setting influences the HDMI 1 Audio menu setting. Note: When a power failure occurs, the sleep timer setting may be cleared. Setup Installation Sleep Timer PC Settings 3 Press the Number buttons to turn off automatically (Maximum 180...

Owner's Manual - English
Page 56
... screen: Press E again. The following information will automatically turn itself off while you will be stored to memory.) 56 Note: You should unplug the TV's power cord if it is tuned to the top or bottom of time after approximately 15 minutes if it is possible that you are viewing the... TV, the Last Mode Memory feature automatically turns on the TV when the power is on-screen. (The last position will be moved to a vacant channel or a station that completes its broadcast...
... screen: Press E again. The following information will automatically turn itself off while you will be stored to memory.) 56 Note: You should unplug the TV's power cord if it is tuned to the top or bottom of time after approximately 15 minutes if it is possible that you are viewing the... TV, the Last Mode Memory feature automatically turns on the TV when the power is on-screen. (The last position will be moved to a vacant channel or a station that completes its broadcast...

Owner's Manual - English
Page 61
...difficulty playing a DVD and/or CD disc on the DVD player contained in this television, please contact Toshiba Customer Service. Press S to resume the playback from the Parental Lock screen, please eject the disc and... (If the disc has a label.) Hold the disc without touching either of DVD and CD discs, Toshiba cannot assure that the DVD player contained in this television will clear the stopped location. YES STOP Note:... playback after loading a disc and you press D one time, the TV memorizes the location where playback is off, the TV will power on and playback will appear on the...
...difficulty playing a DVD and/or CD disc on the DVD player contained in this television, please contact Toshiba Customer Service. Press S to resume the playback from the Parental Lock screen, please eject the disc and... (If the disc has a label.) Hold the disc without touching either of DVD and CD discs, Toshiba cannot assure that the DVD player contained in this television will clear the stopped location. YES STOP Note:... playback after loading a disc and you press D one time, the TV memorizes the location where playback is off, the TV will power on and playback will appear on the...


