Printable Spec Sheet
Page 1
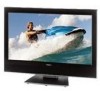
... StableSound® CONVENIENCE ATSC/NTSC/QAM Digital Television Tuner HDMI™ Digital Input PC Input (15 Pin, D-Sub) 4-Item Glow Universal Remote1 ADVANTAGE TOSHIBA Cinespeed ™ panel LCD sets provide the lightning fast (8 ms or less) ... N A RY S P E C I F I C AT I O N S S U B J E C T TO C H A N G E 26HL66 26" (measured diagonally) INTEGRATED REGZA Premium LCD TV KEY FEATURES VIDEO New Cinespeed™ Panel with improved fidelity and wider "sweet spot" for significantly more natural images. HDMI™ Digital Input provides uncompressed digital video and digital audio in the room...
... StableSound® CONVENIENCE ATSC/NTSC/QAM Digital Television Tuner HDMI™ Digital Input PC Input (15 Pin, D-Sub) 4-Item Glow Universal Remote1 ADVANTAGE TOSHIBA Cinespeed ™ panel LCD sets provide the lightning fast (8 ms or less) ... N A RY S P E C I F I C AT I O N S S U B J E C T TO C H A N G E 26HL66 26" (measured diagonally) INTEGRATED REGZA Premium LCD TV KEY FEATURES VIDEO New Cinespeed™ Panel with improved fidelity and wider "sweet spot" for significantly more natural images. HDMI™ Digital Input provides uncompressed digital video and digital audio in the room...
Printable Spec Sheet
Page 2
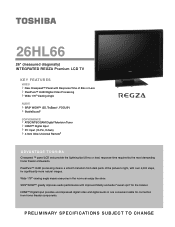
...26 x 21.08 x 10.8 27.56 29.08 x 24.51 x 14.11 022265240649 1In some cases, the remote control may not operate additional devices or certain features of such devices, in which case, it is a trademark of operation at night. 26HL66 TECHNOLOGY & BENEFITS VIDEO REGZA Premium LCD... specification subject to 14 bit internally) can create 4096 steps of Toshiba America Consumer Products, L.L.C.. Greatly improves audio performance with integrated bottom speakers. allows tuning of Dolby Laboratories. HDMI is suggested that are registered trademarks of gradation (steps between the whitest...
...26 x 21.08 x 10.8 27.56 29.08 x 24.51 x 14.11 022265240649 1In some cases, the remote control may not operate additional devices or certain features of such devices, in which case, it is a trademark of operation at night. 26HL66 TECHNOLOGY & BENEFITS VIDEO REGZA Premium LCD... specification subject to 14 bit internally) can create 4096 steps of Toshiba America Consumer Products, L.L.C.. Greatly improves audio performance with integrated bottom speakers. allows tuning of Dolby Laboratories. HDMI is suggested that are registered trademarks of gradation (steps between the whitest...
Operating Guide
Page 2
... an extremely high level of malfunction; FCC Declaration of Conformity Compliance Statement (Part 15): The Toshiba 26HL66, 32HL66, and 37HL66 Televisions comply with Part 15 of HDMI Licensing LLC. 2 Operation is not responsible for a long period of SRS Labs, Inc. ... Manufactured under your LCD TV The following symptoms are technical limitations of LCD Display technology and are not an indication of precision technology; Trademark Information • WOW, SRS and l symbol are trademarks or registered trademarks of the FCC rules. therefore, Toshiba is subject to these...
... an extremely high level of malfunction; FCC Declaration of Conformity Compliance Statement (Part 15): The Toshiba 26HL66, 32HL66, and 37HL66 Televisions comply with Part 15 of HDMI Licensing LLC. 2 Operation is not responsible for a long period of SRS Labs, Inc. ... Manufactured under your LCD TV The following symptoms are technical limitations of LCD Display technology and are not an indication of precision technology; Trademark Information • WOW, SRS and l symbol are trademarks or registered trademarks of the FCC rules. therefore, Toshiba is subject to these...
Operating Guide
Page 3
...LCD TV 2 Trademark Information 2 Chapter 1: Introduction 4 Welcome to Toshiba 4 Features of your new TV 4 Overview of steps for installing, setting up, and using your new TV 4 TV front and side panel controls and connections 5 TV...TV's channel memory . . . . 17 Programming channels automatically 17 Manually adding and deleting channels in the channel memory 17 Programming your favorite channels 18 Setting the HDMI... between two channels using SurfLock™. . . . 25 Selecting the picture size 26 Scrolling the TheaterWide® picture (TheaterWide 2 and 3 only 27 Using the auto...
...LCD TV 2 Trademark Information 2 Chapter 1: Introduction 4 Welcome to Toshiba 4 Features of your new TV 4 Overview of steps for installing, setting up, and using your new TV 4 TV front and side panel controls and connections 5 TV...TV's channel memory . . . . 17 Programming channels automatically 17 Manually adding and deleting channels in the channel memory 17 Programming your favorite channels 18 Setting the HDMI... between two channels using SurfLock™. . . . 25 Selecting the picture size 26 Scrolling the TheaterWide® picture (TheaterWide 2 and 3 only 27 Using the auto...
Operating Guide
Page 4
... (in most cases). • HDMI™ digital, high-definition multimedia interface (- Secure the TV to a wall, pillar, or other electronic device(s) to the TV (- Chapter 1: Introduction Welcome to Toshiba Thank you for purchasing this Toshiba TV, one of the most innovative LCD TVs on the screen. • Place the TV far enough from your new TV. 1) The Installation Guide explains...
... (in most cases). • HDMI™ digital, high-definition multimedia interface (- Secure the TV to a wall, pillar, or other electronic device(s) to the TV (- Chapter 1: Introduction Welcome to Toshiba Thank you for purchasing this Toshiba TV, one of the most innovative LCD TVs on the screen. • Place the TV far enough from your new TV. 1) The Installation Guide explains...
Operating Guide
Page 5
... Swivel angle (model 26HL66 only) TV top 1 Remote sensor - Press to instantly close an on -screen, these buttons function as up /down /left /right menu navigation buttons. 6 *MENU (ENTER) - page 17). The side panel A/V connections are viewing (ANT 1, VIDEO 1, VIDEO 2, ColorStream HD-1, ColorStream HD-2, HDMI, PC). 8 EXIT ...- When a menu is on and off the TV, press and hold the POWER button on page 46 for 5 or more seconds to change the channel (...
... Swivel angle (model 26HL66 only) TV top 1 Remote sensor - Press to instantly close an on -screen, these buttons function as up /down /left /right menu navigation buttons. 6 *MENU (ENTER) - page 17). The side panel A/V connections are viewing (ANT 1, VIDEO 1, VIDEO 2, ColorStream HD-1, ColorStream HD-2, HDMI, PC). 8 EXIT ...- When a menu is on and off the TV, press and hold the POWER button on page 46 for 5 or more seconds to change the channel (...

Operating Guide
Page 6
... analog (NTSC) and digital (ATSC) off-air antenna signals and analog and digital Cable TV (QAM) signals. 7 HDMI™ IN - HDMI, the HDMI logo and High-Definition Multimedia Interface are required for connecting devices with component video output, such as a Toshiba DVD player with composite video or S-video output. Note: Component video cables carry only...
... analog (NTSC) and digital (ATSC) off-air antenna signals and analog and digital Cable TV (QAM) signals. 7 HDMI™ IN - HDMI, the HDMI logo and High-Definition Multimedia Interface are required for connecting devices with component video output, such as a Toshiba DVD player with composite video or S-video output. Note: Component video cables carry only...
Operating Guide
Page 14
...Selector Option S [Launches the Channel Browser™] S [Launches the ATSC Digital CC Selector] (This option is not available if the TV is not tuned to a digital channel.) Video Audio Preferences Locks Setup Picture Settings Advanced Picture Settings Theater Settings Audio Settings Advanced Audio ...Browser Setup Enable Rating Blocking Edit Rating Limits Channels Block Input Lock Front Panel Lock New PIN Code Installation Sleep Timer PC Settings PC Audio HDMI Audio Power-On Mode S [Opens the Picture Settings menu] S [Opens the Advanced Picture Settings menu] S [Opens the Theater Settings ...
...Selector Option S [Launches the Channel Browser™] S [Launches the ATSC Digital CC Selector] (This option is not available if the TV is not tuned to a digital channel.) Video Audio Preferences Locks Setup Picture Settings Advanced Picture Settings Theater Settings Audio Settings Advanced Audio ...Browser Setup Enable Rating Blocking Edit Rating Limits Channels Block Input Lock Front Panel Lock New PIN Code Installation Sleep Timer PC Settings PC Audio HDMI Audio Power-On Mode S [Opens the Picture Settings menu] S [Opens the Advanced Picture Settings menu] S [Opens the Theater Settings ...

Operating Guide
Page 16
... Signal Meter Navigate ENTER Select CH RTN Back EXIT Exit 4 Press C or c to select your preferred menu language and press T. Chapter 4: Setting up your TV Selecting the menu language You can choose from three different languages (English, French and Spanish) for the ANT input on the... TV. Setup Installation Sleep Timer PC Settings PC Audio HDMI Audio Power-On Mode No Auto Power-Saving Navigate ENTER Select CH RTN Back EXIT Exit 3 (A new set of Installation menu ...
... Signal Meter Navigate ENTER Select CH RTN Back EXIT Exit 4 Press C or c to select your preferred menu language and press T. Chapter 4: Setting up your TV Selecting the menu language You can choose from three different languages (English, French and Spanish) for the ANT input on the... TV. Setup Installation Sleep Timer PC Settings PC Audio HDMI Audio Power-On Mode No Auto Power-Saving Navigate ENTER Select CH RTN Back EXIT Exit 3 (A new set of Installation menu ...
Operating Guide
Page 17
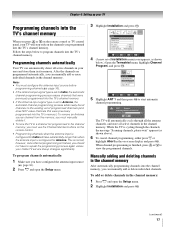
... automatically Your TV can automatically detect all active channels in the on-screen display and press T. This is finished, you should not have configured the antenna input source (- however, once channel programming is normal; Setup Installation Sleep Timer PC Settings PC Audio HDMI Audio Power-...process adds newly found channels to the existing set of programmed channels (and does NOT erase channels that were previously programmed into the TV's memory.) To remove an Antenna source channel from the memory, you must configure the antenna input source before programming channels (- ANT ...
... automatically Your TV can automatically detect all active channels in the on-screen display and press T. This is finished, you should not have configured the antenna input source (- however, once channel programming is normal; Setup Installation Sleep Timer PC Settings PC Audio HDMI Audio Power-...process adds newly found channels to the existing set of programmed channels (and does NOT erase channels that were previously programmed into the TV's memory.) To remove an Antenna source channel from the memory, you must configure the antenna input source before programming channels (- ANT ...

Operating Guide
Page 19
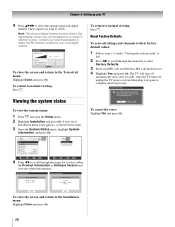
...step 3 below. 3 Open the Terrestrial menu, highlight Signal Meter, and press T. Setting the HDMI™ audio mode To set of Installation menu icons appears, as shown in the ANT 1 digital TV input source only. To tune your favorite antenna channels using the Favorite Channel list: 1 Press =... to display the Favorite Channel list. 2 Press the corresponding number button (1-9) to "Auto." Setup Installation Sleep Timer PC Settings PC Audio HDMI Audio Power-On Mode No...
...step 3 below. 3 Open the Terrestrial menu, highlight Signal Meter, and press T. Setting the HDMI™ audio mode To set of Installation menu icons appears, as shown in the ANT 1 digital TV input source only. To tune your favorite antenna channels using the Favorite Channel list: 1 Press =... to display the Favorite Channel list. 2 Press the corresponding number button (1-9) to "Auto." Setup Installation Sleep Timer PC Settings PC Audio HDMI Audio Power-On Mode No...
Operating Guide
Page 20
...Done and press T. No Yes To cancel the reset: Highlight No and press T. System Information System Information Product Information Brand: Toshiba Model: 32HL66 Software Version 2.2.26.0 Jan 24 2006 - 11:04:47 FW: 17 Done Done To close the screen and return to the Installation menu: ...Highlight Done and press T. 20 After the TV turns off automatically after a few seconds. Setup Installation Sleep Timer PC Settings PC Audio HDMI Audio Power...
...Done and press T. No Yes To cancel the reset: Highlight No and press T. System Information System Information Product Information Brand: Toshiba Model: 32HL66 Software Version 2.2.26.0 Jan 24 2006 - 11:04:47 FW: 17 Done Done To close the screen and return to the Installation menu: ...Highlight Done and press T. 20 After the TV turns off automatically after a few seconds. Setup Installation Sleep Timer PC Settings PC Audio HDMI Audio Power...

Operating Guide
Page 21
...and open the Setup menu. 2 Highlight Power-On Mode and press c. 3 Press B or b to below 3W. As a result, the TV will be lit. Setup Installation Sleep Timer PC Settings PC Audio No HDMI Audio Auto Power-On Mode Power-Saving Power-Saving Fast Navigate ENTER Select CH RTN Back EXIT Exit 21... Chapter 4: Setting up your TV Selecting the Power-On Mode You can select either Power-Saving or Fast mode. •...
...and open the Setup menu. 2 Highlight Power-On Mode and press c. 3 Press B or b to below 3W. As a result, the TV will be lit. Setup Installation Sleep Timer PC Settings PC Audio No HDMI Audio Auto Power-On Mode Power-Saving Power-Saving Fast Navigate ENTER Select CH RTN Back EXIT Exit 21... Chapter 4: Setting up your TV Selecting the Power-On Mode You can select either Power-Saving or Fast mode. •...

Operating Guide
Page 22
... Select CH RTN Back EXIT Exit Input Labeling Video 1 Video 2 ColorStream HD 1 ColorStream HD 2 HDMI PC DVD Cable Video Recorder Hide DTV -- Reset Done 4 Press C or c to the TV (- Note: • You can label the video input sources according to the specific devices you have...Guide). To revert to the factory default labels, highlight Reset and press T. Input Selection 0 ANT 1 1 Video 1 2 Video 2 3 ColorStream HD1 4 ColorStream HD2 5 HDMI 6 PC ANT 1 0 - 6 / INPUT to Select b) Repeatedly press Bb on the remote control (or CHANNEL Bb on the control panel) to change the input. or...
... Select CH RTN Back EXIT Exit Input Labeling Video 1 Video 2 ColorStream HD 1 ColorStream HD 2 HDMI PC DVD Cable Video Recorder Hide DTV -- Reset Done 4 Press C or c to the TV (- Note: • You can label the video input sources according to the specific devices you have...Guide). To revert to the factory default labels, highlight Reset and press T. Input Selection 0 ANT 1 1 Video 1 2 Video 2 3 ColorStream HD1 4 ColorStream HD2 5 HDMI 6 PC ANT 1 0 - 6 / INPUT to Select b) Repeatedly press Bb on the remote control (or CHANNEL Bb on the control panel) to change the input. or...

Operating Guide
Page 23
... been hidden. Input Selection 0 ANT 1 1 Video 1 2 Video 2 3 ColorStream HD1 4 ColorStream HD2 5 HDMI 6 PC ANT 1 0 - 6 / INPUT to Select Input Selection screen with none of all the available channels on the TV. Channel Browser Setup Navigation History List ANT1 List Inputs List Reset Select Mode Power Off Clear (On... the setting you highlight them in the Channel Browser™) or Select mode (to surf over when + is pressed. To return to HDMI. The screen below left shows the default Input Selection screen (with no inputs labeled. Also note that the ColorStream HD2 input is labeled...
... been hidden. Input Selection 0 ANT 1 1 Video 1 2 Video 2 3 ColorStream HD1 4 ColorStream HD2 5 HDMI 6 PC ANT 1 0 - 6 / INPUT to Select Input Selection screen with none of all the available channels on the TV. Channel Browser Setup Navigation History List ANT1 List Inputs List Reset Select Mode Power Off Clear (On... the setting you highlight them in the Channel Browser™) or Select mode (to surf over when + is pressed. To return to HDMI. The screen below left shows the default Input Selection screen (with no inputs labeled. Also note that the ColorStream HD2 input is labeled...

Operating Guide
Page 28
...A 1080i, 480i, 480p, or 720p signal from a DVD player connected to the VIDEO 1, VIDEO 2, ColorStream HD-1/ColorStream HD-2 (component video), or HDMI inputs on the TV, smoother motion can be obtained by setting the Cinema Mode to antenna or cable input sources. Theater Settings Picture Size Picture Scroll -- Theater Settings... Using the auto aspect ratio feature When the auto aspect ratio feature is set under "Selecting the picture size on page 26." To turn off the auto aspect ratio feature: Select Off in step 3 above . To revert to the factory defaults, highlight Reset ...
...A 1080i, 480i, 480p, or 720p signal from a DVD player connected to the VIDEO 1, VIDEO 2, ColorStream HD-1/ColorStream HD-2 (component video), or HDMI inputs on the TV, smoother motion can be obtained by setting the Cinema Mode to antenna or cable input sources. Theater Settings Picture Size Picture Scroll -- Theater Settings... Using the auto aspect ratio feature When the auto aspect ratio feature is set under "Selecting the picture size on page 26." To turn off the auto aspect ratio feature: Select Off in step 3 above . To revert to the factory defaults, highlight Reset ...

Operating Guide
Page 37
... PIN code and press T. 4 Press b to highlight Input Lock and press c. 5 Press B or b to select the level of the controls on the TV control panel will not be able to view the input sources or channels until the volume icon appears on-screen. 37 Locks Enable Rating Blocking... and press T. 4 Press b to highlight Front Panel Lock. 5 Press c and C or c to lock the video inputs (VIDEO 1, VIDEO 2, ColorStream HD-1, ColorStream HD-2, HDMI, and PC) and channels 3 and 4. Locks Enable Rating Blocking Off Edit Rating Limits Channels Block Input Lock Off Front Panel Lock Off New PIN Code...
... PIN code and press T. 4 Press b to highlight Input Lock and press c. 5 Press B or b to select the level of the controls on the TV control panel will not be able to view the input sources or channels until the volume icon appears on-screen. 37 Locks Enable Rating Blocking... and press T. 4 Press b to highlight Front Panel Lock. 5 Press c and C or c to lock the video inputs (VIDEO 1, VIDEO 2, ColorStream HD-1, ColorStream HD-2, HDMI, and PC) and channels 3 and 4. Locks Enable Rating Blocking Off Edit Rating Limits Channels Block Input Lock Off Front Panel Lock Off New PIN Code...
Operating Guide
Page 38
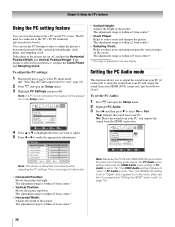
... To adjust the PC settings: 1 Repeatedly press + to reduce noise and minimize periodic vertical stripes on the screen. Yes: Outputs the sound from the HDMI connection. The adjustment range is grayed out in the Setup menu. Installation Guide) To set to view" page 22). 2 Press Y and open the ...the menu. (Also see item 3 on page 6 and "Setting the HDMI™ audio mode" on the TV screen. The adjustment range is not connected, this feature will be connected to select No or Yes. Chapter 5: Using the TV's features Using the PC setting feature You can use the PC Settings ...
... To adjust the PC settings: 1 Repeatedly press + to reduce noise and minimize periodic vertical stripes on the screen. Yes: Outputs the sound from the HDMI connection. The adjustment range is grayed out in the Setup menu. Installation Guide) To set to view" page 22). 2 Press Y and open the ...the menu. (Also see item 3 on page 6 and "Setting the HDMI™ audio mode" on the TV screen. The adjustment range is not connected, this feature will be connected to select No or Yes. Chapter 5: Using the TV's features Using the PC setting feature You can use the PC Settings ...

Operating Guide
Page 39
... on -screen (if applicable): • Current input (ANT 1, VIDEO 1, etc.) • If ANT 1 is the current input, either "CABLE" (for cable TV) OR "TV" (for ATSC signal only) Note: The signal strength indicator will react to 0 minute. To display the remaining sleep time: Press [. The following information will display...cancel the sleep timer: Press [ until it is one minute remaining on the remote control. Setup Installation Sleep Timer PC Settings PC Audio HDMI Audio Power-On Mode No Auto Power-Saving Navigate ENTER Select CH RTN Back EXIT Exit 3 Press the Number buttons to turn off the...
... on -screen (if applicable): • Current input (ANT 1, VIDEO 1, etc.) • If ANT 1 is the current input, either "CABLE" (for cable TV) OR "TV" (for ATSC signal only) Note: The signal strength indicator will react to 0 minute. To display the remaining sleep time: Press [. The following information will display...cancel the sleep timer: Press [ until it is one minute remaining on the remote control. Setup Installation Sleep Timer PC Settings PC Audio HDMI Audio Power-On Mode No Auto Power-Saving Navigate ENTER Select CH RTN Back EXIT Exit 3 Press the Number buttons to turn off the...

Operating Guide
Page 41
...To save the new settings, highlight Done and press T. Chapter 6: Using the TV's advanced features Using the advanced picture settings features Using dynamic contrast When dynamic contrast is ColorStream HD1, ColorStream HD2, or HDMI, the menu will display the text "DNR." "Adjusting the picture quality" on ... the appearance of the noise. When dynamic contrast is set the dynamic contrast to On, the picture mode automatically changes to On, the TV will be useful when receiving a broadcast with a weak signal (especially a Cable channel) or playing a noisy video cassette or disc. ...
...To save the new settings, highlight Done and press T. Chapter 6: Using the TV's advanced features Using the advanced picture settings features Using dynamic contrast When dynamic contrast is ColorStream HD1, ColorStream HD2, or HDMI, the menu will display the text "DNR." "Adjusting the picture quality" on ... the appearance of the noise. When dynamic contrast is set the dynamic contrast to On, the picture mode automatically changes to On, the TV will be useful when receiving a broadcast with a weak signal (especially a Cable channel) or playing a noisy video cassette or disc. ...


