
Owners Manual
Page 2
...Toshiba 3 Important Safety Instructions 3 Important information 7 Getting started Adjusting the angle of the TV 8 Connecting an antenna 8 Exploring your new TV 8 TV front and side panel controls 9 TV back panel connections 10 Learning about the remote control 11 Turning the TV on ...12 Learning about the menu system 12 Watching TV...Other features settings 22 Selecting the video input source to view 23 Teletext ...23 Connecting your TV Back connections ...26 Connecting an HDMI or a DVI device 26 Selecting the PC/HDMI audio mode 28 Setting the HDMI audio mode 28 Selecting the Lip ...
...Toshiba 3 Important Safety Instructions 3 Important information 7 Getting started Adjusting the angle of the TV 8 Connecting an antenna 8 Exploring your new TV 8 TV front and side panel controls 9 TV back panel connections 10 Learning about the remote control 11 Turning the TV on ...12 Learning about the menu system 12 Watching TV...Other features settings 22 Selecting the video input source to view 23 Teletext ...23 Connecting your TV Back connections ...26 Connecting an HDMI or a DVI device 26 Selecting the PC/HDMI audio mode 28 Setting the HDMI audio mode 28 Selecting the Lip ...
Owners Manual
Page 9
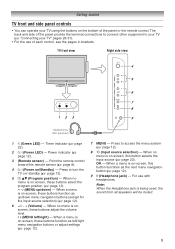
... see the pages in brackets. When a menu is on-screen, this remote sensor (- Getting started TV front and side panel controls • You can operate your TV using the buttons on the bottom of the panel provide the terminal connections to connect other equipment to ...your TV" pages 26-31). • For the use with headphones. "Connecting your TV (- page 22). 2 ! (Power LED) - page 8). 4 ! (Power on / standby (- I i (MENU left /right menu navigation buttons or adjust settings (- ...
... see the pages in brackets. When a menu is on-screen, this remote sensor (- Getting started TV front and side panel controls • You can operate your TV using the buttons on the bottom of the panel provide the terminal connections to connect other equipment to ...your TV" pages 26-31). • For the use with headphones. "Connecting your TV (- page 22). 2 ! (Power LED) - page 8). 4 ! (Power on / standby (- I i (MENU left /right menu navigation buttons or adjust settings (- ...
Owners Manual
Page 10
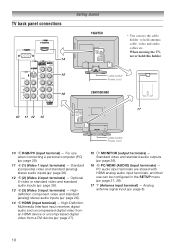
... o (3) (Video 3 input terminals) - page 8). 10 page 26). 14 o HDMI (input terminal) - TV back panel connections Getting started 19AV550 14 * You can be configured in the ...a DVI device (- For use the cable holder to hold this holder. 15 Cable holder* Power cord 16 26AV550/600 17 10 11 12 13 Cable holder* Power cord 10 o RGB/PC (input terminal) - Optional... S-video or standard video and standard audio inputs (- page 26). 16 o PC/HDMI (AUDIO) (input terminals) - page 27). 15 O MONITOR (output terminals) - PC audio...
... o (3) (Video 3 input terminals) - page 8). 10 page 26). 14 o HDMI (input terminal) - TV back panel connections Getting started 19AV550 14 * You can be configured in the ...a DVI device (- For use the cable holder to hold this holder. 15 Cable holder* Power cord 16 26AV550/600 17 10 11 12 13 Cable holder* Power cord 10 o RGB/PC (input terminal) - Optional... S-video or standard video and standard audio inputs (- page 26). 16 o PC/HDMI (AUDIO) (input terminals) - page 27). 15 O MONITOR (output terminals) - PC audio...
Owners Manual
Page 23
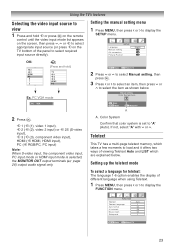
page 26) output audio signal only. Setting up the teletext mode To select a language for teletext:...i to load and it offers two ways of the panel to "A" (Auto). Manual setting Color System:Auto A OK Store MENU Back EXIT Watch TV A 2 Press Q. SETUP Language Manual setting AV connection Picture Position English OK OK OK OK: 2 3 HDMI PC 0 1 2 (Press and...list appears on the screen, then press u, U or o to select appropriate input source (or press o on the TV bottom of viewing Teletext Auto and LIST which are explained below . Color System Confirm that color system is selected...
page 26) output audio signal only. Setting up the teletext mode To select a language for teletext:...i to load and it offers two ways of the panel to "A" (Auto). Manual setting Color System:Auto A OK Store MENU Back EXIT Watch TV A 2 Press Q. SETUP Language Manual setting AV connection Picture Position English OK OK OK OK: 2 3 HDMI PC 0 1 2 (Press and...list appears on the screen, then press u, U or o to select appropriate input source (or press o on the TV bottom of viewing Teletext Auto and LIST which are explained below . Color System Confirm that color system is selected...
Owners Manual
Page 26
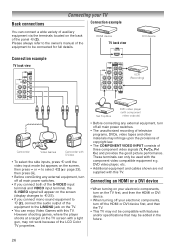
...the back of the panel o (2). Please always refer to be added in the future. 26 However shooting games, where the player shoots at a target on the TV first, and then the HDMI or DVI device. • When turning off your ...electronic components, turn off the HDMI or DVI device first, and then the TV. • This TV may be connected for full details. DVD video player, etc. • Additional equipment and cables shown are not supplied... may not work because of the equipment to o (2), connect the audio output of the LCD Color TV properties.
...the back of the panel o (2). Please always refer to be added in the future. 26 However shooting games, where the player shoots at a target on the TV first, and then the HDMI or DVI device. • When turning off your ...electronic components, turn off the HDMI or DVI device first, and then the TV. • This TV may be connected for full details. DVD video player, etc. • Additional equipment and cables shown are not supplied... may not work because of the equipment to o (2), connect the audio output of the LCD Color TV properties.

