User Manual
Page 10
...-LINK® connection 21 Connecting a digital audio system 22 Connecting a personal computer (PC) .........23 Chapter 3: Using the remote control 24 Preparing the remote control for use 24 Installing the remote control batteries ..........24 Learning about the remote control 25 Chapter 4: Menu layout and navigation ..........27 Main menu layout 27 Setup/Installation menu layout 27...
...-LINK® connection 21 Connecting a digital audio system 22 Connecting a personal computer (PC) .........23 Chapter 3: Using the remote control 24 Preparing the remote control for use 24 Installing the remote control batteries ..........24 Learning about the remote control 25 Chapter 4: Menu layout and navigation ..........27 Main menu layout 27 Setup/Installation menu layout 27...
User Manual
Page 12
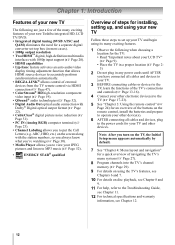
...27). 8 Program channels into the TV's channel memory ( Page 29). 9 For details on using its many exciting features of your new Toshiba integrated HD, LCD TV/DVD: • Integrated digital tuning (8VSB ATSC and QAM) eliminates the need for a separate digital converter set up...adjustment function that allows HDMI source devices to accurately perform synchronization automatically. • REGZA-LINK® allows control of external devices from the TV remote control via HDMI connection ( Page 47). • ColorStream® HD high-resolution component video input ( Page 19). • QSound®...
...27). 8 Program channels into the TV's channel memory ( Page 29). 9 For details on using its many exciting features of your new Toshiba integrated HD, LCD TV/DVD: • Integrated digital tuning (8VSB ATSC and QAM) eliminates the need for a separate digital converter set up...adjustment function that allows HDMI source devices to accurately perform synchronization automatically. • REGZA-LINK® allows control of external devices from the TV remote control via HDMI connection ( Page 47). • ColorStream® HD high-resolution component video input ( Page 19). • QSound®...

User Manual
Page 13
... the TV, press and hold the POWER button on the TV control panel for additional information. 2 Remote sensor (embedded) ─ Point the remote control toward this remote sensor. If the TV stops responding to the controls on the remote control or TV control panel and you are viewing (ANT/ CABLE, Video, ColorStream HD, HDMI...
... the TV, press and hold the POWER button on the TV control panel for additional information. 2 Remote sensor (embedded) ─ Point the remote control toward this remote sensor. If the TV stops responding to the controls on the remote control or TV control panel and you are viewing (ANT/ CABLE, Video, ColorStream HD, HDMI...
User Manual
Page 14
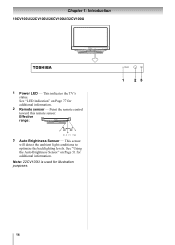
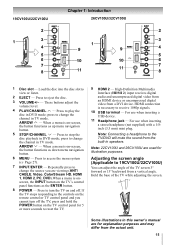
Chapter 1: Introduction 19CV100U/22CV100U/26CV100U/32CV100U 1 Power LED ─ This indicates the TV's status. See "Using the Auto Brightness Sensor" on Page 77 for additional information. 2 Remote sensor ─ Point the remote control toward this remote sensor. Note: 22CV100U is used for additional information. Effective range: 3 Auto Brightness Sensor ─ This sensor will detect the ambient light conditions to optimize the backlighting levels. See "LED indication" on Page 51 for illustration purposes. 14
Chapter 1: Introduction 19CV100U/22CV100U/26CV100U/32CV100U 1 Power LED ─ This indicates the TV's status. See "Using the Auto Brightness Sensor" on Page 77 for additional information. 2 Remote sensor ─ Point the remote control toward this remote sensor. Note: 22CV100U is used for additional information. Effective range: 3 Auto Brightness Sensor ─ This sensor will detect the ambient light conditions to optimize the backlighting levels. See "LED indication" on Page 51 for illustration purposes. 14
User Manual
Page 15
If the TV stops responding to the controls on the remote control or TV control panel and you are viewing (ANT/ CABLE, Video, ColorStream ... audio and uncompressed digital video from an HDMI device or uncompressed digital video from the built-in DVD mode; 19CV100U/22CV100U Chapter 1: Introduction 26CV100U/32CV100U 1 Disc slot ─ Load the disc into the disc slot to view or listen...for 5 or more seconds to the TV/DVD will mute the sound from a DVI device. press to 19CV100U/22CV100U) You can adjust the angle of the TV while adjusting the screen. 3 15 Some illustrations in TV mode...
If the TV stops responding to the controls on the remote control or TV control panel and you are viewing (ANT/ CABLE, Video, ColorStream ... audio and uncompressed digital video from an HDMI device or uncompressed digital video from the built-in DVD mode; 19CV100U/22CV100U Chapter 1: Introduction 26CV100U/32CV100U 1 Disc slot ─ Load the disc into the disc slot to view or listen...for 5 or more seconds to the TV/DVD will mute the sound from a DVI device. press to 19CV100U/22CV100U) You can adjust the angle of the TV while adjusting the screen. 3 15 Some illustrations in TV mode...

User Manual
Page 18
... ANT/CABLE video input source on the 18 Use the Cable box controls to civil and criminal liability. * To select the video input source, press remote control ( Page 33). Select the Video video input source on the TV.* You will need : • standard A/V cables To view the camcorder video: ...Select the Video video input source on the TV.* * To select the video input source, press on the remote control ( Page 33). on the TV.* To view basic and premium Cable channels: Turn OFF the VCR. Chapter 2: Connecting your TV Connecting a VCR, and...
... ANT/CABLE video input source on the 18 Use the Cable box controls to civil and criminal liability. * To select the video input source, press remote control ( Page 33). Select the Video video input source on the TV.* You will need : • standard A/V cables To view the camcorder video: ...Select the Video video input source on the TV.* * To select the video input source, press on the remote control ( Page 33). on the TV.* To view basic and premium Cable channels: Turn OFF the VCR. Chapter 2: Connecting your TV Connecting a VCR, and...
User Manual
Page 19
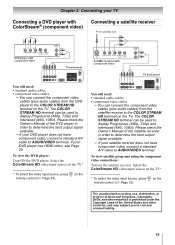
...720p) and Interlaced (480i, 1080i). Select the ColorStream HD video input source on the TV.* * To select the video input source, press remote control ( Page 33). To view the DVD player: Turn ON the DVD player. The COLOR STREAM HD terminal can be used to determine... the best output signal available. - Select the ColorStream HD video input source on the TV.* * To select the video input source, press remote control ( Page 33). Chapter 2: Connecting your TV Red Blue Green Connecting a DVD player with ColorStream® (component video) White Red Connecting a...
...720p) and Interlaced (480i, 1080i). Select the ColorStream HD video input source on the TV.* * To select the video input source, press remote control ( Page 33). To view the DVD player: Turn ON the DVD player. The COLOR STREAM HD terminal can be used to determine... the best output signal available. - Select the ColorStream HD video input source on the TV.* * To select the video input source, press remote control ( Page 33). Chapter 2: Connecting your TV Red Blue Green Connecting a DVD player with ColorStream® (component video) White Red Connecting a...
User Manual
Page 20
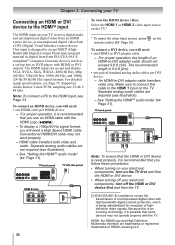
... (60 Hz), 1080i (60 Hz), and 1080p (24 Hz/30 Hz/60 Hz) signal formats. on the TV.* * To select the video input source, press remote control ( Page 33).
... (60 Hz), 1080i (60 Hz), and 1080p (24 Hz/30 Hz/60 Hz) signal formats. on the TV.* * To select the video input source, press remote control ( Page 33).
User Manual
Page 21
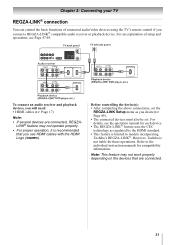
...functions of setup and operations, see the operation manual for compatibility information. For an explanation of connected audio/video devices using the TV's remote control if you will need: • HDMI cables ( Page 17) Note: • If several devices are connected. 21 To connect... an audio receiver and playback devices, you connect a REGZA-LINK® compatible audio receiver or playback device. However, Toshiba is recommended that are connected, REGZALINK® feature may not work properly depending on the devices that you desire ( Page 49). •...
...functions of setup and operations, see the operation manual for compatibility information. For an explanation of connected audio/video devices using the TV's remote control if you will need: • HDMI cables ( Page 17) Note: • If several devices are connected. 21 To connect... an audio receiver and playback devices, you connect a REGZA-LINK® compatible audio receiver or playback device. However, Toshiba is recommended that are connected, REGZALINK® feature may not work properly depending on the devices that you desire ( Page 49). •...

User Manual
Page 22
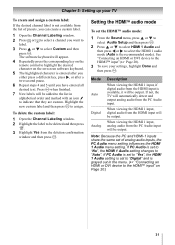
...: • Some audio systems may damage speakers or headphones. To control the audio: 1 Turn on the TV and the digital audio device. 2 Press on the remote control and open the Sound menu. 3 Press or to select either Dolby Digital or PCM, depending on DVDs and audio CDs. If you have a DTS...
...: • Some audio systems may damage speakers or headphones. To control the audio: 1 Turn on the TV and the digital audio device. 2 Press on the remote control and open the Sound menu. 3 Press or to select either Dolby Digital or PCM, depending on DVDs and audio CDs. If you have a DTS...

User Manual
Page 24
... area. • Batteries should always be exposed to be used batteries in mind. This will prevent battery acid from the remote control if they are dead or if the remote control is not to excessive heat such as sunshine, fire or the like. Caution: Batteries must not be disposed of with...new ones. • When necessary to the symbols on the battery compartment. 3 Close the battery cover on the remote control until the tab snaps. Note: • Be sure to use The remote control can operate your TV/DVD and control the basic functions of connected audio/ video devices if you connect...
... area. • Batteries should always be exposed to be used batteries in mind. This will prevent battery acid from the remote control if they are dead or if the remote control is not to excessive heat such as sunshine, fire or the like. Caution: Batteries must not be disposed of with...new ones. • When necessary to the symbols on the battery compartment. 3 Close the battery cover on the remote control until the tab snaps. Note: • Be sure to use The remote control can operate your TV/DVD and control the basic functions of connected audio/ video devices if you connect...

User Manual
Page 25
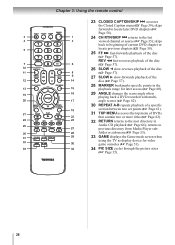
... Note: The error message "NOT AVAILABLE" may appear if you press a key for operating the TV/DVD are described here. For the REGZA-LINK® remote control functions, see the section "Using REGZALINK®" ( Page 47). zooms into the center of the loaded disc ( Page 56). 25 configures the disc ...11 SUBTITLE selects the subtitle language or switches subtitle off ( Page 63). 12 INPUT/ZOOM selects the video input source ( Page 33); Chapter 3: Using the remote control Learning about the remote control The buttons used for a function that is on, the Power LED indicator on and off.
... Note: The error message "NOT AVAILABLE" may appear if you press a key for operating the TV/DVD are described here. For the REGZA-LINK® remote control functions, see the section "Using REGZALINK®" ( Page 47). zooms into the center of the loaded disc ( Page 56). 25 configures the disc ...11 SUBTITLE selects the subtitle language or switches subtitle off ( Page 63). 12 INPUT/ZOOM selects the video input source ( Page 33); Chapter 3: Using the remote control Learning about the remote control The buttons used for a function that is on, the Power LED indicator on and off.
User Manual
Page 26
Chapter 3: Using the remote control 23 CLOSED CAPTION/SKIP accesses the Closed Caption menu ( Page 39); REV fast-reverses playback of the disc ( Page 57). 26 SLOW slow-reverses ...
Chapter 3: Using the remote control 23 CLOSED CAPTION/SKIP accesses the Closed Caption menu ( Page 39); REV fast-reverses playback of the disc ( Page 57). 26 SLOW slow-reverses ...
User Manual
Page 27
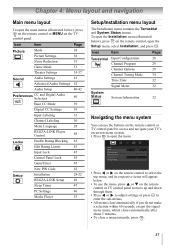
...TV control panel. Chapter 4: Menu layout and navigation Main menu layout To open the main menus (illustrated below), press on the remote control or MENU on the remote control, open the Setup menu, select Installation, and press . Icon Item Terrestrial Input Configuration Channel Program Channel Options Channel Tuning Mode...Signal Meter Page 28 29 29 34 32 32 System Status System Information 32 Navigating the menu system You can use the buttons on the remote control or TV control panel to access and navigate your TV's on-screen menu system. • Press to open the menu. •...
...TV control panel. Chapter 4: Menu layout and navigation Main menu layout To open the main menus (illustrated below), press on the remote control or MENU on the remote control, open the Setup menu, select Installation, and press . Icon Item Terrestrial Input Configuration Channel Program Channel Options Channel Tuning Mode...Signal Meter Page 28 29 29 34 32 32 System Status System Information 32 Navigating the menu system You can use the buttons on the remote control or TV control panel to access and navigate your TV's on-screen menu system. • Press to open the menu. •...

User Manual
Page 29
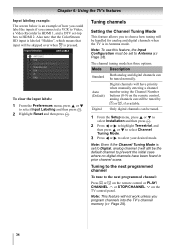
...Chapter 5: Setting up your TV Programming channels into the TV's channel memory When you press or on the remote control or TV control panel, your TV will stop only on the remote control. 29 To program channels automatically: 1 Configure the ANT/CABLE In input if you must configure the ANT...on the channels you can automatically detect all active channels in the box. Note: • You must use the Channel Number buttons on the remote control. • Programming channels when the ANT/ CABLE input is configured for Cable will automatically cycle through all the channels, and store all ...
...Chapter 5: Setting up your TV Programming channels into the TV's channel memory When you press or on the remote control or TV control panel, your TV will stop only on the remote control. 29 To program channels automatically: 1 Configure the ANT/CABLE In input if you must configure the ANT...on the channels you can automatically detect all active channels in the box. Note: • You must use the Channel Number buttons on the remote control. • Programming channels when the ANT/ CABLE input is configured for Cable will automatically cycle through all the channels, and store all ...

User Manual
Page 30
... want to label. 3 Press to remove the unnecessary channel from the channel memory: If an encrypted channel is on the remote control to select Channel Labeling and then press . Press 1 on remote to remove channel Press 1 while the message is accidentally added to the channel list by programming channels, you can remove...
... want to label. 3 Press to remove the unnecessary channel from the channel memory: If an encrypted channel is on the remote control to select Channel Labeling and then press . Press 1 on remote to remove channel Press 1 while the message is accidentally added to the channel list by programming channels, you can remove...
User Manual
Page 31
.... 1 Open the Channel Labeling window. 2 Press or to select a channel you want to label. 3 Press or to highlight the desired character on the on the remote control to select Custom and then press . Chapter 5: Setting up your settings, highlight Done and then press . If PC Audio is set to "Yes", the...
.... 1 Open the Channel Labeling window. 2 Press or to select a channel you want to label. 3 Press or to highlight the desired character on the on the remote control to select Custom and then press . Chapter 5: Setting up your settings, highlight Done and then press . If PC Audio is set to "Yes", the...

User Manual
Page 33
...at right). • Sources can label each video input source according to the type of device you have to press to view 1 Press on the remote control or INPUT/ ENTER on the TV control panel. 2 And then either: a) Press 0-6; Chapter 6: Using the TV's features Selecting the video ... (to change the input; If the connected CEC device has any connected devices, a separate device selection popup window will appear randomly on the remote control and then press to the factory default labels, highlight Reset and then press . 33 If a particular input is connected to highlight HDMI ...
...at right). • Sources can label each video input source according to the type of device you have to press to view 1 Press on the remote control or INPUT/ ENTER on the TV control panel. 2 And then either: a) Press 0-6; Chapter 6: Using the TV's features Selecting the video ... (to change the input; If the connected CEC device has any connected devices, a separate device selection popup window will appear randomly on the remote control and then press to the factory default labels, highlight Reset and then press . 33 If a particular input is connected to highlight HDMI ...
User Manual
Page 34
..., and then press or to select Channel Tuning Mode. 3 Press or to the next programmed channel: Press or on the remote control or PLAY/ CHANNEL or STOP/CHANNEL on the remote control, analog channels can be set to Antenna ( Page 28). Only digital channels can be the default channel to prevent the...
..., and then press or to select Channel Tuning Mode. 3 Press or to the next programmed channel: Press or on the remote control or PLAY/ CHANNEL or STOP/CHANNEL on the remote control, analog channels can be set to Antenna ( Page 28). Only digital channels can be the default channel to prevent the...

User Manual
Page 35
...using Channel Return The Channel Return feature allows you to switch between two channels without entering an actual channel number each input on the remote control, followed by Dot (available in the Picture Size screen). Each time you want to civil and criminal liability. Selecting the ...the picture sizes may subject you are examples only. To select the picture size using the Channel Number buttons and dash ( ) on the remote control. You can do one of the TheaterWide® picture sizes, the top and bottom edges of the picture (including subtitles or captions...
...using Channel Return The Channel Return feature allows you to switch between two channels without entering an actual channel number each input on the remote control, followed by Dot (available in the Picture Size screen). Each time you want to civil and criminal liability. Selecting the ...the picture sizes may subject you are examples only. To select the picture size using the Channel Number buttons and dash ( ) on the remote control. You can do one of the TheaterWide® picture sizes, the top and bottom edges of the picture (including subtitles or captions...

