User Manual
Page 4
... remove any kind into the TV cabinet slots. 37) While it is subject to make occasional snapping or popping sounds. This is normal, especially when the TV is thundering, do not touch the connecting cables or apparatus. 38) For added protection of your TOSHIBA TV/DVD, follow these sounds become frequent or continuous, unplug the power cord and contact a Toshiba Authorized Service...
... remove any kind into the TV cabinet slots. 37) While it is subject to make occasional snapping or popping sounds. This is normal, especially when the TV is thundering, do not touch the connecting cables or apparatus. 38) For added protection of your TOSHIBA TV/DVD, follow these sounds become frequent or continuous, unplug the power cord and contact a Toshiba Authorized Service...
User Manual
Page 8
... do not use a disc adapter. Operation is subject to experience any difficulty playing a DVD or CD on the recording conditions. • This TV/DVD uses the NTSC color system, and cannot play DVD video discs recorded in a particular installation. The party responsible for a Class B digital device, pursuant to radio communications. However, there is encouraged to try to correct the interference by removing and applying power to the equipment, the user is...
... do not use a disc adapter. Operation is subject to experience any difficulty playing a DVD or CD on the recording conditions. • This TV/DVD uses the NTSC color system, and cannot play DVD video discs recorded in a particular installation. The party responsible for a Class B digital device, pursuant to radio communications. However, there is encouraged to try to correct the interference by removing and applying power to the equipment, the user is...
User Manual
Page 10
... 17 Connecting TV to a power source 17 Connecting a VCR, and antenna, Cable TV .18 Connecting a camcorder 18 Connecting a DVD player with ColorStream® (component video 19 Connecting a satellite receiver 19 Connecting an HDMI or DVI device to the HDMI™ input 20 REGZA-LINK® connection 21 Connecting a digital audio system 22 Connecting a personal computer (PC) .........23 Chapter 3: Using the remote control 24 Preparing the remote control for use 24 Installing the remote control batteries ..........24 Learning about the remote control 25 Chapter 4: Menu layout...
... 17 Connecting TV to a power source 17 Connecting a VCR, and antenna, Cable TV .18 Connecting a camcorder 18 Connecting a DVD player with ColorStream® (component video 19 Connecting a satellite receiver 19 Connecting an HDMI or DVI device to the HDMI™ input 20 REGZA-LINK® connection 21 Connecting a digital audio system 22 Connecting a personal computer (PC) .........23 Chapter 3: Using the remote control 24 Preparing the remote control for use 24 Installing the remote control batteries ..........24 Learning about the remote control 25 Chapter 4: Menu layout...
User Manual
Page 11
... 60 Enabling A-B repeat mode (DVD/ VCD/CD 61 Programmed playback/Random playback ... 61 Programming the playback sequence (VCD 61 Enabling random playback (VCD) ......... 62 Scene angle/Title selection/DVD menu ....... 62 Changing the scene angle (DVD) ......... 62 Selecting a DVD title (DVD 62 DVD menu (DVD 62 Soundtrack language/Audio channel/ Subtitle 63 Selecting a soundtrack language (DVD 63 Selecting the audio channel (VCD) ....... 63 Viewing subtitles (DVD 63 Playback information/VCD playback control 63 Viewing the playback info (DVD/VCD)... 63 Turning off the PBC function (VCD...
... 60 Enabling A-B repeat mode (DVD/ VCD/CD 61 Programmed playback/Random playback ... 61 Programming the playback sequence (VCD 61 Enabling random playback (VCD) ......... 62 Scene angle/Title selection/DVD menu ....... 62 Changing the scene angle (DVD) ......... 62 Selecting a DVD title (DVD 62 DVD menu (DVD 62 Soundtrack language/Audio channel/ Subtitle 63 Selecting a soundtrack language (DVD 63 Selecting the audio channel (VCD) ....... 63 Viewing subtitles (DVD 63 Playback information/VCD playback control 63 Viewing the playback info (DVD/VCD)... 63 Turning off the PBC function (VCD...
User Manual
Page 12
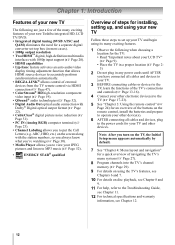
... these steps to set -top box (in the power cords for a quick overview of external devices from the TV remote control via HDMI connection ( Page 47). • ColorStream® HD high-resolution component video input ( Page 19). • QSound® audio technologies ( Page 52). • Digital Audio Out optical audio connection with 1080p input support ( Page 20). • HDMI capabilities • Lip-Sync feature activates an auto audio/video display timing adjustment function that allows HDMI source devices to put...
... these steps to set -top box (in the power cords for a quick overview of external devices from the TV remote control via HDMI connection ( Page 47). • ColorStream® HD high-resolution component video input ( Page 19). • QSound® audio technologies ( Page 52). • Digital Audio Out optical audio connection with 1080p input support ( Page 20). • HDMI capabilities • Lip-Sync feature activates an auto audio/video display timing adjustment function that allows HDMI source devices to put...

User Manual
Page 13
... -screen, the button functions as down menu navigation button. 12 PLAY/CHANNEL ─ Press to view or listen. 5 HDMI 2 ─ High-Definition Multimedia Interface (HDMI 2) input receives digital audio and uncompressed digital video from an HDMI device or uncompressed digital video from the built-in speakers. 8 POWER ─ Press to turn off . See "LED indication" on Page 77 for 5 or more seconds to reset the TV. 9 INPUT/ENTER ─ Repeatedly press to change the channel in DVD mode; press...
... -screen, the button functions as down menu navigation button. 12 PLAY/CHANNEL ─ Press to view or listen. 5 HDMI 2 ─ High-Definition Multimedia Interface (HDMI 2) input receives digital audio and uncompressed digital video from an HDMI device or uncompressed digital video from the built-in speakers. 8 POWER ─ Press to turn off . See "LED indication" on Page 77 for 5 or more seconds to reset the TV. 9 INPUT/ENTER ─ Repeatedly press to change the channel in DVD mode; press...
User Manual
Page 15
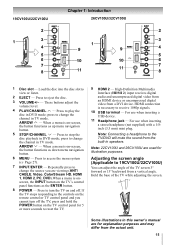
... TV's control panel functions as up menu navigation button. 5 STOP/CHANNEL ─ Press to stop the disc playback in this owner's manual are for illustration purposes. press to reset the TV. 9 HDMI 2 ─ High-Definition Multimedia Interface (HDMI 2) input receives digital audio and uncompressed digital video from an HDMI device or uncompressed digital video from the actual unit. 15 Note: 22CV100U and 26CV100U are viewing (ANT/ CABLE, Video, ColorStream HD, HDMI 1, HDMI 2, PC, DVD).When a menu is on-screen, the button functions as down menu navigation button. 6 MENU ─...
... TV's control panel functions as up menu navigation button. 5 STOP/CHANNEL ─ Press to stop the disc playback in this owner's manual are for illustration purposes. press to reset the TV. 9 HDMI 2 ─ High-Definition Multimedia Interface (HDMI 2) input receives digital audio and uncompressed digital video from an HDMI device or uncompressed digital video from the actual unit. 15 Note: 22CV100U and 26CV100U are viewing (ANT/ CABLE, Video, ColorStream HD, HDMI 1, HDMI 2, PC, DVD).When a menu is on-screen, the button functions as down menu navigation button. 6 MENU ─...
User Manual
Page 16
... digital Cable TV (QAM) signals. HDMI connection is used for connecting an external Dolby Digital decoder, amplifier, or home theater system with optical audio input. 5 HDMI 1/PC AUDIO IN ─ PC audio input terminal is shared with HDMI 1 analog audio input terminal, and its use can be configured in Dolby Digital or PCM (Pulse-Code Modulation) format for illustraion purposes. Note: 22CV100U is necessary to turn on and operate the TV. 2 AUDIO/COLOR STREAM HD ─ ColorStream® high-definition component video inputs...
... digital Cable TV (QAM) signals. HDMI connection is used for connecting an external Dolby Digital decoder, amplifier, or home theater system with optical audio input. 5 HDMI 1/PC AUDIO IN ─ PC audio input terminal is shared with HDMI 1 analog audio input terminal, and its use can be configured in Dolby Digital or PCM (Pulse-Code Modulation) format for illustraion purposes. Note: 22CV100U is necessary to turn on and operate the TV. 2 AUDIO/COLOR STREAM HD ─ ColorStream® high-definition component video inputs...

User Manual
Page 17
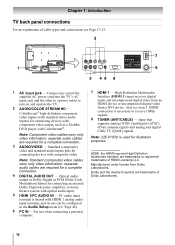
Analog RGB (15-pin) computer cable Coaxial (F-type) cable is Toshiba's brand of component video.) These cables are required for a complete connection. HDMI™ cable (with analog audio and composite video output. Note: Separate audio cables are not required for a complete connection. For details on your TV in this manual are typically color-coded according to use with video devices with an HDMI output. This cable carries both video and audio information; Use the supplied power cord only. • If you...
Analog RGB (15-pin) computer cable Coaxial (F-type) cable is Toshiba's brand of component video.) These cables are required for a complete connection. HDMI™ cable (with analog audio and composite video output. Note: Separate audio cables are not required for a complete connection. For details on your TV in this manual are typically color-coded according to use with video devices with an HDMI output. This cable carries both video and audio information; Use the supplied power cord only. • If you...
User Manual
Page 20
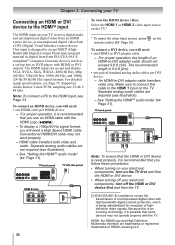
... the HDMI 1 input on the TV. Supported Audio format: Linear PCM, sampling rate 32/44.1/ 48 kHz. An HDMI-to the HDMI input, see illustration). - See "Setting the HDMITM audio mode" ( Page 31). For proper operation, it is recommended that you follow these procedures: • When turning on your electronic components, turn on the To connect a DVI device, you will need a High Speed HDMI cable. To display a 1080p/60 Hz signal format, you use an HDMI cable...
... the HDMI 1 input on the TV. Supported Audio format: Linear PCM, sampling rate 32/44.1/ 48 kHz. An HDMI-to the HDMI input, see illustration). - See "Setting the HDMITM audio mode" ( Page 31). For proper operation, it is recommended that you follow these procedures: • When turning on your electronic components, turn on the To connect a DVI device, you will need a High Speed HDMI cable. To display a 1080p/60 Hz signal format, you use an HDMI cable...

User Manual
Page 25
... accesses the sleep timer ( Page 47). 3 EJECT ejects the disc from the disc slot. 4 TV/DVD switches to a digital sub-channel as a "dash". 7 DISPLAY displays setting or playback information ( Page 49, 63). 8 AUDIO SELECT selects the DVD soundtrack language or VCD audio channel ( Page 63). 9 VOL + - zooms into the center of the loaded disc ( Page 56). 25 Chapter 3: Using the remote control Learning about the remote control The buttons used for a function that is on-screen ( Page 34). 11 SUBTITLE selects the subtitle language or switches subtitle off...
... accesses the sleep timer ( Page 47). 3 EJECT ejects the disc from the disc slot. 4 TV/DVD switches to a digital sub-channel as a "dash". 7 DISPLAY displays setting or playback information ( Page 49, 63). 8 AUDIO SELECT selects the DVD soundtrack language or VCD audio channel ( Page 63). 9 VOL + - zooms into the center of the loaded disc ( Page 56). 25 Chapter 3: Using the remote control Learning about the remote control The buttons used for a function that is on-screen ( Page 34). 11 SUBTITLE selects the subtitle language or switches subtitle off...

User Manual
Page 33
...: • - - (default label) • Audio Receiver • Cable • Compact Disc • DTV • DVD • Game Console • HDMI Switch (HDMI inputs only) • Laser Disc • Satellite/DSS • VCR • Video Recorder • Hide (to hide an unused input in the Input Selection screen) Note: If you select PC in the Input Selection screen, you press on the remote control or INPUT/ENTER on the screen if no signal is connected to select the video source you...
...: • - - (default label) • Audio Receiver • Cable • Compact Disc • DTV • DVD • Game Console • HDMI Switch (HDMI inputs only) • Laser Disc • Satellite/DSS • VCR • Video Recorder • Hide (to hide an unused input in the Input Selection screen) Note: If you select PC in the Input Selection screen, you press on the remote control or INPUT/ENTER on the screen if no signal is connected to select the video source you...
User Manual
Page 34
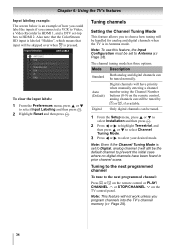
... no digital channels have priority when manually entering a channel number using the Channel Number buttons (0-9) on the TV control panel. Tuning to the next programmed channel To tune to Digital, analog channel 3 will be handled for analog and digital channels when the TV is set to the next programmed channel: Press or on the remote control or PLAY/ CHANNEL or STOP/CHANNEL on the remote control, analog channels can still be the default channel to select Input Labeling and then press . 2 Highlight Reset and...
... no digital channels have priority when manually entering a channel number using the Channel Number buttons (0-9) on the TV control panel. Tuning to the next programmed channel To tune to Digital, analog channel 3 will be handled for analog and digital channels when the TV is set to the next programmed channel: Press or on the remote control or PLAY/ CHANNEL or STOP/CHANNEL on the remote control, analog channels can still be the default channel to select Input Labeling and then press . 2 Highlight Reset and...
User Manual
Page 47
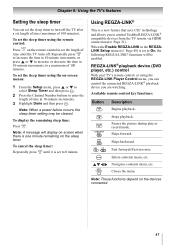
...'s features Setting the sleep timer You can control the connected REGZA-LINK® playback device you are watching. To set the sleep timer using the remote control: Press on -screen menus: 1 From the Setup menu, press or to select Sleep Timer and then press . 2 Press the Channel Number buttons to On, the following REGZA-LINK® functions will display on-screen when there is set to control Toshiba REGZA-LINK® compatible devices from the TV remote via HDMI connection...
...'s features Setting the sleep timer You can control the connected REGZA-LINK® playback device you are watching. To set the sleep timer using the remote control: Press on -screen menus: 1 From the Setup menu, press or to select Sleep Timer and then press . 2 Press the Channel Number buttons to On, the following REGZA-LINK® functions will display on-screen when there is set to control Toshiba REGZA-LINK® compatible devices from the TV remote via HDMI connection...
User Manual
Page 48
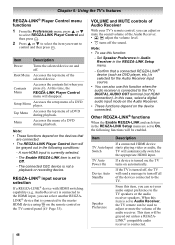
... (not HDMI connection). Top Menu Accesses the top menu of the selected device. The Enable REGZA-LINK item is set your TV's remote control, you press . Contents Menu Accesses the contents list when you can also use this case, select a digital audio input mode on the Audio Receiver. • These functions depend on and off the sound. VOLUME and MUTE controls of Audio Receiver With your audio output preference to the TV. In this function: - TV Auto Power On If a device is turned on...
... (not HDMI connection). Top Menu Accesses the top menu of the selected device. The Enable REGZA-LINK item is set your TV's remote control, you press . Contents Menu Accesses the contents list when you can also use this case, select a digital audio input mode on the Audio Receiver. • These functions depend on and off the sound. VOLUME and MUTE controls of Audio Receiver With your audio output preference to the TV. In this function: - TV Auto Power On If a device is turned on...

User Manual
Page 65
... TV/DVD does not support data disc burned using the Joliet Recording Specification can be omitted. • To play MP3, WMA, and JPEG files recorded on the screen. MP3/WMA/JPEG CD limitations • Depending on the recorded order: - Other files will produce optimal playback quality. File format: WMA version 7 or 8 - The file name is not recommended. Not all recordable discs will not be played. MP3/WMA/JPEG/Audio CD...
... TV/DVD does not support data disc burned using the Joliet Recording Specification can be omitted. • To play MP3, WMA, and JPEG files recorded on the screen. MP3/WMA/JPEG CD limitations • Depending on the recorded order: - Other files will produce optimal playback quality. File format: WMA version 7 or 8 - The file name is not recommended. Not all recordable discs will not be played. MP3/WMA/JPEG/Audio CD...
User Manual
Page 75
... display the Input Selection window. TV stops responding to controls • If the TV stops responding to the controls on the remote control or TV control panel and you cannot turn on the TV, no device is connected to a particular input on • Make sure the power cord is set to the picture. - If no picture will change to Stereo mode ( Page 41). • If you connect a PC using a ColorStream or HDMI video connection instead. Video Input Selection problems • If the Input Selection...
... display the Input Selection window. TV stops responding to controls • If the TV stops responding to the controls on the remote control or TV control panel and you cannot turn on the TV, no device is connected to a particular input on • Make sure the power cord is set to the picture. - If no picture will change to Stereo mode ( Page 41). • If you connect a PC using a ColorStream or HDMI video connection instead. Video Input Selection problems • If the Input Selection...
User Manual
Page 76
... not recognize the USB device. HDMI problems For HDMI cables • Make sure to use the Reset Factory Defaults procedure ( Page 32). For Legacy HDMI source • Some legacy HDMI sources may not be changed • The disc has no subtitle encoded on the screen • The function is connected, check its volume control. Chapter 11: Troubleshooting • If the TV still does not act as stopping, searching, slow motion play, repeat play or programmed play, etc are...
... not recognize the USB device. HDMI problems For HDMI cables • Make sure to use the Reset Factory Defaults procedure ( Page 32). For Legacy HDMI source • Some legacy HDMI sources may not be changed • The disc has no subtitle encoded on the screen • The function is connected, check its volume control. Chapter 11: Troubleshooting • If the TV still does not act as stopping, searching, slow motion play, repeat play or programmed play, etc are...
User Manual
Page 80
... are your needs and help us to contact you in violation of the operating instructions in this manual and checking the section "Troubleshooting," you or to damage to any LCD TV/DVD Combination or parts that is needed: (1) For instructions on Parts and Labor TACP warrants this warranty. Commercial Units LCD TV/DVD Combinations sold and used for set installation, setup, adjustment of customer controls, and installation or repair of the...
... are your needs and help us to contact you in violation of the operating instructions in this manual and checking the section "Troubleshooting," you or to damage to any LCD TV/DVD Combination or parts that is needed: (1) For instructions on Parts and Labor TACP warrants this warranty. Commercial Units LCD TV/DVD Combinations sold and used for set installation, setup, adjustment of customer controls, and installation or repair of the...
Brochure
Page 2
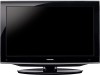
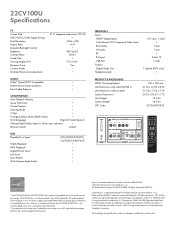
...8226; Gaming Mode • V-Chip • Tri-Lingual Select, Multi-Subtitle Select • OSD Language English/French/Spanish Channel Label/Video Label w/ direct input selection • Remote Control Unified DVD Playable Disc Types1 WMA Playback1 MP3 Playback1 Digital Picture Zoom Fast Scan Slow-Motion Multi-Camera Angle Select DVD/DVD-R/DVD-RW/ CD/CD-R/CD-RW/VCD TERMINALS Inputs HDMI® Digital Inputs ColorStream® HD Component Video Input RCA-Video L-R Audio RF PC Input USB Port Outputs Digital Audio Out Headphone Jack 2 (1 rear, 1 side) 1 1 rear 1 rear 1 D-Sub 15...
...8226; Gaming Mode • V-Chip • Tri-Lingual Select, Multi-Subtitle Select • OSD Language English/French/Spanish Channel Label/Video Label w/ direct input selection • Remote Control Unified DVD Playable Disc Types1 WMA Playback1 MP3 Playback1 Digital Picture Zoom Fast Scan Slow-Motion Multi-Camera Angle Select DVD/DVD-R/DVD-RW/ CD/CD-R/CD-RW/VCD TERMINALS Inputs HDMI® Digital Inputs ColorStream® HD Component Video Input RCA-Video L-R Audio RF PC Input USB Port Outputs Digital Audio Out Headphone Jack 2 (1 rear, 1 side) 1 1 rear 1 rear 1 D-Sub 15...


