Owner's Manual - English
Page 6
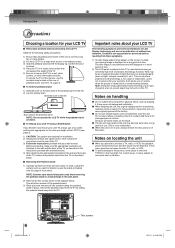
...appropriate for the size and weight of the LCD TV (see item 19, page 4). ■ To fold the pedestal stand 1) Slide the lever on handling ■ Do not subject the LCD panel to physical shock, such as insecticide, near a TV, radio, or VCR, the playback picture may become warm after image (ghost) ...your warranty. Leave the stand protruding over the edge of the surface. therefore, Toshiba is carried out by sliding the pedestal stand away from a normal viewing distance. The after image is locked. 4) Place the TV on locating the unit ■ When you decide to this case, place the...
...appropriate for the size and weight of the LCD TV (see item 19, page 4). ■ To fold the pedestal stand 1) Slide the lever on handling ■ Do not subject the LCD panel to physical shock, such as insecticide, near a TV, radio, or VCR, the playback picture may become warm after image (ghost) ...your warranty. Leave the stand protruding over the edge of the surface. therefore, Toshiba is carried out by sliding the pedestal stand away from a normal viewing distance. The after image is locked. 4) Place the TV on locating the unit ■ When you decide to this case, place the...

Owner's Manual - English
Page 7
... Using the unit when moisture condensation exists may occur in an area where cold air from the center outwards with a soft cloth. Leaving the TV connected to a warm area. For example, handle the disc so that do not have warmed up lens, one of the most crucial internal ...On storing discs Do not store discs in a case. Do not store discs in the TV or DVD Player. There may cause warping. Introduction Prcautions (Continued)/Notes on discs Notes on the disc cause picture and sound deterioration. It may condense on discs outside of the unit. Connect the power ...
... Using the unit when moisture condensation exists may occur in an area where cold air from the center outwards with a soft cloth. Leaving the TV connected to a warm area. For example, handle the disc so that do not have warmed up lens, one of the most crucial internal ...On storing discs Do not store discs in a case. Do not store discs in the TV or DVD Player. There may cause warping. Introduction Prcautions (Continued)/Notes on discs Notes on the disc cause picture and sound deterioration. It may condense on discs outside of the unit. Connect the power ...
Owner's Manual - English
Page 8
... disc) Approx. 80 minutes (single sided disc) 8 cm Approx. 160 minutes (double sided disc) Video CDs DIGITAL VIDEO Audio + Video (moving pictures) 12 cm Approx. 74 minutes (single sided disc) 8 cm Approx. 20 minutes (single sided disc) Audio CDs Audio 12 cm Approx. 74 minutes... ring protector, as above . • You cannot play an 8cm disc. Use of the functions described in this unit in this TV, please contact Toshiba Customer Service. Some of this symbol may subject you do not use , distribution, or revision of copyrighted materials including, without limitation,...
... disc) Approx. 80 minutes (single sided disc) 8 cm Approx. 160 minutes (double sided disc) Video CDs DIGITAL VIDEO Audio + Video (moving pictures) 12 cm Approx. 74 minutes (single sided disc) 8 cm Approx. 20 minutes (single sided disc) Audio CDs Audio 12 cm Approx. 74 minutes... ring protector, as above . • You cannot play an 8cm disc. Use of the functions described in this unit in this TV, please contact Toshiba Customer Service. Some of this symbol may subject you do not use , distribution, or revision of copyrighted materials including, without limitation,...
Owner's Manual - English
Page 9
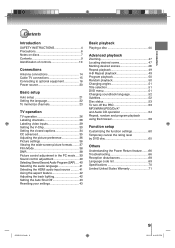
...;cation of controls 10 Connections Antenna connections 14 Cable TV connections 15 Connecting to optional equipment 16 Power source 20 Basic setup Auto setup 21 Setting the language 22 To memorize channels 23 TV operation TV operation 26 Labeling channels 28 Labeling video inputs 29 Setting... the V-Chip 30 Setting the closed captions 34 CC advanced 35 Adjusting the picture preference 36 Picture settings 36 Viewing the wide-screen picture formats........ 37 Film Mode 38 DNR 38 Picture control...
...;cation of controls 10 Connections Antenna connections 14 Cable TV connections 15 Connecting to optional equipment 16 Power source 20 Basic setup Auto setup 21 Setting the language 22 To memorize channels 23 TV operation TV operation 26 Labeling channels 28 Labeling video inputs 29 Setting... the V-Chip 30 Setting the closed captions 34 CC advanced 35 Adjusting the picture preference 36 Picture settings 36 Viewing the wide-screen picture formats........ 37 Film Mode 38 DNR 38 Picture control...
Owner's Manual - English
Page 17
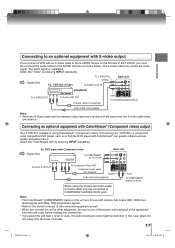
... is capable of using the Component video cable, an Audio cable must also connect the audio cables to the AUDIO IN jacks as a Toshiba DVD player with Component video : Signal flow To COMPONENT (Y, PB, PR) IN Back side To Audio (L/R) OUT To Component ... is separated. Connecting your TV/DVD to a component video compatible DVD player, such as shown below. Select the "ColorStream HD" by pressing INPUT repeatedly. : Signal flow Ex. DVD player with ColorStream® can greatly enhance picture quality and performance. laced signals and 480p, 720p progressive signals....
... is capable of using the Component video cable, an Audio cable must also connect the audio cables to the AUDIO IN jacks as a Toshiba DVD player with Component video : Signal flow To COMPONENT (Y, PB, PR) IN Back side To Audio (L/R) OUT To Component ... is separated. Connecting your TV/DVD to a component video compatible DVD player, such as shown below. Select the "ColorStream HD" by pressing INPUT repeatedly. : Signal flow Ex. DVD player with ColorStream® can greatly enhance picture quality and performance. laced signals and 480p, 720p progressive signals....
Owner's Manual - English
Page 18
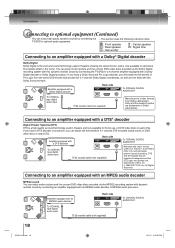
.... All Rights Reserved. Connecting to reproduce this dynamic realistic sound by connecting the TV/DVD to an amplifier equipped with an MPEG audio decoder MPEG2 sound You can enjoy motion picture and live concert DVD video discs encoded via the Dolby Digital recording system with ...DIGITAL AUDIO OUT 18 J50S0101A.indb 18 08.1.9 4:45:02 PM You can enjoy motion picture and live concert DVD video discs encoded via the MPEG2 recording system with dynamic realistic sound by connecting the TV/DVD to optional audio equipment. * This section uses the following reference mark. : Front...
.... All Rights Reserved. Connecting to reproduce this dynamic realistic sound by connecting the TV/DVD to an amplifier equipped with an MPEG audio decoder MPEG2 sound You can enjoy motion picture and live concert DVD video discs encoded via the Dolby Digital recording system with ...DIGITAL AUDIO OUT 18 J50S0101A.indb 18 08.1.9 4:45:02 PM You can enjoy motion picture and live concert DVD video discs encoded via the MPEG2 recording system with dynamic realistic sound by connecting the TV/DVD to optional audio equipment. * This section uses the following reference mark. : Front...
Owner's Manual - English
Page 21
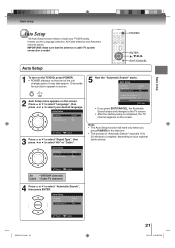
...on the screen. VHF/UHF channels Cable - Basic setup Basic setup Auto Setup The Auto Setup function helps to install your desired language. Cable TV channels 4 Press ▲ or ▼ to select "Automatic Search", then press ENTER. Auto Setup Language Signal Type Automatic Search English Air Start... J50S0101A.indb 21 : Select : Adjust 21 08.1.9 4:45:05 PM It leads you press POWER for a picture to appear on screen. 2 Auto Setup menu appears on the front of "Automatic Search" may take 15 to 30 minutes to complete, depending ...
...on the screen. VHF/UHF channels Cable - Basic setup Basic setup Auto Setup The Auto Setup function helps to install your desired language. Cable TV channels 4 Press ▲ or ▼ to select "Automatic Search", then press ENTER. Auto Setup Language Signal Type Automatic Search English Air Start... J50S0101A.indb 21 : Select : Adjust 21 08.1.9 4:45:05 PM It leads you press POWER for a picture to appear on screen. 2 Auto Setup menu appears on the front of "Automatic Search" may take 15 to 30 minutes to complete, depending ...
Owner's Manual - English
Page 22
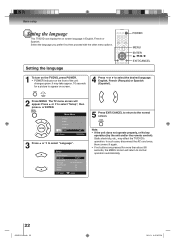
Main Menu Picture Audio Channel Lock Setup : Select ENTER:Set 3 Press ▲ or ▼ to the normal screen. It may affect the TV/DVD's operation. The TV menu screen will return to normal operation automatically. 22 J50S0101A.indb 22 08.1.9 4:45:06 PM Select the language you prefer fi... the MENU screen will appear. In such case, disconnect the AC cord once, then connect it again. • If no buttons are pressed for a picture to appear on screen. 4 Press ◀ or ▶ to select "Setup", then press ▶ or ENTER. Setup Closed Caption Language Video Label ...
Main Menu Picture Audio Channel Lock Setup : Select ENTER:Set 3 Press ▲ or ▼ to the normal screen. It may affect the TV/DVD's operation. The TV menu screen will return to normal operation automatically. 22 J50S0101A.indb 22 08.1.9 4:45:06 PM Select the language you prefer fi... the MENU screen will appear. In such case, disconnect the AC cord once, then connect it again. • If no buttons are pressed for a picture to appear on screen. 4 Press ◀ or ▶ to select "Setup", then press ▶ or ENTER. Setup Closed Caption Language Video Label ...

Owner's Manual - English
Page 23
To use this menu option is equipped with an antenna, set into the TV/DVDʼs memory. Main Menu Picture Audio Channel Lock Setup : Select ENTER:Set 1 Press MENU in the TV mode. Auto Ch Memory Signal Type Automatic Search Cable Start 4 Press ◀ or ▶ to select "... channel set the Tuning Band menu option to select "Channel", then press ▶ or ENTER. The TV menu screen will begin memorizing all the channels available in your area. Main Menu Picture Audio Channel Lock Setup : Select ENTER:Set 2 Press ▲ or ▼ to select "Automatic Search...
To use this menu option is equipped with an antenna, set into the TV/DVDʼs memory. Main Menu Picture Audio Channel Lock Setup : Select ENTER:Set 1 Press MENU in the TV mode. Auto Ch Memory Signal Type Automatic Search Cable Start 4 Press ◀ or ▶ to select "... channel set the Tuning Band menu option to select "Channel", then press ▶ or ENTER. The TV menu screen will begin memorizing all the channels available in your area. Main Menu Picture Audio Channel Lock Setup : Select ENTER:Set 2 Press ▲ or ▼ to select "Automatic Search...

Owner's Manual - English
Page 24
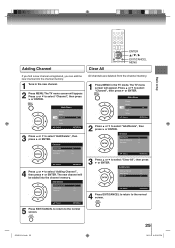
...Add Delete Add Delete : Select : Adjust 5 Press ◀ or ▶ to select "Add" or "Delete", whichever function you want to perform. The TV menu screen will appear. Channel Add/Delete >> Auto Ch Memory >> Ch Label >> : Select ENTER:Set 3 Press ▲ or ▼ to select "... Digital Analog Delete Add Delete Add Delete : Select : Adjust 6 Repeat steps 4 - 5 for other channels you want to skip. 1 Press MENU in the TV mode. Add/Delete Adding Channel >> Add/Delete >> Clear All >> ENTER / / / EXIT/CANCEL MENU 4 Press ▲ or ▼ to select the...
...Add Delete Add Delete : Select : Adjust 5 Press ◀ or ▶ to select "Add" or "Delete", whichever function you want to perform. The TV menu screen will appear. Channel Add/Delete >> Auto Ch Memory >> Ch Label >> : Select ENTER:Set 3 Press ▲ or ▼ to select "... Digital Analog Delete Add Delete Add Delete : Select : Adjust 6 Repeat steps 4 - 5 for other channels you want to skip. 1 Press MENU in the TV mode. Add/Delete Adding Channel >> Add/Delete >> Clear All >> ENTER / / / EXIT/CANCEL MENU 4 Press ▲ or ▼ to select the...
Owner's Manual - English
Page 25
Main Menu Picture Audio Channel Lock Setup : Select ENTER:Set 2 Press ▲ or ▼ to select "Adding Channel", then press ▶ or ENTER. J50S0101A.indb 25 25 08.1.9 4:45:10 PM The TV menu screen will appear. Channel Add/Delete >> Auto Ch Memory >> Ch Label >> : Select ...>> Clear All >> : Select ENTER:Set 4 Press EXIT/CANCEL to return to select "Channel", then press ▶ or ENTER. The TV menu screen will appear. Main Menu Picture Audio Channel Lock Setup : Select ENTER:Set 3 Press ▲ or ▼ to select "Channel", then press ▶ or ENTER...
Main Menu Picture Audio Channel Lock Setup : Select ENTER:Set 2 Press ▲ or ▼ to select "Adding Channel", then press ▶ or ENTER. J50S0101A.indb 25 25 08.1.9 4:45:10 PM The TV menu screen will appear. Channel Add/Delete >> Auto Ch Memory >> Ch Label >> : Select ...>> Clear All >> : Select ENTER:Set 4 Press EXIT/CANCEL to return to select "Channel", then press ▶ or ENTER. The TV menu screen will appear. Main Menu Picture Audio Channel Lock Setup : Select ENTER:Set 3 Press ▲ or ▼ to select "Channel", then press ▶ or ENTER...
Owner's Manual - English
Page 26
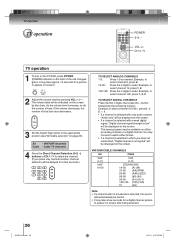
...1-9: Press 1-9 as needed. Example, to which you press only channel number, channel selection will be delayed for a few seconds for a picture to select channel 12, press 1, 2. 100-125: Press the 3 digits in order. You may take approx. 10 seconds for a digital channel...may choose to watch either an analog channel or a digital channel. VOL +/- Cable TV channels 4 Press the Direct Channel Selection (0-9, -) buttons or CH / to select channel 120, press 1, 2, 0. CH / TV operation 1 To turn on the TV/DVD, press POWER. (POWER indicator on the screen by the remaining number. The...
...1-9: Press 1-9 as needed. Example, to which you press only channel number, channel selection will be delayed for a few seconds for a picture to select channel 12, press 1, 2. 100-125: Press the 3 digits in order. You may take approx. 10 seconds for a digital channel...may choose to watch either an analog channel or a digital channel. VOL +/- Cable TV channels 4 Press the Direct Channel Selection (0-9, -) buttons or CH / to select channel 120, press 1, 2, 0. CH / TV operation 1 To turn on the TV/DVD, press POWER. (POWER indicator on the screen by the remaining number. The...
Owner's Manual - English
Page 27
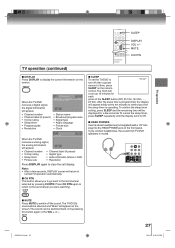
...1080i • Station name • Broadcast program name • Signal type • Audio language • Picture size • Clock 14 Analog Cable Sleep Timer Off When the TV/DVD receives a analog signal, the analog information Full 480i will appear. • Channel number • Channel...1/8" mini plug into the HEAD PHONE jack on the remote control. When the TV/DVD receives a digital signal, the digital information will appear. • Channel number • V-Chip rating • Sleep timer • Picture size • Channel label (if preset) • Signal type • ...
...1080i • Station name • Broadcast program name • Signal type • Audio language • Picture size • Clock 14 Analog Cable Sleep Timer Off When the TV/DVD receives a analog signal, the analog information Full 480i will appear. • Channel number • Channel...1/8" mini plug into the HEAD PHONE jack on the remote control. When the TV/DVD receives a digital signal, the digital information will appear. • Channel number • V-Chip rating • Sleep timer • Picture size • Channel label (if preset) • Signal type • ...
Owner's Manual - English
Page 28
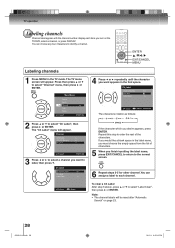
... >> : Select : Adjust ENTER:Set The characters rotation as follows: SPACE If the character which you want to label, then press ▼. TV operation Labeling channels Channel label appear with the channel number display each channel. : Select : Adjust To clear a Ch Label After step 3 above... screen. 6 Repeat steps 3-5 for other channel. ENTER / / / EXIT/CANCEL MENU Labeling channels 1 Press MENU in the first space. Main Menu Picture Audio Channel Lock Setup : Select ENTER:Set 2 Press ▲ or ▼ to select "Channel" menu, then press ▶ or ENTER. Channel...
... >> : Select : Adjust ENTER:Set The characters rotation as follows: SPACE If the character which you want to label, then press ▼. TV operation Labeling channels Channel label appear with the channel number display each channel. : Select : Adjust To clear a Ch Label After step 3 above... screen. 6 Repeat steps 3-5 for other channel. ENTER / / / EXIT/CANCEL MENU Labeling channels 1 Press MENU in the first space. Main Menu Picture Audio Channel Lock Setup : Select ENTER:Set 2 Press ▲ or ▼ to select "Channel" menu, then press ▶ or ENTER. Channel...

Owner's Manual - English
Page 29
Main Menu Picture Audio Channel Lock Setup : Select ENTER:Set 2 Press ▲ or ▼ to the normal screen. : Select : Adjust J50S0101A.indb 29 29 08.1.9 4:45:16 PM ColorStream HD - ColorStream HD SAT HDMI - : Select : Adjust - The TV menu screen will appear. VCR DVD DTV SAT.../CANCEL to return to select "Video Label", then press ▶ or ENTER. Press ▲ or ▼ to select the desired label for your TV/DVD. Setup Closed Caption Language Video Label Backlight 16 Auto Shut Off Aspect Reset : Select >> English >> Off On >> ENTER:Set 3 Press ▲...
Main Menu Picture Audio Channel Lock Setup : Select ENTER:Set 2 Press ▲ or ▼ to the normal screen. : Select : Adjust J50S0101A.indb 29 29 08.1.9 4:45:16 PM ColorStream HD - ColorStream HD SAT HDMI - : Select : Adjust - The TV menu screen will appear. VCR DVD DTV SAT.../CANCEL to return to select "Video Label", then press ▶ or ENTER. Press ▲ or ▼ to select the desired label for your TV/DVD. Setup Closed Caption Language Video Label Backlight 16 Auto Shut Off Aspect Reset : Select >> English >> Off On >> ENTER:Set 3 Press ▲...
Owner's Manual - English
Page 30
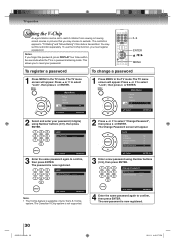
... or ▼ to confirm, then press ENTER. Main Menu Picture Audio Channel Lock Setup : Select ENTER:Set 2 Select and enter your password. 0-9 ENTER / / MENU To register a password To change a password 1 Press MENU in the TV mode. The password is now registered. 30 J50S0101A.indb 30 08...To use the V-Chip function, you may set to restrict children from viewing or hearing violent scenes or pictures that you must register a password. Press ▲ or ▼ to "TV Rating" and "Movie Rating" if this restriction separately. The Change Password screen will appear. Notes: ...
... or ▼ to confirm, then press ENTER. Main Menu Picture Audio Channel Lock Setup : Select ENTER:Set 2 Select and enter your password. 0-9 ENTER / / MENU To register a password To change a password 1 Press MENU in the TV mode. The password is now registered. 30 J50S0101A.indb 30 08...To use the V-Chip function, you may set to restrict children from viewing or hearing violent scenes or pictures that you must register a password. Press ▲ or ▼ to "TV Rating" and "Movie Rating" if this restriction separately. The Change Password screen will appear. Notes: ...
Owner's Manual - English
Page 31
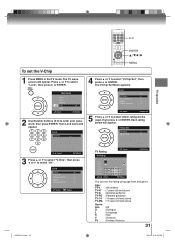
... >> Change Password >> : Select : Adjust J50S0101A.indb 31 TV Rating : Select TV Rating ALL D L S V FV TV-Y TV-Y7 TV-G TV-PG TV-14 TV-MA : Select ENTER:Set ENTER: Set You can set the V-Chip 1 Press MENU in the TV mode. Main Menu Picture Audio Channel Lock Setup : Select ENTER:Set 2 Use Number ... old and above Genre: ALL : All D : Dialogue L : Language S : Sex V : Violence FV : Fantasy Violence 31 08.1.9 4:45:19 PM The TV menu screen will appear. Then Lock menu will be used, then press ▶ or ENTER. Press ▲ or ▼ to select "Lock",...
... >> Change Password >> : Select : Adjust J50S0101A.indb 31 TV Rating : Select TV Rating ALL D L S V FV TV-Y TV-Y7 TV-G TV-PG TV-14 TV-MA : Select ENTER:Set ENTER: Set You can set the V-Chip 1 Press MENU in the TV mode. Main Menu Picture Audio Channel Lock Setup : Select ENTER:Set 2 Use Number ... old and above Genre: ALL : All D : Dialogue L : Language S : Sex V : Violence FV : Fantasy Violence 31 08.1.9 4:45:19 PM The TV menu screen will appear. Then Lock menu will be used, then press ▶ or ENTER. Press ▲ or ▼ to select "Lock",...

Owner's Manual - English
Page 33
Main Menu Picture Audio Channel Lock Setup : Select ENTER:Set 2 Use Number buttons (0-9) to enter your TV/DVD is receiving a digital signal or not, and will be able to download an additional rating system, if such a system becomes available in the future. 0-9... ---- 6 You also need "Update" procedure to select "V-Chip Set (DTV)", then press ▶ or ENTER. J50S0101A.indb 33 33 08.1.9 4:45:21 PM The TV menu screen will appear. As a supplement to the standard V-Chip rating system, your preferred content rating limits for the additional rating system. Lock V-Chip On...
Main Menu Picture Audio Channel Lock Setup : Select ENTER:Set 2 Use Number buttons (0-9) to enter your TV/DVD is receiving a digital signal or not, and will be able to download an additional rating system, if such a system becomes available in the future. 0-9... ---- 6 You also need "Update" procedure to select "V-Chip Set (DTV)", then press ▶ or ENTER. J50S0101A.indb 33 33 08.1.9 4:45:21 PM The TV menu screen will appear. As a supplement to the standard V-Chip rating system, your preferred content rating limits for the additional rating system. Lock V-Chip On...
Owner's Manual - English
Page 34
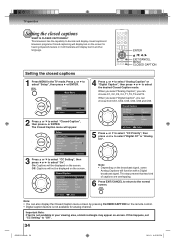
...CANCEL to return to decode and display closed captioned television programs. Closed captioning will translate and display text in another language. Main Menu Picture Audio Channel Lock Setup : Select ENTER:Set 2 Press ▲ or ▼ to select the desired Closed Caption mode. Closed Caption...to select "Closed Caption", then press ▶ or ENTER. The Closed Caption menu will be displayed on -screen. On: Captions will appear. TV operation Setting the closed captions 1 Press MENU in your viewing area, a black rectangle may appear on the screen. ENTER // / EXIT/CANCEL...
...CANCEL to return to decode and display closed captioned television programs. Closed captioning will translate and display text in another language. Main Menu Picture Audio Channel Lock Setup : Select ENTER:Set 2 Press ▲ or ▼ to select the desired Closed Caption mode. Closed Caption...to select "Closed Caption", then press ▶ or ENTER. The Closed Caption menu will be displayed on -screen. On: Captions will appear. TV operation Setting the closed captions 1 Press MENU in your viewing area, a black rectangle may appear on the screen. ENTER // / EXIT/CANCEL...
Owner's Manual - English
Page 35
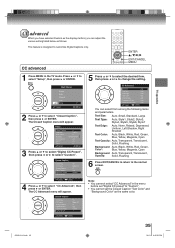
... desired item, then press ◀ or ▶ to select "Custom". Note: • You cannnot select "CC Advanced" in the TV mode. TV operation CC advanced When you have selected Custom as the display method, you can select from among the following items and parameters. Setup Closed Caption...9660; to select "Digital CC Preset", then press ◀ or ▶ to change the setting. The Closed Caption menu will appear. Main Menu Picture Audio Channel Lock Setup : Select ENTER:Set 2 Press ▲ or ▼ to the normal screen. The CC Advanced menu will appear. CC Advanced...
... desired item, then press ◀ or ▶ to select "Custom". Note: • You cannnot select "CC Advanced" in the TV mode. TV operation CC advanced When you have selected Custom as the display method, you can select from among the following items and parameters. Setup Closed Caption...9660; to select "Digital CC Preset", then press ◀ or ▶ to change the setting. The Closed Caption menu will appear. Main Menu Picture Audio Channel Lock Setup : Select ENTER:Set 2 Press ▲ or ▼ to the normal screen. The CC Advanced menu will appear. CC Advanced...


