
User Manual
Page 3
...IS OPENED. Location of the required Marking The rating sheet and the safety caution are designed to correct the interference by removing and applying power to the equipment, the user is no guarantee that may cause hazards. 7. This equipment generates, uses, and can be read before cleaning...Consult the dealer or an experienced radio/TV technician for future reference. 3. FCC Declaration of Conformity Compliance Statement (Part 15): The Toshiba 17HLV85/20HLV85, LCD TV/DVD Combination complies with a dry cloth. 6. ATTACHMENTS Do not use liquid cleaners or aerosol cleaners.
...IS OPENED. Location of the required Marking The rating sheet and the safety caution are designed to correct the interference by removing and applying power to the equipment, the user is no guarantee that may cause hazards. 7. This equipment generates, uses, and can be read before cleaning...Consult the dealer or an experienced radio/TV technician for future reference. 3. FCC Declaration of Conformity Compliance Statement (Part 15): The Toshiba 17HLV85/20HLV85, LCD TV/DVD Combination complies with a dry cloth. 6. ATTACHMENTS Do not use liquid cleaners or aerosol cleaners.

User Manual
Page 4
...electrician to . 10. EXAMPLE OF ANTENNA GROUNDING AS PER THE NATIONAL ELECTRICAL CODE GROUND CLAMP NEC-NATIONAL ELECTRICAL CODE S2898A ELECTRIC SERVICE EQUIPMENT POWER SERVICE GROUNDING ELECTRODE SYSTEM (NEC ART 250, PART H) 4 ANTENNA LEAD IN WIRE ANTENNA DISCHARGE UNIT (NEC SECTION 810-20) GROUNDING... to a child or adult, and serious damage to cords at plugs, convenience receptacles, and the point where they exit from overheating. POWER SOURCE This unit should use a mounting accessory recommended by placing the unit on an unstable cart, stand, tripod, bracket, or table....
...electrician to . 10. EXAMPLE OF ANTENNA GROUNDING AS PER THE NATIONAL ELECTRICAL CODE GROUND CLAMP NEC-NATIONAL ELECTRICAL CODE S2898A ELECTRIC SERVICE EQUIPMENT POWER SERVICE GROUNDING ELECTRODE SYSTEM (NEC ART 250, PART H) 4 ANTENNA LEAD IN WIRE ANTENNA DISCHARGE UNIT (NEC SECTION 810-20) GROUNDING... to a child or adult, and serious damage to cords at plugs, convenience receptacles, and the point where they exit from overheating. POWER SOURCE This unit should use a mounting accessory recommended by placing the unit on an unstable cart, stand, tripod, bracket, or table....

User Manual
Page 5
...LCD panel be connected to the grounding system of the building, as close to the point of the other equipment, turn off the power and unplug all servicing to do not inhale or swallow it. ON DISPOSAL This product contains mercury. Failure to qualified service personnel....Introduction Connecting your TV/DVD Setting up your local authorities or the Electronic Industrial Alliance: www.eiae.org. d. If your doctor. When the power-supply cord or plug is closing. CONNECTING When you have the same characteristics as practical. Doing so may cause hearing damage. 25. c. ...
...LCD panel be connected to the grounding system of the building, as close to the point of the other equipment, turn off the power and unplug all servicing to do not inhale or swallow it. ON DISPOSAL This product contains mercury. Failure to qualified service personnel....Introduction Connecting your TV/DVD Setting up your local authorities or the Electronic Industrial Alliance: www.eiae.org. d. If your doctor. When the power-supply cord or plug is closing. CONNECTING When you have the same characteristics as practical. Doing so may cause hearing damage. 25. c. ...

User Manual
Page 6
... future. Wall outlet Screw Tie Wall Screw holes Hooks TV Stand Screw Safety Band Note on and use volatile liquids, such as it . Therefore, Toshiba is displayed for example, when you move the unit from a cold area to excessive dust or vibration. ■ Always place the TV/DVD on...use the unit occasionally. In the same way, moisture may be an occasional pixel (dot of precision technology; Remove the disc, connect the power cord of the unit to the stand using an extremely high level of light) that does not operate properly (does not light, remains constantly ...
... future. Wall outlet Screw Tie Wall Screw holes Hooks TV Stand Screw Safety Band Note on and use volatile liquids, such as it . Therefore, Toshiba is displayed for example, when you move the unit from a cold area to excessive dust or vibration. ■ Always place the TV/DVD on...use the unit occasionally. In the same way, moisture may be an occasional pixel (dot of precision technology; Remove the disc, connect the power cord of the unit to the stand using an extremely high level of light) that does not operate properly (does not light, remains constantly ...

User Manual
Page 9
...equipped with an MPEG audio decoder 19 Connecting an amplifier equipped with a digital audio input 19 Connecting a PC (Personal Computer 20 Power source 20 Setting up your TV/DVD 21 Using the remote control 21 Installing the remote control batteries 21 Learning about the remote control... ........ 39 Selecting the HDMI audio input source 40 Adjusting the back lighting feature 40 Displaying on-screen information 40 Auto power off 40 Understanding the Power Return feature 40 Picture/Audio adjustments in the PC mode ........ 41 Resetting your picture/audio adjustments in the PC mode 41...
...equipped with an MPEG audio decoder 19 Connecting an amplifier equipped with a digital audio input 19 Connecting a PC (Personal Computer 20 Power source 20 Setting up your TV/DVD 21 Using the remote control 21 Installing the remote control batteries 21 Learning about the remote control... ........ 39 Selecting the HDMI audio input source 40 Adjusting the back lighting feature 40 Displaying on-screen information 40 Auto power off 40 Understanding the Power Return feature 40 Picture/Audio adjustments in the PC mode ........ 41 Resetting your picture/audio adjustments in the PC mode 41...

User Manual
Page 10
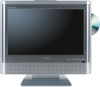
... AUDIO OUT 10 10 6/17/05, 10:59 AM The volume and channel buttons on the top panel can adjust the angle of 20HLV85 Back POWER indicator Remote sensor Left side Disc slot You can be used as / and / buttons while the TV menu is displayed on screen. Approx 5˚ Approx...
... AUDIO OUT 10 10 6/17/05, 10:59 AM The volume and channel buttons on the top panel can adjust the angle of 20HLV85 Back POWER indicator Remote sensor Left side Disc slot You can be used as / and / buttons while the TV menu is displayed on screen. Approx 5˚ Approx...

User Manual
Page 11
.... • Place the TV/DVD far enough from the walls to watch local channels and video programs, play or record on a sturdy platform in any power cords until you can only be used with S-video compatible components. • Component video cables provide better picture performance than standard video cables. TV/DVD...
.... • Place the TV/DVD far enough from the walls to watch local channels and video programs, play or record on a sturdy platform in any power cords until you can only be used with S-video compatible components. • Component video cables provide better picture performance than standard video cables. TV/DVD...

User Manual
Page 18
... well. • The output sound of a Dolby Digital Receiver. If you have a DTS decoder or processor, you connect or disconnect the TV/DVD's power cord. This input on your TV/DVD Connecting an amplifier equipped with a DTS® decoder Digital Theater Systems (DTS) DTS is now available to reproduce... the TV/DVD to the owner's manual of the connected equipment as from Dolby Laboratories. If you connect or disconnect the TV/DVD's power cord. Otherwise, the speakers may be damaged by a sudden high volume sound. • Turn off the amplifier before you leave the amplifier...
... well. • The output sound of a Dolby Digital Receiver. If you have a DTS decoder or processor, you connect or disconnect the TV/DVD's power cord. This input on your TV/DVD Connecting an amplifier equipped with a DTS® decoder Digital Theater Systems (DTS) DTS is now available to reproduce... the TV/DVD to the owner's manual of the connected equipment as from Dolby Laboratories. If you connect or disconnect the TV/DVD's power cord. Otherwise, the speakers may be damaged by a sudden high volume sound. • Turn off the amplifier before you leave the amplifier...

User Manual
Page 19
... jack of the TV/DVD to the "COAXIAL" input of a Receiver or Processor. • Refer to a moderate listening level. If you leave the amplifier power on , the speakers may be damaged by a sudden high volume sound. • Turn off the amplifier before you connect or disconnect the TV/DVD... , the speakers may be damaged by a sudden high volume sound. • Turn off the amplifier before you connect or disconnect the TV/DVD's power cord. Otherwise, the speakers may be damaged. Be sure to adjust the receiver's volume to the owner's manual of the connected equipment as well. &#...
... jack of the TV/DVD to the "COAXIAL" input of a Receiver or Processor. • Refer to a moderate listening level. If you leave the amplifier power on , the speakers may be damaged by a sudden high volume sound. • Turn off the amplifier before you connect or disconnect the TV/DVD... , the speakers may be damaged by a sudden high volume sound. • Turn off the amplifier before you connect or disconnect the TV/DVD's power cord. Otherwise, the speakers may be damaged. Be sure to adjust the receiver's volume to the owner's manual of the connected equipment as well. &#...

User Manual
Page 20
...) VGA cable to the video card of the TV/DVD. Set the video input source to PC mode (see page 41.) To PC Power source Power connection To use AC power 1. Connect the AC cord to the AUDIO L and R connectors of the PC IN jacks of the computer and the other end to... video input source" on page 31 and "Picture/Audio adjustments in the PC mode" on a trip) in PC mode than the supplied AC adapter or power cord. See "Monitor Display modes" at the side of safety, be used. Connecting your TV/DVD Connecting a PC (Personal Computer) Before you return to TV...
...) VGA cable to the video card of the TV/DVD. Set the video input source to PC mode (see page 41.) To PC Power source Power connection To use AC power 1. Connect the AC cord to the AUDIO L and R connectors of the PC IN jacks of the computer and the other end to... video input source" on page 31 and "Picture/Audio adjustments in the PC mode" on a trip) in PC mode than the supplied AC adapter or power cord. See "Monitor Display modes" at the side of safety, be used. Connecting your TV/DVD Connecting a PC (Personal Computer) Before you return to TV...

User Manual
Page 22
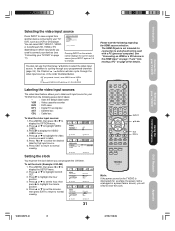
... M/? Approx. 5 meters Remote Sensor 5U90121A(E)P22-25 22 22 6/20/05, 4:06 PM Setting up your TV/DVD Learning about the remote control POWER turns the TV/DVD on either side of approx. 16 ft. (5m). adjusts the volume level ENTER sets programmed menu information (page 23) Eject ...TV/DVD Channel Numbers EXIT/CANCEL exits programming menus or resets information in (page 45) SKIP 4/¢ skips DVD chapter (page 44) Sleep POWER Volume +/- Audio Select Mute Enter DVD menu Exit/Cancel Play Stop FF Closed Caption Skip 4/¢ Marker Repeat A-B Return Pic size FF fast forwards ...
... M/? Approx. 5 meters Remote Sensor 5U90121A(E)P22-25 22 22 6/20/05, 4:06 PM Setting up your TV/DVD Learning about the remote control POWER turns the TV/DVD on either side of approx. 16 ft. (5m). adjusts the volume level ENTER sets programmed menu information (page 23) Eject ...TV/DVD Channel Numbers EXIT/CANCEL exits programming menus or resets information in (page 45) SKIP 4/¢ skips DVD chapter (page 44) Sleep POWER Volume +/- Audio Select Mute Enter DVD menu Exit/Cancel Play Stop FF Closed Caption Skip 4/¢ Marker Repeat A-B Return Pic size FF fast forwards ...

User Manual
Page 23
IMPORTANT: Make sure that the antenna or cable TV system connection is com- Press POWER to see your changes. • After one minute, the menu screen will appear in the process of the on the TV/DVD, and helps you .... Now the "AUTO SETUP" starts. You do not make a menu selection, your changes occur immediately. Press MENU, then press or until the SETUP menu appears. POWER Enter Exit Menu SETUP LANGUAGE CLOCK SET TV / CABLE CH PROGRAM ADD / ERASE :SELECT ENGLISH 12:00AM CABLE ADD :ADJUST 2. The starting setup is made...
IMPORTANT: Make sure that the antenna or cable TV system connection is com- Press POWER to see your changes. • After one minute, the menu screen will appear in the process of the on the TV/DVD, and helps you .... Now the "AUTO SETUP" starts. You do not make a menu selection, your changes occur immediately. Press MENU, then press or until the SETUP menu appears. POWER Enter Exit Menu SETUP LANGUAGE CLOCK SET TV / CABLE CH PROGRAM ADD / ERASE :SELECT ENGLISH 12:00AM CABLE ADD :ADJUST 2. The starting setup is made...

User Manual
Page 29
..., the display will change channels automatically and enter VIDEO LOCK mode. To lock the panel: 1. LOCKS If a button on the TV/DVD top panel (except POWER) do not operate. Press EXIT to return to display the password entering mode. 3. Press ▲ or ▼ to highlight PANEL LOCK and press or to...
..., the display will change channels automatically and enter VIDEO LOCK mode. To lock the panel: 1. LOCKS If a button on the TV/DVD top panel (except POWER) do not operate. Press EXIT to return to display the password entering mode. 3. Press ▲ or ▼ to highlight PANEL LOCK and press or to...
User Manual
Page 31
... ▼ to set the minutes, then press EXIT to return to normal viewing. INPUT Exit Menu Note: If the power source for the TV/DVD is interrupted (for example, the power cord is not intended for connection to and should not be used to connect your devices (see "Connecting your TV... Selecting the video input source Press INPUT to view a signal from the following regarding the HDMI source selection: The HDMI IN jack is unplugged or a power failure occurs), you to label each input source for that input source. 6. You can use the Channel M / ? Press ▲ or ▼ to highlight ...
... ▼ to set the minutes, then press EXIT to return to normal viewing. INPUT Exit Menu Note: If the power source for the TV/DVD is interrupted (for example, the power cord is not intended for connection to and should not be used to connect your devices (see "Connecting your TV... Selecting the video input source Press INPUT to view a signal from the following regarding the HDMI source selection: The HDMI IN jack is unplugged or a power failure occurs), you to label each input source for that input source. 6. You can use the Channel M / ? Press ▲ or ▼ to highlight ...

User Manual
Page 32
.... Press to normal viewing. ON TIMER ON T6I:M3E0ARM RETURN CH012 ONCE / DAILY / CLEAR :ADJUST ENTER : SET Enter Exit Menu Note: After a power failure or disconnection of the power, the timer settings will turn on automatically at a set the time. 5. Setting the ON timer This feature allows you to program the TV...
.... Press to normal viewing. ON TIMER ON T6I:M3E0ARM RETURN CH012 ONCE / DAILY / CLEAR :ADJUST ENTER : SET Enter Exit Menu Note: After a power failure or disconnection of the power, the timer settings will turn on automatically at a set the time. 5. Setting the ON timer This feature allows you to program the TV...

User Manual
Page 40
...SELECT OFF OFF OFF HDMI / DVI :ADJUST Adjusting the back lighting feature If your TV/DVD is resupplied, the Power Return feature will automatically turn the TV/ DVD on automatically. When areas on the screen darken, flicker, or no... TV-PG L V ON TIMER 12:00AM SLEEP TIMER 2h00m FULL ANT ABCD 0 0 2 C L O C K 1 2 : 0 0 A M C A B L E Menu Auto power off The TV/DVD will turn off after approximately 15 minutes if it is going to be off while you connect an HDMI device but...DVD has a limited life. This feature does not work in your nearest Toshiba Authorized Service Station.
...SELECT OFF OFF OFF HDMI / DVI :ADJUST Adjusting the back lighting feature If your TV/DVD is resupplied, the Power Return feature will automatically turn the TV/ DVD on automatically. When areas on the screen darken, flicker, or no... TV-PG L V ON TIMER 12:00AM SLEEP TIMER 2h00m FULL ANT ABCD 0 0 2 C L O C K 1 2 : 0 0 A M C A B L E Menu Auto power off The TV/DVD will turn off after approximately 15 minutes if it is going to be off while you connect an HDMI device but...DVD has a limited life. This feature does not work in your nearest Toshiba Authorized Service Station.

User Manual
Page 42
... changes to end playback. Press ▲/▼ or / to turn on the unit. Play Stop Note: Static electricity may cause serious personal injury. The Power indicator will appear on the TV screen, if the disc has a menu feature. Neglecting to do so may affect the DVD player's operation and cause...("■" appears on screen). 42 5U90121A(E)P42-53 42 6/17/05, 11:01 AM DVD Playback VOLUME 32 6. Title is loading or unloading. Press POWER on the unit or on the remote control to select title, then press ENTER. Note: When you playback the 8cm disc, you press STOP again...
... changes to end playback. Press ▲/▼ or / to turn on the unit. Play Stop Note: Static electricity may cause serious personal injury. The Power indicator will appear on the TV screen, if the disc has a menu feature. Neglecting to do so may affect the DVD player's operation and cause...("■" appears on screen). 42 5U90121A(E)P42-53 42 6/17/05, 11:01 AM DVD Playback VOLUME 32 6. Title is loading or unloading. Press POWER on the unit or on the remote control to select title, then press ENTER. Note: When you playback the 8cm disc, you press STOP again...

User Manual
Page 46
... or stop mode. 2. Press or to appear. Marking desired scenes DVD VCD The unit stores the points that you eject the disc or turn the power off. • Some subtitles recorded around the marker may fail to select the Marker 1-3. 3. You can resume playback from the marked scene. Then press ENTER...
... or stop mode. 2. Press or to appear. Marking desired scenes DVD VCD The unit stores the points that you eject the disc or turn the power off. • Some subtitles recorded around the marker may fail to select the Marker 1-3. 3. You can resume playback from the marked scene. Then press ENTER...

User Manual
Page 48
... playback will start to input the Track or file numbers. • To program others, repeat step 3. • If you eject the disc or turn the power off. Play Mode : Program Repeat : Off 1 4 7 10 2 5 8 11 3 6 9 12 Clear Program Playback /Enter/0 9/Cancel/Play Mode Play Mode : Program Repeat : Off 19 4 7 10 23 5 8 11...
... playback will start to input the Track or file numbers. • To program others, repeat step 3. • If you eject the disc or turn the power off. Play Mode : Program Repeat : Off 1 4 7 10 2 5 8 11 3 6 9 12 Clear Program Playback /Enter/0 9/Cancel/Play Mode Play Mode : Program Repeat : Off 19 4 7 10 23 5 8 11...

User Manual
Page 57
... setting cannot be played back. Select from the level 1 to input a 4-digit password. Be sure to remember this number! • If you turn off the power. Note: You can change the password if you require appears. • Level Off: The parental control setting does not function. • Level 8: Virtually all DVD...
... setting cannot be played back. Select from the level 1 to input a 4-digit password. Be sure to remember this number! • If you turn off the power. Note: You can change the password if you require appears. • Level Off: The parental control setting does not function. • Level 8: Virtually all DVD...
