

User Manual
Page 19
... environment....... 43 Keeping yourself comfortable 44 Precautions 47 Setting up your computer 48 Setting up your software 49 Registering your computer with Toshiba ......... 50 Adding external devices 50 Installing additional memory (optional 51 Connecting a mouse 58 Connecting a printer 58 Connecting a USB printer 58 Connecting a parallel printer 58 Using external display devices 59...
... environment....... 43 Keeping yourself comfortable 44 Precautions 47 Setting up your computer 48 Setting up your software 49 Registering your computer with Toshiba ......... 50 Adding external devices 50 Installing additional memory (optional 51 Connecting a mouse 58 Connecting a printer 58 Connecting a USB printer 58 Connecting a parallel printer 58 Using external display devices 59...

User Manual
Page 25
... conflict 212 A plan of action 212 Resolving hardware conflicts on your own .... 213 Fixing a problem with Device Manager .......... 214 Memory module problems 216 Power and the batteries 217 Keyboard problems 218 Display problems 219 Disk drive problems 221 DVD-ROM or multi-function ...227 Modem problems 228 Develop good computing habits 229 If you need further assistance 230 Before you call 230 Contacting Toshiba 231 Other Toshiba Internet Web sites 232 Toshiba's worldwide offices 233 Appendix A: Hot Keys 236 Volume Mute 236 Instant password security 237 Without a password 237...
... conflict 212 A plan of action 212 Resolving hardware conflicts on your own .... 213 Fixing a problem with Device Manager .......... 214 Memory module problems 216 Power and the batteries 217 Keyboard problems 218 Display problems 219 Disk drive problems 221 DVD-ROM or multi-function ...227 Modem problems 228 Develop good computing habits 229 If you need further assistance 230 Before you call 230 Contacting Toshiba 231 Other Toshiba Internet Web sites 232 Toshiba's worldwide offices 233 Appendix A: Hot Keys 236 Volume Mute 236 Instant password security 237 Without a password 237...

User Manual
Page 41
... causes the disc player to skip to play a CD or DVD. The modem cover protects the built-in modem. NOTE: If you insert additional memory. The expansion memory slot cover protects the slots where you have set a password for logging onto your system, your system tray" on the disc. Underside *Wi-Fi... Mini PCI cover Expansion memory slot cover Modem cover Battery cover Hard disk drive cover *Wi-Fi Mini PCI module is optional Battery release latch The Wi-Fi Mini-PCI...
... causes the disc player to skip to play a CD or DVD. The modem cover protects the built-in modem. NOTE: If you insert additional memory. The expansion memory slot cover protects the slots where you have set a password for logging onto your system, your system tray" on the disc. Underside *Wi-Fi... Mini PCI cover Expansion memory slot cover Modem cover Battery cover Hard disk drive cover *Wi-Fi Mini PCI module is optional Battery release latch The Wi-Fi Mini-PCI...

User Manual
Page 50
... : ❖ Add more memory (see "Installing additional memory (optional)" on page 51) ❖ Connect a mouse (see "Connecting a mouse" on your desktop. Before starting to use your computer, you may register with Toshiba by clicking the Register with Toshiba by doubleclicking the icon on page...may also want to a voice-grade telephone line. Your computer restarts automatically. Adding external devices NOTE: Before adding external devices, Toshiba recommends setting up your software" on the desktop. 6 Enter your personal information in the registration window. 7 Click Finish to complete...
... : ❖ Add more memory (see "Installing additional memory (optional)" on page 51) ❖ Connect a mouse (see "Connecting a mouse" on your desktop. Before starting to use your computer, you may register with Toshiba by clicking the Register with Toshiba by doubleclicking the icon on page...may also want to a voice-grade telephone line. Your computer restarts automatically. Adding external devices NOTE: Before adding external devices, Toshiba recommends setting up your software" on the desktop. 6 Enter your personal information in the registration window. 7 Click Finish to complete...
User Manual
Page 51
...temperature before you use complex software or process large amounts of today's popular applications. CAUTION: If you replace them. Getting Started Installing additional memory (optional) 51 ❖ Connect a full-size keyboard (see "Using an external keyboard" on page 62) ❖ Connect an ...Connecting a printer" on page 58) ❖ Install PC Cards (see "Using PC Cards" on page 187) Installing additional memory (optional) CAUTION: Before you install or remove a memory module while the computer is in Standby or Hibernation mode, data will become hot. If you install or remove...
...temperature before you use complex software or process large amounts of today's popular applications. CAUTION: If you replace them. Getting Started Installing additional memory (optional) 51 ❖ Connect a full-size keyboard (see "Using an external keyboard" on page 62) ❖ Connect an ...Connecting a printer" on page 58) ❖ Install PC Cards (see "Using PC Cards" on page 187) Installing additional memory (optional) CAUTION: Before you install or remove a memory module while the computer is in Standby or Hibernation mode, data will become hot. If you install or remove...
User Manual
Page 52
.... 2 Unplug and remove any cables connected to the DVD-ROM drive has been turned on. The computer is on . 2. CAUTION: Do not install or remove a memory module while the DVD-ROM drive power is on. 1 If the computer is turned on , turn the computer upside down. 52 Getting Started Installing additional...
.... 2 Unplug and remove any cables connected to the DVD-ROM drive has been turned on. The computer is on . 2. CAUTION: Do not install or remove a memory module while the DVD-ROM drive power is on. 1 If the computer is turned on , turn the computer upside down. 52 Getting Started Installing additional...
User Manual
Page 53
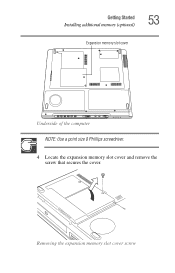
Getting Started Installing additional memory (optional) 53 Expansion memory slot cover Underside of the computer NOTE: Use a point size 0 Phillips screwdriver. 4 Locate the expansion memory slot cover and remove the screw that secures the cover. Removing the expansion memory slot cover screw
Getting Started Installing additional memory (optional) 53 Expansion memory slot cover Underside of the computer NOTE: Use a point size 0 Phillips screwdriver. 4 Locate the expansion memory slot cover and remove the screw that secures the cover. Removing the expansion memory slot cover screw
User Manual
Page 54
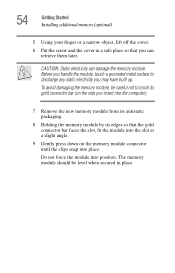
...fit the module into the slot at a slight angle. 9 Gently press down on the side you insert into the computer). 7 Remove the new memory module from its antistatic packaging. 8 Holding the memory module by its edges so that you may have built up. 54 Getting Started Installing additional... Static electricity can retrieve them later. Before you handle the module, touch a grounded metal surface to touch its gold connector bar (on the memory module connector until the clips snap into position. The memory module should be careful not to discharge any static electricity you can damage the...
...fit the module into the slot at a slight angle. 9 Gently press down on the side you insert into the computer). 7 Remove the new memory module from its antistatic packaging. 8 Holding the memory module by its edges so that you may have built up. 54 Getting Started Installing additional... Static electricity can retrieve them later. Before you handle the module, touch a grounded metal surface to touch its gold connector bar (on the memory module connector until the clips snap into position. The memory module should be careful not to discharge any static electricity you can damage the...

User Manual
Page 55
...now continue setting up the computer, verify that the computer has recognized the additional memory. Getting Started Installing additional memory (optional) 55 Inserting the memory module CAUTION: Avoid touching the connectors on the memory module or on page 57. When the operating system has loaded, you are ...adding extra memory after setting up the computer. Grease or dust on the connectors may cause memory access problems. 10 Replace the memory slot cover. 11 Replace the...
...now continue setting up the computer, verify that the computer has recognized the additional memory. Getting Started Installing additional memory (optional) 55 Inserting the memory module CAUTION: Avoid touching the connectors on the memory module or on page 57. When the operating system has loaded, you are ...adding extra memory after setting up the computer. Grease or dust on the connectors may cause memory access problems. 10 Replace the memory slot cover. 11 Replace the...
User Manual
Page 56
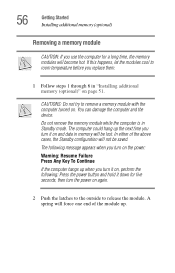
... Continue If the computer hangs up when you turn it on , perform the following: Press the power button and hold it on and data in memory will become hot. CAUTIONS: Do not try to room temperature before you turn it down for a long time, the... memory modules will be saved. In either of the module up the next time you replace them. 1 Follow steps 1 through 6 in Standby mode. You can damage ...
... Continue If the computer hangs up when you turn it on , perform the following: Press the power button and hold it on and data in memory will become hot. CAUTIONS: Do not try to room temperature before you turn it down for a long time, the... memory modules will be saved. In either of the module up the next time you replace them. 1 Follow steps 1 through 6 in Standby mode. You can damage ...

User Manual
Page 57
... automatically appears and shows the recognized memory. 5 If the computer does not recognize the memory configuration, turn off the computer, remove the memory slot cover, and make sure the memory module is seated Checking total memory When you add or remove memory, you can check that the computer... CAUTION: Avoid touching the connectors on the memory module or on page 51. Getting Started Installing additional memory (optional) 57 Removing the memory module 3 Gently pull the module out. Grease or dust on the connectors may cause memory access problems. 4 Complete the procedure by ...
... automatically appears and shows the recognized memory. 5 If the computer does not recognize the memory configuration, turn off the computer, remove the memory slot cover, and make sure the memory module is seated Checking total memory When you add or remove memory, you can check that the computer... CAUTION: Avoid touching the connectors on the memory module or on page 51. Getting Started Installing additional memory (optional) 57 Removing the memory module 3 Gently pull the module out. Grease or dust on the connectors may cause memory access problems. 4 Complete the procedure by ...
User Manual
Page 58
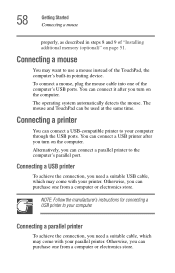
... the computer's parallel port. You can connect a parallel printer to use a mouse instead of the TouchPad, the computer's built-in steps 8 and 9 of "Installing additional memory (optional)" on the computer. 58 Getting Started Connecting a mouse properly, as described in pointing device. To connect a mouse, plug the mouse cable into one from...
... the computer's parallel port. You can connect a parallel printer to use a mouse instead of the TouchPad, the computer's built-in steps 8 and 9 of "Installing additional memory (optional)" on the computer. 58 Getting Started Connecting a mouse properly, as described in pointing device. To connect a mouse, plug the mouse cable into one from...

User Manual
Page 80
... Basics This chapter lists some computing tips and provides important information about basic features. You will lose all unsaved work stays in the computer's temporary memory until you when the battery is running low.
... Basics This chapter lists some computing tips and provides important information about basic features. You will lose all unsaved work stays in the computer's temporary memory until you when the battery is running low.
User Manual
Page 95
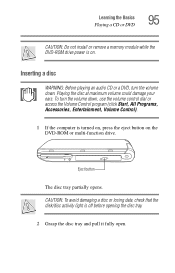
...: Before playing an audio CD or a DVD, turn the volume down . Learning the Basics Playing a CD or DVD 95 CAUTION: Do not install or remove a memory module while the DVD-ROM drive power is on the DVD-ROM or multi-function drive.
...: Before playing an audio CD or a DVD, turn the volume down . Learning the Basics Playing a CD or DVD 95 CAUTION: Do not install or remove a memory module while the DVD-ROM drive power is on the DVD-ROM or multi-function drive.
User Manual
Page 104
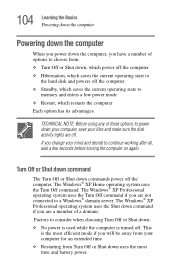
... make sure the disk activity lights are off the computer. This is turned off the computer ❖ Standby, which saves the current operating state to memory and enters a low power mode ❖ Restart, which saves the current operating state to the hard disk and powers off . Turn Off or Shut down...
... make sure the disk activity lights are off the computer. This is turned off the computer ❖ Standby, which saves the current operating state to memory and enters a low power mode ❖ Restart, which saves the current operating state to the hard disk and powers off . Turn Off or Shut down...

User Manual
Page 105
...again, this choice uses less time and battery power than the Standby mode, because information is being retrieved from the hard disk instead of from memory. Restart command Restart is the same as Turn Off or Shut down but it , and opens all the programs and files you need to ... the computer to start up than the Turn Off or Shut down option. Restoring information from the hard disk takes longer than restoring it from memory. ❖ On restarting, the computer returns to the state in which you were previously using . Factors to maintain the saved information, the system settings ...
...again, this choice uses less time and battery power than the Standby mode, because information is being retrieved from the hard disk instead of from memory. Restart command Restart is the same as Turn Off or Shut down but it , and opens all the programs and files you need to ... the computer to start up than the Turn Off or Shut down option. Restoring information from the hard disk takes longer than restoring it from memory. ❖ On restarting, the computer returns to the state in which you were previously using . Factors to maintain the saved information, the system settings ...

User Manual
Page 106
... the Windows® XP Home operating system, or are using the Windows® XP Pro operating system and are not a member of the computer in memory so that, when you restart the computer, you can continue working from where you were using the Standby command and the battery discharges fully, your...
... the Windows® XP Home operating system, or are using the Windows® XP Pro operating system and are not a member of the computer in memory so that, when you restart the computer, you can continue working from where you were using the Standby command and the battery discharges fully, your...
User Manual
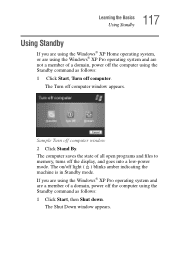
Page 117
... Standby Using Standby If you are using the Windows® XP Pro operating system and are not a member of all open programs and files to memory, turns off the display, and goes into a low-power mode. Sample Turn off computer window appears. The computer saves the state of a domain, power off...
... Standby Using Standby If you are using the Windows® XP Pro operating system and are not a member of all open programs and files to memory, turns off the display, and goes into a low-power mode. Sample Turn off computer window appears. The computer saves the state of a domain, power off...
User Manual
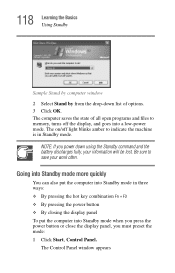
Page 118
... into Standby mode when you press the power button or close the display panel, you power down list of all open programs and files to memory, turns off light blinks amber to save your information will be lost. NOTE: If you must preset the mode: 1 Click Start, Control Panel. The on...
... into Standby mode when you press the power button or close the display panel, you power down list of all open programs and files to memory, turns off light blinks amber to save your information will be lost. NOTE: If you must preset the mode: 1 Click Start, Control Panel. The on...

User Manual
Page 123
... life" on AC power, either through an AC adapter or a docking station for procedures. The RTC battery powers the RTC memory, which stores your computer or visit the Toshiba Web site at toshiba.com. Battery safety precautions ❖ If the battery pack produces an odor, overheats or changes color or shape while it...
... life" on AC power, either through an AC adapter or a docking station for procedures. The RTC battery powers the RTC memory, which stores your computer or visit the Toshiba Web site at toshiba.com. Battery safety precautions ❖ If the battery pack produces an odor, overheats or changes color or shape while it...


