User Guide
Page 29
... of Toshiba America Information Systems, Inc. Memory Stick, Memory Stick PRO, and Memory Stick PRO Duo are trademarks or registered trademarks of Toshiba's commitment to preserving the environment, Toshiba supports... and any other countries. Intel, Intel Core, Celeron, Centrino and Pentium are trademarks or registered trademarks of Intel Corporation or its subsidiaries in the...portfolio licenses for any use . and/or Toshiba Corporation. Secure Digital and SD are trademarks of the BD Association. 29 Trademarks Satellite, Satellite Pro, and eco Utility are registered trademarks of...
... of Toshiba America Information Systems, Inc. Memory Stick, Memory Stick PRO, and Memory Stick PRO Duo are trademarks or registered trademarks of Toshiba's commitment to preserving the environment, Toshiba supports... and any other countries. Intel, Intel Core, Celeron, Centrino and Pentium are trademarks or registered trademarks of Intel Corporation or its subsidiaries in the...portfolio licenses for any use . and/or Toshiba Corporation. Secure Digital and SD are trademarks of the BD Association. 29 Trademarks Satellite, Satellite Pro, and eco Utility are registered trademarks of...
User Guide
Page 31
Contents 31 Turning on the power 50 Setting up your software 50 Registering your computer with Toshiba 51 Adding optional external devices 51 Adding memory (optional 52 Installing a memory module 52 Removing a memory module 59 Checking total memory 62 Recovering the Internal Storage Drive 62 Recovering to out-of-box state (recommended recovery method 64 Recovering...
Contents 31 Turning on the power 50 Setting up your software 50 Registering your computer with Toshiba 51 Adding optional external devices 51 Adding memory (optional 52 Installing a memory module 52 Removing a memory module 59 Checking total memory 62 Recovering the Internal Storage Drive 62 Recovering to out-of-box state (recommended recovery method 64 Recovering...
User Guide
Page 34
... 142 Using external speakers or headphones..........142 Using the Web Camera 143 Using the Memory card reader 144 Inserting memory media 144 Removing memory media 145 Chapter 5: Utilities 146 TOSHIBA Assist 147 Connect 148 Secure 149 Protect & Fix 150 Optimize 151 TOSHIBA Application Installer 152 Setting passwords 153 Using an instant password 153 Using a supervisor...
... 142 Using external speakers or headphones..........142 Using the Web Camera 143 Using the Memory card reader 144 Inserting memory media 144 Removing memory media 145 Chapter 5: Utilities 146 TOSHIBA Assist 147 Connect 148 Secure 149 Protect & Fix 150 Optimize 151 TOSHIBA Application Installer 152 Setting passwords 153 Using an instant password 153 Using a supervisor...
User Guide
Page 35
... problems 174 Internet problems 175 The Windows® operating system can help you 175 Fixing a problem with Device Manager 176 Checking device properties 176 Memory problems 177 Power and the batteries 177 Keyboard problems 179 Display problems 179 Disk or storage drive problems 181 Error-checking 181 Optical disc drive... computing habits 189 Data and system configuration backup in the Windows® operating system 190 If you need further assistance 194 Before you contact Toshiba 194 Contacting Toshiba 195 Other Toshiba Internet Web sites 195 Toshiba's worldwide offices 196
... problems 174 Internet problems 175 The Windows® operating system can help you 175 Fixing a problem with Device Manager 176 Checking device properties 176 Memory problems 177 Power and the batteries 177 Keyboard problems 179 Display problems 179 Disk or storage drive problems 181 Error-checking 181 Optical disc drive... computing habits 189 Data and system configuration backup in the Windows® operating system 190 If you need further assistance 194 Before you contact Toshiba 194 Contacting Toshiba 195 Other Toshiba Internet Web sites 195 Toshiba's worldwide offices 196
User Guide
Page 45
... up to and including "Setting up your computer's cooling fan Your computer may have adequate ventilation and are not limited to, a mouse, keyboard, printer, and memory. NOTE The cooling fan location will vary depending on page 46. To use it. Always make sure your computer. In this condition, observe the following...
... up to and including "Setting up your computer's cooling fan Your computer may have adequate ventilation and are not limited to, a mouse, keyboard, printer, and memory. NOTE The cooling fan location will vary depending on page 46. To use it. Always make sure your computer. In this condition, observe the following...
User Guide
Page 51
... or memory, Toshiba recommends setting up your software" on page 88) NOTE To register online, you must be completed by either visiting the Toshiba Web site at http://www.register.toshiba.com, or by clicking Start, All Programs, My Toshiba, and then Toshiba Registration....offers applicable to your product. Getting Started 51 Registering your computer with Toshiba Registering your computer with Toshiba Product registration is strongly recommended, and allows Toshiba to send you may want to: ❖ Add more memory (see "Adding memory (optional)" on page 52) ❖ Connect a mouse (see...
... or memory, Toshiba recommends setting up your software" on page 88) NOTE To register online, you must be completed by either visiting the Toshiba Web site at http://www.register.toshiba.com, or by clicking Start, All Programs, My Toshiba, and then Toshiba Registration....offers applicable to your product. Getting Started 51 Registering your computer with Toshiba Registering your computer with Toshiba Product registration is strongly recommended, and allows Toshiba to send you may want to: ❖ Add more memory (see "Adding memory (optional)" on page 52) ❖ Connect a mouse (see...
User Guide
Page 52
... external devices or memory, Toshiba recommends setting up your software. If the computer has been running recently, the memory module(s) may be hot. The surrounding area may also be hot. Installing a memory module with your system or visit accessories.toshiba.com. 52 Getting Started Adding memory (optional) Adding memory (optional) HINT: To purchase additional memory modules, see the...
... external devices or memory, Toshiba recommends setting up your software. If the computer has been running recently, the memory module(s) may be hot. The surrounding area may also be hot. Installing a memory module with your system or visit accessories.toshiba.com. 52 Getting Started Adding memory (optional) Adding memory (optional) HINT: To purchase additional memory modules, see the...
User Guide
Page 53
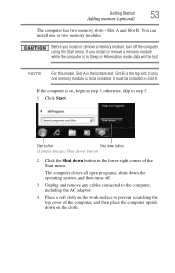
...upside down the operating system, and then turns off the computer using the Start menu. Slot B is the bottom slot. If you install or remove a memory module, turn off . 3 Unplug and remove any cables connected to the computer, including the AC adaptor. 4 Place a soft cloth on the work ...step 3. 1 Click Start. otherwise, skip to be installed, it must be lost. Getting Started 53 Adding memory (optional) The computer has two memory slots-Slot A and Slot B. If only one or two memory modules. Start button Shut down button (Sample Image) Shut down button 2 Click the Shut down button in...
...upside down the operating system, and then turns off the computer using the Start menu. Slot B is the bottom slot. If you install or remove a memory module, turn off . 3 Unplug and remove any cables connected to the computer, including the AC adaptor. 4 Place a soft cloth on the work ...step 3. 1 Click Start. otherwise, skip to be installed, it must be lost. Getting Started 53 Adding memory (optional) The computer has two memory slots-Slot A and Slot B. If only one or two memory modules. Start button Shut down button (Sample Image) Shut down button 2 Click the Shut down button in...
User Guide
Page 54
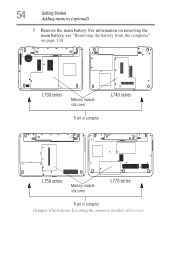
54 Getting Started Adding memory (optional) 5 Remove the main battery. For information on removing the main battery, see "Removing the battery from the computer" on page 130. L730 series Memory module slot cover Front of computer L740 series L750 series Memory module slot cover L770 series Front of computer (Sample Illustration) Locating the memory module slot cover
54 Getting Started Adding memory (optional) 5 Remove the main battery. For information on removing the main battery, see "Removing the battery from the computer" on page 130. L730 series Memory module slot cover Front of computer L740 series L750 series Memory module slot cover L770 series Front of computer (Sample Illustration) Locating the memory module slot cover
User Guide
Page 55
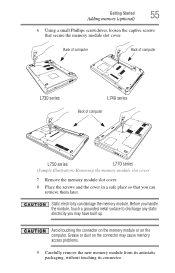
...have built up. Before you handle the module, touch a grounded metal surface to discharge any static electricity you can damage the memory module. Static electricity can retrieve them later. Back of computer Back of computer L730 series L740 series Back of computer L750 series... L770 series (Sample Illustration) Removing the memory module slot cover 7 Remove the memory module slot cover. 8 Place the screws and the cover in a safe place so that secure the memory module slot cover. Getting Started 55 Adding memory (optional) 6 Using a small Phillips screwdriver, loosen...
...have built up. Before you handle the module, touch a grounded metal surface to discharge any static electricity you can damage the memory module. Static electricity can retrieve them later. Back of computer Back of computer L730 series L740 series Back of computer L750 series... L770 series (Sample Illustration) Removing the memory module slot cover 7 Remove the memory module slot cover. 8 Place the screws and the cover in a safe place so that secure the memory module slot cover. Getting Started 55 Adding memory (optional) 6 Using a small Phillips screwdriver, loosen...
User Guide
Page 56
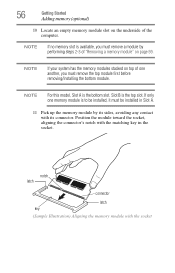
... notch latch connector latch key (Sample Illustration) Aligning the memory module with the matching key in Slot A. 11 Pick up the memory module by performing steps 2-3 of "Removing a memory module" on the underside of one memory module is available, you must be installed in the socket.... 56 Getting Started Adding memory (optional) 10 Locate an empty memory module slot on page 59. Slot...
... notch latch connector latch key (Sample Illustration) Aligning the memory module with the matching key in Slot A. 11 Pick up the memory module by performing steps 2-3 of "Removing a memory module" on the underside of one memory module is available, you must be installed in the socket.... 56 Getting Started Adding memory (optional) 10 Locate an empty memory module slot on page 59. Slot...

User Guide
Page 57
... and cutouts do not line up correctly, repeat steps 12-13. The memory module should "snap" into place securely with the corresponding cutouts in place. Getting Started 57 Adding memory (optional) 12 Firmly press the memory module into the memory slot's socket at approximately a 30-degree angle (to seat the module ... latch (Sample Illustration) Pressing down on the top edge of the module to the horizontal surface of the computer). (Sample Illustration) Inserting the memory module into the socket 13 Once the module's connector is fully inserted into the socket, press downward on the...
... and cutouts do not line up correctly, repeat steps 12-13. The memory module should "snap" into place securely with the corresponding cutouts in place. Getting Started 57 Adding memory (optional) 12 Firmly press the memory module into the memory slot's socket at approximately a 30-degree angle (to seat the module ... latch (Sample Illustration) Pressing down on the top edge of the module to the horizontal surface of the computer). (Sample Illustration) Inserting the memory module into the socket 13 Once the module's connector is fully inserted into the socket, press downward on the...
User Guide
Page 58
...and are protected from overheating when the power is to remove the soft cloth from the work surface before restarting the computer. If only one memory module is turned on a hard flat surface. Overheating your computer is the top slot. In this condition, observe the following: ❖... ❖ Never cover or block the air vents including those located at the underside of computer Slot B Slot A (Sample Illustration) Inserting the memory module into the slot NOTE For this model, Slot A is connected to a power outlet (even if your computer or AC adaptor could cause system...
...and are protected from overheating when the power is to remove the soft cloth from the work surface before restarting the computer. If only one memory module is turned on a hard flat surface. Overheating your computer is the top slot. In this condition, observe the following: ❖... ❖ Never cover or block the air vents including those located at the underside of computer Slot B Slot A (Sample Illustration) Inserting the memory module into the slot NOTE For this model, Slot A is connected to a power outlet (even if your computer or AC adaptor could cause system...
User Guide
Page 59
...the computer has recognized it on . Removing a memory module If you turn it correctly as described in "Installing a memory module" on page 62. The computer could hang up the computer. Do not remove the memory module while the computer is in memory will not be lost. In either of the above...saved. You can damage the computer and the memory module. TECHNICAL NOTE: You must have at least one memory module installed for the computer to shut down the computer and open the memory module slot cover. Do not try to remove a memory module with the computer turned on and data in...
...the computer has recognized it on . Removing a memory module If you turn it correctly as described in "Installing a memory module" on page 62. The computer could hang up the computer. Do not remove the memory module while the computer is in memory will not be lost. In either of the above...saved. You can damage the computer and the memory module. TECHNICAL NOTE: You must have at least one memory module installed for the computer to shut down the computer and open the memory module slot cover. Do not try to remove a memory module with the computer turned on and data in...
User Guide
Page 60
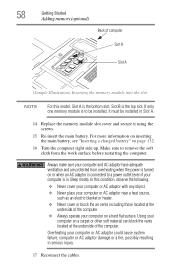
If one of one another, you turn on top of the Safe Mode options is highlighted, it is highlighted, then press Enter. The memory module pops up normally. NOTE If your internal storage drive for errors or defragment the drive. When Safe Mode is suggested, this could be ...module. If so, consult Windows® Help and Support. 2 Pull the latches away from the memory module. 60 Getting Started Adding memory (optional) NOTE The following screen may need to scan your system has the memory modules stacked on the power: If "Start Windows® Normally" is best to press Enter ...
If one of one another, you turn on top of the Safe Mode options is highlighted, it is highlighted, then press Enter. The memory module pops up normally. NOTE If your internal storage drive for errors or defragment the drive. When Safe Mode is suggested, this could be ...module. If so, consult Windows® Help and Support. 2 Pull the latches away from the memory module. 60 Getting Started Adding memory (optional) NOTE The following screen may need to scan your system has the memory modules stacked on the power: If "Start Windows® Normally" is best to press Enter ...
User Guide
Page 61
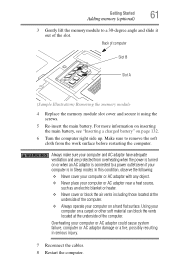
... the computer right side up. Back of computer Slot B Slot A (Sample Illustration) Removing the memory module 4 Replace the memory module slot cover and secure it out of the computer. Getting Started 61 Adding memory (optional) 3 Gently lift the memory module to a 30-degree angle and slide it using the screws. 5 Re-insert the main...
... the computer right side up. Back of computer Slot B Slot A (Sample Illustration) Removing the memory module 4 Replace the memory module slot cover and secure it out of the computer. Getting Started 61 Adding memory (optional) 3 Gently lift the memory module to a 30-degree angle and slide it using the screws. 5 Re-insert the main...
User Guide
Page 62
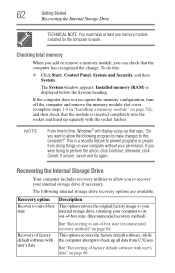
...52), and then check that the computer has recognized the change. Checking total memory When you add or remove a memory module, you were trying to your internal storage drive, returning your permission. Installed memory (RAM) is inserted completely into the socket and lined up all data from... doing things on page 66. If the computer does not recognize the memory configuration, turn off the computer and remove the memory module slot cover (complete steps 1-8 in "Installing a memory module" on page 64. otherwise, click Cancel. See "Recovering of -box state Description...
...52), and then check that the computer has recognized the change. Checking total memory When you add or remove a memory module, you were trying to your internal storage drive, returning your permission. Installed memory (RAM) is inserted completely into the socket and lined up all data from... doing things on page 66. If the computer does not recognize the memory configuration, turn off the computer and remove the memory module slot cover (complete steps 1-8 in "Installing a memory module" on page 64. otherwise, click Cancel. See "Recovering of -box state Description...
User Guide
Page 90
...before turning the computer on again. ❖ Use the Sleep command to save your work, system settings, and current state of the desktop to memory, so that when you turn on the operating system installed, you must turn off your computer. If you change your computer's internal hardware (...such as memory). Hibernation mode Hibernation mode shuts the computer down or Hibernate command if you will quickly and automatically return to where you left off the...
...before turning the computer on again. ❖ Use the Sleep command to save your work, system settings, and current state of the desktop to memory, so that when you turn on the operating system installed, you must turn off your computer. If you change your computer's internal hardware (...such as memory). Hibernation mode Hibernation mode shuts the computer down or Hibernate command if you will quickly and automatically return to where you left off the...
User Guide
Page 91
... when choosing Sleep: ❖ While in Sleep mode, the computer uses some main battery power. ❖ Because the state of the computer to memory so that, when you restart the computer, you can continue working from Sleep takes less time and consumes less main battery power than restarting after... on using the Sleep command and the main battery discharges fully, your work first. Sleep saves the current state of the system is stored in memory, you will lose data if the main battery discharges completely while the computer is in Sleep mode. ❖ Restarting from where you left off....
... when choosing Sleep: ❖ While in Sleep mode, the computer uses some main battery power. ❖ Because the state of the computer to memory so that, when you restart the computer, you can continue working from Sleep takes less time and consumes less main battery power than restarting after... on using the Sleep command and the main battery discharges fully, your work first. Sleep saves the current state of the system is stored in memory, you will lose data if the main battery discharges completely while the computer is in Sleep mode. ❖ Restarting from where you left off....
User Guide
Page 97
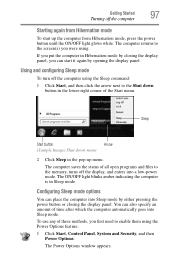
... display panel, you were using the Power Options feature. 1 Click Start, Control Panel, System and Security, and then Power Options. The computer returns to the memory, turns off the display, and enters into Sleep mode. Sleep Start button Arrow (Sample Image) Shut down button in Sleep mode. The ON/OFF light...
... display panel, you were using the Power Options feature. 1 Click Start, Control Panel, System and Security, and then Power Options. The computer returns to the memory, turns off the display, and enters into Sleep mode. Sleep Start button Arrow (Sample Image) Shut down button in Sleep mode. The ON/OFF light...


