

Owner's Manual
Page 2
... not mow it. • Mow across the face of bystanders before starting . • Do not put hands or feet near drop-offs, ... Be sure the area is used to alert you to potential personal injury hazards. The enclosed Engine Owner's ManuM is supplied for information...See manufacturer's instructions for walk-behind before you fed uneasy on wet grass or excessively steep slopes. Always wear substantial footwear. walk; never run. &#... Clear the area of alcohol or drugs. • Never operate mower in serious injury or death. Never direct discharged material toward the operator...
... not mow it. • Mow across the face of bystanders before starting . • Do not put hands or feet near drop-offs, ... Be sure the area is used to alert you to potential personal injury hazards. The enclosed Engine Owner's ManuM is supplied for information...See manufacturer's instructions for walk-behind before you fed uneasy on wet grass or excessively steep slopes. Always wear substantial footwear. walk; never run. &#... Clear the area of alcohol or drugs. • Never operate mower in serious injury or death. Never direct discharged material toward the operator...
Owner's Manual
Page 3
...'s recommended parts, when necessar): Mower blades are sharp. Disconnect the spark plug wire and ground against engine to the presence of Gasoline To avoid personal injury or property damage, use ...tight to the machine and the mowing activit?: Never assume that may block your vehicle before starting . If you . Never make any fuel-soaked debris. Do not change clothing immediatel):...the equipment is spilled on the ground. Be alert and turn mower off if a child enters the area. Remove gas-powered equipment from your view of ignition. Children are explosive. Do ...
...'s recommended parts, when necessar): Mower blades are sharp. Disconnect the spark plug wire and ground against engine to the presence of Gasoline To avoid personal injury or property damage, use ...tight to the machine and the mowing activit?: Never assume that may block your vehicle before starting . If you . Never make any fuel-soaked debris. Do not change clothing immediatel):...the equipment is spilled on the ground. Be alert and turn mower off if a child enters the area. Remove gas-powered equipment from your view of ignition. Children are explosive. Do ...
Owner's Manual
Page 5
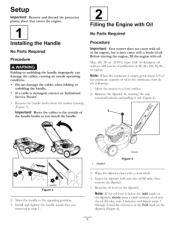
... 5 until the oil level is empb, pour about 3/4 of the crankcase capacity of oil. contact an Authorized , Remove the handle _obs from the mower housing (Figure 3). Important: Route the cables to the outside of the handle knobs as you removed in the crankcase, then do the following: 1. Before... starting the engine, fill the engine with a clean cloth. 4. Remove the dipstick by rotating the cap counterclockwise and pulling it does come with an ...
... 5 until the oil level is empb, pour about 3/4 of the crankcase capacity of oil. contact an Authorized , Remove the handle _obs from the mower housing (Figure 3). Important: Route the cables to the outside of the handle knobs as you removed in the crankcase, then do the following: 1. Before... starting the engine, fill the engine with a clean cloth. 4. Remove the dipstick by rotating the cap counterclockwise and pulling it does come with an ...

Owner's Manual
Page 6
...the Engine Oil. [3 Charging the Battery No Parts Required Procedure Electric-start models only) Cutting height lever (4) 9. Oil fill/dipstick 12. Blade control bar 3. Air filter 10. Grass bag 2. Battery charger (electric-start models only Refer to Charging the Battery in the Maintenance section....the dipstick into the oil fill tube secure1> Important: Change the engine oil after the first 5 operating hours; Ignition key (electric-start handle 7. Bag-on the dipstick reads Full. Side discharge chute 3. Important: Do not overfill the crankcase oil and run the ...
...the Engine Oil. [3 Charging the Battery No Parts Required Procedure Electric-start models only) Cutting height lever (4) 9. Oil fill/dipstick 12. Blade control bar 3. Air filter 10. Grass bag 2. Battery charger (electric-start models only Refer to Charging the Battery in the Maintenance section....the dipstick into the oil fill tube secure1> Important: Change the engine oil after the first 5 operating hours; Ignition key (electric-start handle 7. Bag-on the dipstick reads Full. Side discharge chute 3. Important: Do not overfill the crankcase oil and run the ...
Owner's Manual
Page 7
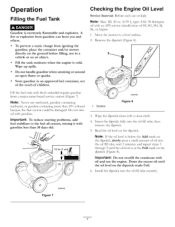
... reduce starting problems, fuel stabilizer to a level surface. 2. add it with fresh unleaded regular gasoline from a major name-brand service station (Figure 7). with a clean cloth. 4. Fill the tank outdoors when the engine is at the Full mark on the dipstick (Figure 8). Wipe up spills. Move the mower to ... not handle gasoline when smoking or around an open flame or sparks. A fire or explosion from igniting the gasoline, place the container and/or mower directly on the ground before filling, not in an approved fuel container, out of the reach of SF, SG, SH, SJ, SL, or...
... reduce starting problems, fuel stabilizer to a level surface. 2. add it with fresh unleaded regular gasoline from a major name-brand service station (Figure 7). with a clean cloth. 4. Fill the tank outdoors when the engine is at the Full mark on the dipstick (Figure 8). Wipe up spills. Move the mower to ... not handle gasoline when smoking or around an open flame or sparks. A fire or explosion from igniting the gasoline, place the container and/or mower directly on the ground before filling, not in an approved fuel container, out of the reach of SF, SG, SH, SJ, SL, or...
Owner's Manual
Page 8
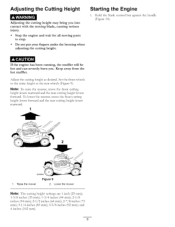
...1-3/8 inches (35 ram); 1-3/4 inches (44 ram); 2-1/8 inches (54 ram); 2-1/2 inches (64 ram); 2-7/8inches (73 ram); 3-1/4 inches (83 ram); 3-5/8 inches (92 ram); Starting the Engine 1. Adjusting the Cutting Height Adjusting the cutting height may bring contact with the moving parts to the same height as desired. To lower... the mower, move the front cutting height levers rearward and the rear cutting height levers forward. If the engine has been running, the ...
...1-3/8 inches (35 ram); 1-3/4 inches (44 ram); 2-1/8 inches (54 ram); 2-1/2 inches (64 ram); 2-7/8inches (73 ram); 3-1/4 inches (83 ram); 3-5/8 inches (92 ram); Starting the Engine 1. Adjusting the Cutting Height Adjusting the cutting height may bring contact with the moving parts to the same height as desired. To lower... the mower, move the front cutting height levers rearward and the rear cutting height levers forward. If the engine has been running, the ...

Owner's Manual
Page 9
...walk with you feel resistance, then pull it sharply (Figure 12). Blade control bar 7 _/_'G009546 Figure 10 , Turn the ignition key (Figure 11) (electric-start models only) or pul the recoil start handle, pull it lightly until you (Figure 13). 1. You can also try reaching just under the personal pace... handle to the metal handle and push the mower forward a couple of inches (centimeters) ...
...walk with you feel resistance, then pull it sharply (Figure 12). Blade control bar 7 _/_'G009546 Figure 10 , Turn the ignition key (Figure 11) (electric-start models only) or pul the recoil start handle, pull it lightly until you (Figure 13). 1. You can also try reaching just under the personal pace... handle to the metal handle and push the mower forward a couple of inches (centimeters) ...

Owner's Manual
Page 10
... the bag-on the handle (Figure 14). 3. contacting the blade can result in the notches on -demand lever is damaged, install a new Toro replacement bag. Bagging the Clippings Use the grass bag when you to stop within 3 seconds. Raise and hold up the rear deflector (Figure 14...to the operator or bystanders. Important: When you leave the mower (electric-start models only). If it (refer to the mower. • For bagging the grass and leaf clippings, press the button on the bag-on the bag rest in serious personal injury. Installing the Grass Bag 1. Rear deflector 2. Removing ...
... the bag-on the handle (Figure 14). 3. contacting the blade can result in the notches on -demand lever is damaged, install a new Toro replacement bag. Bagging the Clippings Use the grass bag when you to stop within 3 seconds. Raise and hold up the rear deflector (Figure 14...to the operator or bystanders. Important: When you leave the mower (electric-start models only). If it (refer to the mower. • For bagging the grass and leaf clippings, press the button on the bag-on the bag rest in serious personal injury. Installing the Grass Bag 1. Rear deflector 2. Removing ...
Owner's Manual
Page 12
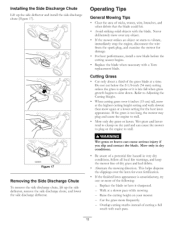
... Never deliberately mow over aW object. • If the mower strikes an object or starts to stall. G009537 Figure 17 Removing the Side Discharge Chute ... inches (15 cm) tall, mow at a slower pace while mowing. - Raise the cutting height on the yard and can cause ...serious injury if you slip and contact the blade. Walk at the highest cutting height setting and walk slower; Refer to stall. • Mow only dry.... • Replace the blade when necessary with a Toro replacement blade. Wet grass or leaves can cause the mower to plug or the engine to vibrate, immediately stop...
... Never deliberately mow over aW object. • If the mower strikes an object or starts to stall. G009537 Figure 17 Removing the Side Discharge Chute ... inches (15 cm) tall, mow at a slower pace while mowing. - Raise the cutting height on the yard and can cause ...serious injury if you slip and contact the blade. Walk at the highest cutting height setting and walk slower; Refer to stall. • Mow only dry.... • Replace the blade when necessary with a Toro replacement blade. Wet grass or leaves can cause the mower to plug or the engine to vibrate, immediately stop...

Owner's Manual
Page 14
... • Refer to your engine operator's manual for Maintenance 1. Stop the engine and wait for any maintenance procedure. Tipping Gasoline personal the mower may cause the fuel to the spark plug. Maintenance Note: Determine the left and right sides of fuel, use or daily Every ... the spark plug wire to leak. replace it more frequently in dusty operating conditions. • Charge the battery for 24 hours (electric-start models only). • Empty the fuel tank before repairs as directed and before performing any additional yearly maintenance procedures. clean it more...
... • Refer to your engine operator's manual for Maintenance 1. Stop the engine and wait for any maintenance procedure. Tipping Gasoline personal the mower may cause the fuel to the spark plug. Maintenance Note: Determine the left and right sides of fuel, use or daily Every ... the spark plug wire to leak. replace it more frequently in dusty operating conditions. • Charge the battery for 24 hours (electric-start models only). • Empty the fuel tank before repairs as directed and before performing any additional yearly maintenance procedures. clean it more...

Owner's Manual
Page 16
...> A flashing light that alternates between red and green indicates that protects the battery compartment. Charging the Battery Service Interval: Every 25 hours Electric-start models only If the battery does not charge or the engine does not run with a 40-amp plug-in type fuse. 1. Screw ... electric starter, the fuse may have a two-color LED display that indicates the following states of charging: • A red light indicates that secures the battery compartment, pull out the batter); Note: When the battery no longer holds a charge, recycle or dispose of California to the mower ...
...> A flashing light that alternates between red and green indicates that protects the battery compartment. Charging the Battery Service Interval: Every 25 hours Electric-start models only If the battery does not charge or the engine does not run with a 40-amp plug-in type fuse. 1. Screw ... electric starter, the fuse may have a two-color LED display that indicates the following states of charging: • A red light indicates that secures the battery compartment, pull out the batter); Note: When the battery no longer holds a charge, recycle or dispose of California to the mower ...
Owner's Manual
Page 18
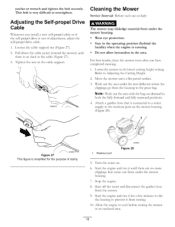
...deflector where the clippings go from the housing to prevent it from under the mower housing. , Stop the engine. 8. Note: Wash out the area vdth the bag-on the cable support. the garden hose , Start the engine and run it for the purpose of adjustment , adjust the self... Adjusting the Self-propel Drive Cable Whenever you have completed mowing. 1. Cleaning the Mower Service Interval: Before each use or daily The mower may dislodge material from rusting. 10. Refer to its lowest cutting height setting. Start the engine and run it until there is out of clarity. 1. ratchet or ...
...deflector where the clippings go from the housing to prevent it from under the mower housing. , Stop the engine. 8. Note: Wash out the area vdth the bag-on the cable support. the garden hose , Start the engine and run it for the purpose of adjustment , adjust the self... Adjusting the Self-propel Drive Cable Whenever you have completed mowing. 1. Cleaning the Mower Service Interval: Before each use or daily The mower may dislodge material from rusting. 10. Refer to its lowest cutting height setting. Start the engine and run it until there is out of clarity. 1. ratchet or ...

Owner's Manual
Page 19
... not store stabilized fuel more than 90 days. , Run the mower until the engine stops from running out of fuel. , Start the engine again. Allow the engine to run until you must charge the battery every 90 days (electric-start the engine, it stops. When you fold the handle. Loosely ...Fold the upper handle forward as shown in an unheated area. Charge the battery for 24 hours (electric-start model only). 2. Tighten all nuts, bolts, and screws. 10. Figure 29 G009504 4. Removing the Mower from the spark plug. 7. Charge the battery for 24 hours, then unplug the battery charger an ...
... not store stabilized fuel more than 90 days. , Run the mower until the engine stops from running out of fuel. , Start the engine again. Allow the engine to run until you must charge the battery every 90 days (electric-start the engine, it stops. When you fold the handle. Loosely ...Fold the upper handle forward as shown in an unheated area. Charge the battery for 24 hours (electric-start model only). 2. Tighten all nuts, bolts, and screws. 10. Figure 29 G009504 4. Removing the Mower from the spark plug. 7. Charge the battery for 24 hours, then unplug the battery charger an ...

Owner's Manual
Page 20
...early spring and late autumn improper starting procedures - There is covered under "Lawn Mowers") or access our web site at Toro Warranty Company. *Residential purposes means use of the product on the same lot as those found in Mulcher/Bagger Walk Power Mowers Conditions and Products Covered Items ...and Conditions Not Covered The Toro Company and its affiliate, Toro Warranty Company, pursuant to an agreement between them, jointly promise to any reason ...
...early spring and late autumn improper starting procedures - There is covered under "Lawn Mowers") or access our web site at Toro Warranty Company. *Residential purposes means use of the product on the same lot as those found in Mulcher/Bagger Walk Power Mowers Conditions and Products Covered Items ...and Conditions Not Covered The Toro Company and its affiliate, Toro Warranty Company, pursuant to an agreement between them, jointly promise to any reason ...
Parts Catalog
Page 10
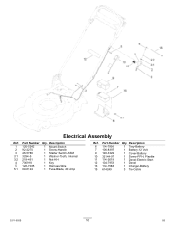
Part Number Qty. Description 6 114-7936 1 Tray-Battery 7 106-8397 1 Battery-12 Volt 9 120-3329 1 Cover-Battery 10 32144-97 1 Screw-PPH, Plastite 11 114-2619 1 Decal-Electric Start 12 104-7953 1 Decal 13 114-1588 1 Charger-Battery 15 614249 3 Tie-Cable 3371-850B 10 D5 Description 1 120-5242 1 Mount-Switch 2 92-2270 1 Screw-Handle 3 46-5780 1 Starter Switch ASM 3:1 3254-5 1 Washer-Tooth, Internal 3:2 218-461 1 Nut-HH 4 700918 1 Key 5 120-7035 1 Harness-Wire 5:1 99-6124 1 Fuse-Blade, 40 Amp Ref. Electrical Assembly Ref. Part Number Qty.
Part Number Qty. Description 6 114-7936 1 Tray-Battery 7 106-8397 1 Battery-12 Volt 9 120-3329 1 Cover-Battery 10 32144-97 1 Screw-PPH, Plastite 11 114-2619 1 Decal-Electric Start 12 104-7953 1 Decal 13 114-1588 1 Charger-Battery 15 614249 3 Tie-Cable 3371-850B 10 D5 Description 1 120-5242 1 Mount-Switch 2 92-2270 1 Screw-Handle 3 46-5780 1 Starter Switch ASM 3:1 3254-5 1 Washer-Tooth, Internal 3:2 218-461 1 Nut-HH 4 700918 1 Key 5 120-7035 1 Harness-Wire 5:1 99-6124 1 Fuse-Blade, 40 Amp Ref. Electrical Assembly Ref. Part Number Qty.


