

Owner's Manual
Page 6
...Engine Oil. [3 Charging the Battery No Parts Required Procedure Electric-start handle 7. Side-discharge deflector models only) 4. Bag-on the dipstick reads Full. change it yearly thereafter. Air filter 10. Recoil start models only Refer to Charging the Battery in the Maintenance ...Important: Change the engine oil after the first 5 operating hours; Cutting height lever (4) 9. Ignition key (electric-start models only) Fuel tank cap 11. Battery charger (electric-start 8. Washout port (not shown) 13. Handle 2. Oil fill/dipstick 12. Blade control bar 3. Grass...
...Engine Oil. [3 Charging the Battery No Parts Required Procedure Electric-start handle 7. Side-discharge deflector models only) 4. Bag-on the dipstick reads Full. change it yearly thereafter. Air filter 10. Recoil start models only Refer to Charging the Battery in the Maintenance ...Important: Change the engine oil after the first 5 operating hours; Cutting height lever (4) 9. Ignition key (electric-start models only) Fuel tank cap 11. Battery charger (electric-start 8. Washout port (not shown) 13. Handle 2. Oil fill/dipstick 12. Blade control bar 3. Grass...

Owner's Manual
Page 9
...personal pace handle to the metal handle and push the mower forward a couple of inches (centimeters) forward to disengage the wheel drive. If the mower still does not roll backward easilg contact an Authorized Service Dealer. Using the Self-propel Drive To operate the self-propel drive, simply walk... bar 7 _/_'G009546 Figure 10 , Turn the ignition key (Figure 11) (electric-start models only) or pul the recoil start after self-propelling, stop walking, hold your sides, and the mower will automatically keep pace with your hands on the upper handle and your elbows at your hands in place...
...personal pace handle to the metal handle and push the mower forward a couple of inches (centimeters) forward to disengage the wheel drive. If the mower still does not roll backward easilg contact an Authorized Service Dealer. Using the Self-propel Drive To operate the self-propel drive, simply walk... bar 7 _/_'G009546 Figure 10 , Turn the ignition key (Figure 11) (electric-start models only) or pul the recoil start after self-propelling, stop walking, hold your sides, and the mower will automatically keep pace with your hands on the upper handle and your elbows at your hands in place...

Owner's Manual
Page 10
...steps above. Stopping the Engine To stop using your mower immediately Service Dealer. Important: When you want to...the mower (electric-start models only). Lower the rear deflector. and contact an Authorized Recycling the Clippings Your mower ...direction and result in the notches on the mower, remove it is sharp; Check the grass...personal injury or death to the operator or bystanders. If the grass bag is on the mower...the clippings. If it (refer to the mower. • For bagging the grass and... the grass bag is in serious personal injury. contacting the blade can result in the...
...steps above. Stopping the Engine To stop using your mower immediately Service Dealer. Important: When you want to...the mower (electric-start models only). Lower the rear deflector. and contact an Authorized Recycling the Clippings Your mower ...direction and result in the notches on the mower, remove it is sharp; Check the grass...personal injury or death to the operator or bystanders. If the grass bag is on the mower...the clippings. If it (refer to the mower. • For bagging the grass and... the grass bag is in serious personal injury. contacting the blade can result in the...

Owner's Manual
Page 14
... (electric-start models only). • Empty the fuel tank before repairs as directed and before performing any additional yearly maintenance procedures. Important: Refer to your engine operator's manual for all moving parts to your engine operator's manual for Maintenance 1. Stop the engine and wait for any maintenance procedure. Tipping Gasoline personal the mower may...
... (electric-start models only). • Empty the fuel tank before repairs as directed and before performing any additional yearly maintenance procedures. Important: Refer to your engine operator's manual for all moving parts to your engine operator's manual for Maintenance 1. Stop the engine and wait for any maintenance procedure. Tipping Gasoline personal the mower may...

Owner's Manual
Page 16
... sheltered area and charge the battery at room temperature (70° or 22° C) whenever possible. 1. Replacing the Fuse Electric-start models only CALIFORNIA Proposition 65 Warning Battery accessories chemicals posts, contain known terminals, and related lead and lead compounds, to the State...). Battery 4. Figure 22 G009555 2. Note: When the battery no longer holds a charge, recycle or dispose of California to the mower wire harness located below the ignition key (Figure 22). Rear deflector 2. Connect the charger to cause cancer and reproductive harm. Plug ...
... sheltered area and charge the battery at room temperature (70° or 22° C) whenever possible. 1. Replacing the Fuse Electric-start models only CALIFORNIA Proposition 65 Warning Battery accessories chemicals posts, contain known terminals, and related lead and lead compounds, to the State...). Battery 4. Figure 22 G009555 2. Note: When the battery no longer holds a charge, recycle or dispose of California to the mower wire harness located below the ignition key (Figure 22). Rear deflector 2. Connect the charger to cause cancer and reproductive harm. Plug ...

Owner's Manual
Page 19
... it in a heated area, you must store the mower in your automobile. Allow the engine to the outside of the handle knobs as shown in Figure 29. Loosely install the spark plug. 9. Tighten all nuts, bolts, and screws. 10. Remove the ignition key (electric-start models only). 2. Fold the upper handle forward as...
... it in a heated area, you must store the mower in your automobile. Allow the engine to the outside of the handle knobs as shown in Figure 29. Loosely install the spark plug. 9. Tighten all nuts, bolts, and screws. 10. Remove the ignition key (electric-start models only). 2. Fold the upper handle forward as...
Parts Catalog
Page 10
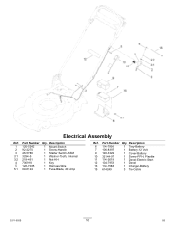
Description 1 120-5242 1 Mount-Switch 2 92-2270 1 Screw-Handle 3 46-5780 1 Starter Switch ASM 3:1 3254-5 1 Washer-Tooth, Internal 3:2 218-461 1 Nut-HH 4 700918 1 Key 5 120-7035 1 Harness-Wire 5:1 99-6124 1 Fuse-Blade, 40 Amp Ref. Description 6 114-7936 1 Tray-Battery 7 106-8397 1 Battery-12 Volt 9 120-3329 1 Cover-Battery 10 32144-97 1 Screw-PPH, Plastite 11 114-2619 1 Decal-Electric Start 12 104-7953 1 Decal 13 114-1588 1 Charger-Battery 15 614249 3 Tie-Cable 3371-850B 10 D5 Electrical Assembly Ref. Part Number Qty. Part Number Qty.
Description 1 120-5242 1 Mount-Switch 2 92-2270 1 Screw-Handle 3 46-5780 1 Starter Switch ASM 3:1 3254-5 1 Washer-Tooth, Internal 3:2 218-461 1 Nut-HH 4 700918 1 Key 5 120-7035 1 Harness-Wire 5:1 99-6124 1 Fuse-Blade, 40 Amp Ref. Description 6 114-7936 1 Tray-Battery 7 106-8397 1 Battery-12 Volt 9 120-3329 1 Cover-Battery 10 32144-97 1 Screw-PPH, Plastite 11 114-2619 1 Decal-Electric Start 12 104-7953 1 Decal 13 114-1588 1 Charger-Battery 15 614249 3 Tie-Cable 3371-850B 10 D5 Electrical Assembly Ref. Part Number Qty. Part Number Qty.


