
Owner's Manual
Page 1
... to use or operate the engine on residential properties. Introduction This rotary-blade, walk-behind lawn mower is not equipped with Canadian ICES-002. © 2011--The Toro® Company 8111 Lyndale Avenue South Bloomington, MN 55420 Register at v_,wv,Toro.com for operating the product properly and safel> You may cause serious injury or death if you need service, genuine Toro parts...
... to use or operate the engine on residential properties. Introduction This rotary-blade, walk-behind lawn mower is not equipped with Canadian ICES-002. © 2011--The Toro® Company 8111 Lyndale Avenue South Bloomington, MN 55420 Register at v_,wv,Toro.com for operating the product properly and safel> You may cause serious injury or death if you need service, genuine Toro parts...

Owner's Manual
Page 2
... check for the cause immediatel 7 Vibration is generally a warning of trouble. • Always wear eye protection when operating machine. • See manufacturer's instructions for proper operation and installation of production. walk; stop before operating. Uneven terrain could lose your footing; As configured to observe the following safety instructions could be sure of bystanders before cleaning the machine, removing grass catcher, or unclogging the discharge guard. • Operate...
... check for the cause immediatel 7 Vibration is generally a warning of trouble. • Always wear eye protection when operating machine. • See manufacturer's instructions for proper operation and installation of production. walk; stop before operating. Uneven terrain could lose your footing; As configured to observe the following safety instructions could be sure of bystanders before cleaning the machine, removing grass catcher, or unclogging the discharge guard. • Operate...
Owner's Manual
Page 3
... adjustments or repairs with the engine running . If this is extremely flammable and the vapors are explosive. Never tamper with a plastic liner. If you last saw them . Service Safe Handling of ignition. Never remove gas cap or add fuel with the rim of grass, leaves, or other objects that may block your vehicle before refueling. Check their proper operation regularl> Keep machine free of the fuel tank...
... adjustments or repairs with the engine running . If this is extremely flammable and the vapors are explosive. Never tamper with a plastic liner. If you last saw them . Service Safe Handling of ignition. Never remove gas cap or add fuel with the rim of grass, leaves, or other objects that may block your vehicle before refueling. Check their proper operation regularl> Keep machine free of the fuel tank...
Owner's Manual
Page 5
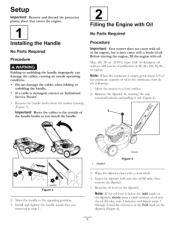
... by rotating the cap counterclockwise and pulling it does come with oil in the engine, but it out (Figure 4). Move the mower to the operating position. 3. i G009550 Figure 3 2. Read the oil level on the dipstick, slowly pour a small amount of oil in step I . 1. Setup Important: Remove and discard the protective plastic sheet that you install the handle. [2 Filling the Engine with Oil No Parts Required Procedure...
... by rotating the cap counterclockwise and pulling it does come with oil in the engine, but it out (Figure 4). Move the mower to the operating position. 3. i G009550 Figure 3 2. Read the oil level on the dipstick, slowly pour a small amount of oil in step I . 1. Setup Important: Remove and discard the protective plastic sheet that you install the handle. [2 Filling the Engine with Oil No Parts Required Procedure...

Owner's Manual
Page 6
...oil level on -demand lever 5. Refer to Changing the Engine Oil. [3 Charging the Battery No Parts Required Procedure Electric-start models only) Handle 2. Air filter 10. Side discharge chute 3. change it yearly thereafter. Side-discharge deflector models only) 4. with oil until 6. Blade control bar 3. Fuel tank cap 11. Spark plug 1 G009526 Figure 6 1. Bag-on the dipstick reads Full. Handle knob (2) 6. Battery charger (electric-start models only Refer to Charging the Battery in the Maintenance section. Important: Do not overfill the crankcase oil and run...
...oil level on -demand lever 5. Refer to Changing the Engine Oil. [3 Charging the Battery No Parts Required Procedure Electric-start models only) Handle 2. Air filter 10. Side discharge chute 3. change it yearly thereafter. Side-discharge deflector models only) 4. with oil until 6. Blade control bar 3. Fuel tank cap 11. Spark plug 1 G009526 Figure 6 1. Bag-on the dipstick reads Full. Handle knob (2) 6. Battery charger (electric-start models only Refer to Charging the Battery in the Maintenance section. Important: Do not overfill the crankcase oil and run...
Owner's Manual
Page 7
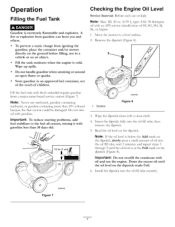
Checking the Engine Oil Level Service Interval: Before each use methanol, gasoline containing methanol, or gasoline containing more than 30 days old. fi11:20 oz. (0.59 1), type: SAE 30 detergent oil with gasoline. Important: To reduce starting problems, fuel stabilizer to a level surface. 2. Insert the dipstick fury into the oil fi11tube secure17 G009498 Figure 7 Note: If the oil level is below the Add mark on the...
Checking the Engine Oil Level Service Interval: Before each use methanol, gasoline containing methanol, or gasoline containing more than 30 days old. fi11:20 oz. (0.59 1), type: SAE 30 detergent oil with gasoline. Important: To reduce starting problems, fuel stabilizer to a level surface. 2. Insert the dipstick fury into the oil fi11tube secure17 G009498 Figure 7 Note: If the oil level is below the Add mark on the...
Owner's Manual
Page 8
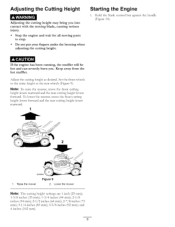
To lower the mower, move the front cutting height levers rearward and the rear cutting height levers forward. and 4 inches (102 ram). Set the front wheels to stop. • Do not put your fingers under the housing when adjusting the cutting height. Adjusting the Cutting Height Adjusting the cutting height may bring contact with the moving parts to the same height as desired. you . Hold the blade control bar against the handle (Figure 10). Raise the mower Figure 9 2. Note...
To lower the mower, move the front cutting height levers rearward and the rear cutting height levers forward. and 4 inches (102 ram). Set the front wheels to stop. • Do not put your fingers under the housing when adjusting the cutting height. Adjusting the Cutting Height Adjusting the cutting height may bring contact with the moving parts to the same height as desired. you . Hold the blade control bar against the handle (Figure 10). Raise the mower Figure 9 2. Note...

Owner's Manual
Page 9
... hands in place, and allow the mower to roll a couple of inches (centimeters). You can also try reaching just under the personal pace handle to the metal handle and push the mower forward a couple of inches (centimeters) forward to disengage the wheel drive. Figure 11 G009547 G009548 Figure 12 Blade control bar 7 _/_'G009546 Figure 10 , Turn the ignition key (Figure 11) (electric-start models only) or pul the recoil start handle (Figure 12).
... hands in place, and allow the mower to roll a couple of inches (centimeters). You can also try reaching just under the personal pace handle to the metal handle and push the mower forward a couple of inches (centimeters) forward to disengage the wheel drive. Figure 11 G009547 G009548 Figure 12 Blade control bar 7 _/_'G009546 Figure 10 , Turn the ignition key (Figure 11) (electric-start models only) or pul the recoil start handle (Figure 12).

Owner's Manual
Page 10
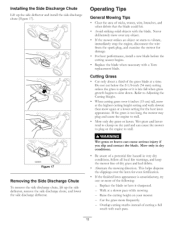
Note: Remove the ignition key when you release the blade control bar, both the engine and blade should stop the engine, release the blade control bar. If the side discharge chute is on the mower, remove it (refer to Removing the Side Discharge Chute) before recycling the clippings. Lower the rear deflector. Removing the Grass Bag To remove the bag, reverse the steps above. If the grass bag is on the mower and the bag-on the mower, remove it (refer to the operator or...
Note: Remove the ignition key when you release the blade control bar, both the engine and blade should stop the engine, release the blade control bar. If the side discharge chute is on the mower, remove it (refer to Removing the Side Discharge Chute) before recycling the clippings. Lower the rear deflector. Removing the Grass Bag To remove the bag, reverse the steps above. If the grass bag is on the mower and the bag-on the mower, remove it (refer to the operator or...
Owner's Manual
Page 12
... the area of the grass blade at a slower pace while mowing. - Never deliberately mow over the lawn for damage. • For best performance, install a new blade before the cutting season begins. • Replace the blade when necessary with the blade. Installing the Side Discharge Chute Lift up the side deflector, remove the side discharge chute, and lower the side discharge deflector. Do not cut below the 2-1/8-inch (54 ram) setting unless the grass is sparse or...
... the area of the grass blade at a slower pace while mowing. - Never deliberately mow over the lawn for damage. • For best performance, install a new blade before the cutting season begins. • Replace the blade when necessary with the blade. Installing the Side Discharge Chute Lift up the side deflector, remove the side discharge chute, and lower the side discharge deflector. Do not cut below the 2-1/8-inch (54 ram) setting unless the grass is sparse or...

Owner's Manual
Page 14
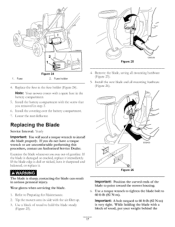
... spark plug wire from an Authorized Service Dealer (go to v_-,v,,_toro.com to your engine operator's manual for any maintenance procedure. Tipping Gasoline personal the mower may cause the fuel to the spark plug. Refer to your engine operator's manual. • Refer to running out of the machine from under the mower. • Replace the air filter; tip the mower prior to your engine operator's manual for 24 hours (electric-start models only). • Empty the fuel tank before repairs...
... spark plug wire from an Authorized Service Dealer (go to v_-,v,,_toro.com to your engine operator's manual for any maintenance procedure. Tipping Gasoline personal the mower may cause the fuel to the spark plug. Refer to your engine operator's manual. • Refer to running out of the machine from under the mower. • Replace the air filter; tip the mower prior to your engine operator's manual for 24 hours (electric-start models only). • Empty the fuel tank before repairs...

Owner's Manual
Page 16
... light indicates that the charger is fully charged or the charger is fully charged. Raise the rear deflector and locate the battery compartment (Figure 23). Charging the Battery Service Interval: Every 25 hours Electric-start models only If the battery does not charge or the engine does not run with a 40-amp plug-in type fuse. 1. Connect the charger to the mower wire harness located below the ignition key (Figure 22). Replace it with the electric starter, the fuse...
... light indicates that the charger is fully charged or the charger is fully charged. Raise the rear deflector and locate the battery compartment (Figure 23). Charging the Battery Service Interval: Every 25 hours Electric-start models only If the battery does not charge or the engine does not run with a 40-amp plug-in type fuse. 1. Connect the charger to the mower wire harness located below the ignition key (Figure 22). Replace it with the electric starter, the fuse...
Owner's Manual
Page 17
Fuse holder 4• Replace the fuse in the battery compartment• 5. Wear gloves when servicing the blade. 1. Use a block of wood, put your weight behind the 17 Important: A bolt torqued to install the blade properly. Install the covering over the battery compartment• 7. Examine the blade whenever you run out of the blade to point toward the mower housing. , Use a torque wrench to tighten the blade bolt to 60 ft-lb (82 N-m). Install the battery compartment you do not...
Fuse holder 4• Replace the fuse in the battery compartment• 5. Wear gloves when servicing the blade. 1. Use a block of wood, put your weight behind the 17 Important: A bolt torqued to install the blade properly. Install the covering over the battery compartment• 7. Examine the blade whenever you run out of the blade to point toward the mower housing. , Use a torque wrench to tighten the blade bolt to 60 ft-lb (82 N-m). Install the battery compartment you do not...
Owner's Manual
Page 18
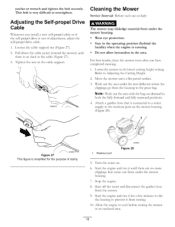
... from rusting. 10. Adjusting the Self-propel Drive Cable Whenever you have completed mowing. 1. the garden hose , Start the engine and run it until there is running. • Do not allow bystanders in the cable (Figure 27). 3. Attach a garden hose that come out from under the rear deflector where the clippings go from the mower. ratchet or wrench and tighten the bolt securely. Pull down the cable jacket (toward the mower) until there are...
... from rusting. 10. Adjusting the Self-propel Drive Cable Whenever you have completed mowing. 1. the garden hose , Start the engine and run it until there is running. • Do not allow bystanders in the cable (Figure 27). 3. Attach a garden hose that come out from under the rear deflector where the clippings go from the mower. ratchet or wrench and tighten the bolt securely. Pull down the cable jacket (toward the mower) until there are...

Owner's Manual
Page 19
...> Recycle it according to local codes, or use it stops. Note: Old fuel in a heated area, you can damage the cables, causing an unsafe operating condition. Charge the battery for 24 hours (electric-start model only). 2. If you must charge the battery every 90 days (electric-start the engine, it is the leading cause of oil through the spark plug hole, and pull the starter rope slowly several times to...
...> Recycle it according to local codes, or use it stops. Note: Old fuel in a heated area, you can damage the cables, causing an unsafe operating condition. Charge the battery for 24 hours (electric-start model only). 2. If you must charge the battery every 90 days (electric-start the engine, it is the leading cause of oil through the spark plug hole, and pull the starter rope slowly several times to...

Owner's Manual
Page 20
... Warranty for Commercial Use* Gas-powered Toro Products used for commercial, institutional, or rental use of the product on the same lot as filters, fuel, lubricants, oil changes, spark plugs, air filters blade sharpening or worn blades, cable!linkage adjustments, or brake and clutch adjustments • Any product or part which vary from the United States or Canada should contact their dealership. This express warranty does not cover the following the maintenance procedures described in the Operator's Manual...
... Warranty for Commercial Use* Gas-powered Toro Products used for commercial, institutional, or rental use of the product on the same lot as filters, fuel, lubricants, oil changes, spark plugs, air filters blade sharpening or worn blades, cable!linkage adjustments, or brake and clutch adjustments • Any product or part which vary from the United States or Canada should contact their dealership. This express warranty does not cover the following the maintenance procedures described in the Operator's Manual...
Parts Catalog
Page 2
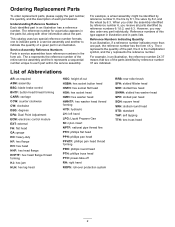
... SRH: slotted round head STD: standard TAP: self tapping TTH: torx truss head 2 List of Abbreviations AR: as required ASM: assembly BBC: blade brake control BHTF: button head thread forming CARR: carriage CCW: counter clockwise CW: clockwise DEG: degrees DPA: Dual Point Adjustment ECM: electronic control module EXT: external FH: flat head GA: gauge HD: heavy-duty HF: hex flange...
... SRH: slotted round head STD: standard TAP: self tapping TTH: torx truss head 2 List of Abbreviations AR: as required ASM: assembly BBC: blade brake control BHTF: button head thread forming CARR: carriage CCW: counter clockwise CW: clockwise DEG: degrees DPA: Dual Point Adjustment ECM: electronic control module EXT: external FH: flat head GA: gauge HD: heavy-duty HF: hex flange...

Parts Catalog
Page 3
Contents Deck, Side Chute and Rear Door Assembly 4 Rear Bag Assembly 5 Engine and Blade Assembly 6 Front Wheel and Height-of-Cut Assembly 7 Transmission and Rear Wheel Drive Assembly 8 Handle Assembly 9 Electrical Assembly 10 Attachments and Accessories 11 © 2012-The Toro® Company Contact us at www.Toro.com. 8111 Lyndale Avenue South Bloomington, MN 55420 3 Printed in the USA. All Rights Reserved
Contents Deck, Side Chute and Rear Door Assembly 4 Rear Bag Assembly 5 Engine and Blade Assembly 6 Front Wheel and Height-of-Cut Assembly 7 Transmission and Rear Wheel Drive Assembly 8 Handle Assembly 9 Electrical Assembly 10 Attachments and Accessories 11 © 2012-The Toro® Company Contact us at www.Toro.com. 8111 Lyndale Avenue South Bloomington, MN 55420 3 Printed in the USA. All Rights Reserved
Parts Catalog
Page 8
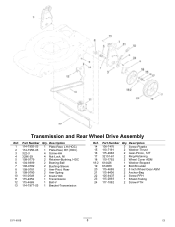
... 18 110-1792 2 Wheel Cover ASM 18:2 614426 1 Washer-Stepped 19 614650 2 Bolt-Shoulder 20 115-4695 2 8 Inch Wheel Gear ASM 21 115-8406 2 Anchor-Bag 22 105-9437 2 Screw...Rear, RH (HOC) 3 322-3 4 Screw-HH 4 3296-29 4 Nut-Lock, NI 5 108-9779 2 Retainer-Bushing, HOC 6 104-8699 2 Bearing-Ball 7 108-9782 2 Bushing-Sleeve 8 108-9781 2 Arm-Pivot, Rear 9 108-9780 2 Arm-Spring 10 110-0549 2 Knob-HOC 11 115-4652 1 Transmission 12 115-4669 1 Belt-V 13 114-7977-03 1 Bracket-Transmission Ref. Part Number Qty. Transmission and Rear Wheel Drive Assembly Ref. Part Number...
... 18 110-1792 2 Wheel Cover ASM 18:2 614426 1 Washer-Stepped 19 614650 2 Bolt-Shoulder 20 115-4695 2 8 Inch Wheel Gear ASM 21 115-8406 2 Anchor-Bag 22 105-9437 2 Screw...Rear, RH (HOC) 3 322-3 4 Screw-HH 4 3296-29 4 Nut-Lock, NI 5 108-9779 2 Retainer-Bushing, HOC 6 104-8699 2 Bearing-Ball 7 108-9782 2 Bushing-Sleeve 8 108-9781 2 Arm-Pivot, Rear 9 108-9780 2 Arm-Spring 10 110-0549 2 Knob-HOC 11 115-4652 1 Transmission 12 115-4669 1 Belt-V 13 114-7977-03 1 Bracket-Transmission Ref. Part Number Qty. Transmission and Rear Wheel Drive Assembly Ref. Part Number...
Parts Catalog
Page 10
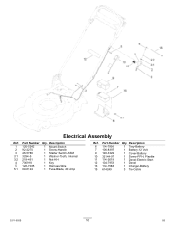
Description 1 120-5242 1 Mount-Switch 2 92-2270 1 Screw-Handle 3 46-5780 1 Starter Switch ASM 3:1 3254-5 1 Washer-Tooth, Internal 3:2 218-461 1 Nut-HH 4 700918 1 Key 5 120-7035 1 Harness-Wire 5:1 99-6124 1 Fuse-Blade, 40 Amp Ref. Description 6 114-7936 1 Tray-Battery 7 106-8397 1 Battery-12 Volt 9 120-3329 1 Cover-Battery 10 32144-97 1 Screw-PPH, Plastite 11 114-2619 1 Decal-Electric Start 12 104-7953 1 Decal 13 114-1588 1 Charger-Battery 15 614249 3 Tie-Cable 3371-850B 10 D5 Part Number Qty. Part Number Qty. Electrical Assembly Ref.
Description 1 120-5242 1 Mount-Switch 2 92-2270 1 Screw-Handle 3 46-5780 1 Starter Switch ASM 3:1 3254-5 1 Washer-Tooth, Internal 3:2 218-461 1 Nut-HH 4 700918 1 Key 5 120-7035 1 Harness-Wire 5:1 99-6124 1 Fuse-Blade, 40 Amp Ref. Description 6 114-7936 1 Tray-Battery 7 106-8397 1 Battery-12 Volt 9 120-3329 1 Cover-Battery 10 32144-97 1 Screw-PPH, Plastite 11 114-2619 1 Decal-Electric Start 12 104-7953 1 Decal 13 114-1588 1 Charger-Battery 15 614249 3 Tie-Cable 3371-850B 10 D5 Part Number Qty. Part Number Qty. Electrical Assembly Ref.


