
Installation Manual
Page 4
... 5. Pushing the appliance into the installation enclosure 15 1. Attaching the appliance to the door panel 20 8. Aligning the base panel 18 3. Removing the installation support part 19 7. Attaching the door panel 21 10. Attaching the strips 23 12. Special installation 12 1. Switching the appliance ON 19 4. Attaching the adjusting rail to...
... 5. Pushing the appliance into the installation enclosure 15 1. Attaching the appliance to the door panel 20 8. Aligning the base panel 18 3. Removing the installation support part 19 7. Attaching the door panel 21 10. Attaching the strips 23 12. Special installation 12 1. Switching the appliance ON 19 4. Attaching the adjusting rail to...

Installation Manual
Page 10
... in different sizes Wooden beam (cross section min. 3" x 4") as an alternative tip protection, length according to the width of two individual appliances, e.g. Panel unification part (Metal strip) FPCONNTS10 For connection of the water pipe (without further preliminary work surfaces. Required accessories and tools Supplied accessories Installation instructions Operating...
... in different sizes Wooden beam (cross section min. 3" x 4") as an alternative tip protection, length according to the width of two individual appliances, e.g. Panel unification part (Metal strip) FPCONNTS10 For connection of the water pipe (without further preliminary work surfaces. Required accessories and tools Supplied accessories Installation instructions Operating...

Installation Manual
Page 11
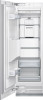
... the installation enclosure , CAUTION: Use the following installation instructions describe the installation steps for damage in transit. All cabinet parts in doubt, contact your appliance. Do not install the appliance if it is being unpacked or if the doors are ...opened. The appliance is very heavy. Remove accessories from inside the appliance until the installation is complete, otherwise the parts may tip over - Note: Do not remove transportation safety devices which was used subsequently for a safe and trouble free installation. 1. Check...
... the installation enclosure , CAUTION: Use the following installation instructions describe the installation steps for damage in transit. All cabinet parts in doubt, contact your appliance. Do not install the appliance if it is being unpacked or if the doors are ...opened. The appliance is very heavy. Remove accessories from inside the appliance until the installation is complete, otherwise the parts may tip over - Note: Do not remove transportation safety devices which was used subsequently for a safe and trouble free installation. 1. Check...
Installation Manual
Page 17
... into the cover strip. 7. Screw on the top of the appliance fix the attachment plate side lugs (top) to the appliance". 17 These parts have been removed. Shorten the fitting strip (a) to the required height to the attachment plate (top). 4. Note: In the case of the fastening... sheets (lateral) with the cabinet parts located next to the bolt included in the installation accessories for side-by -Side installation this installation step is not possible. Instructions are special installation...
... into the cover strip. 7. Screw on the top of the appliance fix the attachment plate side lugs (top) to the appliance". 17 These parts have been removed. Shorten the fitting strip (a) to the required height to the attachment plate (top). 4. Note: In the case of the fastening... sheets (lateral) with the cabinet parts located next to the bolt included in the installation accessories for side-by -Side installation this installation step is not possible. Instructions are special installation...

Installation Manual
Page 19
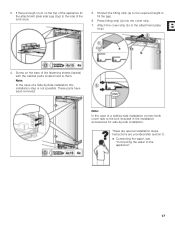
... load the door storage compartments in order to a metal strip on , the appliance should now be purchased from the appliance door. Removing the installation support part Unscrew the positioning aid from customer service as an optional accessory, see the section on the door panels, always observe the following working steps and...
... load the door storage compartments in order to a metal strip on , the appliance should now be purchased from the appliance door. Removing the installation support part Unscrew the positioning aid from customer service as an optional accessory, see the section on the door panels, always observe the following working steps and...
Installation Manual
Page 25
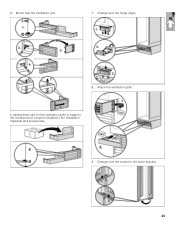
Attach the ventilation grille. A replacement part for the lower bracket. 25 Change over the screw for the ventilation grille to adapt to the modified door hinge is included in the installation materials and accessories. 9. Mount new the ventilation grill. 7. Change over the hinge angle. 8. 6.
Attach the ventilation grille. A replacement part for the lower bracket. 25 Change over the screw for the ventilation grille to adapt to the modified door hinge is included in the installation materials and accessories. 9. Mount new the ventilation grill. 7. Change over the hinge angle. 8. 6.
Installation Manual
Page 26
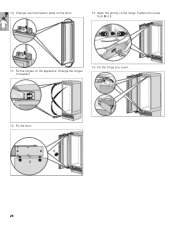
10. Change over the fixation parts on the hinge. Tighten the screw from 0 to I. 11. Change the hinges crosswise! 14. Fix the hinge box cover. 12. Fix the door. 26 Span the spring on the door. 13. Fix the hinges on the appliance.
10. Change over the fixation parts on the hinge. Tighten the screw from 0 to I. 11. Change the hinges crosswise! 14. Fix the hinge box cover. 12. Fix the door. 26 Span the spring on the door. 13. Fix the hinges on the appliance.
Installation Manual
Page 27
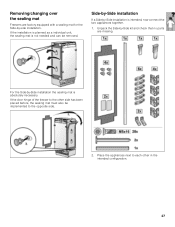
For the Side-by -Side kit and check that no parts are factory equipped with a sealing mat for the Side-by -Side installation is intended, now connect the two appliances together. 1. Unpack the Side-by -Side ...
For the Side-by -Side kit and check that no parts are factory equipped with a sealing mat for the Side-by -Side installation is intended, now connect the two appliances together. 1. Unpack the Side-by -Side ...
