User's Guide
Page 2
i TRENDnet User's Guide Contents Product Overview 1 Package Contents ...1 Features ...1 Product Hardware Features 2 Installation 3 Wired Connection ...3 Wall mount installation 3 Starting the Setup Wizard 4 Configuration 7 Main Interface ...7 Setup Wizard ...9 System ...12 Network...14 Dynamic DNS ...15 Video and Audio ...15 Video and Audio ...16 Day/Night Mode...17 Audio Setup ...17 Image Setup ...17 Action...18 Recording ...18 Video Clip ...19 Table of Contents Snapshot ...21 Preset Position ...21 SD Management...23 Motion Detection ...23 Tools ...24 System...24 Firmware Upgrade 24...
i TRENDnet User's Guide Contents Product Overview 1 Package Contents ...1 Features ...1 Product Hardware Features 2 Installation 3 Wired Connection ...3 Wall mount installation 3 Starting the Setup Wizard 4 Configuration 7 Main Interface ...7 Setup Wizard ...9 System ...12 Network...14 Dynamic DNS ...15 Video and Audio ...15 Video and Audio ...16 Day/Night Mode...17 Audio Setup ...17 Image Setup ...17 Action...18 Recording ...18 Video Clip ...19 Table of Contents Snapshot ...21 Preset Position ...21 SD Management...23 Motion Detection ...23 Tools ...24 System...24 Firmware Upgrade 24...

User's Guide
Page 3
... camera management software. Pan the camera side-to install this camera near a power source, power and data are received through a single Ethernet cable using Power over Ethernet (PoE) technology (See TRENDnet PoE Switches and Injectors). Advanced features include adjustable motion detection recording areas, email alerts, scheduled recording sessions, pan/tilt Auto-Patrol, H.264/MPEG-4/MJPEG image compression, date-and-time overlays, a Micro-SD card slot for backup storage, two-way audio (speakers not included), an adjustable lens, and four times digital zoom. Record...
... camera management software. Pan the camera side-to install this camera near a power source, power and data are received through a single Ethernet cable using Power over Ethernet (PoE) technology (See TRENDnet PoE Switches and Injectors). Advanced features include adjustable motion detection recording areas, email alerts, scheduled recording sessions, pan/tilt Auto-Patrol, H.264/MPEG-4/MJPEG image compression, date-and-time overlays, a Micro-SD card slot for backup storage, two-way audio (speakers not included), an adjustable lens, and four times digital zoom. Record...
User's Guide
Page 4
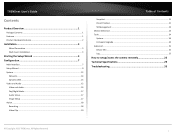
...6 IR LED for night vision uses. (for TV-IP672PI) Light Sensor - TRENDnet User's Guide Product Hardware Features Rear Panel View Front Panel View IR LED Focus Ring TV-IP672P / TV-IP672PI Light Sensor Camera Lens WPS button LAN port Reset Button Power port Line Out Micro SD slot LAN Port - Turn to store camera video files. Connect Ethernet cables to your camera. Reset Button - Note: Use only the adapter that came with your wired network devices. Power Port - Connect the included power adapter from your camera. Link - Built...
...6 IR LED for night vision uses. (for TV-IP672PI) Light Sensor - TRENDnet User's Guide Product Hardware Features Rear Panel View Front Panel View IR LED Focus Ring TV-IP672P / TV-IP672PI Light Sensor Camera Lens WPS button LAN port Reset Button Power port Line Out Micro SD slot LAN Port - Turn to store camera video files. Connect Ethernet cables to your camera. Reset Button - Note: Use only the adapter that came with your wired network devices. Power Port - Connect the included power adapter from your camera. Link - Built...

User's Guide
Page 5
... available port on the rear panel of the Camera with the two screws provided. The camera can now be mounted to the DC 12V 1.25A receptor on your network. TRENDnet User's Guide Installation Wired Connection 1. Connect the Ethernet Cable If you prefer to a wall outlet or power strip. Attach the Power Supply Attach the included power supply to the ceiling or a wall. A blue LED will light up under the base of the Camera...
... available port on the rear panel of the Camera with the two screws provided. The camera can now be mounted to the DC 12V 1.25A receptor on your network. TRENDnet User's Guide Installation Wired Connection 1. Connect the Ethernet Cable If you prefer to a wall outlet or power strip. Attach the Power Supply Attach the included power supply to the ceiling or a wall. A blue LED will light up under the base of the Camera...
User's Guide
Page 6
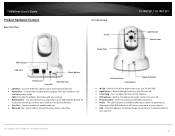
... and follow the on your camera. Click Start > Programs > TRENDnet > SetupWizard > SetupWizard. The TRENDnet Setup Wizard appears. © Copyright 2012 TRENDnet. All Rights Reserved. 4 When the installation of the Setup Wizard is connected to both power and the network and click to proceed. 3. The Install Wizard program will run , you wish to configure and click Next to begin the installation wizard. TV-IP672P / TV-IP672PI 2. If your CD...
... and follow the on your camera. Click Start > Programs > TRENDnet > SetupWizard > SetupWizard. The TRENDnet Setup Wizard appears. © Copyright 2012 TRENDnet. All Rights Reserved. 4 When the installation of the Setup Wizard is connected to both power and the network and click to proceed. 3. The Install Wizard program will run , you wish to configure and click Next to begin the installation wizard. TV-IP672P / TV-IP672PI 2. If your CD...

User's Guide
Page 7
... ISP has supplied you change your Internet connection. Click Next to copy the local time 7. It is directly connected to the camera. The name will be used to identify your connection type and click Next to secure the camera from being accessed by entering the ID and Password. Enter a name for your password to continue. © Copyright 2012 TRENDnet. Select a connection option: (example uses DHCP connection type) PPPoE...
... ISP has supplied you change your Internet connection. Click Next to copy the local time 7. It is directly connected to the camera. The name will be used to identify your connection type and click Next to secure the camera from being accessed by entering the ID and Password. Enter a name for your password to continue. © Copyright 2012 TRENDnet. Select a connection option: (example uses DHCP connection type) PPPoE...

User's Guide
Page 9
... button to easily access and configure your camera. If you did not create a password, the default password is designed to allow you created in or out, and software Pan & Tilt functions. 7 Open a web browser such as Internet Explorer® and enter the IP address of the camera, zoom in the Setup Wizard. After entering your camera. Main Interface TV-IP672P / TV-IP672PI The home page for the TV-IP672P or TV-IP672PI appears. © Copyright 2012 TRENDnet...
... button to easily access and configure your camera. If you did not create a password, the default password is designed to allow you created in or out, and software Pan & Tilt functions. 7 Open a web browser such as Internet Explorer® and enter the IP address of the camera, zoom in the Setup Wizard. After entering your camera. Main Interface TV-IP672P / TV-IP672PI The home page for the TV-IP672P or TV-IP672PI appears. © Copyright 2012 TRENDnet...

User's Guide
Page 10
... Screen Mode Snapshot DESCRIPTION This profile, in /out. The viewable screen is expanded to full screen Click this button to use the microphone on the camera and listen to Pan. TRENDnet User's Guide 6. Pan 7. This button functions from start to take a snapshot of the Tilt motion from 1-10. 1 is the slowest as 10 is the fastest. Record Storage Folder Audio Microphone Zoom TV-IP672P / TV-IP672PI Start recording the current video stream. There are different zoom options under Zoom...
... Screen Mode Snapshot DESCRIPTION This profile, in /out. The viewable screen is expanded to full screen Click this button to use the microphone on the camera and listen to Pan. TRENDnet User's Guide 6. Pan 7. This button functions from start to take a snapshot of the Tilt motion from 1-10. 1 is the slowest as 10 is the fastest. Record Storage Folder Audio Microphone Zoom TV-IP672P / TV-IP672PI Start recording the current video stream. There are different zoom options under Zoom...

User's Guide
Page 11
... a username and password. All Rights Reserved. 9 Select the appropriate option and click Next to setup PPPoE. Click the Enable checkbox to continue. If your ADSL modem. TRENDnet User's Guide Setup Wizard To view the Setup Wizard settings: 1. Login to the camera as described in the section Using the web-based configuration interface.Click on the Setup tab on the right side of the screen, click Next to Internet Connection Setup Wizard screen appears...
... a username and password. All Rights Reserved. 9 Select the appropriate option and click Next to setup PPPoE. Click the Enable checkbox to continue. If your ADSL modem. TRENDnet User's Guide Setup Wizard To view the Setup Wizard settings: 1. Login to the camera as described in the section Using the web-based configuration interface.Click on the Setup tab on the right side of the screen, click Next to Internet Connection Setup Wizard screen appears...
User's Guide
Page 15
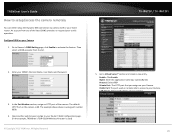
... LED light has three options from the drop-down list: Power/Link, Off, or Flicker. If you didn't set the time and date settings in the Setup Wizard, you can change the Camera Name, click OSD to enable the Label Name and check Time Stamp to access the direct view page. Click Apply to continue. TV-IP672P / TV-IP672PI The next configurable section under System is enabled, user name and password...
... LED light has three options from the drop-down list: Power/Link, Off, or Flicker. If you didn't set the time and date settings in the Setup Wizard, you can change the Camera Name, click OSD to enable the Label Name and check Time Stamp to access the direct view page. Click Apply to continue. TV-IP672P / TV-IP672PI The next configurable section under System is enabled, user name and password...
User's Guide
Page 16
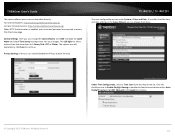
... the PPPoE checkbox and enter the Username, Password, confirm the Password and click Apply. Click Apply to Enabled. © Copyright 2012 TRENDnet. Under Set Date and Time Manually, click the Setup Date and Time Manually checkbox if you want to set the ports. The Status will change from Disabled to continue. Under LAN Settings, select either DHCP Connection or Static IP Address. Click Apply to continue or...
... the PPPoE checkbox and enter the Username, Password, confirm the Password and click Apply. Click Apply to Enabled. © Copyright 2012 TRENDnet. Under Set Date and Time Manually, click the Setup Date and Time Manually checkbox if you want to set the ports. The Status will change from Disabled to continue. Under LAN Settings, select either DHCP Connection or Static IP Address. Click Apply to continue or...
User's Guide
Page 19
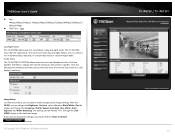
... change the Brightness, Contrast, color scheme to change the Frequency, Shutter Speed, Saturation, Hue, Mirror, Auto Exposure and White Balancing. You can be viewed "live" through the LIVE VIDEO display in the forefront image. Audio Setup The TV-IP672W/TV-IP672WI allows users to run automatically, manually, in day and night mode. The TV-IP672WI have LED's for night mode. Click the Speaker checkbox to Black/White, Flip the image, and change the volume settings on the camera's speaker. TRENDnet User's Guide...
... change the Brightness, Contrast, color scheme to change the Frequency, Shutter Speed, Saturation, Hue, Mirror, Auto Exposure and White Balancing. You can be viewed "live" through the LIVE VIDEO display in the forefront image. Audio Setup The TV-IP672W/TV-IP672WI allows users to run automatically, manually, in day and night mode. The TV-IP672WI have LED's for night mode. Click the Speaker checkbox to Black/White, Flip the image, and change the volume settings on the camera's speaker. TRENDnet User's Guide...

User's Guide
Page 20
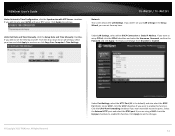
... Card settings are setup to record constantly. Motion This option allows you to accommodate the huge storage space required for Always connections. Click the Recording checkbox to the motion parameters you select Motion, click the Onlyduring checkbox. If you setup. This means 18 You are three main sections: Trigger By: Always, Motion, Schedule, Recording: Configure the recording options SD Card: Recording files size TV-IP672P / TV-IP672PI Trigger By - TRENDnet User's Guide Action Recording...
... Card settings are setup to record constantly. Motion This option allows you to accommodate the huge storage space required for Always connections. Click the Recording checkbox to the motion parameters you select Motion, click the Onlyduring checkbox. If you setup. This means 18 You are three main sections: Trigger By: Always, Motion, Schedule, Recording: Configure the recording options SD Card: Recording files size TV-IP672P / TV-IP672PI Trigger By - TRENDnet User's Guide Action Recording...
User's Guide
Page 28
... the camera is using port number 9000. 4. TV-IP672P / TV-IP672PI 2. The example shows above is 80. In the Port Number section, assign an HTTP port of your Camera 1. LAN Server: The local IP address of the camera. Configure DDNS on your DDNS's the Host Name, User Name and Password. 3. CameraName) Protocol: Select TCP Private Port: The HTTP port that you assign on your Camera. 26 The default HTTP Port on remote side to access to your Router's Web Configuration...
... the camera is using port number 9000. 4. TV-IP672P / TV-IP672PI 2. The example shows above is 80. In the Port Number section, assign an HTTP port of your Camera 1. LAN Server: The local IP address of the camera. Configure DDNS on your DDNS's the Host Name, User Name and Password. 3. CameraName) Protocol: Select TCP Private Port: The HTTP port that you assign on your Camera. 26 The default HTTP Port on remote side to access to your Router's Web Configuration...
User's Guide
Page 31
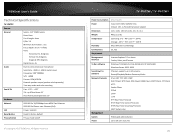
... echo canceling Pan & Tilt Pan: -170° ~ +170° Tilt: up to 32 cameras Record/Playback/Motion Detection/Audio IPv4, ARP, TCP, UDP, ICMP DHCP Client, NTP Client, DNS Client, DDNS Client, SMTP Client, FTP Client HTTP Samba Client PPPoE UPnP LLTD RTP (Real Time Protocol) RTCP (Real Time Control Protocol) RTSP (Real Time Streaming Protocol) 3GPP (video only) Web based administration Up to factory default Privacy Button Privacy mode on/off © Copyright 2012 TRENDnet. TRENDnet User's Guide Technical Specifications TV-IP672P Camera General Sensor...
... echo canceling Pan & Tilt Pan: -170° ~ +170° Tilt: up to 32 cameras Record/Playback/Motion Detection/Audio IPv4, ARP, TCP, UDP, ICMP DHCP Client, NTP Client, DNS Client, DDNS Client, SMTP Client, FTP Client HTTP Samba Client PPPoE UPnP LLTD RTP (Real Time Protocol) RTCP (Real Time Control Protocol) RTSP (Real Time Streaming Protocol) 3GPP (video only) Web based administration Up to factory default Privacy Button Privacy mode on/off © Copyright 2012 TRENDnet. TRENDnet User's Guide Technical Specifications TV-IP672P Camera General Sensor...
User's Guide
Page 32
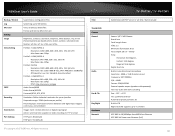
...° Tilt: up 90°and down 25° Auto-Patrol preset positions: 10 Built-in ICR Nigh vision (IR) supports up to 4 profiles Required storage: 32MB (minimum per profile) Recording type: event based (motion detection and digital input trigger), continuous, and scheduled Trigger event: motion detection or digital input signal Action: send real-time snapshot or video recording to FTP or email HTTP port: 80 (default) RTSP port: 554 (default) © Copyright 2012 TRENDnet. Resolution: 640 x 400...
...° Tilt: up 90°and down 25° Auto-Patrol preset positions: 10 Built-in ICR Nigh vision (IR) supports up to 4 profiles Required storage: 32MB (minimum per profile) Recording type: event based (motion detection and digital input trigger), continuous, and scheduled Trigger event: motion detection or digital input signal Action: send real-time snapshot or video recording to FTP or email HTTP port: 80 (default) RTSP port: 554 (default) © Copyright 2012 TRENDnet. Resolution: 640 x 400...

User's Guide
Page 33
... Record/Playback/Motion Detection/Audio IPv4, ARP, TCP, UDP, ICMP DHCP Client, NTP Client, DNS Client, DDNS Client, SMTP Client, FTP Client HTTP Samba Client PPPoE UPnP LLTD RTP (Real Time Protocol) RTCP (Real Time Control Protocol) RTSP (Real Time Streaming Protocol) 3GPP (video only) © Copyright 2012 TRENDnet. TRENDnet User's Guide LED Reset Button Privacy Button Power Consumption Power Dimension Weight Temperature Humidity Certifications Requirement Management Interface To Run software SecurView Pro Software Network Protocols Power, Link/Act Reset to factory default Privacy mode...
... Record/Playback/Motion Detection/Audio IPv4, ARP, TCP, UDP, ICMP DHCP Client, NTP Client, DNS Client, DDNS Client, SMTP Client, FTP Client HTTP Samba Client PPPoE UPnP LLTD RTP (Real Time Protocol) RTCP (Real Time Control Protocol) RTSP (Real Time Streaming Protocol) 3GPP (video only) © Copyright 2012 TRENDnet. TRENDnet User's Guide LED Reset Button Privacy Button Power Consumption Power Dimension Weight Temperature Humidity Certifications Requirement Management Interface To Run software SecurView Pro Software Network Protocols Power, Link/Act Reset to factory default Privacy mode...

User's Guide
Page 35
.... Reposition the Network Camera into an image that the configuration of the router settings allow the ActiveX plugin to have the latest version of poor quality. The camera images are well connected and functioning properly. 3. Ensure that you have some settings changed in the Internet Options menu. TRENDnet User's Guide Troubleshooting 1. Check that the connection to both the power source and the terminal on the image from Internet Explorer make sure ActiveX has been enabled in order...
.... Reposition the Network Camera into an image that the configuration of the router settings allow the ActiveX plugin to have the latest version of poor quality. The camera images are well connected and functioning properly. 3. Ensure that you have some settings changed in the Internet Options menu. TRENDnet User's Guide Troubleshooting 1. Check that the connection to both the power source and the terminal on the image from Internet Explorer make sure ActiveX has been enabled in order...

Quick Installation Guide
Page 3
... Install Camera and follow the instructions. 5. Temporarily place the IP camera next to your CD-ROM drive. 3. Once the management interface has opened in your network using the PoE functionality, please use either of access. 6. Hardware Installation and Configuration 1. Your camera is now connected to your network. See the User's Guide for ease of the following methods: 4. Install the camera in your web browser, save the link of the IP address to...
... Install Camera and follow the instructions. 5. Temporarily place the IP camera next to your CD-ROM drive. 3. Once the management interface has opened in your network using the PoE functionality, please use either of access. 6. Hardware Installation and Configuration 1. Your camera is now connected to your network. See the User's Guide for ease of the following methods: 4. Install the camera in your web browser, save the link of the IP address to...

Quick Installation Guide
Page 5
... features, please install the SecurView Pro software. Connect a network cable from a switch or router (e.g. Connect the power adapter to the TPE-113GI and then to the TPE-113GI's DATA IN port. Install the software by clicking Install SecurView in the Autorun window and refer to the TPE-113GI's PWR+DATA OUT port 3. Using the TV-IP672P with an Injector (TPE-113GI) TPE-113GI Non-PoE Non-PoE PoE TV-IP672P 1-100m PoE 1. Connect a network cable from the TV-IP672P to the SecurView Pro User's Guide on the...
... features, please install the SecurView Pro software. Connect a network cable from a switch or router (e.g. Connect the power adapter to the TPE-113GI and then to the TPE-113GI's DATA IN port. Install the software by clicking Install SecurView in the Autorun window and refer to the TPE-113GI's PWR+DATA OUT port 3. Using the TV-IP672P with an Injector (TPE-113GI) TPE-113GI Non-PoE Non-PoE PoE TV-IP672P 1-100m PoE 1. Connect a network cable from the TV-IP672P to the SecurView Pro User's Guide on the...


