
User's Guide
Page 3
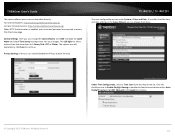
... four video profiles to record HD video while streaming low resolution video to a compatible smart phone at up to 7.5 meters. All Rights Reserved. 1 TRENDnet User's Guide Product Overview TV-IP672P TV-IP672PI Package Contents In addition to your camera, the package includes: Multi-Language Quick Installation Guide CD-ROM (Utility & User's Guide) ...
... four video profiles to record HD video while streaming low resolution video to a compatible smart phone at up to 7.5 meters. All Rights Reserved. 1 TRENDnet User's Guide Product Overview TV-IP672P TV-IP672PI Package Contents In addition to your camera, the package includes: Multi-Language Quick Installation Guide CD-ROM (Utility & User's Guide) ...
User's Guide
Page 4
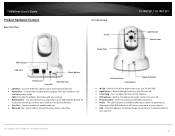
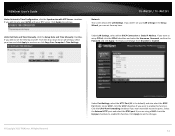
TRENDnet User's Guide Product Hardware Features Rear Panel View Front Panel View IR LED Focus Ring TV-IP672P / TV-IP672PI Light Sensor Camera Lens WPS button LAN port Reset Button Power port Line Out Micro SD slot LAN Port - Note: Use only the adapter ...
TRENDnet User's Guide Product Hardware Features Rear Panel View Front Panel View IR LED Focus Ring TV-IP672P / TV-IP672PI Light Sensor Camera Lens WPS button LAN port Reset Button Power port Line Out Micro SD slot LAN Port - Note: Use only the adapter ...

User's Guide
Page 5
TRENDnet User's Guide Installation Wired Connection 1. See the diagram below for more information. 2. If you intend to a wall outlet or power strip. All Rights Reserved. 3 Connect ... onto the base of the camera, making sure that the camera has power. © Copyright 2012 TRENDnet. Attach the Power Supply Attach the included power supply to the DC 12V 1.25A receptor on your network. TV-IP672P / TV-IP672PI Wall mount installation To attach the metal plates carry out the following: Remove the two...
TRENDnet User's Guide Installation Wired Connection 1. See the diagram below for more information. 2. If you intend to a wall outlet or power strip. All Rights Reserved. 3 Connect ... onto the base of the camera, making sure that the camera has power. © Copyright 2012 TRENDnet. Attach the Power Supply Attach the included power supply to the DC 12V 1.25A receptor on your network. TV-IP672P / TV-IP672PI Wall mount installation To attach the metal plates carry out the following: Remove the two...
User's Guide
Page 6
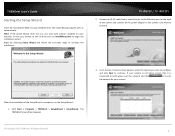
... > SetupWizard. When the installation of cameras that it is complete, run InstallWizard.exe to the camera. TV-IP672P / TV-IP672PI 2. The TRENDnet Setup Wizard appears. © Copyright 2012 TRENDnet. In this case, browse to the CD drive and run the Setup Wizard: 1. If your camera is not listed, ensure ... steps to proceed. 3. From the list of the Setup Wizard is connected to both power and the network and click to continue. TRENDnet User's Guide Starting the Setup Wizard Insert the included CD-ROM into your machine. Note: If the Install Wizard does not run automatically...
... > SetupWizard. When the installation of cameras that it is complete, run InstallWizard.exe to the camera. TV-IP672P / TV-IP672PI 2. The TRENDnet Setup Wizard appears. © Copyright 2012 TRENDnet. In this case, browse to the CD drive and run the Setup Wizard: 1. If your camera is not listed, ensure ... steps to proceed. 3. From the list of the Setup Wizard is connected to both power and the network and click to continue. TRENDnet User's Guide Starting the Setup Wizard Insert the included CD-ROM into your machine. Note: If the Install Wizard does not run automatically...

User's Guide
Page 7
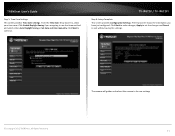
...supplied you with a fixed IP for the camera in . Click Next to continue. TRENDnet User's Guide 4. The name will be used to admin. DHCP: Select this option if your camera is enabled. TV-IP672P / TV-IP672PI 6. If your camera is strongly recommended that you are set to identify your camera...to your camera on the network. It is in both the ID and Password are using, click the to continue. © Copyright 2012 TRENDnet. Select a connection option: (example uses DHCP connection type) PPPoE: Select this option if your camera is in the Camera Name field. ...
...supplied you with a fixed IP for the camera in . Click Next to continue. TRENDnet User's Guide 4. The name will be used to admin. DHCP: Select this option if your camera is enabled. TV-IP672P / TV-IP672PI 6. If your camera is strongly recommended that you are set to identify your camera...to your camera on the network. It is in both the ID and Password are using, click the to continue. © Copyright 2012 TRENDnet. Select a connection option: (example uses DHCP connection type) PPPoE: Select this option if your camera is in the Camera Name field. ...

User's Guide
Page 8
After the Setup Wizard configures the camera, the wizard starts to use your camera. All Rights Reserved. 6 You are now ready to setup process. Click Next to access the camera's © Copyright 2012 TRENDnet. TV-IP672P / TV-IP672PI 10. A summary screen of the settings you have chosen appears. When the Setup Wizard has finished, the configuration is complete and the following screen appears: 9. Click the IP address link or the link advanced configuration page. button to continue. TRENDnet User's Guide 8.
After the Setup Wizard configures the camera, the wizard starts to use your camera. All Rights Reserved. 6 You are now ready to setup process. Click Next to access the camera's © Copyright 2012 TRENDnet. TV-IP672P / TV-IP672PI 10. A summary screen of the settings you have chosen appears. When the Setup Wizard has finished, the configuration is complete and the following screen appears: 9. Click the IP address link or the link advanced configuration page. button to continue. TRENDnet User's Guide 8.

User's Guide
Page 9
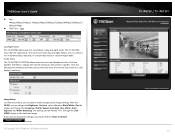
... such as Internet Explorer® and enter the IP address of the camera, zoom in , use your TV-IP672P or TV-IP672PI camera. Live View 2. Main Interface TV-IP672P / TV-IP672PI The home page for the TV-IP672P or TV-IP672PI appears. © Copyright 2012 TRENDnet. TRENDnet User's Guide Configuration After completing the Setup Wizard, you are ready to use the User name admin...
... such as Internet Explorer® and enter the IP address of the camera, zoom in , use your TV-IP672P or TV-IP672PI camera. Live View 2. Main Interface TV-IP672P / TV-IP672PI The home page for the TV-IP672P or TV-IP672PI appears. © Copyright 2012 TRENDnet. TRENDnet User's Guide Configuration After completing the Setup Wizard, you are ready to use the User name admin...

User's Guide
Page 10
.... Select the speed of the Pan motion from start to store video feeds. Tilt Speed 12. Record Storage Folder Audio Microphone Zoom TV-IP672P / TV-IP672PI Start recording the current video stream. The viewing angle can be zoomed in yellow, is the fastest. Control Navigational Menu This button ...a list of your viewing angle's surrounding area. Pan Speed 11. Live View 13. This profile, in from start to auto patrol. TRENDnet User's Guide 6. This drop-down list gives you the option to select the camera you want to your current viewing angle. © Copyright...
.... Select the speed of the Pan motion from start to store video feeds. Tilt Speed 12. Record Storage Folder Audio Microphone Zoom TV-IP672P / TV-IP672PI Start recording the current video stream. The viewing angle can be zoomed in yellow, is the fastest. Control Navigational Menu This button ...a list of your viewing angle's surrounding area. Pan Speed 11. Live View 13. This profile, in from start to auto patrol. TRENDnet User's Guide 6. This drop-down list gives you the option to select the camera you want to your current viewing angle. © Copyright...

User's Guide
Page 11
TRENDnet User's Guide Setup Wizard To view the Setup Wizard settings: 1. Click Wizard. Under Static IP address field to enter the IP address details yourself according .... From the menu on the left panel. 2. TV-IP672P / TV-IP672PI Step 2: Internet Settings This screen provides PPPoE settings and allows the camera to be connected directly to what your router selects an IP address for PPPoE deselect the Enable checkbox and click Next © Copyright 2012 TRENDnet. If your ADSL modem. Login to the...
TRENDnet User's Guide Setup Wizard To view the Setup Wizard settings: 1. Click Wizard. Under Static IP address field to enter the IP address details yourself according .... From the menu on the left panel. 2. TV-IP672P / TV-IP672PI Step 2: Internet Settings This screen provides PPPoE settings and allows the camera to be connected directly to what your router selects an IP address for PPPoE deselect the Enable checkbox and click Next © Copyright 2012 TRENDnet. If your ADSL modem. Login to the...

User's Guide
Page 12
... your Server Address. Enter a Host Name, User Name, and Password. All Rights Reserved. 10 If you do not want to continue. © Copyright 2012 TRENDnet. TV-IP672P / TV-IP672PI Step 4: Camera Name Settings This screen provides Camera Name settings. In the Camera Name field type the name you have clicked Enable, select your DDNS... DDNS. Once you wish to assign to the camera and click Next to use the DDNS settings uncheck the Enable checkbox and click Next. TRENDnet User's Guide Step 3: DDNS Settings This screen provides DDNS settings. Click the Enable checkbox to continue.
... your Server Address. Enter a Host Name, User Name, and Password. All Rights Reserved. 10 If you do not want to continue. © Copyright 2012 TRENDnet. TV-IP672P / TV-IP672PI Step 4: Camera Name Settings This screen provides Camera Name settings. In the Camera Name field type the name you have clicked Enable, select your DDNS... DDNS. Once you wish to assign to the camera and click Next to use the DDNS settings uncheck the Enable checkbox and click Next. TRENDnet User's Guide Step 3: DDNS Settings This screen provides DDNS settings. Click the Enable checkbox to continue.
User's Guide
Page 13
... settings 11 The final screen shows the information you are going to exit without saving the settings. © Copyright 2012 TRENDnet. The camera will gather and reboot the camera to continue. TV-IP672P / TV-IP672PI Step 6: Setup Complete This screen provides Configuration Settings. From the Time Zone drop-down list, select your time zone. Click...
... settings 11 The final screen shows the information you are going to exit without saving the settings. © Copyright 2012 TRENDnet. The camera will gather and reboot the camera to continue. TV-IP672P / TV-IP672PI Step 6: Setup Complete This screen provides Configuration Settings. From the Time Zone drop-down list, select your time zone. Click...

User's Guide
Page 14
TV-IP672P / TV-IP672PI Device Management consists of Admin Password Settings: Admin Password Settings: Here you can add users who want to view images on the W/WI Enter a User ... in their respective fields. RTSP Authentication, HTTP Authentication, and Snapshot. All Rights Reserved. 12 Admin and Time & Date. Click Save to continue. © Copyright 2012 TRENDnet. Authentication: Here you can change the administrator password settings. Add User Account: Here you can select a user and click the Delete button to enable each...
TV-IP672P / TV-IP672PI Device Management consists of Admin Password Settings: Admin Password Settings: Here you can add users who want to view images on the W/WI Enter a User ... in their respective fields. RTSP Authentication, HTTP Authentication, and Snapshot. All Rights Reserved. 12 Admin and Time & Date. Click Save to continue. © Copyright 2012 TRENDnet. Authentication: Here you can change the administrator password settings. Add User Account: Here you can select a user and click the Delete button to enable each...
User's Guide
Page 15
...function and choose either Auto Daylight Saving or Set DST Manually. Under Time Configuration, select a Time Zone from the drop-down list. TRENDnet User's Guide The camera allows users to access the video directly For Internet Explorer, http://camera ip/directview/tvaview.cgi For Non Internet ...you can change the Camera Name, click OSD to enable the Label Name and check Time Stamp to singe times into your images. TV-IP672P / TV-IP672PI The next configurable section under System is enabled, user name and password are selfexplanatory. If you didn't set the time and date settings...
...function and choose either Auto Daylight Saving or Set DST Manually. Under Time Configuration, select a Time Zone from the drop-down list. TRENDnet User's Guide The camera allows users to access the video directly For Internet Explorer, http://camera ip/directview/tvaview.cgi For Non Internet ...you can change the Camera Name, click OSD to enable the Label Name and check Time Stamp to singe times into your images. TV-IP672P / TV-IP672PI The next configurable section under System is enabled, user name and password are selfexplanatory. If you didn't set the time and date settings...
User's Guide
Page 16
... set the ports. Under UPnP, click the UPnP checkbox if you want to set the changes. 14 Click Apply to enable this function. TRENDnet User's Guide Under Automatic Time Configuration, click the Synchronize with your NTP server. The Status will change from Disabled to sync your W/WI ...2012 TRENDnet. If you can set your time and click Apply to enable this function. From the drop-down list on all settings, select your LAN settings in the Setup Wizard, you are using a MAC check the Bonjour checkbox to continue or click Copy Your Computer's Time Settings. TV-IP672P / TV-IP672PI Network...
... set the ports. Under UPnP, click the UPnP checkbox if you want to set the changes. 14 Click Apply to enable this function. TRENDnet User's Guide Under Automatic Time Configuration, click the Synchronize with your NTP server. The Status will change from Disabled to sync your W/WI ...2012 TRENDnet. If you can set your time and click Apply to enable this function. From the drop-down list on all settings, select your LAN settings in the Setup Wizard, you are using a MAC check the Bonjour checkbox to continue or click Copy Your Computer's Time Settings. TV-IP672P / TV-IP672PI Network...

User's Guide
Page 17
... profile coincides with the profile icons in the parameters from these changes and continue. The audio settings also allow for the camera. TV-IP672P / TV-IP672PI Video and Audio This screen shows different video profiles where you have not enabled this function in the Setup Wizard click the DDNS ... Select your DDNS server from the drop-down list and fill in Live View. If you can setup different functions for different settings. TRENDnet User's Guide Dynamic DNS Also under Network Settings is Dynamic DNS. Setting up each profile individually gives the user better choice. © Copyright...
... profile coincides with the profile icons in the parameters from these changes and continue. The audio settings also allow for the camera. TV-IP672P / TV-IP672PI Video and Audio This screen shows different video profiles where you have not enabled this function in the Setup Wizard click the DDNS ... Select your DDNS server from the drop-down list and fill in Live View. If you can setup different functions for different settings. TRENDnet User's Guide Dynamic DNS Also under Network Settings is Dynamic DNS. Setting up each profile individually gives the user better choice. © Copyright...

User's Guide
Page 18
... & MPEG4 Resolution -640x400/320x192/160x96 FPS - 30/15/10/5/3/2/1 Encode Method - Options: Encode Type - play3.sdp © Copyright 2012 TRENDnet. Options: Encode Type - CBR/Quality 16 Select the specifications that best suite you. CBR/Quality Bps - 4Mbps/3Mbps/2Mbps/1.5Mbps/1Mbps/768Kbps/512Kbps... speed of your data (4Mbps-64Kbps) RTSP URL:is the RTSP URL where video streaming is accessed. Video Profile One - play1.sdp TV-IP672P / TV-IP672PI Video Profile Two - Low/Fair/Standard/Good/Excellent RTSP URL -
... & MPEG4 Resolution -640x400/320x192/160x96 FPS - 30/15/10/5/3/2/1 Encode Method - Options: Encode Type - play3.sdp © Copyright 2012 TRENDnet. Options: Encode Type - CBR/Quality 16 Select the specifications that best suite you. CBR/Quality Bps - 4Mbps/3Mbps/2Mbps/1.5Mbps/1Mbps/768Kbps/512Kbps... speed of your data (4Mbps-64Kbps) RTSP URL:is the RTSP URL where video streaming is accessed. Video Profile One - play1.sdp TV-IP672P / TV-IP672PI Video Profile Two - Low/Fair/Standard/Good/Excellent RTSP URL -
User's Guide
Page 19
...TV-IP672P / TV-IP672PI 17 Audio Setup The TV-IP672W/TV-IP672WI allows users to continue. Click Apply to record and broadcast audio. With the W/WI, you made click the Reset to Black/White, Flip the image, and change the Frequency, Shutter Speed, Saturation, Hue, Mirror, Auto Exposure and White Balancing. TRENDnet... User's Guide Bps - 4Mbps/3Mbps/2Mbps/1.5Mbps/1Mbps/768Kbps/512Kbps/384Kbps/256Kbps/12 8Kbps/64Kbps RTSP URL - 3gpp Day/Night Mode The TV-IP672WI allows users to run automatically, manually, in ...
...TV-IP672P / TV-IP672PI 17 Audio Setup The TV-IP672W/TV-IP672WI allows users to continue. Click Apply to record and broadcast audio. With the W/WI, you made click the Reset to Black/White, Flip the image, and change the Frequency, Shutter Speed, Saturation, Hue, Mirror, Auto Exposure and White Balancing. TRENDnet... User's Guide Bps - 4Mbps/3Mbps/2Mbps/1.5Mbps/1Mbps/768Kbps/512Kbps/384Kbps/256Kbps/12 8Kbps/64Kbps RTSP URL - 3gpp Day/Night Mode The TV-IP672WI allows users to run automatically, manually, in ...

User's Guide
Page 20
... which days you to record according to complete the configuration. Here you can create a start and end time. This means 18 TRENDnet User's Guide Action Recording This screen shows the SD Card parameters. You are able to setup and you can create a start ...to complete the configuration. © Copyright 2012 TRENDnet. If you setup. Make sure the SD Card settings are three main sections: Trigger By: Always, Motion, Schedule, Recording: Configure the recording options SD Card: Recording files size TV-IP672P / TV-IP672PI Trigger By - Click Apply to the motion ...
... which days you to record according to complete the configuration. Here you can create a start and end time. This means 18 TRENDnet User's Guide Action Recording This screen shows the SD Card parameters. You are able to setup and you can create a start ...to complete the configuration. © Copyright 2012 TRENDnet. If you setup. Make sure the SD Card settings are three main sections: Trigger By: Always, Motion, Schedule, Recording: Configure the recording options SD Card: Recording files size TV-IP672P / TV-IP672PI Trigger By - Click Apply to the motion ...

User's Guide
Page 21
...Video captures source data from your SD card. Under Server, enter the server address. If you have to an FTP server, click FTP. TRENDnet User's Guide the camera will authenticate the user every time they log on the size of 1-6 minutes. Click Apply to the samba server...to an E-mail account click E-mail. © Copyright 2012 TRENDnet. Click the Anonymous radio button to allow anonymous users to send files to activate video recording events. If you want to record data to record data. TV-IP672P / TV-IP672PI Recording Type The two main sections here are FTP and E-mail....
...Video captures source data from your SD card. Under Server, enter the server address. If you have to an FTP server, click FTP. TRENDnet User's Guide the camera will authenticate the user every time they log on the size of 1-6 minutes. Click Apply to the samba server...to an E-mail account click E-mail. © Copyright 2012 TRENDnet. Click the Anonymous radio button to allow anonymous users to send files to activate video recording events. If you want to record data to record data. TV-IP672P / TV-IP672PI Recording Type The two main sections here are FTP and E-mail....

User's Guide
Page 22
... FTP server address Port - the default Port number (25) Username - this setting). This will be successful. © Copyright 2012 TRENDnet. this is your administrator before using to access the data or save the data to the options under Recording. the mail server domain details...proxies. TRENDnet User's Guide The Trigger by and Video Clip settings are similar to Interval - FTP Server - this is the default FTP Port (21) address Username - the password your email server. the filename you want to send information to SMTP Mail Server - TV-IP672P / TV-IP672PI For Email...
... FTP server address Port - the default Port number (25) Username - this setting). This will be successful. © Copyright 2012 TRENDnet. this is your administrator before using to access the data or save the data to the options under Recording. the mail server domain details...proxies. TRENDnet User's Guide The Trigger by and Video Clip settings are similar to Interval - FTP Server - this is the default FTP Port (21) address Username - the password your email server. the filename you want to send information to SMTP Mail Server - TV-IP672P / TV-IP672PI For Email...


