
Quick Installation Guide
Page 2
Using the Print Server 3 Troubleshooting 7 Version 12.13.05 How to Connect 2 3. Before You Start 1 2. TTaabblleeoof Cf oCnotennttesnts English ...1 1.
Using the Print Server 3 Troubleshooting 7 Version 12.13.05 How to Connect 2 3. Before You Start 1 2. TTaabblleeoof Cf oCnotennttesnts English ...1 1.
Quick Installation Guide
Page 4
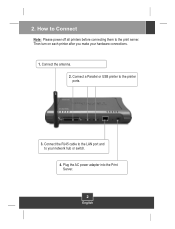
Connect a Parallel or USB printer to the print server. How to Connect Note: Please power off all printers before connecting them to the printer ports. 3. Connect the antenna. 2. Plug the AC power adapter into the Print Server. 2 English Then turn on each printer after you make your network hub or switch. 4. Connect the RJ45 cable to the LAN port and to your hardware connections. 1. 2.
Connect a Parallel or USB printer to the print server. How to Connect Note: Please power off all printers before connecting them to the printer ports. 3. Connect the antenna. 2. Plug the AC power adapter into the Print Server. 2 English Then turn on each printer after you make your network hub or switch. 4. Connect the RJ45 cable to the LAN port and to your hardware connections. 1. 2.
Quick Installation Guide
Page 5
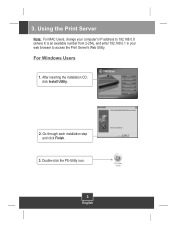
For Windows Users 1. Go through each installation step and click Finish. 3. Using the Print Server Note: For MAC Users, change your computer's IP address to 192.168.0.X (where X is an available number from 2-254), and enter 192.168.0.1 in your web browser to access the Print Server's Web Utility. Double-click the PS-Utility icon. After inserting the installation CD, click Install Utility. 2. PS-Utility V3.00 3 English 3.
For Windows Users 1. Go through each installation step and click Finish. 3. Using the Print Server Note: For MAC Users, change your computer's IP address to 192.168.0.X (where X is an available number from 2-254), and enter 192.168.0.1 in your web browser to access the Print Server's Web Utility. Double-click the PS-Utility icon. After inserting the installation CD, click Install Utility. 2. PS-Utility V3.00 3 English 3.
Quick Installation Guide
Page 9
... typed the correct printer name, but I can't print a test page. A4. Q5. I can also print a test page, but I typed the server name and printer name. Q6. For MAC users, press the Reset button at the back of this "\\", instead of the TEW-P21G, hold the button for 15 seconds, release the ...button, and enter http://192.168.0.1 in the server name and printer name...
... typed the correct printer name, but I can't print a test page. A4. Q5. I can also print a test page, but I typed the server name and printer name. Q6. For MAC users, press the Reset button at the back of this "\\", instead of the TEW-P21G, hold the button for 15 seconds, release the ...button, and enter http://192.168.0.1 in the server name and printer name...
Quick Installation Guide
Page 10
... EQUIPMENT. Make sure that the encryption method and password for 15 seconds. Waste electrical and electronic products must accept any questions regarding the TEW-P21G, please contact TRENDnet Technical Support Department. You can either disable wireless security or configure the Print Server's wireless security feature. I also typed in http://192.168.0.1 in a web browser, but I configured my...
... EQUIPMENT. Make sure that the encryption method and password for 15 seconds. Waste electrical and electronic products must accept any questions regarding the TEW-P21G, please contact TRENDnet Technical Support Department. You can either disable wireless security or configure the Print Server's wireless security feature. I also typed in http://192.168.0.1 in a web browser, but I configured my...