
User Guide
Page 5
... 8 Windows 95/98/ME...8 Windows 2000 ...9 Windows XP ...10 CONFIGURATION 11 Login to the WLAN Router through Wireless LAN ...11 Login to the WLAN Router...11 Using the Web Browser...11 Setup Wizard...12 Advanced configuration...22 Main ...22 LAN & DHCP Server...22 WAN ...23 Password ...24 Time... ...25 Dynamic DNS...26 Wireless ...27 Basic ...27 Security ...28 Advanced ...30 Wi-Fi Protected Setup ...31 Status ...31 Device ...
... 8 Windows 95/98/ME...8 Windows 2000 ...9 Windows XP ...10 CONFIGURATION 11 Login to the WLAN Router through Wireless LAN ...11 Login to the WLAN Router...11 Using the Web Browser...11 Setup Wizard...12 Advanced configuration...22 Main ...22 LAN & DHCP Server...22 WAN ...23 Password ...24 Time... ...25 Dynamic DNS...26 Wireless ...27 Basic ...27 Security ...28 Advanced ...30 Wi-Fi Protected Setup ...31 Status ...31 Device ...

User Guide
Page 7
... purchase of the IEEE 802.11b/g/n Wireless Home Router. Purpose This manual discusses how to your IEEE 802.11b/g/n Wireless Home Router. Describes the IEEE 802.11b/g/n Wireless Home Router and its features. Unpacking and Setup. Describes the front panel, rear panel and LED indicators of this IEEE 802.11b/g/n Wireless Broadband Router. Helps you get started with the...
... purchase of the IEEE 802.11b/g/n Wireless Home Router. Purpose This manual discusses how to your IEEE 802.11b/g/n Wireless Home Router. Describes the IEEE 802.11b/g/n Wireless Home Router and its features. Unpacking and Setup. Describes the front panel, rear panel and LED indicators of this IEEE 802.11b/g/n Wireless Broadband Router. Helps you get started with the...

User Guide
Page 10
... damaged, please contact your wireless network. Setup The setup of the Broadband Router. ‹ Visually inspect the DC power jack and make sure that it . Do not place heavy objects on the Broadband Router. ‹ Fix the direction of the WLAN Router and carefully unpack it is... fully secured to place the Wireless Router in a position that can be performed properly using the following items: ‹ TEW-632BRP Wireless N Home Router ‹ Easy Go Installation CD ‹...
... damaged, please contact your wireless network. Setup The setup of the Broadband Router. ‹ Visually inspect the DC power jack and make sure that it . Do not place heavy objects on the Broadband Router. ‹ Fix the direction of the WLAN Router and carefully unpack it is... fully secured to place the Wireless Router in a position that can be performed properly using the following items: ‹ TEW-632BRP Wireless N Home Router ‹ Easy Go Installation CD ‹...

User Guide
Page 12
...figure below shows the rear panel of the IEEE 802.11b/g/n Wireless Home Router. Rear Panel The figure below shows the side panel of the IEEE 802.11b/g/n Wireless Home Router. LAN (1-4) Four RJ-45 10/100Mbps Auto-MDIX ports for wireless connection. POWER Plug the power adapter to this power jack ...RESET Use a pin-shaped item to push to reset this button to the xDSL/Cable modem for the WAN that connects to execute the Wi-Fi Protected Setup ...
...figure below shows the rear panel of the IEEE 802.11b/g/n Wireless Home Router. Rear Panel The figure below shows the side panel of the IEEE 802.11b/g/n Wireless Home Router. LAN (1-4) Four RJ-45 10/100Mbps Auto-MDIX ports for wireless connection. POWER Plug the power adapter to this power jack ...RESET Use a pin-shaped item to push to reset this button to the xDSL/Cable modem for the WAN that connects to execute the Wi-Fi Protected Setup ...

User Guide
Page 18
User can simply follow the step-by clicking on` the "Wizard" button on the function menu. Please click "Next" to run in 6 easy steps by -step process to get the wireless Router configuration ready to continue. Please click "Next" to continue. Step 1: Set your new password Setting the new admin password of the web configuration utility. The following screen will appear. Please click "Next" to continue. Step 2: Choose time zone Select the time zone from the drop down list. Setup Wizard Setup wizard is provided as part of the WLAN Router.
User can simply follow the step-by clicking on` the "Wizard" button on the function menu. Please click "Next" to run in 6 easy steps by -step process to get the wireless Router configuration ready to continue. Please click "Next" to continue. Step 1: Set your new password Setting the new admin password of the web configuration utility. The following screen will appear. Please click "Next" to continue. Step 2: Choose time zone Select the time zone from the drop down list. Setup Wizard Setup wizard is provided as part of the WLAN Router.

User Guide
Page 27
...the setting by clicking "Back". User also can go back to enable Wireless LAN. Step 6: Setup completed The Setup wizard is now completed. The new settings will be the same as wireless devices attempting to connect to the WLAN Router. Please click "Restart" to quit without any changes. The SSID and... channel must be effective after the WLAN Router restarts. If user does ...
...the setting by clicking "Back". User also can go back to enable Wireless LAN. Step 6: Setup completed The Setup wizard is now completed. The new settings will be the same as wireless devices attempting to connect to the WLAN Router. Please click "Restart" to quit without any changes. The SSID and... channel must be effective after the WLAN Router restarts. If user does ...

User Guide
Page 37
...users to view the status of the WLAN Router LAN, WAN and Wireless connections, and view logs and statistics pertaining to negotiate with WLAN Router via WPS protocol. It is only used when WLAN Router acts as a Registrar. The default value ...is only used when users want their station to configure the Wi-Fi Protected Setup function. Wi-Fi Protected Setup This screen enables users to join Router...
...users to view the status of the WLAN Router LAN, WAN and Wireless connections, and view logs and statistics pertaining to negotiate with WLAN Router via WPS protocol. It is only used when WLAN Router acts as a Registrar. The default value ...is only used when users want their station to configure the Wi-Fi Protected Setup function. Wi-Fi Protected Setup This screen enables users to join Router...
User Guide
Page 54
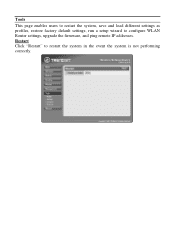
Tools This page enables users to restart the system, save and load different settings as profiles, restore factory default settings, run a setup wizard to restart the system in the event the system is not performing correctly. Restart Click "Restart" to configure WLAN Router settings, upgrade the firmware, and ping remote IP addresses.
Tools This page enables users to restart the system, save and load different settings as profiles, restore factory default settings, run a setup wizard to restart the system in the event the system is not performing correctly. Restart Click "Restart" to configure WLAN Router settings, upgrade the firmware, and ping remote IP addresses.

User Guide
Page 55
User can load when necessary. Click "Load" to the location of a stored profile. Save Settings: Click "Save" to save settings as a profile that can also load the factory default settings, and run a setup wizard to configure the WLAN Router and Router interface. Load Settings: Click "Browse" and go to load the profile's settings. All configuration changes will lost. Settings This screen enables users to save the current configuration as a profile and load profiles for different circumstances. Restore Factory Default Settings: Click "Restore" to restore the default settings.
User can load when necessary. Click "Load" to the location of a stored profile. Save Settings: Click "Save" to save settings as a profile that can also load the factory default settings, and run a setup wizard to configure the WLAN Router and Router interface. Load Settings: Click "Browse" and go to load the profile's settings. All configuration changes will lost. Settings This screen enables users to save the current configuration as a profile and load profiles for different circumstances. Restore Factory Default Settings: Click "Restore" to restore the default settings.

Quick Installation Guide
Page 4
Install Router 1. Insert the Easy Go CD-ROM in order to install Network Magic immediately after the router setup. 4. Then check the "No, thanks..." Note: Leave the "No, thanks..." Choose the desired language from the dropdown list. box and then click Next. Click Start Installation. 3. box unchecked in your computer's CD-ROM Drive and then click Install Router. 2. Click Next. 2 English 2.
Install Router 1. Insert the Easy Go CD-ROM in order to install Network Magic immediately after the router setup. 4. Then check the "No, thanks..." Note: Leave the "No, thanks..." Choose the desired language from the dropdown list. box and then click Next. Click Start Installation. 3. box unchecked in your computer's CD-ROM Drive and then click Install Router. 2. Click Next. 2 English 2.

Quick Installation Guide
Page 7
For detailed information regarding the TEW-632BRP configuration and advanced settings, please refer to the User's Guide included on the Easy Go Installation CD-ROM or TRENDnet's website at www.trendnet.com. 5 English 12. Select Exit Router Setup and then click Finish. Your installation is now complete.
For detailed information regarding the TEW-632BRP configuration and advanced settings, please refer to the User's Guide included on the Easy Go Installation CD-ROM or TRENDnet's website at www.trendnet.com. 5 English 12. Select Exit Router Setup and then click Finish. Your installation is now complete.

Quick Installation Guide
Page 10
..., change the DHCP IP Address Range to 192.168.11.101 to your router to the User's Guide included on the Easy Go Setup CD-ROM or contact TRENDnet's Technical Support Department. 8 A5: First, make sure the wireless network adapter is configured with your computer's CD-ROM Drive. Wait 15 seconds...address bar, where http://192.168.10.1 is set to change the IP address of the TEW-632BRP Wireless Router. If you may need to on the back of the router is the default IP address of the router. 1) Open up Internet explorer, type into my computer's CD-ROM drive and the installation menu...
..., change the DHCP IP Address Range to 192.168.11.101 to your router to the User's Guide included on the Easy Go Setup CD-ROM or contact TRENDnet's Technical Support Department. 8 A5: First, make sure the wireless network adapter is configured with your computer's CD-ROM Drive. Wait 15 seconds...address bar, where http://192.168.10.1 is set to change the IP address of the TEW-632BRP Wireless Router. If you may need to on the back of the router is the default IP address of the router. 1) Open up Internet explorer, type into my computer's CD-ROM drive and the installation menu...


