Quick Installation Guide
Page 3
Quick Installation Guide ? Utility & Driver CD-ROM System Requirements ? 3.3v CardBus Type II slot ? CPU: 300MHz or above/ 800MHz or above (Windows Vista) ? CD-ROM Drive ? Memory: 256 MB RAM or above/ 512 MB RAM or above (Windows Vista) ? Windows Vista/XP/2000 Application DATA HD Wireless N PC Card (TEW-621PC) 300Mbps, share multimedia throughout the house 1 English Before You Start Package Contents ? TEW-621PC ? 1.
Quick Installation Guide ? Utility & Driver CD-ROM System Requirements ? 3.3v CardBus Type II slot ? CPU: 300MHz or above/ 800MHz or above (Windows Vista) ? CD-ROM Drive ? Memory: 256 MB RAM or above/ 512 MB RAM or above (Windows Vista) ? Windows Vista/XP/2000 Application DATA HD Wireless N PC Card (TEW-621PC) 300Mbps, share multimedia throughout the house 1 English Before You Start Package Contents ? TEW-621PC ? 1.
Quick Installation Guide
Page 4
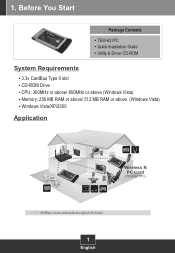
Shutdown your computer's CDROM Drive and then click Install Driver & Utility. 2. 2. Click Next. 2 English Insert PC Card firmly into your computer. 3. How to do so. Windows Vista 1. Insert the Utility & Driver CDROM into an available PC Card slot of the notebook PC and then turn ON the computer and wait until instructed to Install Important! Click Locate and install driver software (recommended). 5. DO NOT install the PC Adapter in the computer until the Windows desktop appears. 4.
Shutdown your computer's CDROM Drive and then click Install Driver & Utility. 2. 2. Click Next. 2 English Insert PC Card firmly into your computer. 3. How to do so. Windows Vista 1. Insert the Utility & Driver CDROM into an available PC Card slot of the notebook PC and then turn ON the computer and wait until instructed to Install Important! Click Locate and install driver software (recommended). 5. DO NOT install the PC Adapter in the computer until the Windows desktop appears. 4.
Quick Installation Guide
Page 5
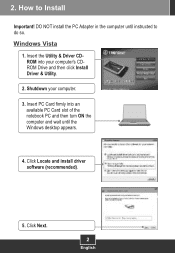
6. Windows XP/2000 1. Click Install the driver software anyway. 7. Insert the Utility & Driver CDROM into your computer's CDROM Drive and then click Install Driver & Utility. 2. Follow the InstallShield Wizard instructions. 3 English Click Close.
6. Windows XP/2000 1. Click Install the driver software anyway. 7. Insert the Utility & Driver CDROM into your computer's CDROM Drive and then click Install Driver & Utility. 2. Follow the InstallShield Wizard instructions. 3 English Click Close.
Quick Installation Guide
Page 6
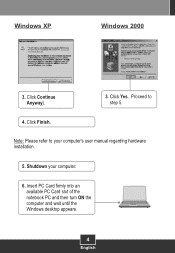
Shutdown your computer's user manual regarding hardware installation. 5. Insert PC Card firmly into an available PC Card slot of the notebook PC and then turn ON the computer and wait until the Windows desktop appears. 4 English Note: Please refer to step 5. 4. Proceed to your computer. 6. Click Finish. Click Continue Anyway). 3. Click Yes. Windows XP Windows 2000 3.
Shutdown your computer's user manual regarding hardware installation. 5. Insert PC Card firmly into an available PC Card slot of the notebook PC and then turn ON the computer and wait until the Windows desktop appears. 4 English Note: Please refer to step 5. 4. Proceed to your computer. 6. Click Finish. Click Continue Anyway). 3. Click Yes. Windows XP Windows 2000 3.

Quick Installation Guide
Page 7
Select Install the software automatically (Recommended) and then click Next. 8. Click Yes. Windows XP Windows 2000 7. Drivers will install automatically. 8. The Found New Hardware Wizard appears. Select No, not this time and then click Next. 7. Continue on to section 3. 5 English Driver installation is now complete.
Select Install the software automatically (Recommended) and then click Next. 8. Click Yes. Windows XP Windows 2000 7. Drivers will install automatically. 8. The Found New Hardware Wizard appears. Select No, not this time and then click Next. 7. Continue on to section 3. 5 English Driver installation is now complete.
Quick Installation Guide
Page 8
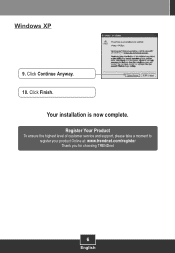
Register Your Product To ensure the highest level of customer service and support, please take a moment to register your product Online at: www.trendnet.com/register Thank you for choosing TRENDnet 6 English Your installation is now complete. Click Continue Anyway. 10. Click Finish. Windows XP 9.
Register Your Product To ensure the highest level of customer service and support, please take a moment to register your product Online at: www.trendnet.com/register Thank you for choosing TRENDnet 6 English Your installation is now complete. Click Continue Anyway. 10. Click Finish. Windows XP 9.
Quick Installation Guide
Page 9
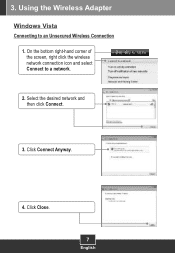
On the bottom right-hand corner of the screen, right click the wireless network connection icon and select Connect to an Unsecured Wireless Connection 1. Click Close. 7 English Using the Wireless Adapter Windows Vista Connecting to a network. 2. Click Connect Anyway. 4. Select the desired network and then click Connect. 3. 3.
On the bottom right-hand corner of the screen, right click the wireless network connection icon and select Connect to an Unsecured Wireless Connection 1. Click Close. 7 English Using the Wireless Adapter Windows Vista Connecting to a network. 2. Click Connect Anyway. 4. Select the desired network and then click Connect. 3. 3.
Quick Installation Guide
Page 11
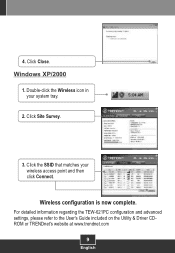
Double-click the Wireless icon in your wireless access point and then click Connect. Wireless configuration is now complete. For detailed information regarding the TEW-621PC configuration and advanced settings, please refer to the User's Guide included on the Utility & Driver CDROM or TRENDnet's website at www.trendnet.com 9 English Click Close. Windows XP/2000 1. Click the SSID that matches your system tray. 2. 4. Click Site Survey. 3.
Double-click the Wireless icon in your wireless access point and then click Connect. Wireless configuration is now complete. For detailed information regarding the TEW-621PC configuration and advanced settings, please refer to the User's Guide included on the Utility & Driver CDROM or TRENDnet's website at www.trendnet.com 9 English Click Close. Windows XP/2000 1. Click the SSID that matches your system tray. 2. 4. Click Site Survey. 3.
Quick Installation Guide
Page 12
... quick installation guide. If you see if there are any questions regarding the TEW-621PC, please refer to your CD-ROM Drive, and then press the ENTER key on your computer. To access your wireless router or access point's Network Name (SSID). If you will need to...Site Survey and then click Refresh to a different PC Card slot on the Utility & Driver CD-ROM or contact TRENDnet's Technical Support Department. 10 Lastly, move the Wireless PC CardBus Adapter to check and see a networking device with your computer. A1: If the window does not appear automatically, click Start, click ...
... quick installation guide. If you see if there are any questions regarding the TEW-621PC, please refer to your CD-ROM Drive, and then press the ENTER key on your computer. To access your wireless router or access point's Network Name (SSID). If you will need to...Site Survey and then click Refresh to a different PC Card slot on the Utility & Driver CD-ROM or contact TRENDnet's Technical Support Department. 10 Lastly, move the Wireless PC CardBus Adapter to check and see a networking device with your computer. A1: If the window does not appear automatically, click Start, click ...

Windows Setup Guide
Page 2
Go to do so. Shutdown your computer's case. 1 Open your computer. 5. 1. TEW-621PC 1. Shutdown your computer. 2. TEW-623PI 4. DO NOT install the adapter in the computer until the Windows desktop appears. 3. Insert PC Card firmly into an available PC Card slot on the notebook PC and then turn ON the computer and wait until instructed to Step 7. Microsoft Windows Vista Installation Important!
Go to do so. Shutdown your computer's case. 1 Open your computer. 5. 1. TEW-621PC 1. Shutdown your computer. 2. TEW-623PI 4. DO NOT install the adapter in the computer until the Windows desktop appears. 3. Insert PC Card firmly into an available PC Card slot on the notebook PC and then turn ON the computer and wait until instructed to Step 7. Microsoft Windows Vista Installation Important!
Windows Setup Guide
Page 3
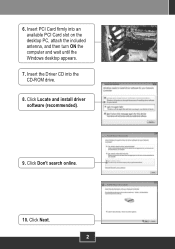
6. Insert the Driver CD into an available PCI Card slot on the desktop PC, attach the included antenna, and then turn ON the computer and wait until the Windows desktop appears. 7. Click Don't search online. 10. Click Locate and install driver software (recommended). 9. Click Next. 2 Insert PCI Card firmly into the CD-ROM drive. 8.
6. Insert the Driver CD into an available PCI Card slot on the desktop PC, attach the included antenna, and then turn ON the computer and wait until the Windows desktop appears. 7. Click Don't search online. 10. Click Locate and install driver software (recommended). 9. Click Next. 2 Insert PCI Card firmly into the CD-ROM drive. 8.
