Quick Installation Guide
Page 2
Using the Wireless Adapter 7 Troubleshooting 10 Version 08.03.2007 TTaabblleeoof Cf oCnotennttesnts English ...1 1. How to Install 2 3. Before You Start 1 2.
Using the Wireless Adapter 7 Troubleshooting 10 Version 08.03.2007 TTaabblleeoof Cf oCnotennttesnts English ...1 1. How to Install 2 3. Before You Start 1 2.
Quick Installation Guide
Page 3
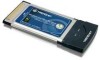
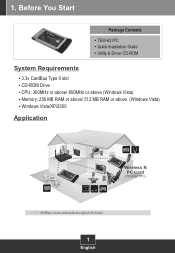
Windows Vista/XP/2000 Application DATA HD Wireless N PC Card (TEW-621PC) 300Mbps, share multimedia throughout the house 1 English Utility & Driver CD-ROM System Requirements ? 3.3v CardBus Type II slot ? CPU: 300MHz or above/ 800MHz or above (Windows Vista) ? Quick Installation Guide ? 1. TEW-621PC ? CD-ROM Drive ? Memory: 256 MB RAM or above/ 512 MB RAM or above (Windows Vista) ? Before You Start Package Contents ?
Windows Vista/XP/2000 Application DATA HD Wireless N PC Card (TEW-621PC) 300Mbps, share multimedia throughout the house 1 English Utility & Driver CD-ROM System Requirements ? 3.3v CardBus Type II slot ? CPU: 300MHz or above/ 800MHz or above (Windows Vista) ? Quick Installation Guide ? 1. TEW-621PC ? CD-ROM Drive ? Memory: 256 MB RAM or above/ 512 MB RAM or above (Windows Vista) ? Before You Start Package Contents ?
Quick Installation Guide
Page 9
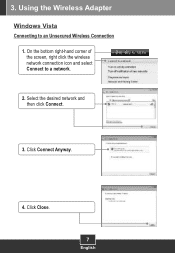
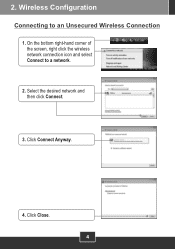
Click Connect Anyway. 4. 3. On the bottom right-hand corner of the screen, right click the wireless network connection icon and select Connect to an Unsecured Wireless Connection 1. Click Close. 7 English Select the desired network and then click Connect. 3. Using the Wireless Adapter Windows Vista Connecting to a network. 2.
Click Connect Anyway. 4. 3. On the bottom right-hand corner of the screen, right click the wireless network connection icon and select Connect to an Unsecured Wireless Connection 1. Click Close. 7 English Select the desired network and then click Connect. 3. Using the Wireless Adapter Windows Vista Connecting to a network. 2.
Quick Installation Guide
Page 10
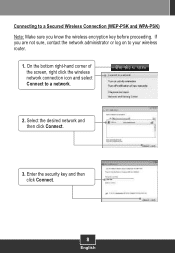
Connecting to your wireless router. 1. If you are not sure, contact the network administrator or log on to a Secured Wireless Connection (WEP-PSK and WPA-PSK) Note: Make sure you know the wireless encryption key before proceeding. On the bottom right-hand corner of the screen, right click the wireless network connection icon and select Connect to a network. 2. Select the desired network and then click Connect. 3. Enter the security key and then click Connect. 8 English
Connecting to your wireless router. 1. If you are not sure, contact the network administrator or log on to a Secured Wireless Connection (WEP-PSK and WPA-PSK) Note: Make sure you know the wireless encryption key before proceeding. On the bottom right-hand corner of the screen, right click the wireless network connection icon and select Connect to a network. 2. Select the desired network and then click Connect. 3. Enter the security key and then click Connect. 8 English
Quick Installation Guide
Page 11
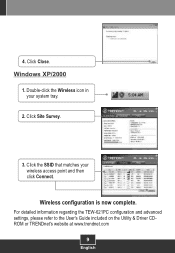
Click Site Survey. 3. Wireless configuration is now complete. For detailed information regarding the TEW-621PC configuration and advanced settings, please refer to the User's Guide included on the Utility & Driver CDROM or TRENDnet's website at www.trendnet.com 9 English Double-click the Wireless icon in your wireless access point and then click Connect. Click the SSID that matches your system tray. 2. Windows XP/2000 1. Click Close. 4.
Click Site Survey. 3. Wireless configuration is now complete. For detailed information regarding the TEW-621PC configuration and advanced settings, please refer to the User's Guide included on the Utility & Driver CDROM or TRENDnet's website at www.trendnet.com 9 English Double-click the Wireless icon in your wireless access point and then click Connect. Click the SSID that matches your system tray. 2. Windows XP/2000 1. Click Close. 4.
Quick Installation Guide
Page 12
... click Device Manager. Fourth, double-click the Wireless Client Utility icon, click Site Survey and then click Refresh to a different PC Card slot on your wireless router or access point's Network Name (SSID)....you see if there are any questions regarding wireless network security. To access your network administrator for more information regarding the TEW-621PC, please refer to the User's Guide included..., and then press the ENTER key on the Utility & Driver CD-ROM or contact TRENDnet's Technical Support Department. 10 Q3: Windows is selected. Q4: I inserted the Utility ...
... click Device Manager. Fourth, double-click the Wireless Client Utility icon, click Site Survey and then click Refresh to a different PC Card slot on your wireless router or access point's Network Name (SSID)....you see if there are any questions regarding wireless network security. To access your network administrator for more information regarding the TEW-621PC, please refer to the User's Guide included..., and then press the ENTER key on the Utility & Driver CD-ROM or contact TRENDnet's Technical Support Department. 10 Q3: Windows is selected. Q4: I inserted the Utility ...
Windows Setup Guide
Page 5
Select the desired network and then click Connect. 3. Click Close. 4 On the bottom right-hand corner of the screen, right click the wireless network connection icon and select Connect to an Unsecured Wireless Connection 1. 2. Wireless Configuration Connecting to a network. 2. Click Connect Anyway. 4.
Select the desired network and then click Connect. 3. Click Close. 4 On the bottom right-hand corner of the screen, right click the wireless network connection icon and select Connect to an Unsecured Wireless Connection 1. 2. Wireless Configuration Connecting to a network. 2. Click Connect Anyway. 4.
Windows Setup Guide
Page 6
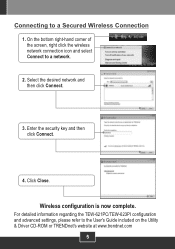
Click Close. For detailed information regarding the TEW-621PC/TEW-623PI configuration and advanced settings, please refer to a Secured Wireless Connection 1. Connecting to the User's Guide included on the Utility & Driver CD-ROM or TRENDnet's website at www.trendnet.com 5 Select the desired network and then click Connect. 3. Wireless configuration is now complete. Enter the security key and then click Connect. 4. On the bottom right-hand corner of the screen, right click the wireless network connection icon and select Connect to a network. 2.
Click Close. For detailed information regarding the TEW-621PC/TEW-623PI configuration and advanced settings, please refer to a Secured Wireless Connection 1. Connecting to the User's Guide included on the Utility & Driver CD-ROM or TRENDnet's website at www.trendnet.com 5 Select the desired network and then click Connect. 3. Wireless configuration is now complete. Enter the security key and then click Connect. 4. On the bottom right-hand corner of the screen, right click the wireless network connection icon and select Connect to a network. 2.