Quick Installation Guide
Page 2
Using the Wireless Adapter 7 Troubleshooting 10 Version 08.03.2007 Before You Start 1 2. How to Install 2 3. TTaabblleeoof Cf oCnotennttesnts English ...1 1.
Using the Wireless Adapter 7 Troubleshooting 10 Version 08.03.2007 Before You Start 1 2. How to Install 2 3. TTaabblleeoof Cf oCnotennttesnts English ...1 1.
Quick Installation Guide
Page 3
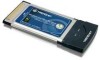
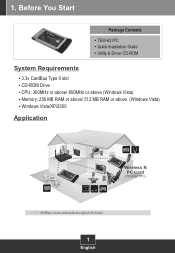
Utility & Driver CD-ROM System Requirements ? 3.3v CardBus Type II slot ? Quick Installation Guide ? CPU: 300MHz or above/ 800MHz or above (Windows Vista) ? Memory: 256 MB RAM or above/ 512 MB RAM or above (Windows Vista) ? Windows Vista/XP/2000 Application DATA HD Wireless N PC Card (TEW-621PC) 300Mbps, share multimedia throughout the house 1 English Before You Start Package Contents ? CD-ROM Drive ? TEW-621PC ? 1.
Utility & Driver CD-ROM System Requirements ? 3.3v CardBus Type II slot ? Quick Installation Guide ? CPU: 300MHz or above/ 800MHz or above (Windows Vista) ? Memory: 256 MB RAM or above/ 512 MB RAM or above (Windows Vista) ? Windows Vista/XP/2000 Application DATA HD Wireless N PC Card (TEW-621PC) 300Mbps, share multimedia throughout the house 1 English Before You Start Package Contents ? CD-ROM Drive ? TEW-621PC ? 1.
Quick Installation Guide
Page 9
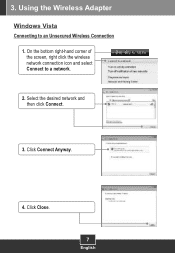
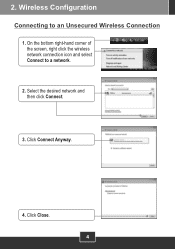
Click Connect Anyway. 4. Select the desired network and then click Connect. 3. Click Close. 7 English On the bottom right-hand corner of the screen, right click the wireless network connection icon and select Connect to an Unsecured Wireless Connection 1. Using the Wireless Adapter Windows Vista Connecting to a network. 2. 3.
Click Connect Anyway. 4. Select the desired network and then click Connect. 3. Click Close. 7 English On the bottom right-hand corner of the screen, right click the wireless network connection icon and select Connect to an Unsecured Wireless Connection 1. Using the Wireless Adapter Windows Vista Connecting to a network. 2. 3.
Quick Installation Guide
Page 10
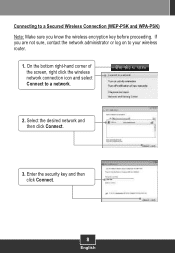
If you know the wireless encryption key before proceeding. Select the desired network and then click Connect. 3. On the bottom right-hand corner of the screen, right click the wireless network connection icon and select Connect to your wireless router. 1. Enter the security key and then click Connect. 8 English Connecting to a Secured Wireless Connection (WEP-PSK and WPA-PSK) Note: Make sure you are not sure, contact the network administrator or log on to a network. 2.
If you know the wireless encryption key before proceeding. Select the desired network and then click Connect. 3. On the bottom right-hand corner of the screen, right click the wireless network connection icon and select Connect to your wireless router. 1. Enter the security key and then click Connect. 8 English Connecting to a Secured Wireless Connection (WEP-PSK and WPA-PSK) Note: Make sure you are not sure, contact the network administrator or log on to a network. 2.
Quick Installation Guide
Page 11
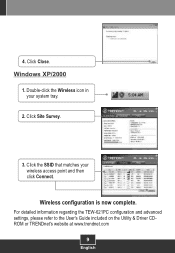
4. Windows XP/2000 1. Wireless configuration is now complete. Click Site Survey. 3. Double-click the Wireless icon in your wireless access point and then click Connect. For detailed information regarding the TEW-621PC configuration and advanced settings, please refer to the User's Guide included on the Utility & Driver CDROM or TRENDnet's website at www.trendnet.com 9 English Click Close. Click the SSID that matches your system tray. 2.
4. Windows XP/2000 1. Wireless configuration is now complete. Click Site Survey. 3. Double-click the Wireless icon in your wireless access point and then click Connect. For detailed information regarding the TEW-621PC configuration and advanced settings, please refer to the User's Guide included on the Utility & Driver CDROM or TRENDnet's website at www.trendnet.com 9 English Click Close. Click the SSID that matches your system tray. 2.
Quick Installation Guide
Page 12
...make sure the adapter is the letter assigned to check and see a networking device with your network administrator for more information regarding the TEW-621PC, please refer to recognize my hardware. What should I do ? A4: Access your device manager to ensure that the Network Name ... to your computer meets the minimum requirements as specified in Section 1 of the wireless configuration utility (as described in order to a different PC Card slot on the Utility & Driver CD-ROM or contact TRENDnet's Technical Support Department. 10 A3: Make sure your computer. If you still ...
...make sure the adapter is the letter assigned to check and see a networking device with your network administrator for more information regarding the TEW-621PC, please refer to recognize my hardware. What should I do ? A4: Access your device manager to ensure that the Network Name ... to your computer meets the minimum requirements as specified in Section 1 of the wireless configuration utility (as described in order to a different PC Card slot on the Utility & Driver CD-ROM or contact TRENDnet's Technical Support Department. 10 A3: Make sure your computer. If you still ...
Windows Setup Guide
Page 5
On the bottom right-hand corner of the screen, right click the wireless network connection icon and select Connect to an Unsecured Wireless Connection 1. Click Close. 4 Wireless Configuration Connecting to a network. 2. Select the desired network and then click Connect. 3. 2. Click Connect Anyway. 4.
On the bottom right-hand corner of the screen, right click the wireless network connection icon and select Connect to an Unsecured Wireless Connection 1. Click Close. 4 Wireless Configuration Connecting to a network. 2. Select the desired network and then click Connect. 3. 2. Click Connect Anyway. 4.
Windows Setup Guide
Page 6
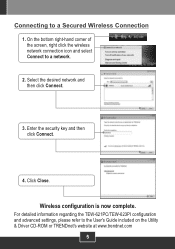
On the bottom right-hand corner of the screen, right click the wireless network connection icon and select Connect to a Secured Wireless Connection 1. Click Close. Connecting to a network. 2. For detailed information regarding the TEW-621PC/TEW-623PI configuration and advanced settings, please refer to the User's Guide included on the Utility & Driver CD-ROM or TRENDnet's website at www.trendnet.com 5 Enter the security key and then click Connect. 4. Select the desired network and then click Connect. 3. Wireless configuration is now complete.
On the bottom right-hand corner of the screen, right click the wireless network connection icon and select Connect to a Secured Wireless Connection 1. Click Close. Connecting to a network. 2. For detailed information regarding the TEW-621PC/TEW-623PI configuration and advanced settings, please refer to the User's Guide included on the Utility & Driver CD-ROM or TRENDnet's website at www.trendnet.com 5 Enter the security key and then click Connect. 4. Select the desired network and then click Connect. 3. Wireless configuration is now complete.