
Quick Installation Guide
Page 2
Before You Start 1 2. How to Install 2 3. Using the Wireless Adapter 6 Troubleshooting 8 Version 11.21.2006 TTaabblleeoof Cf oCnotennttesnts English ...1 1.
Before You Start 1 2. How to Install 2 3. Using the Wireless Adapter 6 Troubleshooting 8 Version 11.21.2006 TTaabblleeoof Cf oCnotennttesnts English ...1 1.
Quick Installation Guide
Page 3
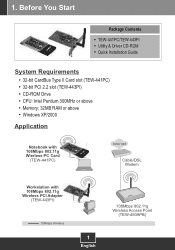
1. Before You Start Package Contents TEW-441PC/TEW-443PI Utility & Driver CD-ROM Quick Installation Guide System Requirements 32-bit CardBus Type II Card slot (TEW-441PC) 32-bit PCI 2.2 slot (TEW-443PI) CD-ROM Drive CPU: Intel Pentium 300MHz or above Memory: 32MB RAM or above Windows XP/2000 Application Notebook with 108Mbps 802.11g Wireless PC Card (TEW-441PC) Internet Cable/DSL Modem Workstation with 108Mbps 802.11g Wireless PCI Adapter (TEW-443PI) 108Mbps Wireless 1 English 108Mbps 802.11g Wireless Access Point (TEW-450APB)
1. Before You Start Package Contents TEW-441PC/TEW-443PI Utility & Driver CD-ROM Quick Installation Guide System Requirements 32-bit CardBus Type II Card slot (TEW-441PC) 32-bit PCI 2.2 slot (TEW-443PI) CD-ROM Drive CPU: Intel Pentium 300MHz or above Memory: 32MB RAM or above Windows XP/2000 Application Notebook with 108Mbps 802.11g Wireless PC Card (TEW-441PC) Internet Cable/DSL Modem Workstation with 108Mbps 802.11g Wireless PCI Adapter (TEW-443PI) 108Mbps Wireless 1 English 108Mbps 802.11g Wireless Access Point (TEW-450APB)
Quick Installation Guide
Page 4
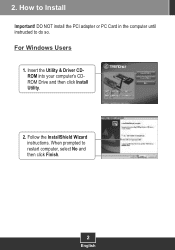
For Windows Users 1. DO NOT install the PCI adapter or PC Card in the computer until instructed to restart computer, select No and then click Finish. 2 English Insert the Utility & Driver CDROM into your computer's CDROM Drive and then click Install Utility. 2. When prompted to do so. 2. Follow the InstallShield Wizard instructions. How to Install Important!
For Windows Users 1. DO NOT install the PCI adapter or PC Card in the computer until instructed to restart computer, select No and then click Finish. 2 English Insert the Utility & Driver CDROM into your computer's CDROM Drive and then click Install Utility. 2. When prompted to do so. 2. Follow the InstallShield Wizard instructions. How to Install Important!
Quick Installation Guide
Page 5
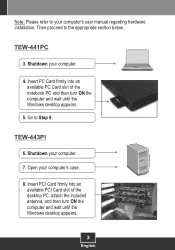
... notebook PC and then turn ON the computer and wait until the Windows desktop appears. 5. Shutdown your computer's case. 8. TEW-441PC 3. TEW-443PI 6. Insert PCI Card firmly into an available PC Card slot of the desktop PC, attach the included antenna, and then turn ON the computer and wait until the Windows desktop appears. 3 English Go to Step 9. Open your computer. 7. Shutdown your computer's user manual regarding hardware installation.
... notebook PC and then turn ON the computer and wait until the Windows desktop appears. 5. Shutdown your computer's case. 8. TEW-441PC 3. TEW-443PI 6. Insert PCI Card firmly into an available PC Card slot of the desktop PC, attach the included antenna, and then turn ON the computer and wait until the Windows desktop appears. 3 English Go to Step 9. Open your computer. 7. Shutdown your computer's user manual regarding hardware installation.
Quick Installation Guide
Page 6
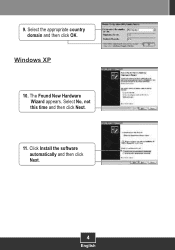
Click Install the software automatically and then click Next. 4 English Select No, not this time and then click Next. 11. The Found New Hardware Wizard appears. 9. Windows XP 10. Select the appropriate country domain and then click OK.
Click Install the software automatically and then click Next. 4 English Select No, not this time and then click Next. 11. The Found New Hardware Wizard appears. 9. Windows XP 10. Select the appropriate country domain and then click OK.
Quick Installation Guide
Page 7
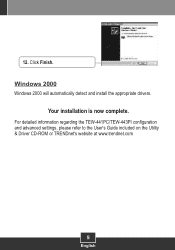
Your installation is now complete. For detailed information regarding the TEW-441PC/TEW-443PI configuration and advanced settings, please refer to the User's Guide included on the Utility & Driver CD-ROM or TRENDnet's website at www.trendnet.com 5 English Click Finish. 12. Windows 2000 Windows 2000 will automatically detect and install the appropriate drivers.
Your installation is now complete. For detailed information regarding the TEW-441PC/TEW-443PI configuration and advanced settings, please refer to the User's Guide included on the Utility & Driver CD-ROM or TRENDnet's website at www.trendnet.com 5 English Click Finish. 12. Windows 2000 Windows 2000 will automatically detect and install the appropriate drivers.
Quick Installation Guide
Page 8
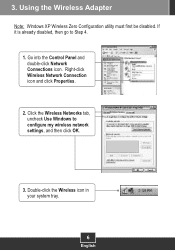
Click the Wireless Networks tab, uncheck Use Windows to Step 4. 1. Right-click Wireless Network Connection icon and click Properties. 2. 3. If it is already disabled, then go to configure my wireless network settings, and then click OK. 3. Double-click the Wireless icon in your system tray. 6 English Go into the Control Panel and double-click Network Connections icon. Using the Wireless Adapter Note: Windows XP Wireless Zero Configuration utility must first be disabled.
Click the Wireless Networks tab, uncheck Use Windows to Step 4. 1. Right-click Wireless Network Connection icon and click Properties. 2. 3. If it is already disabled, then go to configure my wireless network settings, and then click OK. 3. Double-click the Wireless icon in your system tray. 6 English Go into the Control Panel and double-click Network Connections icon. Using the Wireless Adapter Note: Windows XP Wireless Zero Configuration utility must first be disabled.
Quick Installation Guide
Page 9
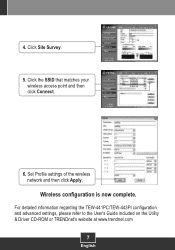
Set Profile settings of the wireless network and then click Apply. For detailed information regarding the TEW-441PC/TEW-443PI configuration and advanced settings, please refer to the User's Guide included on the Utility & Driver CD-ROM or TRENDnet's website at www.trendnet.com 7 English Click Site Survey. 5. Wireless configuration is now complete. Click the SSID that matches your wireless access point and then click Connect. 6. 4.
Set Profile settings of the wireless network and then click Apply. For detailed information regarding the TEW-441PC/TEW-443PI configuration and advanced settings, please refer to the User's Guide included on the Utility & Driver CD-ROM or TRENDnet's website at www.trendnet.com 7 English Click Site Survey. 5. Wireless configuration is now complete. Click the SSID that matches your wireless access point and then click Connect. 6. 4.
Quick Installation Guide
Page 10
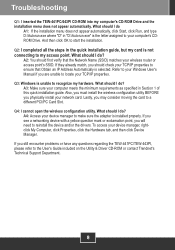
... User's Guide included on the Utility & Driver CD-ROM or contact Trendnet's Technical Support Department. 8 Q4: I do A1: If the installation menu does not appear automatically, click Start, click Run, and type D:\Autorun.exe where "D" in the quick installation guide, but my card is not connecting to my access point. A2: You should I do ? Lastly, you are unable to a different PCI/PC Card Slot. Refer to your Windows User's Manual...
... User's Guide included on the Utility & Driver CD-ROM or contact Trendnet's Technical Support Department. 8 Q4: I do A1: If the installation menu does not appear automatically, click Start, click Run, and type D:\Autorun.exe where "D" in the quick installation guide, but my card is not connecting to my access point. A2: You should I do ? Lastly, you are unable to a different PCI/PC Card Slot. Refer to your Windows User's Manual...

Quick Installation Guide
Page 11
... distinto al mencionado puede producir daños fisicos y/o daños al equipo conectado. SUCH MODIFICATIONS COULD VOID THE USER'S AUTHORITY TO OPERATE THE EQUIPMENT. El adaptador de alimentación debe operar con voltaje y frecuencia de la energia electrica ... Including interference that may not cause harmful interference. (2) This device must not be disposed of with you Local Authority or Retailer for recycling advice. Check with household waste. Waste electrical and electronic products must accept any interference received. Certifications This equipment has been tested...
... distinto al mencionado puede producir daños fisicos y/o daños al equipo conectado. SUCH MODIFICATIONS COULD VOID THE USER'S AUTHORITY TO OPERATE THE EQUIPMENT. El adaptador de alimentación debe operar con voltaje y frecuencia de la energia electrica ... Including interference that may not cause harmful interference. (2) This device must not be disposed of with you Local Authority or Retailer for recycling advice. Check with household waste. Waste electrical and electronic products must accept any interference received. Certifications This equipment has been tested...

Quick Installation Guide
Page 12
Spain . Go to register your product online. TRENDnet. TRENDnet Technical Support US . Switzerland . UK) Toll Free Telephone: +00800 60 76 76 67 English/Espanol - 24/7 Worldwide English/Espanol - 24/7 Product Warranty Registration Please take a moment to TRENDnet's website at http://www.trendnet.com 20675 Manhattan Place Torrance, CA 90501 USA Copyright ©2006. Italy . All Rights Reserved. Canada 24/7 Tech Support Europe (Germany . France .
Spain . Go to register your product online. TRENDnet. TRENDnet Technical Support US . Switzerland . UK) Toll Free Telephone: +00800 60 76 76 67 English/Espanol - 24/7 Worldwide English/Espanol - 24/7 Product Warranty Registration Please take a moment to TRENDnet's website at http://www.trendnet.com 20675 Manhattan Place Torrance, CA 90501 USA Copyright ©2006. Italy . All Rights Reserved. Canada 24/7 Tech Support Europe (Germany . France .
Windows Setup Guide
Page 2
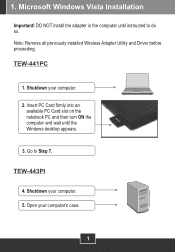
TEW-441PC 1. Open your computer. 5. Insert PC Card firmly into an available PC Card slot on the notebook PC and then turn ON the computer and wait until instructed to Step 7. TEW-443PI 4. DO NOT install the adapter in the computer until the Windows desktop appears. 3. Shutdown your computer's case. 1 Go to do so. 1. Microsoft Windows Vista Installation Important! Note: Remove all previously installed Wireless Adapter Utility and Driver before proceeding. Shutdown your computer. 2.
TEW-441PC 1. Open your computer. 5. Insert PC Card firmly into an available PC Card slot on the notebook PC and then turn ON the computer and wait until instructed to Step 7. TEW-443PI 4. DO NOT install the adapter in the computer until the Windows desktop appears. 3. Shutdown your computer's case. 1 Go to do so. 1. Microsoft Windows Vista Installation Important! Note: Remove all previously installed Wireless Adapter Utility and Driver before proceeding. Shutdown your computer. 2.
Windows Setup Guide
Page 3
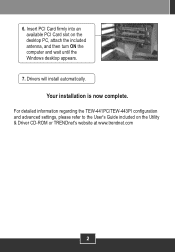
Your installation is now complete. Drivers will install automatically. For detailed information regarding the TEW-441PC/TEW-443PI configuration and advanced settings, please refer to the User's Guide included on the desktop PC, attach the included antenna, and then turn ON the computer and wait until the Windows desktop appears. 7. 6. Insert PCI Card firmly into an available PCI Card slot on the Utility & Driver CD-ROM or TRENDnet's website at www.trendnet.com 2
Your installation is now complete. Drivers will install automatically. For detailed information regarding the TEW-441PC/TEW-443PI configuration and advanced settings, please refer to the User's Guide included on the desktop PC, attach the included antenna, and then turn ON the computer and wait until the Windows desktop appears. 7. 6. Insert PCI Card firmly into an available PCI Card slot on the Utility & Driver CD-ROM or TRENDnet's website at www.trendnet.com 2

Windows Setup Guide
Page 4
Wireless Configuration Connecting to a network. 2. On the bottom right-hand corner of the screen, right click the wireless network connection icon and select Connect to an Unsecured Wireless Connection 1. Click Close. 3 Select the desired network and then click Connect. 3. 2. Click Connect Anyway. 4.
Wireless Configuration Connecting to a network. 2. On the bottom right-hand corner of the screen, right click the wireless network connection icon and select Connect to an Unsecured Wireless Connection 1. Click Close. 3 Select the desired network and then click Connect. 3. 2. Click Connect Anyway. 4.
Windows Setup Guide
Page 5
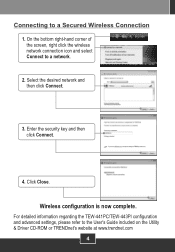
On the bottom right-hand corner of the screen, right click the wireless network connection icon and select Connect to a Secured Wireless Connection 1. Wireless configuration is now complete. Enter the security key and then click Connect. 4. Connecting to a network. 2. Click Close. Select the desired network and then click Connect. 3. For detailed information regarding the TEW-441PC/TEW-443PI configuration and advanced settings, please refer to the User's Guide included on the Utility & Driver CD-ROM or TRENDnet's website at www.trendnet.com 4
On the bottom right-hand corner of the screen, right click the wireless network connection icon and select Connect to a Secured Wireless Connection 1. Wireless configuration is now complete. Enter the security key and then click Connect. 4. Connecting to a network. 2. Click Close. Select the desired network and then click Connect. 3. For detailed information regarding the TEW-441PC/TEW-443PI configuration and advanced settings, please refer to the User's Guide included on the Utility & Driver CD-ROM or TRENDnet's website at www.trendnet.com 4

Windows Setup Guide
Page 6
... Rights Reserved. Canada Toll Free Telephone: 1(866) 845-3673 24/7 Tech Support Europe (Germany . UK) Toll Free Telephone: +00800 60 76 76 67 English/Espanol - 24/7 Francais/Deutsch - 11am-8pm, Monday - France . Italy . TRENDnet Technical Support US . Switzerland . TRENDnet. Friday MET Product Warranty Registration Please take a moment to TRENDnet's website at http://www.trendnet.com 20675 Manhattan Place Torrance...
... Rights Reserved. Canada Toll Free Telephone: 1(866) 845-3673 24/7 Tech Support Europe (Germany . UK) Toll Free Telephone: +00800 60 76 76 67 English/Espanol - 24/7 Francais/Deutsch - 11am-8pm, Monday - France . Italy . TRENDnet Technical Support US . Switzerland . TRENDnet. Friday MET Product Warranty Registration Please take a moment to TRENDnet's website at http://www.trendnet.com 20675 Manhattan Place Torrance...


