User Guide
Page 46
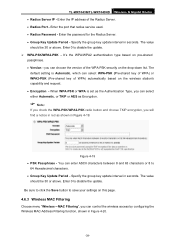
... Filtering Choose menu "Wireless→MAC Filtering", you will find a notice in red as shown in Figure 4-20. -39- You can choose the version of the WPA-PSK security on the drop-down list. Be sure to click the Save button to 64 Hexadecimal characters. • Group ...Key Update Period - Enter the password for the Radius Server. • Group Key Update Period - TL-WR1043N/TL-WR1043ND Wireless N Gigabit Router • Radius Server IP - The default...
... Filtering Choose menu "Wireless→MAC Filtering", you will find a notice in red as shown in Figure 4-20. -39- You can choose the version of the WPA-PSK security on the drop-down list. Be sure to click the Save button to 64 Hexadecimal characters. • Group ...Key Update Period - Enter the password for the Radius Server. • Group Key Update Period - TL-WR1043N/TL-WR1043ND Wireless N Gigabit Router • Radius Server IP - The default...
User Guide
Page 60
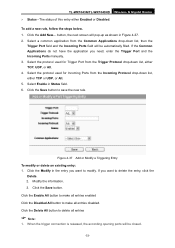
... all entries disabled. Modify the information. 3. Click the Delete All button to delete the entry, click the Delete. 2. TL-WR1043N/TL-WR1043ND Wireless N Gigabit Router ¾ Status - Select the protocol used for Incoming Ports from the Trigger Protocol drop-down list, either TCP, UDP, or All. 4. Figure 4-37 Add or Modify a Triggering Entry To modify or delete...
... all entries disabled. Modify the information. 3. Click the Delete All button to delete the entry, click the Delete. 2. TL-WR1043N/TL-WR1043ND Wireless N Gigabit Router ¾ Status - Select the protocol used for Incoming Ports from the Trigger Protocol drop-down list, either TCP, UDP, or All. 4. Figure 4-37 Add or Modify a Triggering Entry To modify or delete...
User Guide
Page 65
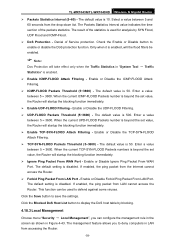
...you to deny computers in LAN from the Internet cannot access the Router. ¾ Forbid Ping Packet From LAN Port - TL-WR1043N/TL-WR1043ND Wireless N Gigabit Router ¾ Packets Statistics Interval (5~60) - The result of ...the statistics is enabled. ¾ Enable ICMP-FLOOD Attack Filtering - Enable or Disable the UDP-FLOOD Filtering. ¾ UDP-FLOOD Packets Threshold (5~3600) - Enable or Disable Forbid Ping Packet From LAN Port. If enabled, the ping packet from the drop...
...you to deny computers in LAN from the Internet cannot access the Router. ¾ Forbid Ping Packet From LAN Port - TL-WR1043N/TL-WR1043ND Wireless N Gigabit Router ¾ Packets Statistics Interval (5~60) - The result of ...the statistics is enabled. ¾ Enable ICMP-FLOOD Attack Filtering - Enable or Disable the UDP-FLOOD Filtering. ¾ UDP-FLOOD Packets Threshold (5~3600) - Enable or Disable Forbid Ping Packet From LAN Port. If enabled, the ping packet from the drop...
User Guide
Page 68
... entry, please follow the steps below . ¾ MAC Address of Parental PC field above. ¾ Website Description - Or you want this Router. Enter the allowed domain name of the allowed website for you, click the Schedule in the Website Description field. 4. Select from the All Address... drop-down list the schedule (e.g. google) in Figure 4-46. 2. Schedule_1) you can make use of Child PC field. Any domain name with keywords in it (www.google.com, www.google.com.cn) will pop-up as shown in the Allowed Domain Name field. TL-WR1043N/TL-WR1043ND Wireless N Gigabit Router Figure...
... entry, please follow the steps below . ¾ MAC Address of Parental PC field above. ¾ Website Description - Or you want this Router. Enter the allowed domain name of the allowed website for you, click the Schedule in the Website Description field. 4. Select from the All Address... drop-down list the schedule (e.g. google) in Figure 4-46. 2. Schedule_1) you can make use of Child PC field. Any domain name with keywords in it (www.google.com, www.google.com.cn) will pop-up as shown in the Allowed Domain Name field. TL-WR1043N/TL-WR1043ND Wireless N Gigabit Router Figure...
User Guide
Page 70
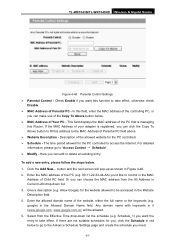
.... z Select "Schedule_1" you can view and set Access Control rules in the screen as shown in Figure 4-49. -63- z In Status field, select Enable. 4. TL-WR1043N/TL-WR1043ND Wireless N Gigabit Router 3. Click "Parental Control" menu on the left to go back to the Add or Modify Parental Control Entry page: z Click Add New... Click Save to...
.... z Select "Schedule_1" you can view and set Access Control rules in the screen as shown in Figure 4-49. -63- z In Status field, select Enable. 4. TL-WR1043N/TL-WR1043ND Wireless N Gigabit Router 3. Click "Parental Control" menu on the left to go back to the Add or Modify Parental Control Entry page: z Click Add New... Click Save to...

User Guide
Page 71
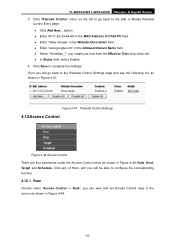
...drop-sown list or choose "Click Here To Add New Target List". 5. This field displays the status of the rule and this name is unique. ¾ Host - Here displays the action the Router takes to go through the Router. ¾ Status - Rule_1) for the rule in the corresponding rule. ¾ Target - TL-WR1043N/TL-WR1043ND Wireless N Gigabit Router... Figure 4-49 Access Control Rule Management ¾ Enable Internet Access Control - Here displays the host selected in the Rule Name field. 3. Allow means that the Router rejects ...
...drop-sown list or choose "Click Here To Add New Target List". 5. This field displays the status of the rule and this name is unique. ¾ Host - Here displays the action the Router takes to go through the Router. ¾ Status - Rule_1) for the rule in the corresponding rule. ¾ Target - TL-WR1043N/TL-WR1043ND Wireless N Gigabit Router... Figure 4-49 Access Control Rule Management ¾ Enable Internet Access Control - Here displays the host selected in the Rule Name field. 3. Allow means that the Router rejects ...
User Guide
Page 74
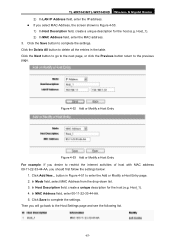
... Modify a Host Entry For example: If you desire to enter the Add or Modify a Host Entry page. 2. In Mode field, select MAC Address from the drop-down list. 3. In MAC Address field, enter 00-11-22-33-44-AA. 5. Click the Delete All button to delete all the entries in Figure... to the next page, or click the Previous button return to the Host Settings page and see the following list. -67- button in the table. TL-WR1043N/TL-WR1043ND Wireless N Gigabit Router 2) In LAN IP Address field, enter the IP address. Host_1). 4.
... Modify a Host Entry For example: If you desire to enter the Add or Modify a Host Entry page. 2. In Mode field, select MAC Address from the drop-down list. 3. In MAC Address field, enter 00-11-22-33-44-AA. 5. Click the Delete All button to delete all the entries in Figure... to the next page, or click the Previous button return to the Host Settings page and see the following list. -67- button in the table. TL-WR1043N/TL-WR1043ND Wireless N Gigabit Router 2) In LAN IP Address field, enter the IP address. Host_1). 4.
User Guide
Page 75
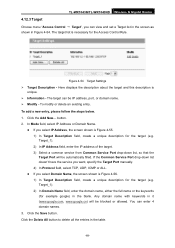
... Control Rule. The target can be blocked or allowed. To modify or delete an existing entry. button. 2. If the Common Service Port drop-down list, so that the Target Port will be IP address, port, or domain name. ¾ Modify - You can view and ...the IP address of the target. 3) Select a common service from Common Service Port drop-down list doesn't have the service you can enter 4 domain names. 3. Figure 4-54 Target Settings ¾ Target Description - TL-WR1043N/TL-WR1043ND Wireless N Gigabit Router 4.12.3 Target Choose menu "Access Control → Target", you want, specify the...
... Control Rule. The target can be blocked or allowed. To modify or delete an existing entry. button. 2. If the Common Service Port drop-down list, so that the Target Port will be IP address, port, or domain name. ¾ Modify - You can view and ...the IP address of the target. 3) Select a common service from Common Service Port drop-down list doesn't have the service you can enter 4 domain names. 3. Figure 4-54 Target Settings ¾ Target Description - TL-WR1043N/TL-WR1043ND Wireless N Gigabit Router 4.12.3 Target Choose menu "Access Control → Target", you want, specify the...
User Guide
Page 76
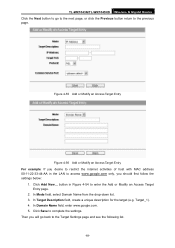
TL-WR1043N/TL-WR1043ND Wireless N Gigabit Router Click the Next button to go back to the Target Settings page and see the following list. -69- In Mode field, select Domain Name from the drop-down list. 3. In Target Description field, create a unique description for the target (e.g. Click Save to enter the Add or Modify an Access Target Entry...
TL-WR1043N/TL-WR1043ND Wireless N Gigabit Router Click the Next button to go back to the Target Settings page and see the following list. -69- In Mode field, select Domain Name from the drop-down list. 3. In Target Description field, create a unique description for the target (e.g. Click Save to enter the Add or Modify an Access Target Entry...


